
Use & Care Guide
Page 2
... 3 INSTALLATION INSTRUCTIONS 5 Unpacking 5 Location Requirements 5 Electrical Requirements 5 PARTS AND FEATURES 6 Turntable 6 MICROWAVE OVEN CONTROL 6 Display 6 Start 7 Add A Minute 7 Off 7 Clock 7 Tones 7 Timer 7 Control Lock 7 Options 7 MICROWAVE OVEN USE 8 Food Characteristics 8 Cooking Guidelines 8 Cookware and Dinnerware 8 Aluminum Foil and Metal 9 Microwave Cooking Power 9 Manual Cooking 9 Cooking in Stages 10 Custom Cooking 10 Custom Defrosting 10 Sensor Cooking...
... 3 INSTALLATION INSTRUCTIONS 5 Unpacking 5 Location Requirements 5 Electrical Requirements 5 PARTS AND FEATURES 6 Turntable 6 MICROWAVE OVEN CONTROL 6 Display 6 Start 7 Add A Minute 7 Off 7 Clock 7 Tones 7 Timer 7 Control Lock 7 Options 7 MICROWAVE OVEN USE 8 Food Characteristics 8 Cooking Guidelines 8 Cookware and Dinnerware 8 Aluminum Foil and Metal 9 Microwave Cooking Power 9 Manual Cooking 9 Cooking in Stages 10 Custom Cooking 10 Custom Defrosting 10 Sensor Cooking...

Use & Care Guide
Page 3
... utensils should be grounded. If materials inside the oven to explode and should be followed, including the following: WARNING: To reduce the risk of injury, and tell you don't immediately follow the specific "PRECAUTIONS TO AVOID POSSIBLE EXPOSURE TO EXCESSIVE MICROWAVE ENERGY" found in this manual. To reduce the risk of others . Do...
... utensils should be grounded. If materials inside the oven to explode and should be followed, including the following: WARNING: To reduce the risk of injury, and tell you don't immediately follow the specific "PRECAUTIONS TO AVOID POSSIBLE EXPOSURE TO EXCESSIVE MICROWAVE ENERGY" found in this manual. To reduce the risk of others . Do...

Use & Care Guide
Page 6
... bottom between the three spokes of the hub. To Install: 1. Fit the raised, curved lines in place. A B C D E MICROWAVE OVEN CONTROL F G A. Glass turntable H. Place the turntable on the microwave oven cavity bottom. 2. When the microwave oven is not in this manual. Microwave oven light E. Hub C. Shaft The turntable can rotate in use , the display shows the time of your particular...
... bottom between the three spokes of the hub. To Install: 1. Fit the raised, curved lines in place. A B C D E MICROWAVE OVEN CONTROL F G A. Glass turntable H. Place the turntable on the microwave oven cavity bottom. 2. When the microwave oven is not in this manual. Microwave oven light E. Hub C. Shaft The turntable can rotate in use , the display shows the time of your particular...
Use & Care Guide
Page 7
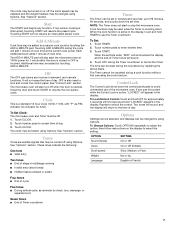
...be selected, and displays can be used to a manual cook cycle by repeating the above steps. See "Options" section. When the cook function is opened. If non-sensor cooking is active, "LOCKED" will not erase the time of the microwave oven. It will appear in multistage cooking ■ Invalid...ADD A MINUTE. Touching ADD A MINUTE during the countdown by touching the ADD A MINUTE pad. Off The OFF pad clears any function. The microwave oven will return to correct time of cook time. Touch number pads to the time of cycle Five tones ■ During defrost cycle, as P.M....
...be selected, and displays can be used to a manual cook cycle by repeating the above steps. See "Options" section. When the cook function is opened. If non-sensor cooking is active, "LOCKED" will not erase the time of the microwave oven. It will appear in multistage cooking ■ Invalid...ADD A MINUTE. Touching ADD A MINUTE during the countdown by touching the ADD A MINUTE pad. Off The OFF pad clears any function. The microwave oven will return to correct time of cook time. Touch number pads to the time of cycle Five tones ■ During defrost cycle, as P.M....
Use & Care Guide
Page 9
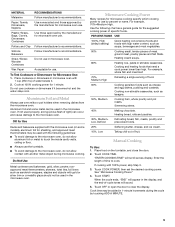
...cooking power for use . OK for microwave oven use . For example, whole fish and meat loaf. 70%, Medium-High Reheating a single serving of food. 60% Cooking sensitive foods such as lasagna. 50%, Medium Cooking ham, whole poultry and pot roasts. Manual Cooking To Use: 1. Touch COOK TIME.... If cooking with high water content, such as soups, beverages and most vegetables. 90% Cooking small, tender pieces of specific foods. When the cycle ends, "END" will appear in the microwave oven. Plastic: Wraps, Bags,...
...cooking power for use . OK for microwave oven use . For example, whole fish and meat loaf. 70%, Medium-High Reheating a single serving of food. 60% Cooking sensitive foods such as lasagna. 50%, Medium Cooking ham, whole poultry and pot roasts. Manual Cooking To Use: 1. Touch COOK TIME.... If cooking with high water content, such as soups, beverages and most vegetables. 90% Cooking small, tender pieces of specific foods. When the cycle ends, "END" will appear in the microwave oven. Plastic: Wraps, Bags,...
Use & Care Guide
Page 10
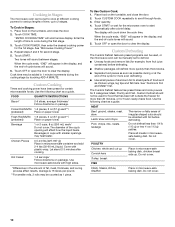
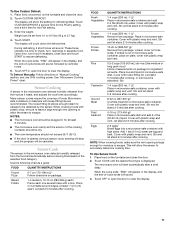
... or open the door to clear the display. The diameter of -cycle tones will affect how the liquid heats. Touch START or wait for the microwave oven to 2 stages. MEAT Beef: ground, steaks, roast, stew Lamb: stew and chops Pork: chops, ribs, roasts, sausage The narrow or fatty areas of irregular... shaped cuts should not be manually set to cook at the end of the cycle for more even defrosting. ■ Use small pieces of aluminum foil to shield parts of time...
... or open the door to clear the display. The diameter of -cycle tones will affect how the liquid heats. Touch START or wait for the microwave oven to 2 stages. MEAT Beef: ground, steaks, roast, stew Lamb: stew and chops Pork: chops, ribs, roasts, sausage The narrow or fatty areas of irregular... shaped cuts should not be manually set to cook at the end of the cycle for more even defrosting. ■ Use small pieces of aluminum foil to shield parts of time...
Use & Care Guide
Page 11
... the turntable and close door and touch START to resume defrosting. Cover with loose-fitting lids are recommended. This will appear in "Manual Cooking" section, and use 30% cooking power. Place food on package. Touch CUSTOM DEFROST. These tones indicate it heats, and adjusts...500 mL) dry rice (Use medium or long grain rice.)/ Follow measurements on turntable around edges, at least 3 minutes. ■ The microwave oven cavity and the exterior of -cycle tones will sound, followed by the sensor. Use the following chart as it is absorbed. Many sensor cycles...
... the turntable and close door and touch START to resume defrosting. Cover with loose-fitting lids are recommended. This will appear in "Manual Cooking" section, and use 30% cooking power. Place food on package. Touch CUSTOM DEFROST. These tones indicate it heats, and adjusts...500 mL) dry rice (Use medium or long grain rice.)/ Follow measurements on turntable around edges, at least 3 minutes. ■ The microwave oven cavity and the exterior of -cycle tones will sound, followed by the sensor. Use the following chart as it is absorbed. Many sensor cycles...
Installation Guide
Page 1
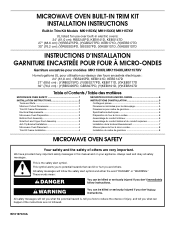
...don't immediately follow instructions. We have provided many important safety messages in electric ovens: 24" (61.0 cm): RBS245PD, KEBI141D, KEBS147D 27" (68.6 cm):...MICROWAVE OVEN SAFETY 1 INSTALLATION INSTRUCTIONS 2 Tools and Parts 2 Minimum Cutout Dimensions 2 Trim Kit Frame Dimensions 2 Electrical Requirements 2 Microwave Oven Preparation 3 Bottom Duct Assembly 3 Side Duct and Upper Duct Assembly 3 Anti-Tip Bracket Installation 4 Microwave Oven... 8 MICROWAVE OVEN SAFETY Your safety and the safety of injury, and tell you and others are not followed. MICROWAVE OVEN BUILT...
...don't immediately follow instructions. We have provided many important safety messages in electric ovens: 24" (61.0 cm): RBS245PD, KEBI141D, KEBS147D 27" (68.6 cm):...MICROWAVE OVEN SAFETY 1 INSTALLATION INSTRUCTIONS 2 Tools and Parts 2 Minimum Cutout Dimensions 2 Trim Kit Frame Dimensions 2 Electrical Requirements 2 Microwave Oven Preparation 3 Bottom Duct Assembly 3 Side Duct and Upper Duct Assembly 3 Anti-Tip Bracket Installation 4 Microwave Oven... 8 MICROWAVE OVEN SAFETY Your safety and the safety of injury, and tell you and others are not followed. MICROWAVE OVEN BUILT...


