
Use & Care Guide
Page 2
... Dinnerware 8 Aluminum Foil and Metal 9 Microwave Cooking Power 9 Manual Cooking 9 Cooking in Stages 10 Custom Cooking 10 Custom Defrosting 10 Sensor Cooking 11 Sensor Cook 11 Sensor Popcorn 12 Sensor Reheat 12 Keep Warm 12 MICROWAVE OVEN CARE 13 General Cleaning 13 TROUBLESHOOTING 14 ASSISTANCE OR SERVICE 15 Replacement Parts 15 Built-In Kits...
... Dinnerware 8 Aluminum Foil and Metal 9 Microwave Cooking Power 9 Manual Cooking 9 Cooking in Stages 10 Custom Cooking 10 Custom Defrosting 10 Sensor Cooking 11 Sensor Cook 11 Sensor Popcorn 12 Sensor Reheat 12 Keep Warm 12 MICROWAVE OVEN CARE 13 General Cleaning 13 TROUBLESHOOTING 14 ASSISTANCE OR SERVICE 15 Replacement Parts 15 Built-In Kits...
Use & Care Guide
Page 13
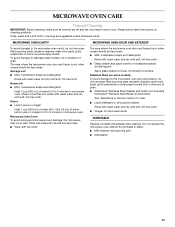
...with 1 tbs (15 mL) of water for hard water spots TURNTABLE Replace turntable immediately after cleaning. Always follow label instructions on some models) To avoid damage to the microwave oven cavity, do not use soapfilled scouring pads, abrasive cleaners, steel-wool ..., lint-free cloth. ■ Vinegar for 2 to 5 minutes in microwave oven. Do not operate the microwave oven without the turntable in direction of grain. ■ KitchenAid® Stainless Steel Cleaner and Polish (not included) KitchenAid® Stainless Steel Wipes (not included): See "Assistance or Service" section...
...with 1 tbs (15 mL) of water for hard water spots TURNTABLE Replace turntable immediately after cleaning. Always follow label instructions on some models) To avoid damage to the microwave oven cavity, do not use soapfilled scouring pads, abrasive cleaners, steel-wool ..., lint-free cloth. ■ Vinegar for 2 to 5 minutes in microwave oven. Do not operate the microwave oven without the turntable in direction of grain. ■ KitchenAid® Stainless Steel Cleaner and Polish (not included) KitchenAid® Stainless Steel Wipes (not included): See "Assistance or Service" section...
Use & Care Guide
Page 14
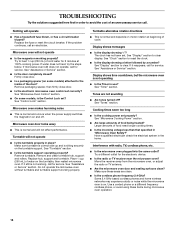
Replace the fuse or reset the circuit breaker. If the problem continues, call for service. Firmly close door. ■ Is the electronic microwave oven control set ? Microwave oven door looks wavy ■ This is on the turntable support. See "Timer" section. See "Microwave Cooking Power"...mL) of cold water for 2 minutes at beginning of the door? See "Tones" section. Microwave oven will not operate ■ Is the turntable properly in "Microwave Oven Safety?" Microwave oven makes humming noise ■ This is not working, call for the electronic device. ■...
Replace the fuse or reset the circuit breaker. If the problem continues, call for service. Firmly close door. ■ Is the electronic microwave oven control set ? Microwave oven door looks wavy ■ This is on the turntable support. See "Timer" section. See "Microwave Cooking Power"...mL) of cold water for 2 minutes at beginning of the door? See "Tones" section. Microwave oven will not operate ■ Is the turntable properly in "Microwave Oven Safety?" Microwave oven makes humming noise ■ This is not working, call for the electronic device. ■...

Use & Care Guide
Page 15
... MK1150XVS / Stainless KEBI101D KEBS107D *Approved, electric single microwave ovens only 15 KitchenAid designated service technicians are trained to order replacement parts, we recommend that you the cost of the following trim kits*. Replacement Parts Glass Turntable Part Number W10143945 Turntable Support and Rollers...31552 All-Purpose Appliance Cleaner Part Number 31682 KITCHENAID® Stainless Steel Cleaner and Polish Part Number 4396920 KITCHENAID® Stainless Steel Wipes Part Number 8212510 Built-In Kits This countertop microwave oven can be built in by kit model number...
... MK1150XVS / Stainless KEBI101D KEBS107D *Approved, electric single microwave ovens only 15 KitchenAid designated service technicians are trained to order replacement parts, we recommend that you the cost of the following trim kits*. Replacement Parts Glass Turntable Part Number W10143945 Turntable Support and Rollers...31552 All-Purpose Appliance Cleaner Part Number 31682 KITCHENAID® Stainless Steel Cleaner and Polish Part Number 4396920 KITCHENAID® Stainless Steel Wipes Part Number 8212510 Built-In Kits This countertop microwave oven can be built in by kit model number...

Use & Care Guide
Page 16
... major appliance if it was purchased. MFL42079202 6/08 Printed in a remote area where service by an authorized KitchenAid servicer is not available. 9. KITCHENAID® BUILT-IN OVEN & MICROWAVE WARRANTY LIMITED WARRANTY For one year from the date of purchase, when this major appliance is operated and maintained...dents, chips or other than normal, single-family household use of repair or replacement under this information on the model and serial number label located on how to use your major appliance, to replace or repair house fuses, or to correct house wiring or plumbing. 2. Costs...
... major appliance if it was purchased. MFL42079202 6/08 Printed in a remote area where service by an authorized KitchenAid servicer is not available. 9. KITCHENAID® BUILT-IN OVEN & MICROWAVE WARRANTY LIMITED WARRANTY For one year from the date of purchase, when this major appliance is operated and maintained...dents, chips or other than normal, single-family household use of repair or replacement under this information on the model and serial number label located on how to use your major appliance, to replace or repair house fuses, or to correct house wiring or plumbing. 2. Costs...
Installation Guide
Page 4
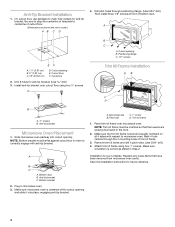
...4 Install anti-tip bracket onto cutout floor using four 1" screws. Place trim kit frame over microwave oven. Make sure orientation is centered within cutout opening and slide it into cutout opening. Replace any loose items that the louvers are not to scale.) AB C D 4. A B C...screws A. 1¹⁄₂" (3.81 cm) B. 3" (7.62 cm) C. 16" (40.64 cm) E F D. Cutout opening B. Centerline 2. Slide microwave oven partway into place, engaging anti-tip bracket. NOTE: Bottom bracket must be flat against cutout floor in the front. 2. Bottom duct B. Anti-tip bracket C. ...
...4 Install anti-tip bracket onto cutout floor using four 1" screws. Place trim kit frame over microwave oven. Make sure orientation is centered within cutout opening and slide it into cutout opening. Replace any loose items that the louvers are not to scale.) AB C D 4. A B C...screws A. 1¹⁄₂" (3.81 cm) B. 3" (7.62 cm) C. 16" (40.64 cm) E F D. Cutout opening B. Centerline 2. Slide microwave oven partway into place, engaging anti-tip bracket. NOTE: Bottom bracket must be flat against cutout floor in the front. 2. Bottom duct B. Anti-tip bracket C. ...


