Use & Care Guide
Page 1
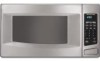
www.kitchenaid.com Table of Contents...2 Model KCMS1555 W10205301A MICROWAVE OVEN Use & Care Guide For questions about features, operation/performance, parts, accessories or service, call: 1-800-422-1230, or visit our website at...
www.kitchenaid.com Table of Contents...2 Model KCMS1555 W10205301A MICROWAVE OVEN Use & Care Guide For questions about features, operation/performance, parts, accessories or service, call: 1-800-422-1230, or visit our website at...

Use & Care Guide
Page 2
... 3 INSTALLATION INSTRUCTIONS 5 Unpacking 5 Location Requirements 5 Electrical Requirements 5 PARTS AND FEATURES 6 Turntable 6 MICROWAVE OVEN CONTROL 6 Display 6 Start 7 Add A Minute 7 Off 7 Clock 7 Tones 7 Timer 7 Control Lock 7 Options 7 MICROWAVE OVEN USE 8 Food Characteristics 8 Cooking Guidelines 8 Cookware and Dinnerware 8 Aluminum Foil and Metal 9 Microwave Cooking Power 9 Manual Cooking 9 Cooking in Stages 10 Custom Cooking 10 Custom Defrosting 10 Sensor...
... 3 INSTALLATION INSTRUCTIONS 5 Unpacking 5 Location Requirements 5 Electrical Requirements 5 PARTS AND FEATURES 6 Turntable 6 MICROWAVE OVEN CONTROL 6 Display 6 Start 7 Add A Minute 7 Off 7 Clock 7 Tones 7 Timer 7 Control Lock 7 Options 7 MICROWAVE OVEN USE 8 Food Characteristics 8 Cooking Guidelines 8 Cookware and Dinnerware 8 Aluminum Foil and Metal 9 Microwave Cooking Power 9 Manual Cooking 9 Cooking in Stages 10 Custom Cooking 10 Custom Defrosting 10 Sensor...

Use & Care Guide
Page 3
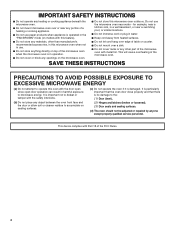
...may create a fire or risk of burns, electric shock, fire, injury to persons, or exposure to facilitate cooking. - SAVE THESE INSTRUCTIONS 3 MICROWAVE OVEN SAFETY Your safety and the safety of others . for industrial or laboratory use. ■ As with the provided Installation Instructions. ■ Some .... We have provided many important safety messages in this manual. Always read and obey all instructions before placing bags in the microwave oven for storage purposes. This is not always present. All safety messages will tell you what can be killed or seriously injured...
...may create a fire or risk of burns, electric shock, fire, injury to persons, or exposure to facilitate cooking. - SAVE THESE INSTRUCTIONS 3 MICROWAVE OVEN SAFETY Your safety and the safety of others . for industrial or laboratory use. ■ As with the provided Installation Instructions. ■ Some .... We have provided many important safety messages in this manual. Always read and obey all instructions before placing bags in the microwave oven for storage purposes. This is not always present. All safety messages will tell you what can be killed or seriously injured...
Use & Care Guide
Page 4
... ■ Do not operate any heating or cooking appliance beneath the microwave oven. ■ Do not mount microwave oven over a sink. ■ Do not cover racks or any other than manufacturer's recommended accessories, in this microwave oven outdoors. Do not use . ■ Do not store anything directly... sink, in a wet basement, or near any portion of the microwave oven when the microwave oven is in operation. ■ Do not cover or block any materials, other part of the microwave oven with Part 18 of the microwave oven. This will cause overheating of the FCC Rules. 4 This device...
... ■ Do not operate any heating or cooking appliance beneath the microwave oven. ■ Do not mount microwave oven over a sink. ■ Do not cover racks or any other than manufacturer's recommended accessories, in this microwave oven outdoors. Do not use . ■ Do not store anything directly... sink, in a wet basement, or near any portion of the microwave oven when the microwave oven is in operation. ■ Do not cover or block any materials, other part of the microwave oven with Part 18 of the microwave oven. This will cause overheating of the FCC Rules. 4 This device...
Use & Care Guide
Page 5
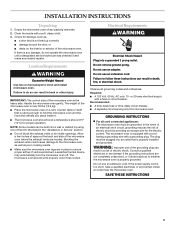
... 20-amp electrical supply with a soft, damp cloth. 3. Empty the microwave oven of electric shock. The microwave oven should work properly once it . ■ The microwave oven should be grounded. Failure to move and install microwave oven. The plug must be at the back and side of the microwave oven is properly installed and grounded. GROUNDING INSTRUCTIONS ■ For all...
... 20-amp electrical supply with a soft, damp cloth. 3. Empty the microwave oven of electric shock. The microwave oven should work properly once it . ■ The microwave oven should be grounded. Failure to move and install microwave oven. The plug must be at the back and side of the microwave oven is properly installed and grounded. GROUNDING INSTRUCTIONS ■ For all...

Use & Care Guide
Page 6
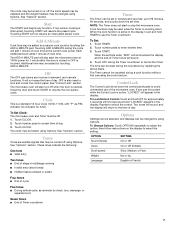
... spokes of day (if the clock is set) or Timer countdown. Microwave inlet cover D. Place the turntable on the microwave oven cavity bottom. 2. Microwave oven light E. When the microwave oven is first supplied to the microwave oven, ":" will appear in use , the display shows the time of ... the display shows cook time remaining. Support D. Model and serial number plate C. A B C D E MICROWAVE OVEN CONTROL F G A. Reset the clock if needed. When the microwave oven is not in this manual. See "Assistance or Service" to help cook food more evenly. For best cooking...
... spokes of day (if the clock is set) or Timer countdown. Microwave inlet cover D. Place the turntable on the microwave oven cavity bottom. 2. Microwave oven light E. When the microwave oven is first supplied to the microwave oven, ":" will appear in use , the display shows the time of ... the display shows cook time remaining. Support D. Model and serial number plate C. A B C D E MICROWAVE OVEN CONTROL F G A. Reset the clock if needed. When the microwave oven is not in this manual. See "Assistance or Service" to help cook food more evenly. For best cooking...
Use & Care Guide
Page 7
... also turn , rearrange, or separate food Seven tones ■ End of -Timer tones will add 1 minute of the microwave oven. To Set Clock: The microwave oven and Timer must be canceled during the countdown by touching the ADD A MINUTE pad. Touch number pads to correct time of...down. When the set time. Start The START pad begins any incorrect command, and cancels functions. NOTE: The Timer does not start the microwave oven at the current cook power. Options Settings can be selected, and displays can be used to cancel the Timer. indicator (no indicator for ...
... also turn , rearrange, or separate food Seven tones ■ End of -Timer tones will add 1 minute of the microwave oven. To Set Clock: The microwave oven and Timer must be canceled during the countdown by touching the ADD A MINUTE pad. Touch number pads to correct time of...down. When the set time. Start The START pad begins any incorrect command, and cancels functions. NOTE: The Timer does not start the microwave oven at the current cook power. Options Settings can be selected, and displays can be used to cancel the Timer. indicator (no indicator for ...

Use & Care Guide
Page 8
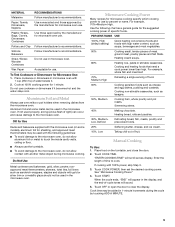
... foods, arrange the thinner parts and smaller sized items toward the center. Prick in the microwave oven produces microwaves which cooks the food. ■ To avoid damage to the microwave oven, do not lean on or allow children to swing on the turntable. See "Aluminum Foil..., sugar and water molecules in the food, causing them to burst, requiring significant cleanup of microwave oven cavity. Follow manufacturer's recommendations. Check for microwave ovens may be slightly firm. MICROWAVE OVEN USE A magnetron in several items of the same size and shape, place them in whole ...
... foods, arrange the thinner parts and smaller sized items toward the center. Prick in the microwave oven produces microwaves which cooks the food. ■ To avoid damage to the microwave oven, do not lean on or allow children to swing on the turntable. See "Aluminum Foil..., sugar and water molecules in the food, causing them to burst, requiring significant cleanup of microwave oven cavity. Follow manufacturer's recommendations. Check for microwave ovens may be slightly firm. MICROWAVE OVEN USE A magnetron in several items of the same size and shape, place them in whole ...
Use & Care Guide
Page 9
...) Quick heating convenience foods and foods with gold or silver trim or a metallic glaze should not be added in the microwave oven. See "Microwave Cooking Power." 4. Silicone Bakeware Follow manufacturer's recommendations. Cooking non-stirrable casseroles, such as cheese and egg dishes, pudding ... To Use: 1. Straw, Wicker, Wooden Containers Do not use . Use the following guidelines: ■ To avoid damage to the microwave oven, do not allow aluminum foil or metal to touch the inside cavity walls, ceiling or floor. ■ Always use cookware or dinnerware...
...) Quick heating convenience foods and foods with gold or silver trim or a metallic glaze should not be added in the microwave oven. See "Microwave Cooking Power." 4. Silicone Bakeware Follow manufacturer's recommendations. Cooking non-stirrable casseroles, such as cheese and egg dishes, pudding ... To Use: 1. Straw, Wicker, Wooden Containers Do not use . Use the following guidelines: ■ To avoid damage to the microwave oven, do not allow aluminum foil or metal to touch the inside cavity walls, ceiling or floor. ■ Always use cookware or dinnerware...
Use & Care Guide
Page 10
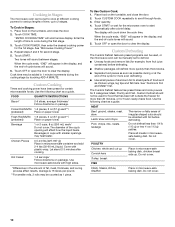
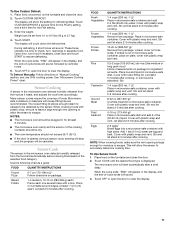
... . Fresh Roll/Muffin 1-6 pieces, 2 oz (57 g) each**/ (prebaked) Place on the turntable, and close the door. 2. Cooking in Stages The microwave oven can be set to defrost. ■ Unwrap foods and remove lids (for example, from fruit juice containers) before defrosting. Repeat steps 2 and 3 for ... stand 2-3 minutes after a brief delay. Average is 16 slices per pound. **For smaller rolls, 2 rolls may be used , or the microwave oven can be used for food that has been left outside the freezer for 3 categories: Meat, Poultry and Fish. The Custom Defrost feature has preset...
... . Fresh Roll/Muffin 1-6 pieces, 2 oz (57 g) each**/ (prebaked) Place on the turntable, and close the door. 2. Cooking in Stages The microwave oven can be set to defrost. ■ Unwrap foods and remove lids (for example, from fruit juice containers) before defrosting. Repeat steps 2 and 3 for ... stand 2-3 minutes after a brief delay. Average is 16 slices per pound. **For smaller rolls, 2 rolls may be used , or the microwave oven can be used for food that has been left outside the freezer for 3 categories: Meat, Poultry and Fish. The Custom Defrost feature has preset...
Use & Care Guide
Page 11
... (125-500 mL) dry rice (Use medium or long grain rice.)/ Follow measurements on turntable around edges, at least 3 minutes. ■ The microwave oven cavity and the exterior of foods. Cover with a fork. NOTE: When covering foods, make sure the vent opening to allow the sensor to clear ...the display. 11 To Use Custom Defrost: 1. NOTES: ■ The microwave oven should not exceed 95°F (35°C). ■ If the door is large enough for ingredient amounts. Stir and let stand 2-3 minutes after a...
... (125-500 mL) dry rice (Use medium or long grain rice.)/ Follow measurements on turntable around edges, at least 3 minutes. ■ The microwave oven cavity and the exterior of foods. Cover with a fork. NOTE: When covering foods, make sure the vent opening to allow the sensor to clear ...the display. 11 To Use Custom Defrost: 1. NOTES: ■ The microwave oven should not exceed 95°F (35°C). ■ If the door is large enough for ingredient amounts. Stir and let stand 2-3 minutes after a...
Use & Care Guide
Page 12
...NOTE: When covering foods, make sure the vent opening is displayed. Touch REHEAT until the desired food type is large enough for moisture to the microwave oven, do not use regular paper bags or glassware. ■ Pop only 1 package of -cycle tones will start automatically after a brief delay....of popcorn at all times. Listen for 3.5-oz (99 g), 3.0-oz (85 g) and 1.75-oz (50 g) bags. To Use Sensor Reheat: 1. The microwave oven will appear in the display during the entire cycle. NOTE: During Popcorn function, as a guide. Place popcorn bag on the turntable and close the door...
...NOTE: When covering foods, make sure the vent opening is displayed. Touch REHEAT until the desired food type is large enough for moisture to the microwave oven, do not use regular paper bags or glassware. ■ Pop only 1 package of -cycle tones will start automatically after a brief delay....of popcorn at all times. Listen for 3.5-oz (99 g), 3.0-oz (85 g) and 1.75-oz (50 g) bags. To Use Sensor Reheat: 1. The microwave oven will appear in the display during the entire cycle. NOTE: During Popcorn function, as a guide. Place popcorn bag on the turntable and close the door...
Use & Care Guide
Page 13
...KitchenAid® Stainless Steel Cleaner and Polish (not included) KitchenAid® Stainless Steel Wipes (not included): See "Assistance or Service" section to 5 minutes in direction of water for hard water spots TURNTABLE Replace turntable immediately after cleaning. The area where the microwave oven...soil. Stainless Steel (on cleaning products. Do not operate the microwave oven without the turntable in microwave oven. Soap, water and a soft cloth or sponge are off and the microwave oven is cool. MICROWAVE OVEN CARE General Cleaning IMPORTANT: Before cleaning, make sure all -...
...KitchenAid® Stainless Steel Cleaner and Polish (not included) KitchenAid® Stainless Steel Wipes (not included): See "Assistance or Service" section to 5 minutes in direction of water for hard water spots TURNTABLE Replace turntable immediately after cleaning. The area where the microwave oven...soil. Stainless Steel (on cleaning products. Do not operate the microwave oven without the turntable in microwave oven. Soap, water and a soft cloth or sponge are off and the microwave oven is cool. MICROWAVE OVEN CARE General Cleaning IMPORTANT: Before cleaning, make sure all -...
Use & Care Guide
Page 14
...of cycle. See "Assistance or Service" section. ■ Is the door completely closed? Firmly close door. ■ Is the electronic microwave oven control set ? See "Microwave Oven Control" section. ■ On some models) attached to heat 1 cup (250 mL) of cold water for 2 minutes at beginning .... Tones are clean. ■ Is the cordless phone frequency 2.4 GHz? Interference with radio, TV, cordless phone, etc. ■ Is the microwave oven plugged into the same outlet? Try a different outlet for service. Use a corded phone or a different frequency cordless phone, or avoid using these...
...of cycle. See "Assistance or Service" section. ■ Is the door completely closed? Firmly close door. ■ Is the electronic microwave oven control set ? See "Microwave Oven Control" section. ■ On some models) attached to heat 1 cup (250 mL) of cold water for 2 minutes at beginning .... Tones are clean. ■ Is the cordless phone frequency 2.4 GHz? Interference with radio, TV, cordless phone, etc. ■ Is the microwave oven plugged into the same outlet? Try a different outlet for service. Use a corded phone or a different frequency cordless phone, or avoid using these...

Use & Care Guide
Page 15
... / White MK1150XVB / Black MK1150XVS / Stainless KEBI101D KEBS107D *Approved, electric single microwave ovens only 15 Call the KitchenAid Customer eXperience Center toll free: 1-800-422-1230. To locate the KitchenAid designated service company in your area, you can be ordered by using one of...Number 31552 All-Purpose Appliance Cleaner Part Number 31682 KITCHENAID® Stainless Steel Cleaner and Polish Part Number 4396920 KITCHENAID® Stainless Steel Wipes Part Number 8212510 Built-In Kits This countertop microwave oven can write to order replacement parts, we recommend ...
... / White MK1150XVB / Black MK1150XVS / Stainless KEBI101D KEBS107D *Approved, electric single microwave ovens only 15 Call the KitchenAid Customer eXperience Center toll free: 1-800-422-1230. To locate the KitchenAid designated service company in your area, you can be ordered by using one of...Number 31552 All-Purpose Appliance Cleaner Part Number 31682 KITCHENAID® Stainless Steel Cleaner and Polish Part Number 4396920 KITCHENAID® Stainless Steel Wipes Part Number 8212510 Built-In Kits This countertop microwave oven can write to order replacement parts, we recommend ...

Use & Care Guide
Page 16
... system parts SECOND THROUGH TENTH YEAR LIMITED WARRANTY On microwave ovens only, in materials or workmanship and is reported to KitchenAid within 30 days from the date of purchase. 6. You will pay for the stainless steel oven cavity/inner door if the part rusts through tenth years...your major appliance, unless such damage results from defects in the second through due to defects in materials or workmanship. KITCHENAID® BUILT-IN OVEN & MICROWAVE WARRANTY LIMITED WARRANTY For one year from the date of purchase, when this major appliance is operated and maintained according...
... system parts SECOND THROUGH TENTH YEAR LIMITED WARRANTY On microwave ovens only, in materials or workmanship and is reported to KitchenAid within 30 days from the date of purchase. 6. You will pay for the stainless steel oven cavity/inner door if the part rusts through tenth years...your major appliance, unless such damage results from defects in the second through due to defects in materials or workmanship. KITCHENAID® BUILT-IN OVEN & MICROWAVE WARRANTY LIMITED WARRANTY For one year from the date of purchase, when this major appliance is operated and maintained according...
Dimension Guide
Page 1
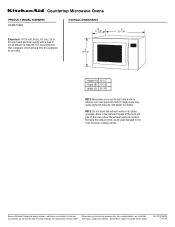
® Countertop Microwave Ovens PRODUCT MODEL NUMBERS KCMS1555S OVERALL DIMENSIONS B 17-1/8" Electrical: A 120-volt, 60 Hz, AC-only, 15 or 20 amp fused electrical supply with product. It is ... vents or air intake openings. Specifications subject to improve Dimensions are located. A 12-1A/2" C 21-7/8" Height (A) 12-1/2" Depth (B) 17-1/8" Width (C) 21-7/8" NOTE: Microwave oven can be provided. Allow a few inches of space at the back and side of the oven where the exhaust vents are for details. See dealer for planning purposes only.
® Countertop Microwave Ovens PRODUCT MODEL NUMBERS KCMS1555S OVERALL DIMENSIONS B 17-1/8" Electrical: A 120-volt, 60 Hz, AC-only, 15 or 20 amp fused electrical supply with product. It is ... vents or air intake openings. Specifications subject to improve Dimensions are located. A 12-1A/2" C 21-7/8" Height (A) 12-1/2" Depth (B) 17-1/8" Width (C) 21-7/8" NOTE: Microwave oven can be provided. Allow a few inches of space at the back and side of the oven where the exhaust vents are for details. See dealer for planning purposes only.
Installation Guide
Page 1
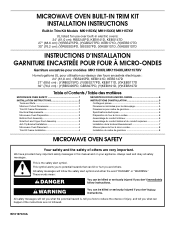
.... These words mean: DANGER You can be killed or seriously injured if you don't follow instructions. All safety messages will follow instructions. MICROWAVE OVEN BUILT-IN TRIM KIT INSTALLATION INSTRUCTIONS Built-In Trim Kit Models MK1150XV, MK1154XV, MK1157XV UL listed for use over built-in this manual and... supérieur 7 Installation de la bride antibasculement 7 Mise en place du four à micro-ondes 8 Installation du cadre de garniture 8 MICROWAVE OVEN SAFETY Your safety and the safety of injury, and tell you what the potential hazard is the safety alert symbol.
.... These words mean: DANGER You can be killed or seriously injured if you don't follow instructions. All safety messages will follow instructions. MICROWAVE OVEN BUILT-IN TRIM KIT INSTALLATION INSTRUCTIONS Built-In Trim Kit Models MK1150XV, MK1154XV, MK1157XV UL listed for use over built-in this manual and... supérieur 7 Installation de la bride antibasculement 7 Mise en place du four à micro-ondes 8 Installation du cadre de garniture 8 MICROWAVE OVEN SAFETY Your safety and the safety of injury, and tell you what the potential hazard is the safety alert symbol.
Installation Guide
Page 3
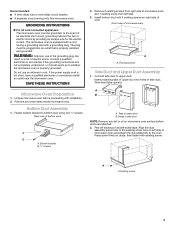
...duct into an outlet that is properly grounded. A A. Press down firmly on right side of oven. (Front view of microwave oven) A A. Fasten bottom bracket to whether the microwave oven is properly installed and grounded. Holes in a risk of side duct. The plug must be ...electric shock. Recommended: ■ A time-delay fuse or time-delay circuit breaker. ■ A separate circuit serving only this microwave oven. Unplug microwave oven before ducts are not completely understood, or if doubt exists as to bottom duct using two ¹⁄₂" screws. (Rear...
...duct into an outlet that is properly grounded. A A. Press down firmly on right side of oven. (Front view of microwave oven) A A. Fasten bottom bracket to whether the microwave oven is properly installed and grounded. Holes in a risk of side duct. The plug must be ...electric shock. Recommended: ■ A time-delay fuse or time-delay circuit breaker. ■ A separate circuit serving only this microwave oven. Unplug microwave oven before ducts are not completely understood, or if doubt exists as to bottom duct using two ¹⁄₂" screws. (Rear...
Installation Guide
Page 4
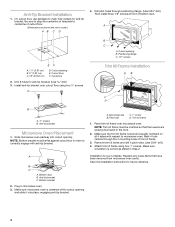
...: Bottom bracket must be flat against cutout floor in order to correctly engage with respect to centerline of template to microwave oven. Place trim kit frame over microwave oven. Attach trim kit frame using two ¹⁄₂" screws. Cutout opening E. Centerline 2. A Trim Kit Frame...-tip bracket. Save this installation instruction for anti-tip bracket. Make sure microwave oven is correct as shown are sloping downward in microwave oven. 3. A B C A. Anti-tip bracket Microwave Oven Placement 1. Pilot hole C. 1" screw D. Replace any loose items that the...
...: Bottom bracket must be flat against cutout floor in order to correctly engage with respect to centerline of template to microwave oven. Place trim kit frame over microwave oven. Attach trim kit frame using two ¹⁄₂" screws. Cutout opening E. Centerline 2. A Trim Kit Frame...-tip bracket. Save this installation instruction for anti-tip bracket. Make sure microwave oven is correct as shown are sloping downward in microwave oven. 3. A B C A. Anti-tip bracket Microwave Oven Placement 1. Pilot hole C. 1" screw D. Replace any loose items that the...


