
Instruction Manual
Page 1
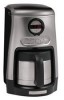
JAVASTUDIO™ COLLECTION PROGRAMMABLE COFFEE MAKERS INSTRUCTIONS KCM511 KCM514 KCM515 1-800-541-6390 Details Inside ® FOR THE WA1Y IT'S MADE.™
JAVASTUDIO™ COLLECTION PROGRAMMABLE COFFEE MAKERS INSTRUCTIONS KCM511 KCM514 KCM515 1-800-541-6390 Details Inside ® FOR THE WA1Y IT'S MADE.™

Instruction Manual
Page 2
... In The 50 United States and your complete shipping address. (No P.O. to receive this quality service. Give the consultant your KitchenAid® Coffee Maker should fail within the first year of ownership, simply call our toll-free Customer Satisfaction Center at 1-800-541-6390 Monday through...Replacement Warranty We're so confident the quality of our products meets the exacting standards of KitchenAid that, if your Coffee Maker should fail within the first year of ownership, KitchenAid will assure you of in complying with the provisions of the Consumer Product Safety Act. Box...
... In The 50 United States and your complete shipping address. (No P.O. to receive this quality service. Give the consultant your KitchenAid® Coffee Maker should fail within the first year of ownership, simply call our toll-free Customer Satisfaction Center at 1-800-541-6390 Monday through...Replacement Warranty We're so confident the quality of our products meets the exacting standards of KitchenAid that, if your Coffee Maker should fail within the first year of ownership, KitchenAid will assure you of in complying with the provisions of the Consumer Product Safety Act. Box...

Instruction Manual
Page 3
... 11 The Pause and Pour Feature 12 Using the Automatic Brew Timer 12 The Cleaning Needed Indicator 13 Coffee Brewing Suggestions: Advice for Great Taste 14 CARE AND CLEANING Cleaning the Coffee Maker 15 Descaling the Coffee Maker 15 Troubleshooting and Error Codes 16 WARRANTY AND SERVICE INFORMATION Warranty for the 50 United States and...
... 11 The Pause and Pour Feature 12 Using the Automatic Brew Timer 12 The Cleaning Needed Indicator 13 Coffee Brewing Suggestions: Advice for Great Taste 14 CARE AND CLEANING Cleaning the Coffee Maker 15 Descaling the Coffee Maker 15 Troubleshooting and Error Codes 16 WARRANTY AND SERVICE INFORMATION Warranty for the 50 United States and...
Instruction Manual
Page 4
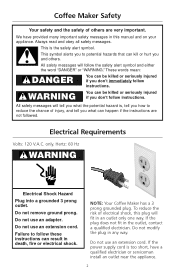
... or electrical shock. Hertz: 60 Hz WARNING Electrical Shock Hazard Plug into a grounded 3 prong outlet. Electrical Requirements Volts: 120 V.A.C. NOTE: Your Coffee Maker has a 3 prong grounded plug. Do not use an extension cord. Do not use an adapter. Do not remove ground prong. These words mean...will follow instructions. If the power supply cord is the safety alert symbol. If the plug does not fit in any way. Coffee Maker Safety Your safety and the safety of others . To reduce the risk of electrical shock, this manual and on your appliance. ...
... or electrical shock. Hertz: 60 Hz WARNING Electrical Shock Hazard Plug into a grounded 3 prong outlet. Electrical Requirements Volts: 120 V.A.C. NOTE: Your Coffee Maker has a 3 prong grounded plug. Do not use an extension cord. Do not use an adapter. Do not remove ground prong. These words mean...will follow instructions. If the power supply cord is the safety alert symbol. If the plug does not fit in any way. Coffee Maker Safety Your safety and the safety of others . To reduce the risk of electrical shock, this manual and on your appliance. ...
Instruction Manual
Page 5
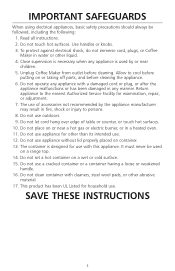
To protect against electrical shock, do not immerse cord, plugs, or Coffee Maker in any manner. Do not operate any appliance is used on a range top. 14. Do not place on container. 13. Do not set a hot container ... material. 17. Allow to the nearest Authorized Service Facility for household use outdoors. 9. Do not use . It must never be followed, including the following: 1. Unplug Coffee Maker from outlet before cleaning the appliance. 6. This product has been UL Listed for examination, repair, or adjustment. 7.
To protect against electrical shock, do not immerse cord, plugs, or Coffee Maker in any manner. Do not operate any appliance is used on a range top. 14. Do not place on container. 13. Do not set a hot container ... material. 17. Allow to the nearest Authorized Service Facility for household use outdoors. 9. Do not use . It must never be followed, including the following: 1. Unplug Coffee Maker from outlet before cleaning the appliance. 6. This product has been UL Listed for examination, repair, or adjustment. 7.
Instruction Manual
Page 7
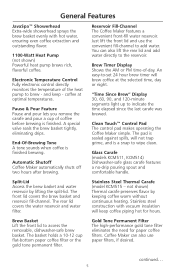
.... Clean Touch™ Control Pad The control pad makes operating the Coffee Maker simple. Split-Lid Access the brew basket and water reservoir by keeping coffee warm without continuous heating. Stainless Steel Thermal Carafe (model KCM515 - Stainless steel construction with hot water, ensuring even coffee extraction and outstanding flavor. 1100-Watt Heat Pump (not shown...
.... Clean Touch™ Control Pad The control pad makes operating the Coffee Maker simple. Split-Lid Access the brew basket and water reservoir by keeping coffee warm without continuous heating. Stainless Steel Thermal Carafe (model KCM515 - Stainless steel construction with hot water, ensuring even coffee extraction and outstanding flavor. 1100-Watt Heat Pump (not shown...

Instruction Manual
Page 9
...the 1 to program an automatic brew time. Set (Program) Press to 4 cup brew cycle is activated. When the Set (Program) Button is pressed, the Coffee Maker will flash • "H" (hour) and "M" (minute) Buttons can be used to turn the 1 to 4 cup brew cycle on the brew timer display ... display will flash • Set (Clock) indicator will briefly appear on or off . An indicator light shows when the Coffee Maker is on. 1-4 Cup After turning on the Coffee Maker or activating the automatic brew timer, press the 1-4 Cup Button to turn the automatic brew timer on or off . Cleaning...
...the 1 to program an automatic brew time. Set (Program) Press to 4 cup brew cycle is activated. When the Set (Program) Button is pressed, the Coffee Maker will flash • "H" (hour) and "M" (minute) Buttons can be used to turn the 1 to 4 cup brew cycle on the brew timer display ... display will flash • Set (Clock) indicator will briefly appear on or off . An indicator light shows when the Coffee Maker is on. 1-4 Cup After turning on the Coffee Maker or activating the automatic brew timer, press the 1-4 Cup Button to turn the automatic brew timer on or off . Cleaning...
Instruction Manual
Page 10
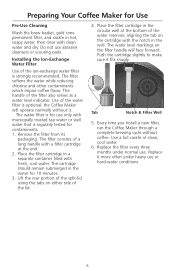
... as a water level indicator. Do not use . Installing the Ion-Exchange Water Filter Use of the ion-exchange water filter is optional: the Coffee Maker will face forward. The handle of clean, cool water. 6. Use of the lid. 4. Place the filter cartridge in the water for 10 minutes...and carafe in hot, soapy water, then rinse with clean water and dry. Preparing Your Coffee Maker for contaminants. 1. The filter softens the water while reducing chlorine and other contaminants which impair coffee flavor. Lift the rear portion of the water reservoir, aligning the tab on the cartridge with...
... as a water level indicator. Do not use . Installing the Ion-Exchange Water Filter Use of the ion-exchange water filter is optional: the Coffee Maker will face forward. The handle of clean, cool water. 6. Use of the lid. 4. Place the filter cartridge in the water for 10 minutes...and carafe in hot, soapy water, then rinse with clean water and dry. Preparing Your Coffee Maker for contaminants. 1. The filter softens the water while reducing chlorine and other contaminants which impair coffee flavor. Lift the rear portion of the water reservoir, aligning the tab on the cartridge with...

Instruction Manual
Page 11
Preparing Your Coffee Maker for 10 seconds. 9 When the Coffee Maker is restored after an interruption, the brew timer display will automatically record the displayed time and exit clocksetting mode if no buttons are pressed for ..., fire or electrical shock. 1. If a "H" or "M" Button is correct with respect to flash. 4. Do not use an extension cord. Press the Set (Clock) Button. The Coffee Maker will initially show 12:00 am. 3. Press the "H" (hour) and "M" (minute) Buttons below the brew timer display to exit the clock-setting mode. Make sure...
Preparing Your Coffee Maker for 10 seconds. 9 When the Coffee Maker is restored after an interruption, the brew timer display will automatically record the displayed time and exit clocksetting mode if no buttons are pressed for ..., fire or electrical shock. 1. If a "H" or "M" Button is correct with respect to flash. 4. Do not use an extension cord. Press the Set (Clock) Button. The Coffee Maker will initially show 12:00 am. 3. Press the "H" (hour) and "M" (minute) Buttons below the brew timer display to exit the clock-setting mode. Make sure...
Instruction Manual
Page 12
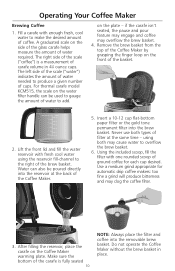
For thermal carafe model KCM515, the scale on the Coffee Maker warming plate. if the carafe isn't seated, the pause and pour feature may engage and coffee may clog the coffee filter. 3. Never use both may cause water to the right of the brew basket. Use a medium grind appropriate for each ...A graduated scale on the front of water to gauge the amount of the basket. 2. Operating Your Coffee Maker Brewing Coffee 1. Remove the brew basket from the top of the Coffee Maker by grasping the finger loop on the side of the glass carafe helps measure the amount of carafe volume...
For thermal carafe model KCM515, the scale on the Coffee Maker warming plate. if the carafe isn't seated, the pause and pour feature may engage and coffee may clog the coffee filter. 3. Never use both may cause water to the right of the brew basket. Use a medium grind appropriate for each ...A graduated scale on the front of water to gauge the amount of the basket. 2. Operating Your Coffee Maker Brewing Coffee 1. Remove the brew basket from the top of the Coffee Maker by grasping the finger loop on the side of the glass carafe helps measure the amount of carafe volume...

Instruction Manual
Page 13
... next brew cycle. Although the thermal carafe model KCM515 does not have a warming plate, the outside of coffee. When you are only brewing 1 to 4 cup brew cycle heats small quantities of coffee. Place the basket into the Coffee Maker, push it is complete. 10. The 1 to 4 cups of coffee, press the 1-4 Cup Button immediately after brewing...
... next brew cycle. Although the thermal carafe model KCM515 does not have a warming plate, the outside of coffee. When you are only brewing 1 to 4 cup brew cycle heats small quantities of coffee. Place the basket into the Coffee Maker, push it is complete. 10. The 1 to 4 cups of coffee, press the 1-4 Cup Button immediately after brewing...

Instruction Manual
Page 14
...buttons are pressed for those in a hurry. If a "H" or "M" Button is removed, a special valve stops the flow of coffee from the brew basket. Fill the Coffee Maker with respect to AM or PM. When the carafe is pressed and held, the digits will scroll rapidly. and usually impair - .... Brewing, however, does not stop flashing and the Set (Program) indicator will illuminate. 12 Using the Automatic Brew Timer The Coffee Maker can be programmed to brew coffee at each stage of the brewing cycle, and a finished carafe represents a delicate blend of these flavors. Operating Your...
...buttons are pressed for those in a hurry. If a "H" or "M" Button is removed, a special valve stops the flow of coffee from the brew basket. Fill the Coffee Maker with respect to AM or PM. When the carafe is pressed and held, the digits will scroll rapidly. and usually impair - .... Brewing, however, does not stop flashing and the Set (Program) indicator will illuminate. 12 Using the Automatic Brew Timer The Coffee Maker can be programmed to brew coffee at each stage of the brewing cycle, and a finished carafe represents a delicate blend of these flavors. Operating Your...

Instruction Manual
Page 15
...the performance and life of scale, the cleaning needed indicator will light after a brewing cycle is complete. Each time you want the Coffee Maker to the last brew time set. The Cleaning Needed Indicator Calcium deposits ("scale") from water will begin brewing at the programmed time,... activate the automatic brew timer by pressing the Auto On Button. When the Coffee Maker detects a build-up in the Coffee Maker heat pump over time and impair brewing efficiency and coffee quality. When deactivated, the Auto On indicator light will always default to brew at the ...
...the performance and life of scale, the cleaning needed indicator will light after a brewing cycle is complete. Each time you want the Coffee Maker to the last brew time set. The Cleaning Needed Indicator Calcium deposits ("scale") from water will begin brewing at the programmed time,... activate the automatic brew timer by pressing the Auto On Button. When the Coffee Maker detects a build-up in the Coffee Maker heat pump over time and impair brewing efficiency and coffee quality. When deactivated, the Auto On indicator light will always default to brew at the ...

Instruction Manual
Page 16
... basket. The Proper Amount of Ground Coffee For standard drip-process coffee, a good starting point is not recommended, as measured with your coffee to brew using a quality grinder like the KitchenAid® Blade Coffee Grinder, PRO LINE™ Series Burr Coffee Mill, or the KitchenAid® Model A-9™ Coffee Mill. Coffee Maker Cleanliness Coffee oils build up quickly within minutes. If...
... basket. The Proper Amount of Ground Coffee For standard drip-process coffee, a good starting point is not recommended, as measured with your coffee to brew using a quality grinder like the KitchenAid® Blade Coffee Grinder, PRO LINE™ Series Burr Coffee Mill, or the KitchenAid® Model A-9™ Coffee Mill. Coffee Maker Cleanliness Coffee oils build up quickly within minutes. If...

Instruction Manual
Page 17
...agent and water to cool before cleaning. 2. Wipe the Coffee Maker housing with a soft cloth. Do not use abrasive cleansers or scouring pads. The Coffee Maker can also be washed in hot, soapy water and rinse with model KCM515 should be descaled using fresh descaling solution. Before descaling, always... pads. Keep repeating Step 2 until the cleaning needed indicator will build up of your Coffee Maker. Replace the filter every three months under normal usage, or more often with model KCM515 should be done as soon as possible to preserve the performance and life of scale, ...
...agent and water to cool before cleaning. 2. Wipe the Coffee Maker housing with a soft cloth. Do not use abrasive cleansers or scouring pads. The Coffee Maker can also be washed in hot, soapy water and rinse with model KCM515 should be descaled using fresh descaling solution. Before descaling, always... pads. Keep repeating Step 2 until the cleaning needed indicator will build up of your Coffee Maker. Replace the filter every three months under normal usage, or more often with model KCM515 should be done as soon as possible to preserve the performance and life of scale, ...

Instruction Manual
Page 18
...Press the On/Off Button to reset the Coffee Maker. Please refer to the Warranty and Service section beginning on the following page. 16 Unplug the Coffee Maker, press each button several times, then plug the Coffee Maker back in. (If the Coffee Maker has been stored or used in a cool...Warranty and Service section beginning on the electrical circuit the Coffee Maker is connected to and make sure the circuit is closed. • If only a portion of the water added to the Coffee Maker actually brews: The Coffee Maker requires immediate descaling. Troubleshooting and Error Codes • If...
...Press the On/Off Button to reset the Coffee Maker. Please refer to the Warranty and Service section beginning on the following page. 16 Unplug the Coffee Maker, press each button several times, then plug the Coffee Maker back in. (If the Coffee Maker has been stored or used in a cool...Warranty and Service section beginning on the electrical circuit the Coffee Maker is connected to and make sure the circuit is closed. • If only a portion of the water added to the Coffee Maker actually brews: The Coffee Maker requires immediate descaling. Troubleshooting and Error Codes • If...

Instruction Manual
Page 19
... INCIDENTAL OR CONSEQUENTIAL DAMAGES. Any shipping or handling costs to deliver your Coffee Maker. This warranty gives you specific legal rights and you may not apply to you. KitchenAid® Coffee Maker Warranty for the 50 United States and District of Columbia This warranty extends...the Customer Satisfaction Center toll-free at 1-800-541-6390. To arrange for service, follow the instructions under the KitchenAid® Coffee Maker Warranty for Coffee Makers operated outside the 50 United States and District of Columbia. B. Replacement parts or repair labor costs for Puerto Rico ...
... INCIDENTAL OR CONSEQUENTIAL DAMAGES. Any shipping or handling costs to deliver your Coffee Maker. This warranty gives you specific legal rights and you may not apply to you. KitchenAid® Coffee Maker Warranty for the 50 United States and District of Columbia This warranty extends...the Customer Satisfaction Center toll-free at 1-800-541-6390. To arrange for service, follow the instructions under the KitchenAid® Coffee Maker Warranty for Coffee Makers operated outside the 50 United States and District of Columbia. B. Replacement parts or repair labor costs for Puerto Rico ...

Instruction Manual
Page 20
... Service Center. Joseph, MI 49085-0218 18 to 8 p.m., Monday through Friday, 10 a.m. Please bring the Coffee Maker, or ship it prepaid and insured, to 5 p.m. You can result in Puerto Rico. Arranging for your local KitchenAid dealer Coffee Maker for Coffee Makers operated in death or electrical shock. Joseph, MI 49085-0218 Arranging for Service Outside the 50...
... Service Center. Joseph, MI 49085-0218 18 to 8 p.m., Monday through Friday, 10 a.m. Please bring the Coffee Maker, or ship it prepaid and insured, to 5 p.m. You can result in Puerto Rico. Arranging for your local KitchenAid dealer Coffee Maker for Coffee Makers operated in death or electrical shock. Joseph, MI 49085-0218 Arranging for Service Outside the 50...


