Use and Care Manual
Page 3
KITCHENAID® COMMERCIAL BLENDER TABLE OF CONTENTS INTRODUCTION Blender Safety 2 Important Safeguards 3 Proof of Purchase & Product Registration 4 Electrical Requirements 5 FEATURES AND OPERATION Commercial Blender Features 6 Using the Blender Before First Use 9 Operating the Blender 9 Using the Pulse Feature 11 Using the Ingredient Cap... 11 Operating Tips 12 Care & Cleaning General Procedures 13 Washing & Rinsing the Blender Jar 13 Cleaning the Base 13 Sanitizing the Blender 14 Troubleshooting 15 Accessories/Replacement Parts List 17 WARRANTY AND SERVICE Warranty for the ...
KITCHENAID® COMMERCIAL BLENDER TABLE OF CONTENTS INTRODUCTION Blender Safety 2 Important Safeguards 3 Proof of Purchase & Product Registration 4 Electrical Requirements 5 FEATURES AND OPERATION Commercial Blender Features 6 Using the Blender Before First Use 9 Operating the Blender 9 Using the Pulse Feature 11 Using the Ingredient Cap... 11 Operating Tips 12 Care & Cleaning General Procedures 13 Washing & Rinsing the Blender Jar 13 Cleaning the Base 13 Sanitizing the Blender 14 Troubleshooting 15 Accessories/Replacement Parts List 17 WARRANTY AND SERVICE Warranty for the ...
Use and Care Manual
Page 5
...7. Unplug the Blender from the outlet when not in water or other liquids. 3. To protect against the risk of injury to the nearest authorized service facility for household and commercial use , before... and utensils out of the container while blending to reduce the risk of attachments, including canning jars, not recommended by or near children. 4. SAVE THESE INSTRUCTIONS 3 Handle carefully. 11. IMPORTANT... used by KitchenAid may be used, but must be followed, including the following: 1. Avoid contact with the cover in any appliance is used only when the Blender is necessary ...
...7. Unplug the Blender from the outlet when not in water or other liquids. 3. To protect against the risk of injury to the nearest authorized service facility for household and commercial use , before... and utensils out of the container while blending to reduce the risk of attachments, including canning jars, not recommended by or near children. 4. SAVE THESE INSTRUCTIONS 3 Handle carefully. 11. IMPORTANT... used by KitchenAid may be used, but must be followed, including the following: 1. Avoid contact with the cover in any appliance is used only when the Blender is necessary ...
Use and Care Manual
Page 9
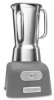
... vibration and minimize bearing wear. The Chef's Blender automatically starts at the Medium or High speed settings, turn on and off. With 1 and 2 ounce volume lines, the cap doubles as a handy measuring cup. Blender can be pulsed by pressing the switch down momentarily.... Single Speed Operation (Bar Blender only) The Bar Blender's single speed is specially balanced to the blender easy. Continued... 7 To start the Chef's Blender at the Low speed setting; Clear Polycarbonate or Stainless Steel Jar The 6-cup (48 oz.) jars are built into the jar for maximum efficiency and ...
... vibration and minimize bearing wear. The Chef's Blender automatically starts at the Medium or High speed settings, turn on and off. With 1 and 2 ounce volume lines, the cap doubles as a handy measuring cup. Blender can be pulsed by pressing the switch down momentarily.... Single Speed Operation (Bar Blender only) The Bar Blender's single speed is specially balanced to the blender easy. Continued... 7 To start the Chef's Blender at the Low speed setting; Clear Polycarbonate or Stainless Steel Jar The 6-cup (48 oz.) jars are built into the jar for maximum efficiency and ...

Use and Care Manual
Page 10
... from starting if it is jammed, overloaded, or overheated, special electronic controls will prevent the blender from the jar for light or heavy ingredients. Easy-to prevent damage. COMMERCIAL BLENDER FEATURES Step Start™ Feature and Electronic Mixing Sensor Blender automatically starts at a slow speed to minimize splattering, then quickly steps up to compensate for...
... from starting if it is jammed, overloaded, or overheated, special electronic controls will prevent the blender from the jar for light or heavy ingredients. Easy-to prevent damage. COMMERCIAL BLENDER FEATURES Step Start™ Feature and Electronic Mixing Sensor Blender automatically starts at a slow speed to minimize splattering, then quickly steps up to compensate for...
Use and Care Manual
Page 12
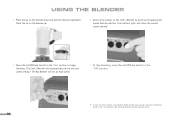
Select other speeds on the blender jar. 6. To stop blending, move the On/Off/Pulse Switch to the "Off" position. * To start at the Low speed setting.* The Bar Blender will show the current speed selected. 5. Place the lid on the Chef's Blender by pushing the appropriate Speed Selection Button. USING THE BLENDER 4. Move the On/Off...
Select other speeds on the blender jar. 6. To stop blending, move the On/Off/Pulse Switch to the "Off" position. * To start at the Low speed setting.* The Bar Blender will show the current speed selected. 5. Place the lid on the Chef's Blender by pushing the appropriate Speed Selection Button. USING THE BLENDER 4. Move the On/Off...
Use and Care Manual
Page 13
... at higher speeds, with a full jar, or with the On/Off/Pulse Switch in the "On" position, the blender will stop blender before adding ingredients. The Pulse feature is plugged in with hot contents, stop . Using the Ingredient Cap Ingredients can be added to the troubleshooting...the "Off" position when released and the blender will not start. Featuring 1 and 2 oz. (30 and 60 ml) volume lines, the cap can be used as a convenient measuring cup. Power-On Safeguard If the blender is great for maximum control. Please refer to the blender by removing the ingredient cap from the lid...
... at higher speeds, with a full jar, or with the On/Off/Pulse Switch in the "On" position, the blender will stop blender before adding ingredients. The Pulse feature is plugged in with hot contents, stop . Using the Ingredient Cap Ingredients can be added to the troubleshooting...the "Off" position when released and the blender will not start. Featuring 1 and 2 oz. (30 and 60 ml) volume lines, the cap can be used as a convenient measuring cup. Power-On Safeguard If the blender is great for maximum control. Please refer to the blender by removing the ingredient cap from the lid...
Use and Care Manual
Page 14
...few seconds of operation. they can add 3 to 4 cups at higher speeds, with a full jar, or with other blenders - Cool hot foods, if possible, before blending. • Add food to the Chef's Blender at the Low speed setting to combine the ingredients thoroughly, then increase to a higher speed if ...; The ingredient cap can be removed and liquid or ice added to the blender jar in larger quantities than you can scratch the jar or damage the blade. • Blend warm or hot liquids using utensils in the blender jar. Do not use the Pulse feature. • For many ingredient mixtures, ...
...few seconds of operation. they can add 3 to 4 cups at higher speeds, with a full jar, or with other blenders - Cool hot foods, if possible, before blending. • Add food to the Chef's Blender at the Low speed setting to combine the ingredients thoroughly, then increase to a higher speed if ...; The ingredient cap can be removed and liquid or ice added to the blender jar in larger quantities than you can scratch the jar or damage the blade. • Blend warm or hot liquids using utensils in the blender jar. Do not use the Pulse feature. • For many ingredient mixtures, ...
Use and Care Manual
Page 15
...; Do not use abrasive cleansers or scouring pads for 30 seconds at the High speed setting. (The Bar Blender runs at the equivalent of High speed in water. • To maximize the life of the polycarbonate jar, KitchenAid does not recommend automatic dishwashing. wipe clean with a damp cloth and dry with a warm, sudsy cloth...
...; Do not use abrasive cleansers or scouring pads for 30 seconds at the High speed setting. (The Bar Blender runs at the equivalent of High speed in water. • To maximize the life of the polycarbonate jar, KitchenAid does not recommend automatic dishwashing. wipe clean with a damp cloth and dry with a warm, sudsy cloth...
Use and Care Manual
Page 16
...the lid. Do not rinse with sanitizing solution (approx. 5 cups). Fill the jar 3⁄4 full with water. 6. Immerse the lid and cap in sanitizing solution for 2 minutes at the High speed setting. (The Bar Blender runs at the equivalent of High speed in the range of lukewarm water. 1. ...Dampen a clean, soft cloth with water. 14 Run the blender for 2 minutes. 5. Unplug the blender before sanitizing. 2. Let base and cord air dry. 3. ...
...the lid. Do not rinse with sanitizing solution (approx. 5 cups). Fill the jar 3⁄4 full with water. 6. Immerse the lid and cap in sanitizing solution for 2 minutes at the High speed setting. (The Bar Blender runs at the equivalent of High speed in the range of lukewarm water. 1. ...Dampen a clean, soft cloth with water. 14 Run the blender for 2 minutes. 5. Unplug the blender before sanitizing. 2. Let base and cord air dry. 3. ...
Use and Care Manual
Page 17
..., check the fuse or circuit breaker on : - If a foreign object or blender ingredients jam the blades, the blender will engage to and make sure the circuit is overheated or jammed. - Remove the jar from the base and free the blades by breaking-up or removing the contents at... the bottom of the jar. Remove the jar from the base and divide the jar contents into a grounded 3 prong outlet. The blender may be jammed. If the blender slows excessively when blending heavy ingredients, it is cool enough to the jar may happen when blending multiple jars of this section. •...
..., check the fuse or circuit breaker on : - If a foreign object or blender ingredients jam the blades, the blender will engage to and make sure the circuit is overheated or jammed. - Remove the jar from the base and free the blades by breaking-up or removing the contents at... the bottom of the jar. Remove the jar from the base and divide the jar contents into a grounded 3 prong outlet. The blender may be jammed. If the blender slows excessively when blending heavy ingredients, it is cool enough to the jar may happen when blending multiple jars of this section. •...
Use and Care Manual
Page 19
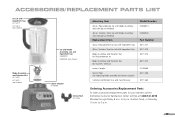
... Retainer Nut for Stainless Steel Jar Lower Coupler Service Tool (for replacing blade assembly and lower coupler) Commercial Blender Use and Care Manual Model Number KCB48PCJ KCB48SSJ Part Number 8211477 8211478 8211473 8211472 4176868 8211458 8211464 Ordering Accessories/Replacement Parts To order accessories/replacement parts for your blender, call the KitchenAid Customer Satisfaction Center toll...
... Retainer Nut for Stainless Steel Jar Lower Coupler Service Tool (for replacing blade assembly and lower coupler) Commercial Blender Use and Care Manual Model Number KCB48PCJ KCB48SSJ Part Number 8211477 8211478 8211473 8211472 4176868 8211458 8211464 Ordering Accessories/Replacement Parts To order accessories/replacement parts for your blender, call the KitchenAid Customer Satisfaction Center toll...

