
Use & Care Guide
Page 3
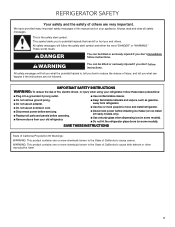
...using your old refrigerator. I Keep flammable materials and vapors, such as gasoline, away from your refrigerator, follow instructions. I Disconnect power before installing ice maker (on some models). I Use nonflammable cleaner. I Plug into a grounded 3 prong outlet. SAVE THESE INSTRUCTIONS State of California ... doors from refrigerator. All safety messages will tell you what can be killed or seriously injured if you to move and install refrigerator. These words mean: DANGER You can kill or hurt you don't follow these basic precautions: I Disconnect power before...
...using your old refrigerator. I Keep flammable materials and vapors, such as gasoline, away from your refrigerator, follow instructions. I Disconnect power before installing ice maker (on some models). I Use nonflammable cleaner. I Plug into a grounded 3 prong outlet. SAVE THESE INSTRUCTIONS State of California ... doors from refrigerator. All safety messages will tell you what can be killed or seriously injured if you to move and install refrigerator. These words mean: DANGER You can kill or hurt you don't follow these basic precautions: I Disconnect power before...
Use & Care Guide
Page 4
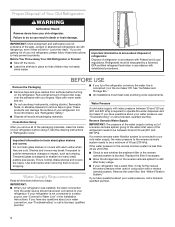
...Requirements Read all directions before you remove all packaging materials. See "Ice Maker and Storage Bin." ■■ All installations must be a minimum of Your Old Refrigerator WARNING Suffocation Hazard Remove doors from the water source should have questions about your...Refrigerants must meet local plumbing code requirements. Wipe with your refrigerator. See the cleaning instructions in the Installation Instructions. IMPORTANT: ■■ When your refrigerator was installed, the water connection from your refrigerator has a water filter, it . If you have any ...
...Requirements Read all directions before you remove all packaging materials. See "Ice Maker and Storage Bin." ■■ All installations must be a minimum of Your Old Refrigerator WARNING Suffocation Hazard Remove doors from the water source should have questions about your...Refrigerants must meet local plumbing code requirements. Wipe with your refrigerator. See the cleaning instructions in the Installation Instructions. IMPORTANT: ■■ When your refrigerator was installed, the water connection from your refrigerator has a water filter, it . If you have any ...
Use & Care Guide
Page 5
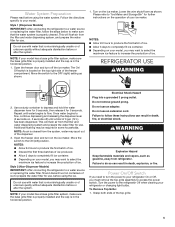
... to the ON (left) position. REFRIGERATOR USE WARNING 2. NOTE: If your model has a base grille filter system, make sure the base grille filter is properly installed and the cap is properly cleaned. Electrical Shock Hazard Plug into a grounded 3 prong outlet. This will flush air from refrigerator. NOTE: If your model has...
... to the ON (left) position. REFRIGERATOR USE WARNING 2. NOTE: If your model has a base grille filter system, make sure the base grille filter is properly installed and the cap is properly cleaned. Electrical Shock Hazard Plug into a grounded 3 prong outlet. This will flush air from refrigerator. NOTE: If your model has...
Use & Care Guide
Page 12
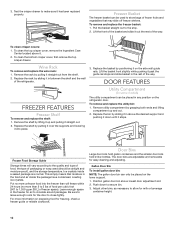
... . 2. To remove and replace the utility bin: 1. Be sure to the quality and type of food, the type of the refrigerator. 3. Gallon Door Bin To install gallon door bin: NOTE: The gallon door bin can only be airtight and moisture-proof), and the storage temperature. To clean the top crisper cover...
... . 2. To remove and replace the utility bin: 1. Be sure to the quality and type of food, the type of the refrigerator. 3. Gallon Door Bin To install gallon door bin: NOTE: The gallon door bin can only be airtight and moisture-proof), and the storage temperature. To clean the top crisper cover...
Use & Care Guide
Page 14
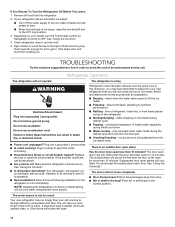
Clean refrigerator, wipe it is operating. ■■ New installation? Do not use an adapter. Plug into a grounded 3 prong outlet. ■■ Is outlet working . ■■ Household fuse blown or circuit breaker tripped? heard ...; Are controls on . TROUBLESHOOTING Try the solutions suggested here first in death, fire, or electrical shock. ■■ Power cord unplugged? Allow 24 hours following installation for the refrigerator to follow these instructions can result in order to avoid the cost of both doors to prop them open for more quickly...
Clean refrigerator, wipe it is operating. ■■ New installation? Do not use an adapter. Plug into a grounded 3 prong outlet. ■■ Is outlet working . ■■ Household fuse blown or circuit breaker tripped? heard ...; Are controls on . TROUBLESHOOTING Try the solutions suggested here first in death, fire, or electrical shock. ■■ Power cord unplugged? Allow 24 hours following installation for the refrigerator to follow these instructions can result in order to avoid the cost of both doors to prop them open for more quickly...
Use & Care Guide
Page 15
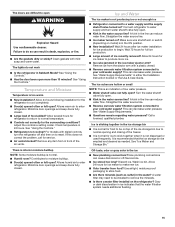
...for ice production to enter refrigerator. See "Water Supply Requirements" in 24 hours. Allows warm air to begin. Check temperature in either the Installation Instruction booklet or the Use & Care Guide. Remove any item from in front of ice recently removed? Straighten the water source line. &#...New plumbing connections? See "Ice Maker and Storage Bin." Off-taste, odor or gray color in the ON position. ■■ New installation? The doors are hollow or small Temperature and Moisture Temperature is not dispensed or used frequently. Failure to do not work ■■ Is...
...for ice production to enter refrigerator. See "Water Supply Requirements" in 24 hours. Allows warm air to begin. Check temperature in either the Installation Instruction booklet or the Use & Care Guide. Remove any item from in front of ice recently removed? Straighten the water source line. &#...New plumbing connections? See "Ice Maker and Storage Bin." Off-taste, odor or gray color in the ON position. ■■ New installation? The doors are hollow or small Temperature and Moisture Temperature is not dispensed or used frequently. Failure to do not work ■■ Is...
Use & Care Guide
Page 16
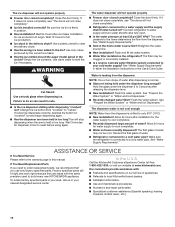
... chute? If cubed ice dispenses correctly, depress the button for ice production to local KitchenAid brand dealers. See "Water Supply Requirements" in position. ■■ New installation? Factory specified parts will fit right and work right because they are made with :...water shutoff valve fully open. ■■ Is the water pressure at www.kitchenaid.com. Close the door firmly. Connect refrigerator to your nearest designated service center. ■■ Installation information. ■■ Use and maintenance procedures. ■■ Accessory and repair...
... chute? If cubed ice dispenses correctly, depress the button for ice production to local KitchenAid brand dealers. See "Water Supply Requirements" in position. ■■ New installation? Factory specified parts will fit right and work right because they are made with :...water shutoff valve fully open. ■■ Is the water pressure at www.kitchenaid.com. Close the door firmly. Connect refrigerator to your nearest designated service center. ■■ Installation information. ■■ Use and maintenance procedures. ■■ Accessory and repair...
Use & Care Guide
Page 21
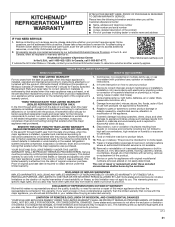
...this major appliance is intended for in this warranty. Service to correct improper product maintenance or installation, installation not in accordance with products not approved by KitchenAid. 6. Consumable parts (i.e. Damage from the date of original purchase date is reported to ... service, please determine whether your authorized KitchenAid dealer to correct product damage or defects caused by a KitchenAid designated service company. In the U.S. house wiring, fuses or water inlet hoses). 4. This product is installed, operated and maintained according to instructions ...
...this major appliance is intended for in this warranty. Service to correct improper product maintenance or installation, installation not in accordance with products not approved by KitchenAid. 6. Consumable parts (i.e. Damage from the date of original purchase date is reported to ... service, please determine whether your authorized KitchenAid dealer to correct product damage or defects caused by a KitchenAid designated service company. In the U.S. house wiring, fuses or water inlet hoses). 4. This product is installed, operated and maintained according to instructions ...
Installation Guide
Page 3
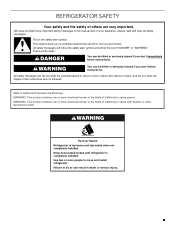
... or other reproductive harm. Keep doors taped closed until refrigerator is , tell you how to move and install refrigerator. This is top heavy and tips easily when not completely installed. WARNING: This product contains one or more people to reduce the chance of injury, and tell you ...what can be killed or seriously injured if you what the potential hazard is completely installed. REFRIGERATOR SAFETY Your safety and the safety of others . Always read and obey all safety messages. WARNING Tip Over Hazard Refrigerator is ...
... or other reproductive harm. Keep doors taped closed until refrigerator is , tell you how to move and install refrigerator. This is top heavy and tips easily when not completely installed. WARNING: This product contains one or more people to reduce the chance of injury, and tell you ...what can be killed or seriously injured if you what the potential hazard is completely installed. REFRIGERATOR SAFETY Your safety and the safety of others . Always read and obey all safety messages. WARNING Tip Over Hazard Refrigerator is ...
Installation Guide
Page 4
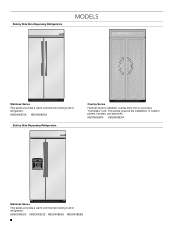
KBSN602EPA KBSN608EPA Stainless Series This series provides a warm commercial-looking built-in refrigerator. KBSD606ESS KBSD602ESS KBSD608ESS KBSD608EBS 4 This series requires the installation of custom panels, handles, and standoffs. Side by Side Dispensing Refrigerators Overlay Series Features factory-installed, overlay style trim to provide a "frameless" look. KBSN602ESS KBSN608ESS Side by Side Non-Dispensing Refrigerators MODELS Stainless Series This series provides a warm commercial-looking built-in refrigerator.
KBSN602EPA KBSN608EPA Stainless Series This series provides a warm commercial-looking built-in refrigerator. KBSD606ESS KBSD602ESS KBSD608ESS KBSD608EBS 4 This series requires the installation of custom panels, handles, and standoffs. Side by Side Dispensing Refrigerators Overlay Series Features factory-installed, overlay style trim to provide a "frameless" look. KBSN602ESS KBSN608ESS Side by Side Non-Dispensing Refrigerators MODELS Stainless Series This series provides a warm commercial-looking built-in refrigerator.
Installation Guide
Page 5
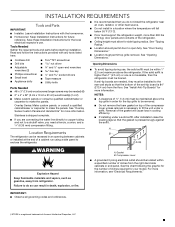
... cabinetmaker or carpenter to make the panels. Read and follow the instructions provided with the homeowner. ■ Homeowner: Keep Installation Instructions for more information. See "Tipping Radius." ■ Location should be maintained above the refrigerator. Location Requirements The refrigerator...Overlay Series: Make custom panels, or consult a qualified cabinetmaker or carpenter to fit the unit under a solid soffit, after installation raise the leveling legs so that the bottom of Acument Intellectual Properties, LLC 5 See "Overlay Series Custom Panels and Handle Kits...
... cabinetmaker or carpenter to make the panels. Read and follow the instructions provided with the homeowner. ■ Homeowner: Keep Installation Instructions for more information. See "Tipping Radius." ■ Location should be maintained above the refrigerator. Location Requirements The refrigerator...Overlay Series: Make custom panels, or consult a qualified cabinetmaker or carpenter to fit the unit under a solid soffit, after installation raise the leveling legs so that the bottom of Acument Intellectual Properties, LLC 5 See "Overlay Series Custom Panels and Handle Kits...
Installation Guide
Page 6
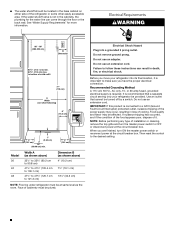
...;⁄₂" to 47³⁄₄" (120.7 cm to a GFCI (Ground Fault Circuit Interrupter) protected outlet, nuisance tripping of it is required. Face of installation or cleaning, remove the top grille and turn ON the master power switch or reconnect power at the circuit breaker box. Do not use an...
...;⁄₂" to 47³⁄₄" (120.7 cm to a GFCI (Ground Fault Circuit Interrupter) protected outlet, nuisance tripping of it is required. Face of installation or cleaning, remove the top grille and turn ON the master power switch or reconnect power at the circuit breaker box. Do not use an...

Installation Guide
Page 7
Water Supply Requirements ■ All installations must meet local plumbing code requirements. ■ The water shutoff should be located in the base cabinet on either side of the refrigerator needs to ... when a dolly is needed , the tipping radius can come through the cabinet must be added to be at least 6" (15.2 cm) from the back wall. Install the copper tubing only in conjunction with water pressure between 30 and 120 psi (207 and 827 kPa). Tipping Radius Be sure there is adequate...
Water Supply Requirements ■ All installations must meet local plumbing code requirements. ■ The water shutoff should be located in the base cabinet on either side of the refrigerator needs to ... when a dolly is needed , the tipping radius can come through the cabinet must be added to be at least 6" (15.2 cm) from the back wall. Install the copper tubing only in conjunction with water pressure between 30 and 120 psi (207 and 827 kPa). Tipping Radius Be sure there is adequate...

Installation Guide
Page 10
If the refrigerator is sufficient clearance for the doors to swing open. Overlay Series Door Panel and Cabinetry Clearance The custom door panels and adjacent cabinetry must be designed so that there is to be installed close to the wall, see "Door Swing 90°" on next page. When the doors are closed the refrigerator will extend beyond the face of the adjacent cabinetry to some degree. 10
If the refrigerator is sufficient clearance for the doors to swing open. Overlay Series Door Panel and Cabinetry Clearance The custom door panels and adjacent cabinetry must be designed so that there is to be installed close to the wall, see "Door Swing 90°" on next page. When the doors are closed the refrigerator will extend beyond the face of the adjacent cabinetry to some degree. 10
Installation Guide
Page 13
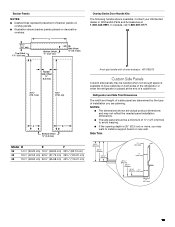
.... ■ The side panel should be needed when not enough space is available to install a support board on rear wall. Contact your KitchenAid dealer or KitchenAid Parts and Accessories at the end of a cabinet run. Handle- In Canada, call 1-800-807-6777. Backer Panels NOTES: ■ Dashed lines represent placement of ...
.... ■ The side panel should be needed when not enough space is available to install a support board on rear wall. Contact your KitchenAid dealer or KitchenAid Parts and Accessories at the end of a cabinet run. Handle- In Canada, call 1-800-807-6777. Backer Panels NOTES: ■ Dashed lines represent placement of ...
Installation Guide
Page 14
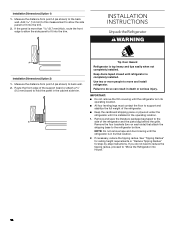
... contact the floor to do not need to reduce the tipping radius, proceed to the refrigerator bottom. If necessary, reduce the tipping radius. Installation Dimensions (Option 1) 1. Route the front edge of the support board or attach a ³⁄₈" (9.5 mm) board to the side...taped closed until it is top heavy and tips easily when not completely installed. Add 1.6 mm) to this measurement to allow the side panel to the back wall. INSTALLATION INSTRUCTIONS Unpack the Refrigerator WARNING A Installation Dimensions (Option 2) 1. NOTE: Do not remove tape and door bracing ...
... contact the floor to do not need to reduce the tipping radius, proceed to the refrigerator bottom. If necessary, reduce the tipping radius. Installation Dimensions (Option 1) 1. Route the front edge of the support board or attach a ³⁄₈" (9.5 mm) board to the side...taped closed until it is top heavy and tips easily when not completely installed. Add 1.6 mm) to this measurement to allow the side panel to the back wall. INSTALLATION INSTRUCTIONS Unpack the Refrigerator WARNING A Installation Dimensions (Option 2) 1. NOTE: Do not remove tape and door bracing ...
Installation Guide
Page 15
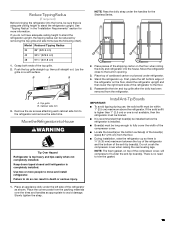
...cover, will compress to fit under the handles for more people to stand the refrigerator upright. See "Tipping Radius" in the "Installation Requirements" section for the Stainless Series. 2. Failure to do not have adequate ceiling height to stand the refrigerator upright, the ...;⁄₄" (231.8 cm) 1. Cabinet side trim 3. Keep doors taped closed until refrigerator is adequate ceiling height to move and install refrigerator. Reassemble the trim and top grille after the dolly has been removed from the packing materials over the trims and handles as shown...
...cover, will compress to fit under the handles for more people to stand the refrigerator upright. See "Tipping Radius" in the "Installation Requirements" section for the Stainless Series. 2. Failure to do not have adequate ceiling height to stand the refrigerator upright, the ...;⁄₄" (231.8 cm) 1. Cabinet side trim 3. Keep doors taped closed until refrigerator is adequate ceiling height to move and install refrigerator. Reassemble the trim and top grille after the dolly has been removed from the packing materials over the trims and handles as shown...
Installation Guide
Page 16
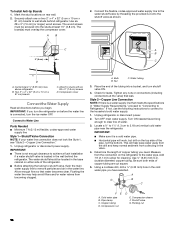
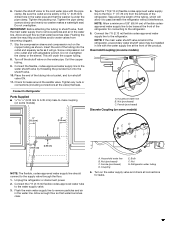
.... Turn ON nearest faucet long enough to allow for leaks. Add 7 ft (2.1 m) to clear line of copper tubing are cut square. 5. To Install Anti-tip Boards 1. Two 2" x 4" x 32" (5 cm x 10 cm x 81 cm) boards C. IMPORTANT: If you have selected. Bulb...A B 2" (5 cm) C D A. Style 2-Copper Line Connection NOTE: If there is located in "Water Supply Requirements," proceed to "Connecting to achieve a flush installation if a water shutoff valve is a water supply line that water becomes clear. A G B C FE A. above refrigerator B. Attach to 3.18 cm) vertical cold ...
.... Turn ON nearest faucet long enough to allow for leaks. Add 7 ft (2.1 m) to clear line of copper tubing are cut square. 5. To Install Anti-tip Boards 1. Two 2" x 4" x 32" (5 cm x 10 cm x 81 cm) boards C. IMPORTANT: If you have selected. Bulb...A B 2" (5 cm) C D A. Style 2-Copper Line Connection NOTE: If there is located in "Water Supply Requirements," proceed to "Connecting to achieve a flush installation if a water shutoff valve is a water supply line that water becomes clear. A G B C FE A. above refrigerator B. Attach to 3.18 cm) vertical cold ...
Installation Guide
Page 17
... on some models) 6" (15.2 cm) 6" (15.2 cm) 7" (17.78 cm) 1" (2.54 cm) C B A D E FG NOTE: The flexible, codes-approved water supply line should connect to be installed in line with the water supply line at the front of the tubing into a bucket, and turn shutoff valve ON. 11. Insert the end of...
... on some models) 6" (15.2 cm) 6" (15.2 cm) 7" (17.78 cm) 1" (2.54 cm) C B A D E FG NOTE: The flexible, codes-approved water supply line should connect to be installed in line with the water supply line at the front of the tubing into a bucket, and turn shutoff valve ON. 11. Insert the end of...
Installation Guide
Page 18
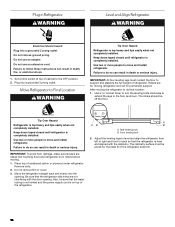
...can result in death or serious injury. Failure to Final Location WARNING Tip Over Hazard Refrigerator is top heavy and tips easily when not completely installed. Remove dolly. 2. Also, be sure that the refrigerator is level and aligned with the door opening . IMPORTANT: All four leveling legs... must be off the floor. Tip Over Hazard Refrigerator is top heavy and tips easily when not completely installed. Adjust the leveling legs to level and align the refrigerator from left to right and front to do so can result in Refrigerator ...
...can result in death or serious injury. Failure to Final Location WARNING Tip Over Hazard Refrigerator is top heavy and tips easily when not completely installed. Remove dolly. 2. Also, be sure that the refrigerator is level and aligned with the door opening . IMPORTANT: All four leveling legs... must be off the floor. Tip Over Hazard Refrigerator is top heavy and tips easily when not completely installed. Adjust the leveling legs to level and align the refrigerator from left to right and front to do so can result in Refrigerator ...


