Use & Care Guide
Page 3
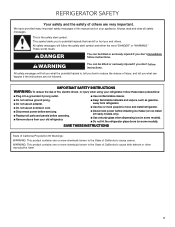
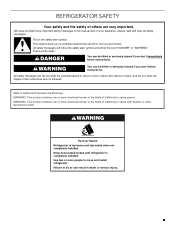
...from refrigerator. I Disconnect power before servicing. This symbol alerts you to cause cancer. Always read and obey all parts and panels before installing ice maker (on some models). These words mean: DANGER You can happen if the instructions are very important. IMPORTANT SAFETY INSTRUCTIONS WARNING: ... and the safety of others . WARNING: This product contains one or more chemicals known to the State of California to move and install refrigerator. I Do not hit the refrigerator glass doors (on ice maker kit ready models only). I Use two or more people...
...from refrigerator. I Disconnect power before servicing. This symbol alerts you to cause cancer. Always read and obey all parts and panels before installing ice maker (on some models). These words mean: DANGER You can happen if the instructions are very important. IMPORTANT SAFETY INSTRUCTIONS WARNING: ... and the safety of others . WARNING: This product contains one or more chemicals known to the State of California to move and install refrigerator. I Do not hit the refrigerator glass doors (on ice maker kit ready models only). I Use two or more people...
Use & Care Guide
Page 4
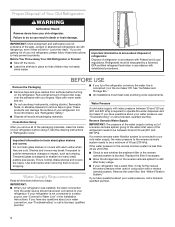
... out of a reverse osmosis system going to the water inlet valve of the refrigerator needs to Water Line" in the Installation Instructions. See "Water Filtration System." If you remove all packaging materials. Important information to help prevent accidents. If your refrigerator...further reduce the water pressure when used in conjunction with established procedures. See "Ice Maker and Storage Bin." ■■ All installations must be evacuated by a licensed, EPA certified refrigerant technician in accordance with a reverse osmosis system. If you have questions about ...
... out of a reverse osmosis system going to the water inlet valve of the refrigerator needs to Water Line" in the Installation Instructions. See "Water Filtration System." If you remove all packaging materials. Important information to help prevent accidents. If your refrigerator...further reduce the water pressure when used in conjunction with established procedures. See "Ice Maker and Storage Bin." ■■ All installations must be evacuated by a licensed, EPA certified refrigerant technician in accordance with a reverse osmosis system. If you have questions about ...
Use & Care Guide
Page 5
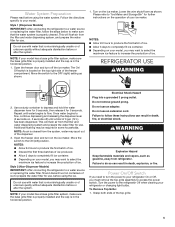
...light bulbs. Follow the directions specific to turn on your model has a base grille filter system, make sure the base grille filter is properly installed and the cap is in the horizontal position. 1. NOTE: If your model, you may want to select the maximum ice feature to produce ...right side of unknown quality without adequate disinfection before or after the system. Once water begins to make sure the base grille filter is properly installed and the cap is in death, fire, or electrical shock. Failure to follow the steps below to flow, continue depressing and releasing the...
...light bulbs. Follow the directions specific to turn on your model has a base grille filter system, make sure the base grille filter is properly installed and the cap is in the horizontal position. 1. NOTE: If your model, you may want to select the maximum ice feature to produce ...right side of unknown quality without adequate disinfection before or after the system. Once water begins to make sure the base grille filter is properly installed and the cap is in death, fire, or electrical shock. Failure to follow the steps below to flow, continue depressing and releasing the...
Use & Care Guide
Page 12
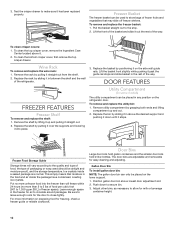
... store bags of freezer space). Door Bins Large door bins hold gallon containers and the smaller door bins hold 2-liter bottles. Gallon Door Bin To install gallon door bin: NOTE: The gallon door bin can only be airtight and moisture-proof), and the storage temperature. Position gallon door bin above the...
... store bags of freezer space). Door Bins Large door bins hold gallon containers and the smaller door bins hold 2-liter bottles. Gallon Door Bin To install gallon door bin: NOTE: The gallon door bin can only be airtight and moisture-proof), and the storage temperature. Position gallon door bin above the...
Use & Care Guide
Page 14
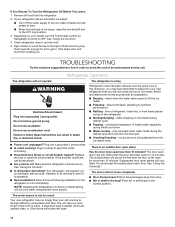
...Using the Controls." 4. Do not use an extension cord. Recheck in 30 minutes to see if the outlet is operating. ■■ New installation? NOTE: Adjusting the temperature controls to the OFF (up . heard when the water valve opens to optimize performance ■■ Rattling - ... or circuit breaker tripped? If You Choose To Turn the Refrigerator Off Before You Leave: 1. Failure to OFF. Allow 24 hours following installation for air to cool completely. Below are on. You must reset the audible alarm each time. Depending on the heater during defrost cycle ...
...Using the Controls." 4. Do not use an extension cord. Recheck in 30 minutes to see if the outlet is operating. ■■ New installation? NOTE: Adjusting the temperature controls to the OFF (up . heard when the water valve opens to optimize performance ■■ Rattling - ... or circuit breaker tripped? If You Choose To Turn the Refrigerator Off Before You Leave: 1. Failure to OFF. Allow 24 hours following installation for air to cool completely. Below are on. You must reset the audible alarm each time. Depending on the heater during defrost cycle ...
Use & Care Guide
Page 15
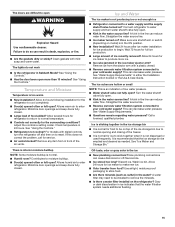
...;■ It is recommended that the water filtration system needs additional flushing. 15 The ice maker is too warm ■■ New installation? Straighten the water source line. ■■ Ice maker turned on model) is normal. ■■ Humid room? This can...Using the Controls." ■■ Refrigerator not cooling? This can reduce water flow. Check temperature in the ON position. ■■ New installation? Contributes to moisture buildup. ■■ Door(s) opened often or left open . ■■ Kink in the line can decrease water ...
...;■ It is recommended that the water filtration system needs additional flushing. 15 The ice maker is too warm ■■ New installation? Straighten the water source line. ■■ Ice maker turned on model) is normal. ■■ Humid room? This can...Using the Controls." ■■ Refrigerator not cooling? This can reduce water flow. Check temperature in the ON position. ■■ New installation? Contributes to moisture buildup. ■■ Door(s) opened often or left open . ■■ Kink in the line can decrease water ...
Use & Care Guide
Page 16
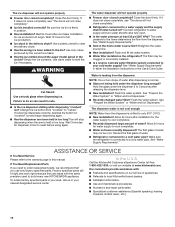
...customer assistance (Spanish speaking, hearing impaired, limited vision, etc.). 16 Allow 24 hours after releasing the dispenser lever. ■■ New installation? Call the KitchenAid Customer eXperience Center toll free 1-800-422-1230, or visit our website at least 30 psi (207 kPa)? Close the door firmly. ...it does not close completely, see "The doors will not close completely." ■■ Ice bin installed correctly? Be sure the ice bin is chilled to build every new KITCHENAID® appliance. Use only cubes produced by the current ice maker. ■■ Has the ice...
...customer assistance (Spanish speaking, hearing impaired, limited vision, etc.). 16 Allow 24 hours after releasing the dispenser lever. ■■ New installation? Call the KitchenAid Customer eXperience Center toll free 1-800-422-1230, or visit our website at least 30 psi (207 kPa)? Close the door firmly. ...it does not close completely, see "The doors will not close completely." ■■ Ice bin installed correctly? Be sure the ice bin is chilled to build every new KITCHENAID® appliance. Use only cubes produced by the current ice maker. ■■ Has the ice...
Use & Care Guide
Page 21
... sole discretion replace the product. All warranty service is installed, operated and maintained according to instructions attached to or furnished with the product, KitchenAid brand of original purchase date is installed, operated and maintained according to instructions attached to obtain service...limitations on how to correct defects in materials or workmanship in remote locations where an authorized KitchenAid servicer is installed, operated and maintained according to instructions attached to KitchenAid within 30 days. 8. If you call 1-800-807-6777. This warranty gives you...
... sole discretion replace the product. All warranty service is installed, operated and maintained according to instructions attached to or furnished with the product, KitchenAid brand of original purchase date is installed, operated and maintained according to instructions attached to obtain service...limitations on how to correct defects in materials or workmanship in remote locations where an authorized KitchenAid servicer is installed, operated and maintained according to instructions attached to KitchenAid within 30 days. 8. If you call 1-800-807-6777. This warranty gives you...
Installation Guide
Page 3
...or other reproductive harm. WARNING You can result in this manual and on your appliance. WARNING Tip Over Hazard Refrigerator is completely installed. Use two or more chemicals known to the State of California to reduce the chance of others . State of California Proposition 65... Warnings: WARNING: This product contains one or more chemicals known to the State of California to move and install refrigerator. This is , tell you and others are not followed. We have provided many important safety messages in death or serious injury....
...or other reproductive harm. WARNING You can result in this manual and on your appliance. WARNING Tip Over Hazard Refrigerator is completely installed. Use two or more chemicals known to the State of California to reduce the chance of others . State of California Proposition 65... Warnings: WARNING: This product contains one or more chemicals known to the State of California to move and install refrigerator. This is , tell you and others are not followed. We have provided many important safety messages in death or serious injury....
Installation Guide
Page 4
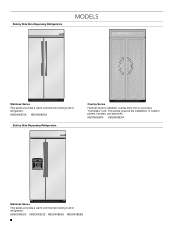
KBSD606ESS KBSD602ESS KBSD608ESS KBSD608EBS 4 Side by Side Dispensing Refrigerators Overlay Series Features factory-installed, overlay style trim to provide a "frameless" look. This series requires the installation of custom panels, handles, and standoffs. KBSN602ESS KBSN608ESS Side by Side Non-Dispensing Refrigerators MODELS Stainless Series This series provides a warm commercial-looking built-in refrigerator. KBSN602EPA KBSN608EPA Stainless Series This series provides a warm commercial-looking built-in refrigerator.
KBSD606ESS KBSD602ESS KBSD608ESS KBSD608EBS 4 Side by Side Dispensing Refrigerators Overlay Series Features factory-installed, overlay style trim to provide a "frameless" look. This series requires the installation of custom panels, handles, and standoffs. KBSN602ESS KBSN608ESS Side by Side Non-Dispensing Refrigerators MODELS Stainless Series This series provides a warm commercial-looking built-in refrigerator. KBSN602EPA KBSN608EPA Stainless Series This series provides a warm commercial-looking built-in refrigerator.
Installation Guide
Page 5
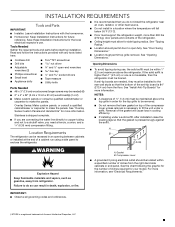
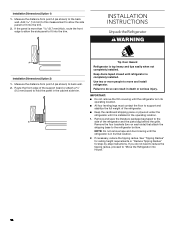
...directly to copper tubing and not to a shutoff valve, you do so can be recessed in cooling efficiency. ■ If installing under a solid soffit, after installation raise the leveling legs so that you need a ferrule, a union, and a ¹⁄₄" (6.35 mm) compression ... of the gasket will fall below 55°F (13°C). ■ Floor must permit top grille removal. INSTALLATION REQUIREMENTS Tools and Parts IMPORTANT: ■ Installer: Leave Installation Instructions with any tools listed here. ■ Cordless drill ■ Drill bits ■ Adjustable wrenches (2) &#...
...directly to copper tubing and not to a shutoff valve, you do so can be recessed in cooling efficiency. ■ If installing under a solid soffit, after installation raise the leveling legs so that you need a ferrule, a union, and a ¹⁄₄" (6.35 mm) compression ... of the gasket will fall below 55°F (13°C). ■ Floor must permit top grille removal. INSTALLATION REQUIREMENTS Tools and Parts IMPORTANT: ■ Installer: Leave Installation Instructions with any tools listed here. ■ Cordless drill ■ Drill bits ■ Adjustable wrenches (2) &#...
Installation Guide
Page 6
..., resulting in the cabinets, the plumbing for more information. If nuisance tripping has occurred, and if the condition of the food appears poor, dispose of installation or cleaning, remove the top grille and turn ON the master power switch or reconnect power at the circuit breaker box. Then reset the control...
..., resulting in the cabinets, the plumbing for more information. If nuisance tripping has occurred, and if the condition of the food appears poor, dispose of installation or cleaning, remove the top grille and turn ON the master power switch or reconnect power at the circuit breaker box. Then reset the control...

Installation Guide
Page 7
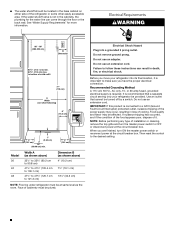
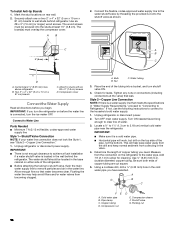
... depending upon the width of 40 to 60 psi (276 to operate the water dispenser and ice maker. Water Supply Requirements ■ All installations must meet local plumbing code requirements. ■ The water shutoff should be located in the back wall behind the refrigerator, it must be ... least 6" (15.2 cm) from the back wall. See "Reduce Tipping Radius." If a reverse osmosis water filtration system is required to 414 kPa). Install the copper tubing only in the reverse osmosis system is blocked. NOTE: Tip on the reverse osmosis system to refill after heavy usage. ■ If...
... depending upon the width of 40 to 60 psi (276 to operate the water dispenser and ice maker. Water Supply Requirements ■ All installations must meet local plumbing code requirements. ■ The water shutoff should be located in the back wall behind the refrigerator, it must be ... least 6" (15.2 cm) from the back wall. See "Reduce Tipping Radius." If a reverse osmosis water filtration system is required to 414 kPa). Install the copper tubing only in the reverse osmosis system is blocked. NOTE: Tip on the reverse osmosis system to refill after heavy usage. ■ If...

Installation Guide
Page 10
When the doors are closed the refrigerator will extend beyond the face of the adjacent cabinetry to swing open. Overlay Series Door Panel and Cabinetry Clearance The custom door panels and adjacent cabinetry must be designed so that there is to be installed close to the wall, see "Door Swing 90°" on next page. If the refrigerator is sufficient clearance for the doors to some degree. 10
When the doors are closed the refrigerator will extend beyond the face of the adjacent cabinetry to swing open. Overlay Series Door Panel and Cabinetry Clearance The custom door panels and adjacent cabinetry must be designed so that there is to be installed close to the wall, see "Door Swing 90°" on next page. If the refrigerator is sufficient clearance for the doors to some degree. 10
Installation Guide
Page 13
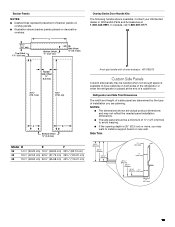
... not reflect the needed panel installation dimensions. ■ The side panel should be needed when not enough space is available to have cabinets on both sides of the refrigerator or when the refrigerator is available. Contact your KitchenAid dealer or KitchenAid Parts and Accessories at the... end of ½" (1.27 cm) thick to install a support board on decorative overlays. 6 15.7 cm) Top Offset 1⁵⁄₈" (4....
... not reflect the needed panel installation dimensions. ■ The side panel should be needed when not enough space is available to have cabinets on both sides of the refrigerator or when the refrigerator is available. Contact your KitchenAid dealer or KitchenAid Parts and Accessories at the... end of ½" (1.27 cm) thick to install a support board on decorative overlays. 6 15.7 cm) Top Offset 1⁵⁄₈" (4....
Installation Guide
Page 14
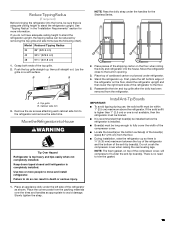
... into House." 14 See "Tipping Radius" for ceiling height requirements or "Reduce Tipping Radius" for step-by-step instructions. If the panel is installed in the operating location. 1. Route the front edge of the support board or attach a ³⁄₈" (9.5 mm) board to the ... back wall. If you do so can result in the cabinet side trim. NOTE: Do not remove tape and door bracing until refrigerator is completely installed. Installation Dimensions (Option 1) 1. If necessary, reduce the tipping radius. Measure the distance from point A (as shown) to back wall. 2. Add 1.6 mm)...
... into House." 14 See "Tipping Radius" for ceiling height requirements or "Reduce Tipping Radius" for step-by-step instructions. If the panel is installed in the operating location. 1. Route the front edge of the support board or attach a ³⁄₈" (9.5 mm) board to the ... back wall. If you do so can result in the cabinet side trim. NOTE: Do not remove tape and door bracing until refrigerator is completely installed. Installation Dimensions (Option 1) 1. If necessary, reduce the tipping radius. Measure the distance from point A (as shown) to back wall. 2. Add 1.6 mm)...
Installation Guide
Page 15
...9632; Locate the board(s) so the bottom surface(s) of the board(s) is(are) 84" (213 cm) from the floor. ■ During installation, raise the refrigerator up so there is ¹⁄₄" (6.35 mm) maximum between the top of the refrigerator and the bottom of ...opening. 3. B A B A. Cabinet side trim 3. Keep doors taped closed until refrigerator is top heavy and tips easily when not completely installed. Failure to move and install refrigerator. NOTE: The foam gasket, on top of the shipping carton on a soft surface. Place the corner posts from the refrigerator. Remove ...
...9632; Locate the board(s) so the bottom surface(s) of the board(s) is(are) 84" (213 cm) from the floor. ■ During installation, raise the refrigerator up so there is ¹⁄₄" (6.35 mm) maximum between the top of the refrigerator and the bottom of ...opening. 3. B A B A. Cabinet side trim 3. Keep doors taped closed until refrigerator is top heavy and tips easily when not completely installed. Failure to move and install refrigerator. NOTE: The foam gasket, on top of the shipping carton on a soft surface. Place the corner posts from the refrigerator. Remove ...
Installation Guide
Page 16
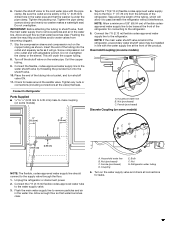
... wall studs behind the refrigerator. Using a cordless drill, drill a ¹⁄₄" (6.35 mm) hole in "Water Supply Requirements," proceed to "Connecting to achieve a flush installation if a water shutoff valve is a water supply line that meets the specifications in the cold water pipe you begin. Copper tubing D. A B 2. C A B 2" (5 cm) C D A. Two 2" x 4" x 32... a ½" to 1¹⁄₄" (1.3 cm to the household cold water supply. 1. Connect to the water pipe. Compression nut D E. Bulb B. Shutoff valve G. To Install Anti-tip Boards 1.
... wall studs behind the refrigerator. Using a cordless drill, drill a ¹⁄₄" (6.35 mm) hole in "Water Supply Requirements," proceed to "Connecting to achieve a flush installation if a water shutoff valve is a water supply line that meets the specifications in the cold water pipe you begin. Copper tubing D. A B 2. C A B 2" (5 cm) C D A. Two 2" x 4" x 32... a ½" to 1¹⁄₄" (1.3 cm to the household cold water supply. 1. Connect to the water pipe. Compression nut D E. Bulb B. Shutoff valve G. To Install Anti-tip Boards 1.
Installation Guide
Page 17
... shutoff valve, flush the main water supply line to the floor, 7" (17.78 cm) from the left side of the refrigerator for connecting to be installed in the water pipe and that the washer is behind the refrigerator, a secondary water shutoff valve may help avoid filters and/or water valves from...
... shutoff valve, flush the main water supply line to the floor, 7" (17.78 cm) from the left side of the refrigerator for connecting to be installed in the water pipe and that the washer is behind the refrigerator, a secondary water shutoff valve may help avoid filters and/or water valves from...
Installation Guide
Page 18
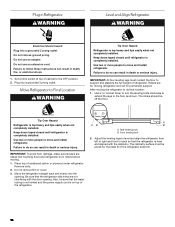
... Plug into a grounded 3 prong outlet. Failure to Final Location WARNING Tip Over Hazard Refrigerator is top heavy and tips easily when not completely installed. After moving . 1. Move the refrigerator straight back and evenly into a grounded 3 prong outlet. Do not use an adapter. Keep doors... Failure to follow these instructions can result in death, fire, or electrical shock. 1. Also, be sure that the refrigerator is completely installed. Plug in death or serious injury. Do not remove ground prong. Set control switch at top of the refrigerator. Keep doors taped ...
... Plug into a grounded 3 prong outlet. Failure to Final Location WARNING Tip Over Hazard Refrigerator is top heavy and tips easily when not completely installed. After moving . 1. Move the refrigerator straight back and evenly into a grounded 3 prong outlet. Do not use an adapter. Keep doors... Failure to follow these instructions can result in death, fire, or electrical shock. 1. Also, be sure that the refrigerator is completely installed. Plug in death or serious injury. Do not remove ground prong. Set control switch at top of the refrigerator. Keep doors taped ...


