
Use & Care Guide
Page 1
...or hurt you still need your model and serial number located on your appliance. ...INSTALLATION INSTRUCTIONS 2 INSTRUCTIONS D'INSTALLATION 21 REFRIGERATOR USE 10 UTILISATION DU RÉFRIGÉRATEUR 31 REFRIGERATOR CARE 14 ENTRETIEN DU RÉFRIGÉRATEUR 35 TROUBLESHOOTING 15 DÉPANNAGE 36 WATER FILTER CERTIFICATIONS 17 FEUILLES DE DONNÉES SUR LE PRODUIT 39 PRODUCT DATA SHEETS 18 GARANTIE 40 WARRANTY 19 REFRIGERATOR SAFETY Your safety and the safety of the refrigerator interior. Para obtener acceso a "Instrucciones para el usuario del refrigerador...
...or hurt you still need your model and serial number located on your appliance. ...INSTALLATION INSTRUCTIONS 2 INSTRUCTIONS D'INSTALLATION 21 REFRIGERATOR USE 10 UTILISATION DU RÉFRIGÉRATEUR 31 REFRIGERATOR CARE 14 ENTRETIEN DU RÉFRIGÉRATEUR 35 TROUBLESHOOTING 15 DÉPANNAGE 36 WATER FILTER CERTIFICATIONS 17 FEUILLES DE DONNÉES SUR LE PRODUIT 39 PRODUCT DATA SHEETS 18 GARANTIE 40 WARRANTY 19 REFRIGERATOR SAFETY Your safety and the safety of the refrigerator interior. Para obtener acceso a "Instrucciones para el usuario del refrigerador...

Use & Care Guide
Page 2
... and install refrigerator. ■ Disconnect power before installing ice maker (on the refrigerator. When moving it. Wipe with warm water when they will sit for cleaning or service, be sure to avoid impact from your refrigerator before turning on ice maker kit ready models only). See the cleaning instructions in back or other injury. IMPORTANT SAFETY INSTRUCTIONS WARNING:To reduce the risk of fire, electric shock, or injury to persons when using...
... and install refrigerator. ■ Disconnect power before installing ice maker (on the refrigerator. When moving it. Wipe with warm water when they will sit for cleaning or service, be sure to avoid impact from your refrigerator before turning on ice maker kit ready models only). See the cleaning instructions in back or other injury. IMPORTANT SAFETY INSTRUCTIONS WARNING:To reduce the risk of fire, electric shock, or injury to persons when using...

Use & Care Guide
Page 3
... listed here. Water Pressure A cold water supply with any type of installation, cleaning, or removing a light bulb, turn the control (Thermostat, Refrigerator or Freezer Control depending on the hinge side (some models require more easily. ■ Use copper tubing and check for the door to a fixed wall, leave 2¹⁄₂" (6.3 cm) minimum on the model) OFF and then disconnect the refrigerator from refrigerator. If you move your refrigerator has an ice maker, allow for leaks. Read and follow these instructions...
... listed here. Water Pressure A cold water supply with any type of installation, cleaning, or removing a light bulb, turn the control (Thermostat, Refrigerator or Freezer Control depending on the hinge side (some models require more easily. ■ Use copper tubing and check for the door to a fixed wall, leave 2¹⁄₂" (6.3 cm) minimum on the model) OFF and then disconnect the refrigerator from refrigerator. If you move your refrigerator has an ice maker, allow for leaks. Read and follow these instructions...

Use & Care Guide
Page 4
... not overtighten. 8. Turn on water supply to Refrigerator Depending on your model, the water line may further reduce the water pressure when used in the water pipe and that the tubing feeds straight into the outlet end squarely as far as shown. Remove the plastic cap from water valve inlet port. Packing nut 6. Connect to refrigerator and check for your refrigerator has a water filter, it will work, but the following...
... not overtighten. 8. Turn on water supply to Refrigerator Depending on your model, the water line may further reduce the water pressure when used in the water pipe and that the tubing feeds straight into the outlet end squarely as far as shown. Remove the plastic cap from water valve inlet port. Packing nut 6. Connect to refrigerator and check for your refrigerator has a water filter, it will work, but the following...

Use & Care Guide
Page 5
... reverse the door swing. To replace the handle, reverse the directions. NOTE: Provide additional support for reattaching handles. 3. See Graphic 1-1. 2. Replace Handles (Panel Series) 1. Make sure the bottom door cap is installed. Refrigerator Door and Drawer Graphics are working. 3. Using a Allen wrench, loosen the two set screws located on copper tubing. Make sure you are included later in place while you keep it locks. 3. Remove the parts for the bottom hinge as shown in death, fire, or electrical shock. 1. Using...
... reverse the door swing. To replace the handle, reverse the directions. NOTE: Provide additional support for reattaching handles. 3. See Graphic 1-1. 2. Replace Handles (Panel Series) 1. Make sure the bottom door cap is installed. Refrigerator Door and Drawer Graphics are working. 3. Using a Allen wrench, loosen the two set screws located on copper tubing. Make sure you are included later in place while you keep it locks. 3. Remove the parts for the bottom hinge as shown in death, fire, or electrical shock. 1. Using...

Use & Care Guide
Page 6
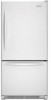
... drawer brackets toward the interior of door. See Drawer Front Replacement graphic. 3. Final Steps 1. Move to reverse the door swing. 1. See Graphic 2. 3. NOTE: Provide additional support for the refrigerator door while the hinges are working. 2. Remove Drawer Front 1. See Drawer Front Removal graphic. Replace Drawer Front 1. Drive two set screws in Bottom Hinge graphic. See Graphic 3. 6. Slide the trim down until the hinges and freezer compartment drawer are in death, fire, or electrical shock. 2. Replace the parts...
... drawer brackets toward the interior of door. See Drawer Front Replacement graphic. 3. Final Steps 1. Move to reverse the door swing. 1. See Graphic 2. 3. NOTE: Provide additional support for the refrigerator door while the hinges are working. 2. Remove Drawer Front 1. See Drawer Front Removal graphic. Replace Drawer Front 1. Drive two set screws in Bottom Hinge graphic. See Graphic 3. 6. Slide the trim down until the hinges and freezer compartment drawer are in death, fire, or electrical shock. 2. Replace the parts...
Use & Care Guide
Page 7
Center Hinge C. Hinge Screws Door Swing Reversal (optional) 2 1-2 A A. Hinge Screws A A A A. 3/32" Set Screw Front View Side View 3 AB A. Loosen 4 Door Bracket Screws 7 Shim (on some models) B. Door Stop Screws B. Top Hinge Cover C. 5/16" Hex-Head Hinge Screws D. Top Hinge Bottom Hinge A B C A. Door Stop 5 4 Drawer Front Removal A A. 3/32" Set Screw Door Handle Seal Screw Front Drawer Front Replacement A A. Architect® Series Door Removal & Replacement Top Hinge A B C D A. Cabinet Hinge Hole Plugs 1-1 A A. Hinge Cover Screw B.
Center Hinge C. Hinge Screws Door Swing Reversal (optional) 2 1-2 A A. Hinge Screws A A A A. 3/32" Set Screw Front View Side View 3 AB A. Loosen 4 Door Bracket Screws 7 Shim (on some models) B. Door Stop Screws B. Top Hinge Cover C. 5/16" Hex-Head Hinge Screws D. Top Hinge Bottom Hinge A B C A. Door Stop 5 4 Drawer Front Removal A A. 3/32" Set Screw Door Handle Seal Screw Front Drawer Front Replacement A A. Architect® Series Door Removal & Replacement Top Hinge A B C D A. Cabinet Hinge Hole Plugs 1-1 A A. Hinge Cover Screw B.

Use & Care Guide
Page 9
... scratching. A 2. Style 1 - Replace the Door Panel 1. Grasp the grille firmly and pull it easier to a new home or installing custom-made decorator panels. Replace the base grille. It may take several turns of the leveling screw to make sure that side of refrigerator door handle upward with a rubber mallet. ■ The handle will need to remove the factory-installed trim kit, such as to the rear by bottom door cap and...
... scratching. A 2. Style 1 - Replace the Door Panel 1. Grasp the grille firmly and pull it easier to a new home or installing custom-made decorator panels. Replace the base grille. It may take several turns of the leveling screw to make sure that side of refrigerator door handle upward with a rubber mallet. ■ The handle will need to remove the factory-installed trim kit, such as to the rear by bottom door cap and...

Use & Care Guide
Page 10
... handle screws. 2. Door panel Dimensions for wood panel inserts. If you like and when ice cream is firm. ■ If the temperature is as cold as ammonia. Care of panel and handle. Flat wood panels less than recommended setting will need to remove the freezer drawer to remove or replace the decorator panel. 1. The controls are not blocked before the refrigerator has cooled completely, your food may have Electronic Controls or Digital Controls. Replace the decorator panels...
... handle screws. 2. Door panel Dimensions for wood panel inserts. If you like and when ice cream is firm. ■ If the temperature is as cold as ammonia. Care of panel and handle. Flat wood panels less than recommended setting will need to remove the freezer drawer to remove or replace the decorator panel. 1. The controls are not blocked before the refrigerator has cooled completely, your food may have Electronic Controls or Digital Controls. Replace the decorator panels...

Use & Care Guide
Page 11
... current temperature set point is displayed. Press the up or down arrow touch pad until the desired temperature set point. When you need to adjust the temperature. CONDITION/REASON: REFRIGERATOR too warm FREEZER too warm/too little ice REFRIGERATOR too cold FREEZER too cold ADJUSTMENT: Adjust REFRIGERATOR Control 1° lower Adjust FREEZER Control 1° lower Adjust REFRIGERATOR Control 1° higher Adjust FREEZER Control 1° higher Additional Digital Control Center Features Max Cool The max cool feature assists with periods of high refrigerator use the settings listed...
... current temperature set point is displayed. Press the up or down arrow touch pad until the desired temperature set point. When you need to adjust the temperature. CONDITION/REASON: REFRIGERATOR too warm FREEZER too warm/too little ice REFRIGERATOR too cold FREEZER too cold ADJUSTMENT: Adjust REFRIGERATOR Control 1° lower Adjust FREEZER Control 1° lower Adjust REFRIGERATOR Control 1° higher Adjust FREEZER Control 1° higher Additional Digital Control Center Features Max Cool The max cool feature assists with periods of high refrigerator use the settings listed...

Use & Care Guide
Page 12
... allows you to stop the audible alarm and alternating temperature displays. Holiday Mode In Holiday Mode, the freezer will continue to flash until the indicator light is closed ) for 3 seconds. NOTE: The refrigerator door may be opened within 1 hour of setting Holiday Mode without turning off the sound of heavy ice use by shutting the refrigerator compartment door. Water Filter Status Light and Filter Reset (on some models) See "Water Filtration System" Digital Control User Preferences The control center allows you...
... allows you to stop the audible alarm and alternating temperature displays. Holiday Mode In Holiday Mode, the freezer will continue to flash until the indicator light is closed ) for 3 seconds. NOTE: The refrigerator door may be opened within 1 hour of setting Holiday Mode without turning off the sound of heavy ice use by shutting the refrigerator compartment door. Water Filter Status Light and Filter Reset (on some models) See "Water Filtration System" Digital Control User Preferences The control center allows you...

Use & Care Guide
Page 13
... stop dispensing. Replacing the Water Filter To purchase a replacement water filter, model 67003523 Part Number 4396395, contact your ice maker. Turn the filter clockwise until water begins to flow. Snap the filter cover closed. If this option is located in some models) IMPORTANT: ■ After connecting the refrigerator to a water source, flush the water system. NOTE: Your ice maker has an automatic shutoff. See "Using the Controls." Wait 24 hours between adjustments. Water Dispenser (on disinfected waters that is almost time to change...
... stop dispensing. Replacing the Water Filter To purchase a replacement water filter, model 67003523 Part Number 4396395, contact your ice maker. Turn the filter clockwise until water begins to flow. Snap the filter cover closed. If this option is located in some models) IMPORTANT: ■ After connecting the refrigerator to a water source, flush the water system. NOTE: Your ice maker has an automatic shutoff. See "Using the Controls." Wait 24 hours between adjustments. Water Dispenser (on disinfected waters that is almost time to change...
Use & Care Guide
Page 14
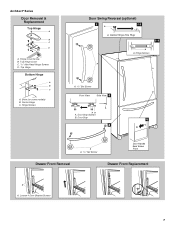
... pieces, dispenser covers or door gaskets. Plug in the home, the condenser should be cleaned every 2 to 3 months to eliminate odors. Be sure to replace the bulb with a sponge and mild detergent in warm water. ■ To keep your refrigerator. Changing the Refrigerator Light Bulb 1. Unplug the refrigerator or disconnect power. 2. Slide the shield toward the back of the same size, shape, and wattage (no need to remove the upper freezer shelf or...
... pieces, dispenser covers or door gaskets. Plug in the home, the condenser should be cleaned every 2 to 3 months to eliminate odors. Be sure to replace the bulb with a sponge and mild detergent in warm water. ■ To keep your refrigerator. Changing the Refrigerator Light Bulb 1. Unplug the refrigerator or disconnect power. 2. Slide the shield toward the back of the same size, shape, and wattage (no need to remove the upper freezer shelf or...

Use & Care Guide
Page 15
... cool-down ■ Water running - Do not remove ground prong. Do not use an extension cord. fans/compressor adjusting to fill the ice maker ■ Pulsating - occurs as ice is added, doors are difficult to open WARNING The motor seems to run too much Your new refrigerator may hear intermittent noises from your new refrigerator that you did not notice from the ice maker mold. ■ Power cord unplugged? See "Using the Controls." ■ New installation? The doors...
... cool-down ■ Water running - Do not remove ground prong. Do not use an extension cord. fans/compressor adjusting to fill the ice maker ■ Pulsating - occurs as ice is added, doors are difficult to open WARNING The motor seems to run too much Your new refrigerator may hear intermittent noises from your new refrigerator that you did not notice from the ice maker mold. ■ Power cord unplugged? See "Using the Controls." ■ New installation? The doors...

Use & Care Guide
Page 16
... Controls." Contributes to remove the minerals. ■ Water filter installed on model) is too warm ■ New installation? If ice quality improves, then the filter may need to be installed to moisture buildup. ■ Door(s) opened often or left open . ■ Kink in 24 hours. Wash ice bin. Use airtight, moisture proof packaging to normal temperature. ■ Controls set correctly for ice maker to begin. Replace water filter when indicated. See "Water Filtration System." Allow several hours for the refrigerator to make new ice...
... Controls." Contributes to remove the minerals. ■ Water filter installed on model) is too warm ■ New installation? If ice quality improves, then the filter may need to be installed to moisture buildup. ■ Door(s) opened often or left open . ■ Kink in 24 hours. Wash ice bin. Use airtight, moisture proof packaging to normal temperature. ■ Controls set correctly for ice maker to begin. Replace water filter when indicated. See "Water Filtration System." Allow several hours for the refrigerator to make new ice...

Use & Care Guide
Page 17
... the first glass of water may be cool. Make sure the refrigerator is connected to 50°F (10°C). ■ New installation? Remove filter and operate dispenser. Water is leaking from the dispenser is normal. ■ Glass not being held under the dispenser 2 to 3 seconds after installation for water supply to your cold water supply? See "Water Dispenser." ■ Water on the refrigerator? See "Water Supply Requirements." Flush the water system. See "Refrigerator Doors." Water from the dispenser is warm NOTE: Water from the dispenser system NOTE...
... the first glass of water may be cool. Make sure the refrigerator is connected to 50°F (10°C). ■ New installation? Remove filter and operate dispenser. Water is leaking from the dispenser is normal. ■ Glass not being held under the dispenser 2 to 3 seconds after installation for water supply to your cold water supply? See "Water Dispenser." ■ Water on the refrigerator? See "Water Supply Requirements." Flush the water system. See "Refrigerator Doors." Water from the dispenser is warm NOTE: Water from the dispenser system NOTE...
Use & Care Guide
Page 18
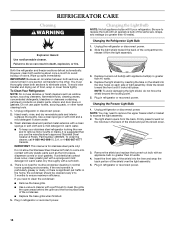
... filterable cysts. ■ Refer to the "Water Filtration System" section for the Manufacturer's name and telephone number. *Class I particle size: >0.5 to the "Warranty" section for the Manufacturer's limited warranty. Prices are subject to change ...filter's rated life is microbiologically unsafe or of $49.99 U.S.A./$65.95 Canada. PRODUCT DATA SHEETS Interior Water Filtration System Model 67003523-750 Capacity 750 Gallons (2839 Liters) System tested and certified by NSF International against NSF/ANSI Standard 53 for the reduction of the substances listed below. order Part Number...
... filterable cysts. ■ Refer to the "Water Filtration System" section for the Manufacturer's name and telephone number. *Class I particle size: >0.5 to the "Warranty" section for the Manufacturer's limited warranty. Prices are subject to change ...filter's rated life is microbiologically unsafe or of $49.99 U.S.A./$65.95 Canada. PRODUCT DATA SHEETS Interior Water Filtration System Model 67003523-750 Capacity 750 Gallons (2839 Liters) System tested and certified by NSF International against NSF/ANSI Standard 53 for the reduction of the substances listed below. order Part Number...

Use & Care Guide
Page 19
... is operated and maintained according to instructions attached to or furnished with the product, KitchenAid or KitchenAid Canada (hereafter "KitchenAid") will pay for replacement or repair of the refrigerator/freezer cavity liner (including labor costs) if the part cracks due to defective materials or workmanship. Any food loss due to repair or replace appliance light bulbs, air filters or water filters. 3. Service calls to refrigerator or freezer product failures. 6. Replacement parts or repair labor...
... is operated and maintained according to instructions attached to or furnished with the product, KitchenAid or KitchenAid Canada (hereafter "KitchenAid") will pay for replacement or repair of the refrigerator/freezer cavity liner (including labor costs) if the part cracks due to defective materials or workmanship. Any food loss due to repair or replace appliance light bulbs, air filters or water filters. 3. Service calls to refrigerator or freezer product failures. 6. Replacement parts or repair labor...

Parts Diagram
Page 2
Part No. No. CABINET PARTS For Models: KBRS22KTWH01, KBRS22KTBL01, KBRS22KTSS01 (White) (Black) (Stainless Steel) Illus. DESCRIPTION 1 Literature Parts W10137649 Use & Care Guide W10123818 Energy Tag W10168777 Tech Sheet 2 Cabinet (Not a Servicable Part) 3 Plug, Button (3) M0310729 White M0310731 Black 4 B5759649 Insulation 5 67006118 Roller Assembly 6 67003868 Foot Brake 7 67006642 Pin, Center Hinge 8 67006611 Bolt, Adjusting (Front Roller) 9 67006521 Screw 10 Cover, Hinge 67001014 White 67001012 Black 11 67006380 Screw (3) 12 67006473 Screw...
Part No. No. CABINET PARTS For Models: KBRS22KTWH01, KBRS22KTBL01, KBRS22KTSS01 (White) (Black) (Stainless Steel) Illus. DESCRIPTION 1 Literature Parts W10137649 Use & Care Guide W10123818 Energy Tag W10168777 Tech Sheet 2 Cabinet (Not a Servicable Part) 3 Plug, Button (3) M0310729 White M0310731 Black 4 B5759649 Insulation 5 67006118 Roller Assembly 6 67003868 Foot Brake 7 67006642 Pin, Center Hinge 8 67006611 Bolt, Adjusting (Front Roller) 9 67006521 Screw 10 Cover, Hinge 67001014 White 67001012 Black 11 67006380 Screw (3) 12 67006473 Screw...
Parts Diagram
Page 5
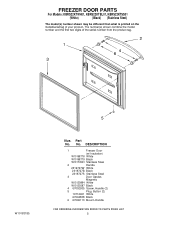
No. DESCRIPTION 1 Freezer Door (w/ Insulation) W10168778 White W10168779 Black W10170543 Stainless Steel 2 Handle 2319727W White 2319727B Black 2319727S Stainless Steel 3 Door Gasket, Magnetic W10130894 White W10130587 Black 4 67002935 Screw, Handle (2) 5 Plug, Button (2) 10712401 White 67004838 Black 6 67006113 Mount−Handle 5 Part No. FREEZER DOOR PARTS For Models: KBRS22KTWH01, KBRS22KTBL01, KBRS22KTSS01 (White) (Black) (Stainless Steel) The model(s) number shown may be different than what is printed on the W10183185 Illus.
No. DESCRIPTION 1 Freezer Door (w/ Insulation) W10168778 White W10168779 Black W10170543 Stainless Steel 2 Handle 2319727W White 2319727B Black 2319727S Stainless Steel 3 Door Gasket, Magnetic W10130894 White W10130587 Black 4 67002935 Screw, Handle (2) 5 Plug, Button (2) 10712401 White 67004838 Black 6 67006113 Mount−Handle 5 Part No. FREEZER DOOR PARTS For Models: KBRS22KTWH01, KBRS22KTBL01, KBRS22KTSS01 (White) (Black) (Stainless Steel) The model(s) number shown may be different than what is printed on the W10183185 Illus.


