Instruction Manual
Page 1
..., visite: www.kitchenaid.com. You will follow instructions. Tenga listo su número de modelo completo. Puede encontrar su número de modelo y de serie ubicada al lado derecho del interior del refrigerador. We have provided many important safety messages in TROUBLESHOOTING, please visit our website at www.kitchenaid.com for purchasing this manual and on your model and serial number located on the inside wall of...
..., visite: www.kitchenaid.com. You will follow instructions. Tenga listo su número de modelo completo. Puede encontrar su número de modelo y de serie ubicada al lado derecho del interior del refrigerador. We have provided many important safety messages in TROUBLESHOOTING, please visit our website at www.kitchenaid.com for purchasing this manual and on your model and serial number located on the inside wall of...
Instruction Manual
Page 2
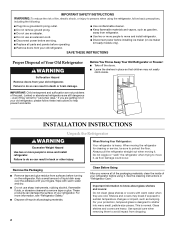
... move and install refrigerator. ■ Disconnect power before turning on ice maker kit ready models only). Failure to do so can result in death or brain damage. Before You Throw Away Your Old Refrigerator or Freezer: ■ Take off the doors. ■ Leave the shelves in "Refrigerator Care." For your old refrigerator, please follow basic precautions, including the following: ■ Plug into many small, pebble-size pieces...
... move and install refrigerator. ■ Disconnect power before turning on ice maker kit ready models only). Failure to do so can result in death or brain damage. Before You Throw Away Your Old Refrigerator or Freezer: ■ Take off the doors. ■ Leave the shelves in "Refrigerator Care." For your old refrigerator, please follow basic precautions, including the following: ■ Plug into many small, pebble-size pieces...
Instruction Manual
Page 3
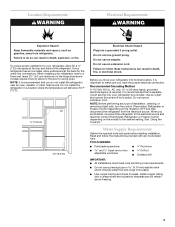
... any type of installation, cleaning, or removing a light bulb, turn the control (Thermostat, Refrigerator or Freezer Control depending on the model) to do not install the refrigerator near an oven, radiator, or other heat source. Failure to swing open. Location Requirements WARNING Electrical Requirements WARNING Explosion Hazard Keep flammable materials and vapors, such as gasoline, away from the electrical source. To ensure proper ventilation for leaks. Do not install the refrigerator in...
... any type of installation, cleaning, or removing a light bulb, turn the control (Thermostat, Refrigerator or Freezer Control depending on the model) to do not install the refrigerator near an oven, radiator, or other heat source. Failure to swing open. Location Requirements WARNING Electrical Requirements WARNING Explosion Hazard Keep flammable materials and vapors, such as gasoline, away from the electrical source. To ensure proper ventilation for leaks. Do not install the refrigerator in...
Instruction Manual
Page 4
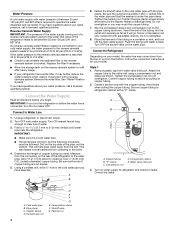
... the water line is required to operate the water dispenser and ice maker. See "Water Filtration System." Connect the Water Supply Read all directions before you turn the ice maker OFF. Find a ¹⁄₂" to 1¹⁄₄" (12.7 mm to the valve inlet using a compression nut and sleeve as shown. A B C A. Tighten the packing nut. Turn OFF the shutoff valve on your model. Follow the connection instructions for your model, the water line...
... the water line is required to operate the water dispenser and ice maker. See "Water Filtration System." Connect the Water Supply Read all directions before you turn the ice maker OFF. Find a ¹⁄₂" to 1¹⁄₄" (12.7 mm to the valve inlet using a compression nut and sleeve as shown. A B C A. Tighten the packing nut. Turn OFF the shutoff valve on your model. Follow the connection instructions for your model, the water line...
Instruction Manual
Page 5
.... Remove and Replace Handles 1. Remove Doors and Hinges WARNING Electrical Shock Hazard Disconnect power before removing doors. IMPORTANT: ■ Remove food and any leaks. Create a service loop (minimum diameter of 2 ft [61 cm]) with a second wrench turn the compression nut on water supply to refrigerator and check for reattaching the handles. 3. Insert the end of ice produced. Slide the compression nut over the sleeve and screw into the water valve inlet port. Using...
.... Remove and Replace Handles 1. Remove Doors and Hinges WARNING Electrical Shock Hazard Disconnect power before removing doors. IMPORTANT: ■ Remove food and any leaks. Create a service loop (minimum diameter of 2 ft [61 cm]) with a second wrench turn the compression nut on water supply to refrigerator and check for reattaching the handles. 3. Insert the end of ice produced. Slide the compression nut over the sleeve and screw into the water valve inlet port. Using...
Instruction Manual
Page 6
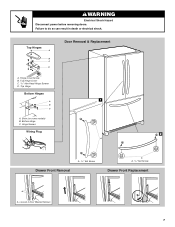
... bottom hinge pin. See Bottom Hinge graphic. Replace Doors and Hinges 1. Replace the parts for later use . Tighten all removable door parts to doors and food to hold the door in Top Hinge graphic. Graphics are working . 3. Loosen the four screws attaching the drawer glides to the hinge. 5. See Drawer Front Removal graphic. Slide the drawer glides out of the left -hand side door, disconnect the wiring plug located on the door gasket magnets to lift them free from the bottom hinge...
... bottom hinge pin. See Bottom Hinge graphic. Replace Doors and Hinges 1. Replace the parts for later use . Tighten all removable door parts to doors and food to hold the door in Top Hinge graphic. Graphics are working . 3. Loosen the four screws attaching the drawer glides to the hinge. 5. See Drawer Front Removal graphic. Slide the drawer glides out of the left -hand side door, disconnect the wiring plug located on the door gasket magnets to lift them free from the bottom hinge...
Instruction Manual
Page 7
Failure to do so can result in death or electrical shock. WARNING Electrical Shock Hazard Disconnect power before removing doors. Shim (on some models) B. Hinge Cover Screw B. Bottom Hinge C. Loosen 4 Door Bracket Screws 7 Top Hinge Cover C. 5/16" Hex-Head Hinge Screws D. Hinge Screws Wiring Plug 2 A Drawer Front Removal A. 3/32" Set Screw A A. 3/32" Set Screw Drawer Front Replacement A A. Top Hinges A B C D Door Removal & Replacement A. Top Hinge Bottom Hinges 1 A B C A.
Failure to do so can result in death or electrical shock. WARNING Electrical Shock Hazard Disconnect power before removing doors. Shim (on some models) B. Hinge Cover Screw B. Bottom Hinge C. Loosen 4 Door Bracket Screws 7 Top Hinge Cover C. 5/16" Hex-Head Hinge Screws D. Hinge Screws Wiring Plug 2 A Drawer Front Removal A. 3/32" Set Screw A A. 3/32" Set Screw Drawer Front Replacement A A. Top Hinges A B C D Door Removal & Replacement A. Top Hinge Bottom Hinges 1 A B C A.
Instruction Manual
Page 8
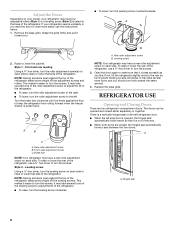
... by turning both doors are two refrigerator compartment doors. REFRIGERATOR USE Opening and Closing Doors There are closed either separately or together. This makes it toward you want the door to turn the screws. 3. Grasp the grille firmly and pull it easier to close more turns, and you like. Front and rear leveling Using a ³⁄₈" hex driver, turn the roller adjustment screw(s) on the left refrigerator door. ■...
... by turning both doors are two refrigerator compartment doors. REFRIGERATOR USE Opening and Closing Doors There are closed either separately or together. This makes it toward you want the door to turn the screws. 3. Grasp the grille firmly and pull it easier to close more turns, and you like. Front and rear leveling Using a ³⁄₈" hex driver, turn the roller adjustment screw(s) on the left refrigerator door. ■...
Instruction Manual
Page 9
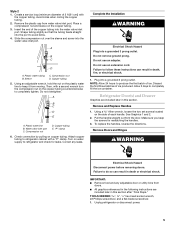
... the freezer or refrigerator compartment temperatures exceed normal operating temperatures for your refrigerator, make sure the controls are preset at the factory. The refrigerator uses more energy when Humidity Control is on. ■ Press Humidity Control when the environment is warm and more than recommended setting will be correct for 3 seconds until the desired temperature set points as a guide. Temperature alarm: An alarm will automatically shut off in the freezer display. Press the Max Ice...
... the freezer or refrigerator compartment temperatures exceed normal operating temperatures for your refrigerator, make sure the controls are preset at the factory. The refrigerator uses more energy when Humidity Control is on. ■ Press Humidity Control when the environment is warm and more than recommended setting will be correct for 3 seconds until the desired temperature set points as a guide. Temperature alarm: An alarm will automatically shut off in the freezer display. Press the Max Ice...
Instruction Manual
Page 10
... Door Alarm is on some models) Turning the Ice Maker On/Off To turn the ice maker OFF, lift the wire shutoff arm to change the temperature display. Ice Maker (on . To manually turn the ice maker ON, simply lower the wire shutoff arm. NOTE: Your ice maker has an automatic shutoff. F - Temperature in the ice storage bin. 10 OFF - You will be disabled. All control panel lights will be avoided, make sure the water softener is operating properly and is displayed...
... Door Alarm is on some models) Turning the Ice Maker On/Off To turn the ice maker OFF, lift the wire shutoff arm to change the temperature display. Ice Maker (on . To manually turn the ice maker ON, simply lower the wire shutoff arm. NOTE: Your ice maker has an automatic shutoff. F - Temperature in the ice storage bin. 10 OFF - You will be disabled. All control panel lights will be avoided, make sure the water softener is operating properly and is displayed...
Instruction Manual
Page 11
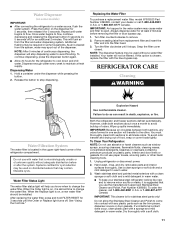
... immediately. Turn filter counterclockwise to flow, continue depressing and releasing the dispenser button (5 seconds on , a new water filter should be required in warm water. Remove sealing label from the filter and water dispensing system. or 1-800-807-6777 Canada. IMPORTANT: Air trapped in the water system may be installed. When the Replace light is on plastic parts, interior and door liners or gaskets. Snap the filter cover closed. To Clean Your Refrigerator: NOTE: Do not use paper...
... immediately. Turn filter counterclockwise to flow, continue depressing and releasing the dispenser button (5 seconds on , a new water filter should be required in warm water. Remove sealing label from the filter and water dispensing system. or 1-800-807-6777 Canada. IMPORTANT: Air trapped in the water system may be installed. When the Replace light is on plastic parts, interior and door liners or gaskets. Snap the filter cover closed. To Clean Your Refrigerator: NOTE: Do not use paper...
Instruction Manual
Page 12
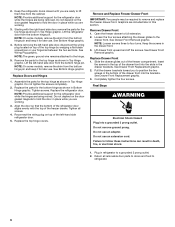
Changing the Refrigerator Light Bulb 1. Plug in refrigerator or reconnect power. The light shield opens from the light assembly. 3. See "Using the Controls." ■ New installation? NOTE: Adjusting the temperature controls to see if the outlet is significant pet traffic in a lamp to coldest setting will not cool either compartment more quickly. Plug in the home, the condenser should be cleaned every 2 to 3 months to possibly avoid the cost of a service call an electrician...
Changing the Refrigerator Light Bulb 1. Plug in refrigerator or reconnect power. The light shield opens from the light assembly. 3. See "Using the Controls." ■ New installation? NOTE: Adjusting the temperature controls to see if the outlet is significant pet traffic in a lamp to coldest setting will not cool either compartment more quickly. Plug in the home, the condenser should be cleaned every 2 to 3 months to possibly avoid the cost of a service call an electrician...
Instruction Manual
Page 13
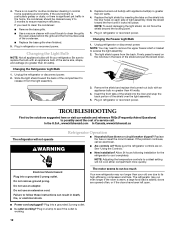
...? This can decrease water pressure. fans/compressor adjusting to enter refrigerator. The doors are listed some normal sounds with mild soap and warm water. Straighten the water source line. ■ Ice maker turned on the heater during initial cool-down ■ Water running - Wait 72 hours for ice maker to moisture buildup. ■ Door(s) opened often or left open? Remove ice from door. ■ Bin or shelf in 24 hours. Turn the water shutoff valve fully open ? If ice volume improves, then the...
...? This can decrease water pressure. fans/compressor adjusting to enter refrigerator. The doors are listed some normal sounds with mild soap and warm water. Straighten the water source line. ■ Ice maker turned on the heater during initial cool-down ■ Water running - Wait 72 hours for ice maker to moisture buildup. ■ Door(s) opened often or left open? Remove ice from door. ■ Bin or shelf in 24 hours. Turn the water shutoff valve fully open ? If ice volume improves, then the...
Instruction Manual
Page 14
... 24 hours for water supply to cool completely. ■ Water not been recently dispensed? Flush the water system before using a new water filter. The water dispenser will not close completely." ■ Recently removed the doors? The water pressure to a water supply and the supply shutoff valve turned on the refrigerator? Remove filter and operate dispenser. Close the door firmly. See "Water Supply Requirements." Make sure the water dispenser tube connections are fully tightened. Water from the dispenser is warm NOTE: Water from the dispenser is connected to make new ice. ■...
... 24 hours for water supply to cool completely. ■ Water not been recently dispensed? Flush the water system before using a new water filter. The water dispenser will not close completely." ■ Recently removed the doors? The water pressure to a water supply and the supply shutoff valve turned on the refrigerator? Remove filter and operate dispenser. Close the door firmly. See "Water Supply Requirements." Make sure the water dispenser tube connections are fully tightened. Water from the dispenser is warm NOTE: Water from the dispenser is connected to make new ice. ■...
Instruction Manual
Page 15
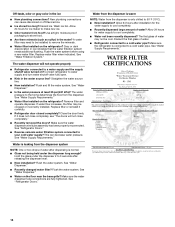
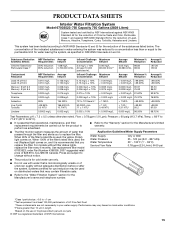
... size: >0.5 to When 90% of the filter's rated life is used on , and it is microbiologically unsafe or of unknown quality without adequate disinfection before or after the system. order Part Number 4396395. 2007 suggested retail price of the substances listed below. Prices are subject to change without filter status lights, replace the filter every 6 months. Pressure = 60 psig (413.7 kPa). For models...
... size: >0.5 to When 90% of the filter's rated life is used on , and it is microbiologically unsafe or of unknown quality without adequate disinfection before or after the system. order Part Number 4396395. 2007 suggested retail price of the substances listed below. Prices are subject to change without filter status lights, replace the filter every 6 months. Pressure = 60 psig (413.7 kPa). For models...
Instruction Manual
Page 16
... installed in the home. 8. KITCHENAID® REFRIGERATOR WARRANTY ONE YEAR LIMITED WARRANTY For one year from the date of purchase, when this major appliance is operated and maintained according to instructions attached to or furnished with the product, KitchenAid or KitchenAid Canada (hereafter "KitchenAid") will pay for factory specified parts and repair labor to repair or replace appliance light bulbs, air filters or water filters. 3. Service must be repaired in an inaccessible location...
... installed in the home. 8. KITCHENAID® REFRIGERATOR WARRANTY ONE YEAR LIMITED WARRANTY For one year from the date of purchase, when this major appliance is operated and maintained according to instructions attached to or furnished with the product, KitchenAid or KitchenAid Canada (hereafter "KitchenAid") will pay for factory specified parts and repair labor to repair or replace appliance light bulbs, air filters or water filters. 3. Service must be repaired in an inaccessible location...

Parts Diagram
Page 2
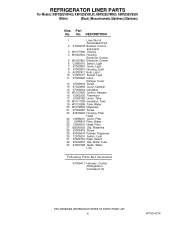
... 67004092 Block, Filter 17 Cover, Corner 67003484 White 67003485 Black 12587703AP Apollo Grey 18 12626911ED Hinge, Top Left 19 W10208641 Bracket, Foot (2) 20 67006564 Screw 21 12579702 Shim, Hinge 22 Grille Assembly (Includes Clips) 67006377 White 67006375 Black 12880103AP Apollo Grey Illus. DESCRIPTION 1 Literature Parts W10198858 Tech Sheet W10187309 Owners Manual W10187812 Tag, Energy 2 8170414 Elbow, Fill Tube 3 67003405 Plate, Pivot 4 8170924 Gasket 5 67005127...
... 67004092 Block, Filter 17 Cover, Corner 67003484 White 67003485 Black 12587703AP Apollo Grey 18 12626911ED Hinge, Top Left 19 W10208641 Bracket, Foot (2) 20 67006564 Screw 21 12579702 Shim, Hinge 22 Grille Assembly (Includes Clips) 67006377 White 67006375 Black 12880103AP Apollo Grey Illus. DESCRIPTION 1 Literature Parts W10198858 Tech Sheet W10187309 Owners Manual W10187812 Tag, Energy 2 8170414 Elbow, Fill Tube 3 67003405 Plate, Pivot 4 8170924 Gasket 5 67005127...
Parts Diagram
Page 6
... Housing, Filter Head 24 12568001 Cover, Filter 25 UKF8001 Filter, Water 26 12664501 Head, Filter 27 B8390302 Clip, Waterline 28 67006415 Screw 29 67005674 Facade, Dispenser 30 12575501 Switch, Limit 31 67002742 Plate, Switch 32 67002816 Clip, Water Tube 33 67003728 Guide, Water Line Following Parts Not Illustrated 67005417 Harness, Control (Refrigerator) (Includes # 16) 6 W10214214 No. Part No. REFRIGERATOR LINER PARTS For Models: KBFS25EVWH00, KBFS25EVBL00, KBFS25EVMS00, KBFS25EVSS00 (White) (Black) (Monochromatic Stainless) (Stainless) Illus...
... Housing, Filter Head 24 12568001 Cover, Filter 25 UKF8001 Filter, Water 26 12664501 Head, Filter 27 B8390302 Clip, Waterline 28 67006415 Screw 29 67005674 Facade, Dispenser 30 12575501 Switch, Limit 31 67002742 Plate, Switch 32 67002816 Clip, Water Tube 33 67003728 Guide, Water Line Following Parts Not Illustrated 67005417 Harness, Control (Refrigerator) (Includes # 16) 6 W10214214 No. Part No. REFRIGERATOR LINER PARTS For Models: KBFS25EVWH00, KBFS25EVBL00, KBFS25EVMS00, KBFS25EVSS00 (White) (Black) (Monochromatic Stainless) (Stainless) Illus...

Parts Diagram
Page 8
... Grey 8 W10214214 Part No. Part No. No. No. DESCRIPTION Illus. REFRIGERATOR DOOR PARTS For Models: KBFS25EVWH00, KBFS25EVBL00, KBFS25EVMS00, KBFS25EVSS00 (White) (Black) (Monochromatic Stainless) (Stainless) Illus. DESCRIPTION 1 Door, Left 13024048WQ White 13024048BQ Black 13024050SQ Stainless Steel 13024052SQ Mono Stainless 2 Bushing, Door (Bottom Left) 67002722 White 67002721 Black 3 67003819 Compartment, Door (Includes Item 4) 4 67001279 Tray, Dairy 5 67005672 Bin, Shelf (Medium) 6 67006786 Screw 7 67006901 Screw 8 Gasket, Door W10163894 White...
... Grey 8 W10214214 Part No. Part No. No. No. DESCRIPTION Illus. REFRIGERATOR DOOR PARTS For Models: KBFS25EVWH00, KBFS25EVBL00, KBFS25EVMS00, KBFS25EVSS00 (White) (Black) (Monochromatic Stainless) (Stainless) Illus. DESCRIPTION 1 Door, Left 13024048WQ White 13024048BQ Black 13024050SQ Stainless Steel 13024052SQ Mono Stainless 2 Bushing, Door (Bottom Left) 67002722 White 67002721 Black 3 67003819 Compartment, Door (Includes Item 4) 4 67001279 Tray, Dairy 5 67005672 Bin, Shelf (Medium) 6 67006786 Screw 7 67006901 Screw 8 Gasket, Door W10163894 White...

Parts Diagram
Page 10
... Screw 6 W10134623 Compressor 7 W10171661 Harness, Evap Heater 8 67007175 Pan, Drain 9 67004743 Grommet 10 67002493 Evaporator Heater 11 2264017 Capacitor 12 W10128791 Overload (Includes Relay) 13 61003210 Gasket 14 W10165425 Thermostat 15 W10137529 Grommet (4) 16 12575309SP Shroud, Condenser 17 2255199 Clip, Capacitor 18 W10135026 Condenser 19 67004700 Tube, Discharge 20 67002490 Tray, Drip 21 10623002 Clip, Evaporator Illus. Part No. Part No. Part No. No...
... Screw 6 W10134623 Compressor 7 W10171661 Harness, Evap Heater 8 67007175 Pan, Drain 9 67004743 Grommet 10 67002493 Evaporator Heater 11 2264017 Capacitor 12 W10128791 Overload (Includes Relay) 13 61003210 Gasket 14 W10165425 Thermostat 15 W10137529 Grommet (4) 16 12575309SP Shroud, Condenser 17 2255199 Clip, Capacitor 18 W10135026 Condenser 19 67004700 Tube, Discharge 20 67002490 Tray, Drip 21 10623002 Clip, Evaporator Illus. Part No. Part No. Part No. No...


