Use & Care Guide
Page 1
BUILT-IN MICROWAVE OVEN Use & Care Guide For questions about features, operation/performance, parts, accessories or service, call: 1-800-422-1230, or visit our website at... www.kitchenaid.com Table of Contents...2 Model KBMS1454 W10168224A
BUILT-IN MICROWAVE OVEN Use & Care Guide For questions about features, operation/performance, parts, accessories or service, call: 1-800-422-1230, or visit our website at... www.kitchenaid.com Table of Contents...2 Model KBMS1454 W10168224A
Use & Care Guide
Page 2
TABLE OF CONTENTS BUILT-IN MICROWAVE OVEN SAFETY 3 Electrical Requirements 4 PARTS AND FEATURES 5 Turntable 5 MICROWAVE OVEN CONTROL 5 Display 5 Start 6 Cancel/Off 6 Add a Minute 6 Dial 6 Select 6 Clock 6 Tones 6 Demo Mode 6 Control Lock 7 Cooling Fan 7 MICROWAVE OVEN USE 7 Food Characteristics 7 Cooking Guidelines 7 Cookware and Dinnerware 8 Aluminum Foil and Metal 8 Microwave Cooking Power 8 Cook Time Set 9 Doneness 9 Meal Prep Cook 9 Meal Prep...
TABLE OF CONTENTS BUILT-IN MICROWAVE OVEN SAFETY 3 Electrical Requirements 4 PARTS AND FEATURES 5 Turntable 5 MICROWAVE OVEN CONTROL 5 Display 5 Start 6 Cancel/Off 6 Add a Minute 6 Dial 6 Select 6 Clock 6 Tones 6 Demo Mode 6 Control Lock 7 Cooling Fan 7 MICROWAVE OVEN USE 7 Food Characteristics 7 Cooking Guidelines 7 Cookware and Dinnerware 8 Aluminum Foil and Metal 8 Microwave Cooking Power 8 Cook Time Set 9 Doneness 9 Meal Prep Cook 9 Meal Prep...
Use & Care Guide
Page 3
... vapors in the "Microwave Oven Care" section. ■ To reduce the risk of oven is not always present. WARNING You can happen if the instructions are very important. Call an authorized service company for example, closed , turn oven off, and disconnect the power cord, or shut off the pad and touch electrical parts involving a risk...
... vapors in the "Microwave Oven Care" section. ■ To reduce the risk of oven is not always present. WARNING You can happen if the instructions are very important. Call an authorized service company for example, closed , turn oven off, and disconnect the power cord, or shut off the pad and touch electrical parts involving a risk...

Use & Care Guide
Page 4
... and that is properly installed and grounded. or 20-amp electrical supply with Part 18 of the oven. The microwave oven is properly grounded. SAVE THESE INSTRUCTIONS PRECAUTIONS TO AVOID POSSIBLE EXPOSURE TO EXCESSIVE MICROWAVE ENERGY (a) Do not attempt to whether the microwave oven is equipped with a cord having a grounding wire with metal foil. Electrical Requirements WARNING...
... and that is properly installed and grounded. or 20-amp electrical supply with Part 18 of the oven. The microwave oven is properly grounded. SAVE THESE INSTRUCTIONS PRECAUTIONS TO AVOID POSSIBLE EXPOSURE TO EXCESSIVE MICROWAVE ENERGY (a) Do not attempt to whether the microwave oven is equipped with a cord having a grounding wire with metal foil. Electrical Requirements WARNING...

Use & Care Guide
Page 5
.... Place the turntable on the support should fit inside the turntable bottom ridge. When the microwave oven is first supplied to the microwave oven, a ":" will be active in either direction to stop the blinking. The rollers on the support. PARTS AND FEATURES This manual may have some or all of the features shown here. Door...
.... Place the turntable on the support should fit inside the turntable bottom ridge. When the microwave oven is first supplied to the microwave oven, a ":" will be active in either direction to stop the blinking. The rollers on the support. PARTS AND FEATURES This manual may have some or all of the features shown here. Door...
Use & Care Guide
Page 7
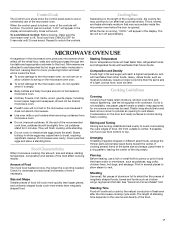
... in the microwave oven produces microwaves which cooks the food. ■ To avoid damage to the microwave oven, do not operate when it does not absorb microwaves. ■ Use oven mitts or pot holders when removing containers from microwave oven. ■ Do not overcook potatoes. Arranging If heating irregularly shaped or different sized foods, arrange the thinner parts and smaller...
... in the microwave oven produces microwaves which cooks the food. ■ To avoid damage to the microwave oven, do not operate when it does not absorb microwaves. ■ Use oven mitts or pot holders when removing containers from microwave oven. ■ Do not overcook potatoes. Arranging If heating irregularly shaped or different sized foods, arrange the thinner parts and smaller...
Use & Care Guide
Page 10
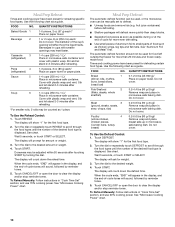
...and vent. Stir and let stand 2-3 minutes after touching START by reminder tones. 5. Turn the dial or repeatedly touch REHEAT to shield parts of -cycle tones will sound, followed by reminder tones. 5. See chart. Times and cooking power have been preset for reheating specific food ...been preset for defrosting certain food types. Wait 5 seconds, or touch START or SELECT. See "Microwave Cooking Power" chart. The automatic defrost function should not be used , or the microwave oven can be used for food left outside the freezer for more than deep blocks. ■ Separate...
...and vent. Stir and let stand 2-3 minutes after touching START by reminder tones. 5. Turn the dial or repeatedly touch REHEAT to shield parts of -cycle tones will sound, followed by reminder tones. 5. See chart. Times and cooking power have been preset for reheating specific food ...been preset for defrosting certain food types. Wait 5 seconds, or touch START or SELECT. See "Microwave Cooking Power" chart. The automatic defrost function should not be used , or the microwave oven can be used for food left outside the freezer for more than deep blocks. ■ Separate...
Use & Care Guide
Page 13
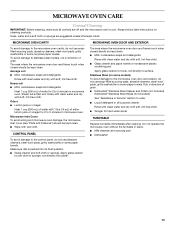
...or all controls are suggested unless otherwise noted. Rub in microwave oven. Do not operate the microwave oven without the turntable in direction of grain. ■ KitchenAid® Stainless Steel Cleaner and Polish (not included) KitchenAid® Stainless Steel Wipes (not included): See "Assistance... or Service" section to 5 minutes in direction of grain. To avoid damage to surface. Microwave Inlet Cover To avoid arcing and microwave oven damage, the microwave inlet cover (see "Parts and Features")...
...or all controls are suggested unless otherwise noted. Rub in microwave oven. Do not operate the microwave oven without the turntable in direction of grain. ■ KitchenAid® Stainless Steel Cleaner and Polish (not included) KitchenAid® Stainless Steel Wipes (not included): See "Assistance... or Service" section to 5 minutes in direction of grain. To avoid damage to surface. Microwave Inlet Cover To avoid arcing and microwave oven damage, the microwave inlet cover (see "Parts and Features")...
Use & Care Guide
Page 15
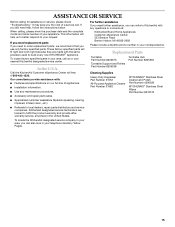
... help , follow the instructions below. Replacement Parts Turntable Part Number 8205676 Turntable Support and Rollers Part Number 8205538 Turntable Hub Part Number 8205539 Cleaning Supplies Heavy Duty Degreaser Part Number 31552 All-Purpose Appliance Cleaner Part Number 31682 KITCHENAID® Stainless Steel Cleaner and Polish Part Number 4396920 KITCHENAID® Stainless Steel Wipes Part Number 8212510 15 To locate the...
... help , follow the instructions below. Replacement Parts Turntable Part Number 8205676 Turntable Support and Rollers Part Number 8205538 Turntable Hub Part Number 8205539 Cleaning Supplies Heavy Duty Degreaser Part Number 31552 All-Purpose Appliance Cleaner Part Number 31682 KITCHENAID® Stainless Steel Cleaner and Polish Part Number 4396920 KITCHENAID® Stainless Steel Wipes Part Number 8212510 15 To locate the...

Use & Care Guide
Page 16
...if defective in materials or workmanship: ■ Electric element ■ Solid state touch control system parts SECOND THROUGH TENTH YEAR LIMITED WARRANTY On microwave ovens only, in materials or workmanship. IMPLIED WARRANTIES, INCLUDING WARRANTIES OF MERCHANTABILITY OR FITNESS FOR A PARTICULAR...designed to use your major appliance. The removal and reinstallation of consumables or cleaning products not approved by the customer. KITCHENAID SHALL NOT BE LIABLE FOR INCIDENTAL OR CONSEQUENTIAL DAMAGES. After checking "Troubleshooting," you need service, first see the "...
...if defective in materials or workmanship: ■ Electric element ■ Solid state touch control system parts SECOND THROUGH TENTH YEAR LIMITED WARRANTY On microwave ovens only, in materials or workmanship. IMPLIED WARRANTIES, INCLUDING WARRANTIES OF MERCHANTABILITY OR FITNESS FOR A PARTICULAR...designed to use your major appliance. The removal and reinstallation of consumables or cleaning products not approved by the customer. KITCHENAID SHALL NOT BE LIABLE FOR INCIDENTAL OR CONSEQUENTIAL DAMAGES. After checking "Troubleshooting," you need service, first see the "...

Installation Guide
Page 1
... or gas cooktops. All safety messages will follow instructions. Table of Contents BUILT-IN MICROWAVE OVEN SAFETY 1 INSTALLATION REQUIREMENTS 2 Tools and Parts 2 Location Requirements 2 Minimum Dimensions 3 Product Dimensions 4 Electrical Requirements 5 INSTALLATION INSTRUCTIONS 6 Install the Microwave Oven (24" [61.0 cm] Installation Only 6 Install the Microwave Oven (27" [68.6 cm] or 30" [76.2 cm] Installation Only 7 Complete Installation 8 ASSISTANCE 8 BUILT...
... or gas cooktops. All safety messages will follow instructions. Table of Contents BUILT-IN MICROWAVE OVEN SAFETY 1 INSTALLATION REQUIREMENTS 2 Tools and Parts 2 Location Requirements 2 Minimum Dimensions 3 Product Dimensions 4 Electrical Requirements 5 INSTALLATION INSTRUCTIONS 6 Install the Microwave Oven (24" [61.0 cm] Installation Only 6 Install the Microwave Oven (27" [68.6 cm] or 30" [76.2 cm] Installation Only 7 Complete Installation 8 ASSISTANCE 8 BUILT...

Installation Guide
Page 2
... TORX®† screwdriver s Electric drill s 5/64" (2 mm) drill bit Parts Supplied All of at least 150 lbs (68 kg), which includes microwave oven and items placed inside. s Minimum installation clearances for weight of the following parts are used . Wide side trim panels (2) INSTALLATION PARTS USED 24" (61.0 cm) installation C 27" (68.6 cm) installation* A, C, D 30" (76...
... TORX®† screwdriver s Electric drill s 5/64" (2 mm) drill bit Parts Supplied All of at least 150 lbs (68 kg), which includes microwave oven and items placed inside. s Minimum installation clearances for weight of the following parts are used . Wide side trim panels (2) INSTALLATION PARTS USED 24" (61.0 cm) installation C 27" (68.6 cm) installation* A, C, D 30" (76...
Installation Guide
Page 3
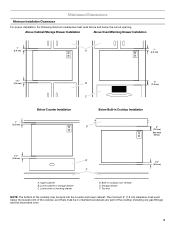
... installation, the following minimum clearances must be no interference between any gas fittings) and the microwave oven. 3 Built-in Cooktop Installation D 3" (7.6 cm) See note below the cutout opening. Toe kick NOTE: The bottom of the cooktop (including any part of the cooktop may be sunk into the counter and lower cabinet. The minimum...
... installation, the following minimum clearances must be no interference between any gas fittings) and the microwave oven. 3 Built-in Cooktop Installation D 3" (7.6 cm) See note below the cutout opening. Toe kick NOTE: The bottom of the cooktop (including any part of the cooktop may be sunk into the counter and lower cabinet. The minimum...

