Use & Care Guide
Page 1
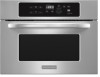
BUILT-IN MICROWAVE OVEN Use & Care Guide For questions about features, operation/performance, parts, accessories or service, call: 1-800-422-1230, or visit our website at... www.kitchenaid.com Table of Contents...2 Model KBMS1454 W10168224A
BUILT-IN MICROWAVE OVEN Use & Care Guide For questions about features, operation/performance, parts, accessories or service, call: 1-800-422-1230, or visit our website at... www.kitchenaid.com Table of Contents...2 Model KBMS1454 W10168224A
Use & Care Guide
Page 2
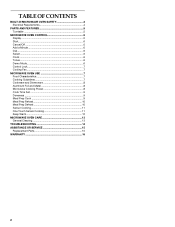
TABLE OF CONTENTS BUILT-IN MICROWAVE OVEN SAFETY 3 Electrical Requirements 4 PARTS AND FEATURES 5 Turntable 5 MICROWAVE OVEN CONTROL 5 Display 5 Start 6 Cancel/Off 6 Add a Minute 6 Dial 6 Select 6 Clock 6 Tones 6 Demo Mode 6 Control Lock 7 Cooling Fan 7 MICROWAVE OVEN USE 7 ... Sensor Cooking 11 One Touch Sensor Cooking 11 Keep Warm 12 MICROWAVE OVEN CARE 13 General Cleaning 13 TROUBLESHOOTING 14 ASSISTANCE OR SERVICE 15 Replacement Parts 15 WARRANTY 16 2
TABLE OF CONTENTS BUILT-IN MICROWAVE OVEN SAFETY 3 Electrical Requirements 4 PARTS AND FEATURES 5 Turntable 5 MICROWAVE OVEN CONTROL 5 Display 5 Start 6 Cancel/Off 6 Add a Minute 6 Dial 6 Select 6 Clock 6 Tones 6 Demo Mode 6 Control Lock 7 Cooling Fan 7 MICROWAVE OVEN USE 7 ... Sensor Cooking 11 One Touch Sensor Cooking 11 Keep Warm 12 MICROWAVE OVEN CARE 13 General Cleaning 13 TROUBLESHOOTING 14 ASSISTANCE OR SERVICE 15 Replacement Parts 15 WARRANTY 16 2
Use & Care Guide
Page 3
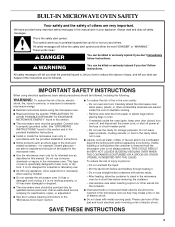
... manual. Call an authorized service company for example, closed , turn oven off, and disconnect the power cord, or shut off the pad and touch electrical parts involving a risk of oven is , tell you don't immediately follow the safety alert symbol and either the word "DANGER" or "WARNING." To reduce the risk...
... manual. Call an authorized service company for example, closed , turn oven off, and disconnect the power cord, or shut off the pad and touch electrical parts involving a risk of oven is , tell you don't immediately follow the safety alert symbol and either the word "DANGER" or "WARNING." To reduce the risk...

Use & Care Guide
Page 4
... Do not store anything directly on top of electric shock by anyone except properly qualified service personnel. SAVE THESE INSTRUCTIONS This device complies with Part 18 of the oven. SAVE THESE INSTRUCTIONS PRECAUTIONS TO AVOID POSSIBLE EXPOSURE TO EXCESSIVE MICROWAVE ENERGY (a) Do not attempt to operate this oven ...paper products when appliance is operated in the "PAN BROWN" mode (on models with this feature). ■ Do not store any materials, other part of electric shock. Do not use an extension cord. WARNING: Improper use of the grounding plug can result in a wet basement, or near...
... Do not store anything directly on top of electric shock by anyone except properly qualified service personnel. SAVE THESE INSTRUCTIONS This device complies with Part 18 of the oven. SAVE THESE INSTRUCTIONS PRECAUTIONS TO AVOID POSSIBLE EXPOSURE TO EXCESSIVE MICROWAVE ENERGY (a) Do not attempt to operate this oven ...paper products when appliance is operated in the "PAN BROWN" mode (on models with this feature). ■ Do not store any materials, other part of electric shock. Do not use an extension cord. WARNING: Improper use of the grounding plug can result in a wet basement, or near...

Use & Care Guide
Page 5
...occurred. See "Assistance or Service" to help cook food more evenly. Touch CANCEL/OFF and reset the clock if needed. The appearance of the parts. Model and serial number plate E. Door handle H. For best cooking results, do not operate the microwave oven without having the turntable in the ... at any of your particular model may differ slightly from the illustrations in this manual. If the ":" blinks in place. Door lock system D. PARTS AND FEATURES This manual may have some or all of the hub. The model you have purchased may cover several different models. Glass turntable F. ...
...occurred. See "Assistance or Service" to help cook food more evenly. Touch CANCEL/OFF and reset the clock if needed. The appearance of the parts. Model and serial number plate E. Door handle H. For best cooking results, do not operate the microwave oven without having the turntable in the ... at any of your particular model may differ slightly from the illustrations in this manual. If the ":" blinks in place. Door lock system D. PARTS AND FEATURES This manual may have some or all of the hub. The model you have purchased may cover several different models. Glass turntable F. ...
Use & Care Guide
Page 7
..., wood, gourds, paper, including brown paper bags and newspaper, should not be used. Arranging If heating irregularly shaped or different sized foods, arrange the thinner parts and smaller sized items toward the center. Control Lock The Control Lock shuts down the control panel pads to vent steam. If a control pad is...
..., wood, gourds, paper, including brown paper bags and newspaper, should not be used. Arranging If heating irregularly shaped or different sized foods, arrange the thinner parts and smaller sized items toward the center. Control Lock The Control Lock shuts down the control panel pads to vent steam. If a control pad is...
Use & Care Guide
Page 10
... the display and/or stop reminder tones. When the cycle ends, "END" will sound, followed by reminder tones. 5. Touch DEFROST. Turn the dial to shield parts of -cycle tones will appear in microwave-safe container.
... the display and/or stop reminder tones. When the cycle ends, "END" will sound, followed by reminder tones. 5. Touch DEFROST. Turn the dial to shield parts of -cycle tones will appear in microwave-safe container.
Use & Care Guide
Page 13
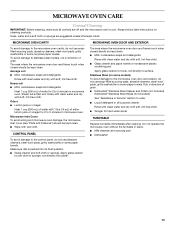
...5 minutes in microwave oven. Odors ■ Lemon juice or vinegar: Heat 1 cup (250 mL) of grain. ■ KitchenAid® Stainless Steel Cleaner and Polish (not included) KitchenAid® Stainless Steel Wipes (not included): See "Assistance or Service" section to order. ■ Liquid detergent or all controls are... of water with soft, lint-free cloth. Microwave Inlet Cover To avoid arcing and microwave oven damage, the microwave inlet cover (see "Parts and Features") should be kept clean. ■ Wipe with soft, lint-free cloth. Rub in direction of water for hard water spots...
...5 minutes in microwave oven. Odors ■ Lemon juice or vinegar: Heat 1 cup (250 mL) of grain. ■ KitchenAid® Stainless Steel Cleaner and Polish (not included) KitchenAid® Stainless Steel Wipes (not included): See "Assistance or Service" section to order. ■ Liquid detergent or all controls are... of water with soft, lint-free cloth. Microwave Inlet Cover To avoid arcing and microwave oven damage, the microwave inlet cover (see "Parts and Features") should be kept clean. ■ Wipe with soft, lint-free cloth. Rub in direction of water for hard water spots...
Use & Care Guide
Page 15
...Parts Turntable Part Number 8205676 Turntable Support and Rollers Part Number 8205538 Turntable Hub Part Number 8205539 Cleaning Supplies Heavy Duty Degreaser Part Number 31552 All-Purpose Appliance Cleaner Part Number 31682 KITCHENAID® Stainless Steel Cleaner and Polish Part Number 4396920 KITCHENAID® Stainless Steel Wipes Part...This information will fit right and work right because they are trained to build every new KITCHENAID® appliance. To locate factory specified parts in the United States. Our consultants provide assistance with: ■ Features and specifications ...
...Parts Turntable Part Number 8205676 Turntable Support and Rollers Part Number 8205538 Turntable Hub Part Number 8205539 Cleaning Supplies Heavy Duty Degreaser Part Number 31552 All-Purpose Appliance Cleaner Part Number 31682 KITCHENAID® Stainless Steel Cleaner and Polish Part Number 4396920 KITCHENAID® Stainless Steel Wipes Part...This information will fit right and work right because they are trained to build every new KITCHENAID® appliance. To locate factory specified parts in the United States. Our consultants provide assistance with: ■ Features and specifications ...

Use & Care Guide
Page 16
... major appliance is operated and maintained according to instructions attached to or furnished with the product, KitchenAid will pay for Factory Specified Parts for the following components if defective in materials or workmanship: ■ Electric element ■ Solid state... appliance is designed to use of consumables or cleaning products not approved by a KitchenAid designated service company. Major appliances with electrical or plumbing codes, or use your authorized KitchenAid dealer to parts or systems resulting from accident, alteration, misuse, abuse, fire, flood, acts ...
... major appliance is operated and maintained according to instructions attached to or furnished with the product, KitchenAid will pay for Factory Specified Parts for the following components if defective in materials or workmanship: ■ Electric element ■ Solid state... appliance is designed to use of consumables or cleaning products not approved by a KitchenAid designated service company. Major appliances with electrical or plumbing codes, or use your authorized KitchenAid dealer to parts or systems resulting from accident, alteration, misuse, abuse, fire, flood, acts ...

Installation Guide
Page 1
... is suitable for use above electric or gas built-in these Installation Instructions. Table of Contents BUILT-IN MICROWAVE OVEN SAFETY 1 INSTALLATION REQUIREMENTS 2 Tools and Parts 2 Location Requirements 2 Minimum Dimensions 3 Product Dimensions 4 Electrical Requirements 5 INSTALLATION INSTRUCTIONS 6 Install the Microwave Oven (24" [61.0 cm] Installation Only 6 Install the Microwave Oven (27" [68...
... is suitable for use above electric or gas built-in these Installation Instructions. Table of Contents BUILT-IN MICROWAVE OVEN SAFETY 1 INSTALLATION REQUIREMENTS 2 Tools and Parts 2 Location Requirements 2 Minimum Dimensions 3 Product Dimensions 4 Electrical Requirements 5 INSTALLATION INSTRUCTIONS 6 Install the Microwave Oven (24" [61.0 cm] Installation Only 6 Install the Microwave Oven (27" [68...

Installation Guide
Page 2
... section. See chart below a non-vented cooktop. Narrow side trim panels (2) E. s Support for each installation. See "Minimum Dimensions" section. Wide side trim panels (2) INSTALLATION PARTS USED 24" (61.0 cm) installation C 27" (68.6 cm) installation* A, C, D 30" (76.2 cm) installation A, B, C, E *Extension plate (B) will... may be installed. D E A. Read and follow the instructions provided with bottom of at least 150 lbs (68 kg), which parts you will be located in a cabinet, and/or above a built-in "Minimum Dimensions" section. Check the opening that is a...
... section. See chart below a non-vented cooktop. Narrow side trim panels (2) E. s Support for each installation. See "Minimum Dimensions" section. Wide side trim panels (2) INSTALLATION PARTS USED 24" (61.0 cm) installation C 27" (68.6 cm) installation* A, C, D 30" (76.2 cm) installation A, B, C, E *Extension plate (B) will... may be installed. D E A. Read and follow the instructions provided with bottom of at least 150 lbs (68 kg), which parts you will be located in a cabinet, and/or above a built-in "Minimum Dimensions" section. Check the opening that is a...
Installation Guide
Page 3
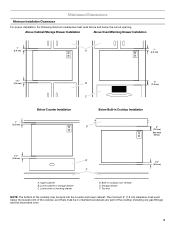
... of the cooktop (including any gas fittings) and the microwave oven. 3 Toe kick NOTE: The bottom of the cooktop may be no interference between any part of the cooktop, and there must exist above and below . 1¹⁄₂" (3.8 cm) E F 1¹⁄₂" (3.8 cm) A. Minimum Dimensions Minimum Installation Clearances For proper...
... of the cooktop (including any gas fittings) and the microwave oven. 3 Toe kick NOTE: The bottom of the cooktop may be no interference between any part of the cooktop, and there must exist above and below . 1¹⁄₂" (3.8 cm) E F 1¹⁄₂" (3.8 cm) A. Minimum Dimensions Minimum Installation Clearances For proper...

