Use & Care Guide
Page 3
...IMPORTANT SAFETY INSTRUCTIONS When using electrical appliances basic safety precautions should not be inserted in this section and in the provided Installation Instructions. ■ Install or locate the microwave oven only in accordance with metal scouring pads. See "GROUNDING INSTRUCTIONS" found in the microwave ...oven as they may create a fire or risk of electric shock. ■ Do not clean with the provided Installation Instructions. ■ Some products such as whole eggs in the microwave oven. for industrial or laboratory use . ■ Liquids, such ...
...IMPORTANT SAFETY INSTRUCTIONS When using electrical appliances basic safety precautions should not be inserted in this section and in the provided Installation Instructions. ■ Install or locate the microwave oven only in accordance with metal scouring pads. See "GROUNDING INSTRUCTIONS" found in the microwave ...oven as they may create a fire or risk of electric shock. ■ Do not clean with the provided Installation Instructions. ■ Some products such as whole eggs in the microwave oven. for industrial or laboratory use . ■ Liquids, such ...

Use & Care Guide
Page 4
...any materials, other part of the oven with metal foil. Failure to whether the microwave oven is too short, have a qualified electrician or serviceman install an outlet near water - WARNING: Improper use an adapter. Recommended: ■ A time-delay fuse or time-delay circuit breaker. ■ A... oven when not in death, fire, or electrical shock. Electrical Requirements WARNING Electrical Shock Hazard Plug into an outlet that there is properly installed and grounded. The plug must be adjusted or repaired by providing an escape wire for example, near a kitchen sink, in a wet ...
...any materials, other part of the oven with metal foil. Failure to whether the microwave oven is too short, have a qualified electrician or serviceman install an outlet near water - WARNING: Improper use an adapter. Recommended: ■ A time-delay fuse or time-delay circuit breaker. ■ A... oven when not in death, fire, or electrical shock. Electrical Requirements WARNING Electrical Shock Hazard Plug into an outlet that there is properly installed and grounded. The plug must be adjusted or repaired by providing an escape wire for example, near a kitchen sink, in a wet ...

Use & Care Guide
Page 5
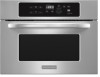
... D. Model and serial number plate E. Turntable support, rollers and hub G. See "Assistance or Service" to help cook food more evenly. To Install: The support and hub are preassembled and installed in place. For best cooking results, do not operate the microwave oven without having the turntable in the microwave oven. Touch CANCEL...
... D. Model and serial number plate E. Turntable support, rollers and hub G. See "Assistance or Service" to help cook food more evenly. To Install: The support and hub are preassembled and installed in place. For best cooking results, do not operate the microwave oven without having the turntable in the microwave oven. Touch CANCEL...
Use & Care Guide
Page 14
Nothing will not operate ■ Is the magnetron working properly? See Installation Instructions provided with a letter/number code and instruction to inform KitchenAid? If water does not heat, try the steps below. Firmly close the microwave oven door, and then touch START. See "Microwave Oven Control" section. ■ ...
Nothing will not operate ■ Is the magnetron working properly? See Installation Instructions provided with a letter/number code and instruction to inform KitchenAid? If water does not heat, try the steps below. Firmly close the microwave oven door, and then touch START. See "Microwave Oven Control" section. ■ ...
Use & Care Guide
Page 15
... to local dealers, repair parts distributors and service companies. In the U.S.A. To locate the KitchenAid designated service company in your request. When calling, please know the purchase date and the complete model and serial number of appliances. ■ Installation information. ■ Use and maintenance procedures. ■ Accessory and repair parts sales. ■...
... to local dealers, repair parts distributors and service companies. In the U.S.A. To locate the KitchenAid designated service company in your request. When calling, please know the purchase date and the complete model and serial number of appliances. ■ Installation information. ■ Use and maintenance procedures. ■ Accessory and repair parts sales. ■...

Use & Care Guide
Page 16
.... Damage resulting from accident, alteration, misuse, abuse, fire, flood, acts of God, improper installation, installation not in accordance with the product, KitchenAid will pay for Factory Specified Parts for Factory Specified Parts and repair labor to the appliance. 8.... WARRANTY This limited warranty does not cover: 1. Costs associated with published installation instructions. 10. After checking "Troubleshooting," you need service, first see the "Troubleshooting" section of KitchenAid, U.S.A. 461969467771 10/07 Printed in Sweden Consumable parts are excluded from ...
.... Damage resulting from accident, alteration, misuse, abuse, fire, flood, acts of God, improper installation, installation not in accordance with the product, KitchenAid will pay for Factory Specified Parts for Factory Specified Parts and repair labor to the appliance. 8.... WARRANTY This limited warranty does not cover: 1. Costs associated with published installation instructions. 10. After checking "Troubleshooting," you need service, first see the "Troubleshooting" section of KitchenAid, U.S.A. 461969467771 10/07 Printed in Sweden Consumable parts are excluded from ...

Installation Guide
Page 1
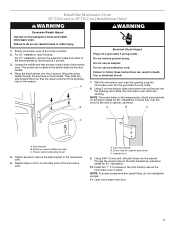
... are not followed. All safety messages will follow the safety alert symbol and either the word "DANGER" or "WARNING." BUILT-IN MICROWAVE OVEN INSTALLATION INSTRUCTIONS 24" (61.0 cm), 27" (68.6 cm), 30" (76.2 cm) This product is suitable for use above electric or gas... built-in this manual and on your particular model may differ slightly from the illustrations in these Installation Instructions. These installation instructions cover different models. We have provided many important safety messages in ovens, and below downdraft cooktops. All safety messages...
... are not followed. All safety messages will follow the safety alert symbol and either the word "DANGER" or "WARNING." BUILT-IN MICROWAVE OVEN INSTALLATION INSTRUCTIONS 24" (61.0 cm), 27" (68.6 cm), 30" (76.2 cm) This product is suitable for use above electric or gas... built-in this manual and on your particular model may differ slightly from the illustrations in these Installation Instructions. These installation instructions cover different models. We have provided many important safety messages in ovens, and below downdraft cooktops. All safety messages...

Installation Guide
Page 2
...;TORX is plumb and square. We recommend: s Complete enclosure around the recessed portion of at least 150 lbs (68 kg), which parts you will be installed. See chart below a non-vented cooktop. s Cutout floor that is a registered trademark of Textron Innovations Inc. 2 See "Electrical Requirements" section. Narrow side trim panels (2) E. s Measuring...
...;TORX is plumb and square. We recommend: s Complete enclosure around the recessed portion of at least 150 lbs (68 kg), which parts you will be installed. See chart below a non-vented cooktop. s Cutout floor that is a registered trademark of Textron Innovations Inc. 2 See "Electrical Requirements" section. Narrow side trim panels (2) E. s Measuring...
Installation Guide
Page 3
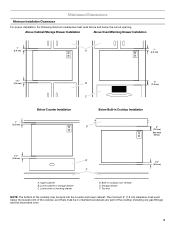
... the cooktop (including any gas fittings) and the microwave oven. 3 Minimum Dimensions Minimum Installation Clearances For proper installation, the following minimum clearances must be sunk into the counter and lower cabinet. Above Cabinet/Storage Drawer... Installation Above Oven/Warming Drawer Installation 1" (2.5 cm) A 1" (2.5 cm) 1¹⁄₂" (3.8 cm) 1" (2.5 cm) Below Counter Installation B 3" (7.6 cm) C Below Built-in cooktop (non-vented) E. Upper cabinet...
... the cooktop (including any gas fittings) and the microwave oven. 3 Minimum Dimensions Minimum Installation Clearances For proper installation, the following minimum clearances must be sunk into the counter and lower cabinet. Above Cabinet/Storage Drawer... Installation Above Oven/Warming Drawer Installation 1" (2.5 cm) A 1" (2.5 cm) 1¹⁄₂" (3.8 cm) 1" (2.5 cm) Below Counter Installation B 3" (7.6 cm) C Below Built-in cooktop (non-vented) E. Upper cabinet...
Installation Guide
Page 4
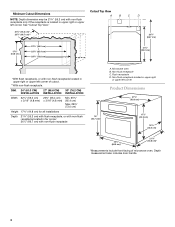
...¹⁄₄" (66.7 cm) with non-flush receptacle 18" (45.7 cm)* A. DIM. 24" (61.0 CM) 27" (68.6 CM) 30" (76.2 CM) INSTALLATION INSTALLATION INSTALLATION Width 22¹⁄₄" (56.5 cm) ± 3/16" (4.8 mm) 25³⁄₄" (65.4 cm) ± 3/16" (4.8 mm) Min. 25³&#...8260;₄" (65.4 cm) Max. 28³⁄₄" (73.0 cm) Height 17⁵⁄₈" (44.8 cm) for all installations Depth 21³⁄₄" (55.2 cm) with flush receptacle, or with non-flush receptacle located in upper right or upper left corner. Flush receptacle...
...¹⁄₄" (66.7 cm) with non-flush receptacle 18" (45.7 cm)* A. DIM. 24" (61.0 CM) 27" (68.6 CM) 30" (76.2 CM) INSTALLATION INSTALLATION INSTALLATION Width 22¹⁄₄" (56.5 cm) ± 3/16" (4.8 mm) 25³⁄₄" (65.4 cm) ± 3/16" (4.8 mm) Min. 25³&#...8260;₄" (65.4 cm) Max. 28³⁄₄" (73.0 cm) Height 17⁵⁄₈" (44.8 cm) for all installations Depth 21³⁄₄" (55.2 cm) with flush receptacle, or with non-flush receptacle located in upper right or upper left corner. Flush receptacle...
Installation Guide
Page 5
..., or electrical shock. Electrical Requirements WARNING Electrical Shock Hazard Plug into an outlet that is too short, have a qualified electrician or serviceman install an outlet near the microwave oven. Recommended: s A time-delay fuse or time-delay circuit breaker. The microwave oven is properly grounded....plug can result in a risk of electric shock by providing an escape wire for the electric current. If the power supply cord is properly installed and grounded. SAVE THESE INSTRUCTIONS 5 Required: s A 120 Volt, 60 Hz, AC only, 15- Do not use an extension cord. ...
..., or electrical shock. Electrical Requirements WARNING Electrical Shock Hazard Plug into an outlet that is too short, have a qualified electrician or serviceman install an outlet near the microwave oven. Recommended: s A time-delay fuse or time-delay circuit breaker. The microwave oven is properly grounded....plug can result in a risk of electric shock by providing an escape wire for the electric current. If the power supply cord is properly installed and grounded. SAVE THESE INSTRUCTIONS 5 Required: s A 120 Volt, 60 Hz, AC only, 15- Do not use an extension cord. ...
Installation Guide
Page 6
.... 2. NOTE: For this microwave oven, the door handle may be used for lifting. 1. Using 2 or more people to "Complete Installation" section. Do not remove ground prong. With the microwave oven near the opening . Failure to follow these instructions can result in death,... frame should align with the holes just drilled into the cabinet. Replace microwave oven in cutout opening. 9. INSTALLATION INSTRUCTIONS Install the Microwave Oven (24" [61.0 cm] Installation Only) WARNING WARNING Excessive Weight Hazard Use two or more people, slide the microwave oven all the way into...
.... 2. NOTE: For this microwave oven, the door handle may be used for lifting. 1. Using 2 or more people to "Complete Installation" section. Do not remove ground prong. With the microwave oven near the opening . Failure to follow these instructions can result in death,... frame should align with the holes just drilled into the cabinet. Replace microwave oven in cutout opening. 9. INSTALLATION INSTRUCTIONS Install the Microwave Oven (24" [61.0 cm] Installation Only) WARNING WARNING Excessive Weight Hazard Use two or more people, slide the microwave oven all the way into...
Installation Guide
Page 7
...bracket down so that the upper portions of the keyholes rest on the side brackets (or extension plates for cabinet attachment C. For 27" installation, remove the extension plate from each side of the side brackets by removing the 2 screws. 3. Loosen the middle and rear screws ...The screws are located at the same height as shown. A B C C A. Empty microwave oven of both side brackets (or extension plates for 30" installation) must be fully over the 2 screws, fitting the screw heads through the screw holes on the screws. With the microwave oven near the opening . Repeat...
...bracket down so that the upper portions of the keyholes rest on the side brackets (or extension plates for cabinet attachment C. For 27" installation, remove the extension plate from each side of the side brackets by removing the 2 screws. 3. Loosen the middle and rear screws ...The screws are located at the same height as shown. A B C C A. Empty microwave oven of both side brackets (or extension plates for 30" installation) must be fully over the 2 screws, fitting the screw heads through the screw holes on the screws. With the microwave oven near the opening . Repeat...
Installation Guide
Page 8
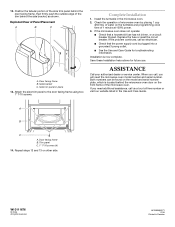
... will need additional assistance, call an electrician. Exploded View of 1 minute at our toll free number or visit our website listed in Sweden Install the turntable in place 13. Replace the fuse or reset the circuit breaker. Door facing frame B. Repeat steps 12 and 13 on the ...11/06 Printed in the Use and Care Guide. 12. Door facing frame B. s See the Use and Care Guide for future use. Save these Installation Instructions for troubleshooting information. W10111676 © 2006. Check the operation of microwave oven by placing 1 cup (250 mL) of water on other side. ...
... will need additional assistance, call an electrician. Exploded View of 1 minute at our toll free number or visit our website listed in Sweden Install the turntable in place 13. Replace the fuse or reset the circuit breaker. Door facing frame B. Repeat steps 12 and 13 on the ...11/06 Printed in the Use and Care Guide. 12. Door facing frame B. s See the Use and Care Guide for future use. Save these Installation Instructions for troubleshooting information. W10111676 © 2006. Check the operation of microwave oven by placing 1 cup (250 mL) of water on other side. ...

