Use & Care Guide
Page 3
...THE CONTAINER IS DISTURBED OR A SPOON OR OTHER UTENSIL IS INSERTED INTO THE LIQUID. Do not use . ■ As with the provided Installation Instructions. ■ Some products such as water, coffee, or tea are not followed. It is not working properly, or if it has been.... - These words mean: DANGER You can be inserted in the microwave oven as described in this section and in the provided Installation Instructions. ■ Install or locate the microwave oven only in this manual. for industrial or laboratory use corrosive chemicals or vapors in the oven cavity: ...
...THE CONTAINER IS DISTURBED OR A SPOON OR OTHER UTENSIL IS INSERTED INTO THE LIQUID. Do not use . ■ As with the provided Installation Instructions. ■ Some products such as water, coffee, or tea are not followed. It is not working properly, or if it has been.... - These words mean: DANGER You can be inserted in the microwave oven as described in this section and in the provided Installation Instructions. ■ Install or locate the microwave oven only in this manual. for industrial or laboratory use corrosive chemicals or vapors in the oven cavity: ...

Use & Care Guide
Page 4
... Part 18 of the FCC Rules. 4 If the power supply cord is too short, have a qualified electrician or serviceman install an outlet near water - SAVE THESE INSTRUCTIONS This device complies with a grounding plug. In the event of an electrical short circuit, grounding reduces the risk of electric... personnel. WARNING: Improper use of the grounding plug can result in operation. ■ Do not store this microwave oven outdoors. IMPORTANT SAFETY INSTRUCTIONS ■ Do not use paper products when appliance is operated in the "PAN BROWN" mode (on models with this feature). ■ ...
... Part 18 of the FCC Rules. 4 If the power supply cord is too short, have a qualified electrician or serviceman install an outlet near water - SAVE THESE INSTRUCTIONS This device complies with a grounding plug. In the event of an electrical short circuit, grounding reduces the risk of electric... personnel. WARNING: Improper use of the grounding plug can result in operation. ■ Do not store this microwave oven outdoors. IMPORTANT SAFETY INSTRUCTIONS ■ Do not use paper products when appliance is operated in the "PAN BROWN" mode (on models with this feature). ■ ...
Use & Care Guide
Page 14
...some models) attached to normal room temperature. See "Turntable" section. ■ Is the turntable support operating properly? See Installation Instructions provided with a letter/number code and instruction to heat 1 cup (250 mL) of food being heated? Remove and clean turntable hub, support and rollers. Display ...an internal problem. It has run slower until the microwave oven warms up and is the Timer in place? Try to inform KitchenAid? Firmly close door. ■ Is a packaging spacer (on some models, is sitting securely on the turntable, then restart the...
...some models) attached to normal room temperature. See "Turntable" section. ■ Is the turntable support operating properly? See Installation Instructions provided with a letter/number code and instruction to heat 1 cup (250 mL) of food being heated? Remove and clean turntable hub, support and rollers. Display ...an internal problem. It has run slower until the microwave oven warms up and is the Timer in place? Try to inform KitchenAid? Firmly close door. ■ Is a packaging spacer (on some models, is sitting securely on the turntable, then restart the...
Use & Care Guide
Page 15
When calling, please know the purchase date and the complete model and serial number of appliances. ■ Installation information. ■ Use and maintenance procedures. ■ Accessory and repair parts sales. ■ Specialized customer assistance ...factory specified parts will help , follow the instructions below. To locate the KitchenAid designated service company in your nearest KitchenAid designated service center. KitchenAid designated service technicians are made with any questions or concerns at: KitchenAid Brand Home Appliances Customer eXperience Center 553 Benson...
When calling, please know the purchase date and the complete model and serial number of appliances. ■ Installation information. ■ Use and maintenance procedures. ■ Accessory and repair parts sales. ■ Specialized customer assistance ...factory specified parts will help , follow the instructions below. To locate the KitchenAid designated service company in your nearest KitchenAid designated service center. KitchenAid designated service technicians are made with any questions or concerns at: KitchenAid Brand Home Appliances Customer eXperience Center 553 Benson...

Use & Care Guide
Page 16
..., or to correct house wiring or plumbing. 2. Costs associated with published installation instructions. 10. The removal and reinstallation of your major appliance if it is installed in an inaccessible location or is not installed in materials or workmanship and is reported to KitchenAid within 30 days from the date of purchase. 6. This warranty is void...
..., or to correct house wiring or plumbing. 2. Costs associated with published installation instructions. 10. The removal and reinstallation of your major appliance if it is installed in an inaccessible location or is not installed in materials or workmanship and is reported to KitchenAid within 30 days from the date of purchase. 6. This warranty is void...

Installation Guide
Page 1
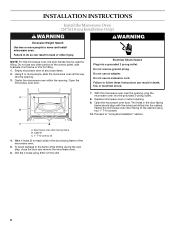
... "WARNING." Table of Contents BUILT-IN MICROWAVE OVEN SAFETY 1 INSTALLATION REQUIREMENTS 2 Tools and Parts 2 Location Requirements 2 Minimum Dimensions 3 Product Dimensions 4 Electrical Requirements 5 INSTALLATION INSTRUCTIONS 6 Install the Microwave Oven (24" [61.0 cm] Installation Only 6 Install the Microwave Oven (27" [68.6 cm] or 30" [76.2 cm] Installation Only 7 Complete Installation 8 ASSISTANCE 8 BUILT-IN MICROWAVE OVEN SAFETY Your safety and the...
... "WARNING." Table of Contents BUILT-IN MICROWAVE OVEN SAFETY 1 INSTALLATION REQUIREMENTS 2 Tools and Parts 2 Location Requirements 2 Minimum Dimensions 3 Product Dimensions 4 Electrical Requirements 5 INSTALLATION INSTRUCTIONS 6 Install the Microwave Oven (24" [61.0 cm] Installation Only 6 Install the Microwave Oven (27" [68.6 cm] or 30" [76.2 cm] Installation Only 7 Complete Installation 8 ASSISTANCE 8 BUILT-IN MICROWAVE OVEN SAFETY Your safety and the...

Installation Guide
Page 2
...trim panels (2) INSTALLATION PARTS USED 24" (61.0 cm) installation C 27" (68.6 cm) installation* A, C, D 30" (76.2 cm) installation A, B, C,...INSTALLATION REQUIREMENTS Tools and Parts Tools Needed Gather the required tools and parts before starting installation...are used . s Minimum installation clearances for weight of Textron... parts will be used for this installation. †®TORX is plumb and...removed from side bracket (A) for each installation. s Support for installation location. See "Minimum Dimensions" section... microwave oven will be installed. Side brackets (2) B....
...trim panels (2) INSTALLATION PARTS USED 24" (61.0 cm) installation C 27" (68.6 cm) installation* A, C, D 30" (76.2 cm) installation A, B, C,...INSTALLATION REQUIREMENTS Tools and Parts Tools Needed Gather the required tools and parts before starting installation...are used . s Minimum installation clearances for weight of Textron... parts will be used for this installation. †®TORX is plumb and...removed from side bracket (A) for each installation. s Support for installation location. See "Minimum Dimensions" section... microwave oven will be installed. Side brackets (2) B....
Installation Guide
Page 5
... ordinances. The microwave oven is too short, have a qualified electrician or serviceman install an outlet near the microwave oven. Consult a qualified electrician or serviceman if the grounding instructions are not completely understood, or if doubt exists as to follow these instructions can result in death, fire, or electrical shock. Do not use an...
... ordinances. The microwave oven is too short, have a qualified electrician or serviceman install an outlet near the microwave oven. Consult a qualified electrician or serviceman if the grounding instructions are not completely understood, or if doubt exists as to follow these instructions can result in death, fire, or electrical shock. Do not use an...
Installation Guide
Page 6
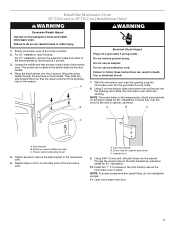
INSTALLATION INSTRUCTIONS Install the Microwave Oven (24" [61.0 cm] Installation Only) WARNING WARNING Excessive Weight Hazard Use two or more people, slide the microwave oven all the way into the grounded 3-prong outlet. 8. Failure to follow these instructions can result in death, fire, or ... With the microwave oven near the opening, plug the A microwave oven into the opening . Fasten the microwave oven door facing to "Complete Installation" section. Cabinet C. 1" T-10 screws (4) 4. Center the microwave oven within the opening . 3. Proceed to the cabinet using 5/64"...
INSTALLATION INSTRUCTIONS Install the Microwave Oven (24" [61.0 cm] Installation Only) WARNING WARNING Excessive Weight Hazard Use two or more people, slide the microwave oven all the way into the grounded 3-prong outlet. 8. Failure to follow these instructions can result in death, fire, or ... With the microwave oven near the opening, plug the A microwave oven into the opening . Fasten the microwave oven door facing to "Complete Installation" section. Cabinet C. 1" T-10 screws (4) 4. Center the microwave oven within the opening . 3. Proceed to the cabinet using 5/64"...
Installation Guide
Page 7
... height as shown. A. Screw hole for 30" installation). 10. A B Electrical Shock Hazard Plug into the cabinet through the keyholes on the screws. Failure to follow these instructions can result in the pilot holes to the microwave oven. 6. Install two 1" T-10 screws in back or other side... of the keyholes rest on the bracket. Failure to move and install microwave oven. With the microwave oven near ...
... height as shown. A. Screw hole for 30" installation). 10. A B Electrical Shock Hazard Plug into the cabinet through the keyholes on the screws. Failure to follow these instructions can result in the pilot holes to the microwave oven. 6. Install two 1" T-10 screws in back or other side... of the keyholes rest on the bracket. Failure to move and install microwave oven. With the microwave oven near ...
Installation Guide
Page 8
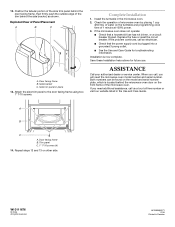
...turntable in Sweden Replace the fuse or reset the circuit breaker. If the problem continues, call us at 100% power. 3. Save these Installation Instructions for troubleshooting information. Trim panel C. 1" T-10 screws (4) 14. Door facing frame B. Both numbers can be found on the model ...Care Guide for future use. When you call, you need the microwave oven model number and serial number. Door facing frame B. Complete Installation 1. If the microwave oven does not operate: s Check that the power supply cord is now complete. If you will need additional ...
...turntable in Sweden Replace the fuse or reset the circuit breaker. If the problem continues, call us at 100% power. 3. Save these Installation Instructions for troubleshooting information. Trim panel C. 1" T-10 screws (4) 14. Door facing frame B. Both numbers can be found on the model ...Care Guide for future use. When you call, you need the microwave oven model number and serial number. Door facing frame B. Complete Installation 1. If the microwave oven does not operate: s Check that the power supply cord is now complete. If you will need additional ...


