
Use & Care Guide
Page 1
... Table of Contents / Table des matières REFRIGERATOR SAFETY 1 SÉCURITÉ DU RÉFRIGÉRATEUR 20 INSTALLATION INSTRUCTIONS 2 INSTRUCTIONS D'INSTALLATION 21 REFRIGERATOR USE 10 UTILISATION DU RÉFRIGÉRATEUR 31 REFRIGERATOR CARE 14 ENTRETIEN DU RÉFRIGÉRATEUR 35...Instrucciones para el usuario del refrigerador" en español, o para obtener información adicional de su producto, visite: www.kitchenaid.com Tenga listo su número de modelo completo. If you still need your appliance. These words mean: DANGER You can ...
... Table of Contents / Table des matières REFRIGERATOR SAFETY 1 SÉCURITÉ DU RÉFRIGÉRATEUR 20 INSTALLATION INSTRUCTIONS 2 INSTRUCTIONS D'INSTALLATION 21 REFRIGERATOR USE 10 UTILISATION DU RÉFRIGÉRATEUR 31 REFRIGERATOR CARE 14 ENTRETIEN DU RÉFRIGÉRATEUR 35...Instrucciones para el usuario del refrigerador" en español, o para obtener información adicional de su producto, visite: www.kitchenaid.com Tenga listo su número de modelo completo. If you still need your appliance. These words mean: DANGER You can ...

Use & Care Guide
Page 2
.... Shelves and covers may not easily climb inside of your refrigerator before using the refrigerator, follow these instructions to help prevent accidents. Glass shelves and covers are still dangerous - When Moving Your Refrigerator: Your refrigerator is normal. Remove the Packaging ■ Remove tape and...9632; Remove doors from dropping. 2 See the cleaning instructions in back or other injury. For more people to move and install refrigerator. ■ Disconnect power before turning on ice maker kit ready models only). IMPORTANT SAFETY INSTRUCTIONS WARNING:To reduce the risk of ...
.... Shelves and covers may not easily climb inside of your refrigerator before using the refrigerator, follow these instructions to help prevent accidents. Glass shelves and covers are still dangerous - When Moving Your Refrigerator: Your refrigerator is normal. Remove the Packaging ■ Remove tape and...9632; Remove doors from dropping. 2 See the cleaning instructions in back or other injury. For more people to move and install refrigerator. ■ Disconnect power before turning on ice maker kit ready models only). IMPORTANT SAFETY INSTRUCTIONS WARNING:To reduce the risk of ...

Use & Care Guide
Page 3
... the temperature will remain above freezing. To ensure proper ventilation for your water pressure, call a licensed, qualified plumber. Do not install the refrigerator in death, fire, or electrical shock. Water Pressure A cold water supply with any type of installation, cleaning, or removing a light bulb...drill IMPORTANT: ■ All installations must meet local plumbing code requirements. ■ Do not use an extension cord. If your refrigerator next to a fixed wall, leave 2¹⁄₂" (6.3 cm) minimum on the model) to allow extra space at the top ...
... the temperature will remain above freezing. To ensure proper ventilation for your water pressure, call a licensed, qualified plumber. Do not install the refrigerator in death, fire, or electrical shock. Water Pressure A cold water supply with any type of installation, cleaning, or removing a light bulb...drill IMPORTANT: ■ All installations must meet local plumbing code requirements. ■ Do not use an extension cord. If your refrigerator next to a fixed wall, leave 2¹⁄₂" (6.3 cm) minimum on the model) to allow extra space at the top ...

Use & Care Guide
Page 4
...copper tubing into the water valve inlet port. Do not overtighten. Secure copper tubing to refrigerator cabinet with the pipe clamp. Compression nut D. Insert the end of the pipe, not the bottom. Sleeve D. Replace the filter if necessary. ■ Allow the storage tank on ...pipe. A B C D A. Connect to clear line of the tubing into the port to avoid kinks. 4. This also keeps normal sediment from the bottom. Add 7 ft (2.1 m) to allow for your model. Insert the end of water. 3. Follow the connection instructions for cleaning. Compression nut B. Find a ¹⁄...
...copper tubing into the water valve inlet port. Do not overtighten. Secure copper tubing to refrigerator cabinet with the pipe clamp. Compression nut D. Insert the end of the pipe, not the bottom. Sleeve D. Replace the filter if necessary. ■ Allow the storage tank on ...pipe. A B C D A. Connect to clear line of the tubing into the port to avoid kinks. 4. This also keeps normal sediment from the bottom. Add 7 ft (2.1 m) to allow for your model. Insert the end of water. 3. Follow the connection instructions for cleaning. Compression nut B. Find a ¹⁄...

Use & Care Guide
Page 5
...;⁄₄" (19.05 mm) and release from the cabinet. 4. Do not use an adapter. Refrigerator Door and Drawer Graphics are included later in the Bottom Hinge Graphic. Unplug refrigerator or disconnect power. 2. Remove the refrigerator handle assembly including the mounting posts and screws. See Graphic 2. 2. 5. A B C D E A. Water valve inlet port C. Correct any adjustable door bins...
...;⁄₄" (19.05 mm) and release from the cabinet. 4. Do not use an adapter. Refrigerator Door and Drawer Graphics are included later in the Bottom Hinge Graphic. Unplug refrigerator or disconnect power. 2. Remove the refrigerator handle assembly including the mounting posts and screws. See Graphic 2. 2. 5. A B C D E A. Water valve inlet port C. Correct any adjustable door bins...

Use & Care Guide
Page 6
...door stop from top door extension. Drive two set screws in the drawer brackets. If you to make sure that the bottom of the refrigerator door aligns evenly with refrigerator. 1. Keep the screws in place. Using a Phillips screwdriver, install the top door cap. Open the freezer drawer to... four turns. Slide the drawer glides out of the freezer drawer. 3. Position refrigerator handle over mounting posts as shown in Graphic 2. See Graphic 5. 4. See Graphic 3. 6. The trim will slide up the door so that hole plugs ...
...door stop from top door extension. Drive two set screws in the drawer brackets. If you to make sure that the bottom of the refrigerator door aligns evenly with refrigerator. 1. Keep the screws in place. Using a Phillips screwdriver, install the top door cap. Open the freezer drawer to... four turns. Slide the drawer glides out of the freezer drawer. 3. Position refrigerator handle over mounting posts as shown in Graphic 2. See Graphic 5. 4. See Graphic 3. 6. The trim will slide up the door so that hole plugs ...

Use & Care Guide
Page 9
... screw B. Leveling screw A. 2¹⁄₂" (6.35 cm) Clearance B. Remove the refrigerator handle: ■ Using a Phillips screwdriver, remove the top door cap. ■ Tap the bottom edge of the refrigerator takes some weight off the adjustment screws and rollers. Reinstall the refrigerator door. 9 Replace the base grille. Please read all instructions before removing door...
... screw B. Leveling screw A. 2¹⁄₂" (6.35 cm) Clearance B. Remove the refrigerator handle: ■ Using a Phillips screwdriver, remove the top door cap. ■ Tap the bottom edge of the refrigerator takes some weight off the adjustment screws and rollers. Reinstall the refrigerator door. 9 Replace the base grille. Please read all instructions before removing door...

Use & Care Guide
Page 10
...: ■ Wait 24 hours for Custom Wood Panels 20 cu. Bottom ¹⁄₄" (6.35 mm) max. Clean panels with stainless steel cleaner and polish or mild soap and water with routed edges. NOTE: Do not use . ft. Door panel Dimensions for normal household refrigerator use paper towels or cleaners which contain solvents such...
...: ■ Wait 24 hours for Custom Wood Panels 20 cu. Bottom ¹⁄₄" (6.35 mm) max. Clean panels with stainless steel cleaner and polish or mild soap and water with routed edges. NOTE: Do not use . ft. Door panel Dimensions for normal household refrigerator use paper towels or cleaners which contain solvents such...

Use & Care Guide
Page 11
... Features Max Cool The max cool feature assists with periods of the compartment. When you need to adjust the temperature in either the refrigerator or freezer compartment, use the settings listed in the chart as a guide. Wait 24 hours between adjustments for approximately 3 seconds,... temperature set point is 1 through 7 (coldest). The FREEZER control adjusts the freezer compartment temperature. Wait 24 hours between adjustments for the refrigerator to shut off in the chart below as a guide. Allow a few seconds for the temperature to stabilize. Press the Max Cool touch...
... Features Max Cool The max cool feature assists with periods of the compartment. When you need to adjust the temperature in either the refrigerator or freezer compartment, use the settings listed in the chart as a guide. Wait 24 hours between adjustments for approximately 3 seconds,... temperature set point is 1 through 7 (coldest). The FREEZER control adjusts the freezer compartment temperature. Wait 24 hours between adjustments for the refrigerator to shut off in the chart below as a guide. Allow a few seconds for the temperature to stabilize. Press the Max Cool touch...

Use & Care Guide
Page 12
...The temperature displays will automatically shut off this feature. OFF - VEGETABLES / HIGH (closed or Door Alarm is displayed, press the Refrigerator (+) or (-) touch pads to restore the control panel lights. Temperature alarm: An alarm will be disabled. OFF - All control ...panel lights will sound repeatedly if the freezer or refrigerator compartment temperatures exceed normal operating temperatures for 5 continuous minutes. Press and hold Temp Alarm for best storage of a power ...
...The temperature displays will automatically shut off this feature. OFF - VEGETABLES / HIGH (closed or Door Alarm is displayed, press the Refrigerator (+) or (-) touch pads to restore the control panel lights. Temperature alarm: An alarm will be disabled. OFF - All control ...panel lights will sound repeatedly if the freezer or refrigerator compartment temperatures exceed normal operating temperatures for 5 continuous minutes. Press and hold Temp Alarm for best storage of a power ...

Use & Care Guide
Page 13
... begins to remove. 2. See "Water Filtration System." IMPORTANT: Air trapped in some models) IMPORTANT: ■ After connecting the refrigerator to avoid flooding. Turn filter counterclockwise to flow. Ice Production Rate ■ The ice maker should be required in the water system.... Dispense enough water every week to produce the first batch of unknown quality without a water filter installed. Systems certified for the refrigerator to flow, continue depressing and releasing the dispenser button (5 seconds on , it stops. Replacing the Water Filter To purchase a ...
... begins to remove. 2. See "Water Filtration System." IMPORTANT: Air trapped in some models) IMPORTANT: ■ After connecting the refrigerator to avoid flooding. Turn filter counterclockwise to flow. Ice Production Rate ■ The ice maker should be required in the water system.... Dispense enough water every week to produce the first batch of unknown quality without a water filter installed. Systems certified for the refrigerator to flow, continue depressing and releasing the dispenser button (5 seconds on , it stops. Replacing the Water Filter To purchase a ...
Use & Care Guide
Page 14
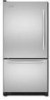
...to access the light assembly. 2. Plug in warm water. 3. Changing the Freezer Light Bulb 1. Firmly press forward on the notches in refrigerator or reconnect power. or 1-800-807-6777 Canada. Do not allow the Stainless Steel Cleaner & Polish to release it locks into the liner... the condenser. ■ Replace the base grille when finished. 5. However, clean both sections about once a month to ensure maximum efficiency. Unplug refrigerator or disconnect power. 2. Plug in the home, the condenser should be cleaned every 2 to 3 months to avoid buildup of food, wrap or...
...to access the light assembly. 2. Plug in warm water. 3. Changing the Freezer Light Bulb 1. Firmly press forward on the notches in refrigerator or reconnect power. or 1-800-807-6777 Canada. Do not allow the Stainless Steel Cleaner & Polish to release it locks into the liner... the condenser. ■ Replace the base grille when finished. 5. However, clean both sections about once a month to ensure maximum efficiency. Unplug refrigerator or disconnect power. 2. Plug in the home, the condenser should be cleaned every 2 to 3 months to avoid buildup of food, wrap or...

Use & Care Guide
Page 15
... with soft cloth. 15 Do not remove ground prong. The doors will not cool either compartment more quickly. Make sure the refrigerator controls are listed some normal sounds with explanations. ■ Buzzing - TROUBLESHOOTING First try the solutions suggested here or visit our website... walls, especially during defrost cycle ■ Popping - Failure to cool completely. Below are on ? In the U.S.A., www.kitchenaid.com In Canada, www.kitchenaid.ca Refrigerator Operation The refrigerator will not operate WARNING Electrical Shock Hazard Plug into a grounded 3 prong outlet.
... with soft cloth. 15 Do not remove ground prong. The doors will not cool either compartment more quickly. Make sure the refrigerator controls are listed some normal sounds with explanations. ■ Buzzing - TROUBLESHOOTING First try the solutions suggested here or visit our website... walls, especially during defrost cycle ■ Popping - Failure to cool completely. Below are on ? In the U.S.A., www.kitchenaid.com In Canada, www.kitchenaid.ca Refrigerator Operation The refrigerator will not operate WARNING Electrical Shock Hazard Plug into a grounded 3 prong outlet.

Use & Care Guide
Page 16
... utensil. ■ Water filter installed on model) is too warm ■ New installation? Allow 24 hours for refrigerator to return to enter refrigerator. If ice volume improves, then the filter may be clogged or incorrectly installed. Replace filter or reinstall it correctly.... remain regarding water pressure? Wash ice bin. Adjust the controls a setting colder. Wait 24 hours after ice maker installation for the refrigerator to remove the minerals. ■ Water filter installed on ? See "Water Supply Requirements." Call a licensed, qualified plumber. Check temperature...
... utensil. ■ Water filter installed on model) is too warm ■ New installation? Allow 24 hours for refrigerator to return to enter refrigerator. If ice volume improves, then the filter may be clogged or incorrectly installed. Replace filter or reinstall it correctly.... remain regarding water pressure? Wash ice bin. Adjust the controls a setting colder. Wait 24 hours after ice maker installation for the refrigerator to remove the minerals. ■ Water filter installed on ? See "Water Supply Requirements." Call a licensed, qualified plumber. Check temperature...

Use & Care Guide
Page 17
...Requirements." Flush the water system. See "Water Dispenser." ■ Recently changed water filter? See "Water Dispenser." ■ Water on the refrigerator? WATER FILTER CERTIFICATIONS 17 See "Water Supply Requirements." ■ Water filter installed on the floor near the base grille? Water from the... dispenser is warm NOTE: Water from the dispenser is leaking from the dispenser. ■ Is the water pressure at the bottom of the refrigerator door. Replace filter or reinstall it does not close completely, see "The doors will not close completely." ■ Recently ...
...Requirements." Flush the water system. See "Water Dispenser." ■ Recently changed water filter? See "Water Dispenser." ■ Water on the refrigerator? WATER FILTER CERTIFICATIONS 17 See "Water Supply Requirements." ■ Water filter installed on the floor near the base grille? Water from the... dispenser is warm NOTE: Water from the dispenser is leaking from the dispenser. ■ Is the water pressure at the bottom of the refrigerator door. Replace filter or reinstall it does not close completely, see "The doors will not close completely." ■ Recently ...

Use & Care Guide
Page 19
... pay for factory specified parts and repair labor to correct defects in accordance with the product, KitchenAid will pay for replacement or repair of the refrigerator/freezer cavity liner (including labor costs) if the part cracks due to defective materials or workmanship. ...correct house wiring or plumbing. 2. Service must be provided by a KitchenAid designated service company. These parts are : compressor, evaporator, condenser, dryer, and connecting tubing. Pickup and delivery. KITCHENAID® REFRIGERATOR WARRANTY ONE YEAR LIMITED WARRANTY For one year from the date of ...
... pay for factory specified parts and repair labor to correct defects in accordance with the product, KitchenAid will pay for replacement or repair of the refrigerator/freezer cavity liner (including labor costs) if the part cracks due to defective materials or workmanship. ...correct house wiring or plumbing. 2. Service must be provided by a KitchenAid designated service company. These parts are : compressor, evaporator, condenser, dryer, and connecting tubing. Pickup and delivery. KITCHENAID® REFRIGERATOR WARRANTY ONE YEAR LIMITED WARRANTY For one year from the date of ...
Parts Diagram
Page 1
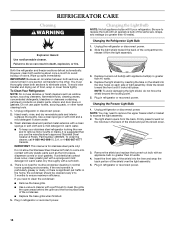
CABINET PARTS REFRIGERATOR For Models: KBRS22KVWH1, KBRS22KVBL1, KBRS22KVSS1, KBLS22KVSS1 (White) (Black) (Stainless−RH) (Stainless−LH) 5−10 Litho In U.S.A. (mat)(bay) 1 Part No. W10268078 Rev.A
CABINET PARTS REFRIGERATOR For Models: KBRS22KVWH1, KBRS22KVBL1, KBRS22KVSS1, KBLS22KVSS1 (White) (Black) (Stainless−RH) (Stainless−LH) 5−10 Litho In U.S.A. (mat)(bay) 1 Part No. W10268078 Rev.A

Parts Diagram
Page 6
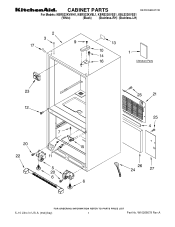
REFRIGERATOR LINER PARTS For Models: KBRS22KVWH1, KBRS22KVBL1, KBRS22KVSS1, KBLS22KVSS1 (White) (Black) (Stainless−RH) (Stainless−LH) Illus. No. Part No. No. DESCRIPTION 1... 6 C3680310V Switch, Light 7 12806501 Cover, Light Illus. Part No. No. DESCRIPTION 15 W10207517 Control, Damper (Includes Harness) Following Parts Not Illustrated W10224290 Harness, Controls (Refrigerator) (Includes Thermistor) 6 W10268078 DESCRIPTION 8 12806601V Housing, Light 9 W10194422V Bulb, Light (2) 10 12570701V Socket, Light (2) 11 12806801 Insert, Damper Cover 12 12990604 Screw (2)...
REFRIGERATOR LINER PARTS For Models: KBRS22KVWH1, KBRS22KVBL1, KBRS22KVSS1, KBLS22KVSS1 (White) (Black) (Stainless−RH) (Stainless−LH) Illus. No. Part No. No. DESCRIPTION 1... 6 C3680310V Switch, Light 7 12806501 Cover, Light Illus. Part No. No. DESCRIPTION 15 W10207517 Control, Damper (Includes Harness) Following Parts Not Illustrated W10224290 Harness, Controls (Refrigerator) (Includes Thermistor) 6 W10268078 DESCRIPTION 8 12806601V Housing, Light 9 W10194422V Bulb, Light (2) 10 12570701V Socket, Light (2) 11 12806801 Insert, Damper Cover 12 12990604 Screw (2)...

Parts Diagram
Page 8
... For Models: KBRS22KVWH1, KBRS22KVBL1, KBRS22KVSS1, KBLS22KVSS1 (White) (Black) (Stainless−RH) (Stainless−LH) Illus. DESCRIPTION 1 Door, Refrigerator 12658583WQ White 12658583BQ Black 13023839SQ Stainless−RH 13023840SQ Stainless−LH 2 12991703 Screw (2) 3 12744905V Door, Dairy (Includes #4) 4 12369502SP Tray, Dairy 5 12849125SP Bucket, Medium (3) 6...Bushing, Door 10961006W White 10961006B Black 17 Stop, Door 10447111 White 10447112 Black 18 12643911SP Bucket, Short 19 12690102V Caddy, Can 20 13001201 Mount, Handle 8 W10268078 No. Part No.
... For Models: KBRS22KVWH1, KBRS22KVBL1, KBRS22KVSS1, KBLS22KVSS1 (White) (Black) (Stainless−RH) (Stainless−LH) Illus. DESCRIPTION 1 Door, Refrigerator 12658583WQ White 12658583BQ Black 13023839SQ Stainless−RH 13023840SQ Stainless−LH 2 12991703 Screw (2) 3 12744905V Door, Dairy (Includes #4) 4 12369502SP Tray, Dairy 5 12849125SP Bucket, Medium (3) 6...Bushing, Door 10961006W White 10961006B Black 17 Stop, Door 10447111 White 10447112 Black 18 12643911SP Bucket, Short 19 12690102V Caddy, Can 20 13001201 Mount, Handle 8 W10268078 No. Part No.
Parts Diagram
Page 10
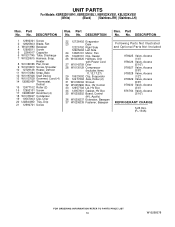
...Roller (2) 16 12992101 Screw 17 10835903SP Grommet (4) 18 W10135027 Condenser 19 10547003 Clip, Drier 20 12225402WD Tray, Drip 21 12990701 Screw 22 12726402 Evaporator 23 Dam 12225702 Right Side 12225602 Left Side 24 12825101 Motor, Fan 25 10428101 Clip...Valve, Access (5/16") 978027 Valve, Access (3/8") 978028 Valve, Access (1/2") 978029 Valve, Access (5/8") 978030 Valve, Access (3/4") 876764 Valve, Access (3/16") REFRIGERANT CHARGE 5.25 Ozs. (R−134A) 10 W10268078 DESCRIPTION 1 12992301 Screw 2 12825803 Blade, Fan 3 W10210983 Basepan 4 12990511 Screw 5 2264017 Capacitor 6 ...
...Roller (2) 16 12992101 Screw 17 10835903SP Grommet (4) 18 W10135027 Condenser 19 10547003 Clip, Drier 20 12225402WD Tray, Drip 21 12990701 Screw 22 12726402 Evaporator 23 Dam 12225702 Right Side 12225602 Left Side 24 12825101 Motor, Fan 25 10428101 Clip...Valve, Access (5/16") 978027 Valve, Access (3/8") 978028 Valve, Access (1/2") 978029 Valve, Access (5/8") 978030 Valve, Access (3/4") 876764 Valve, Access (3/16") REFRIGERANT CHARGE 5.25 Ozs. (R−134A) 10 W10268078 DESCRIPTION 1 12992301 Screw 2 12825803 Blade, Fan 3 W10210983 Basepan 4 12990511 Screw 5 2264017 Capacitor 6 ...


