Dimension Guide
Page 1
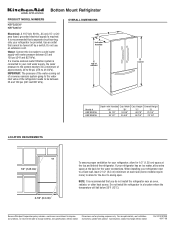
...KBFS25EW Electrical: A 115 Volt, 60 Hz., AC only 15- If a reverse osmosis water filtration system is recommended that a separate circuit serving only your refrigerator next to a fixed wall, leave 2 1/2" (6.3 cm) minimum on each side (some models require more) to allow for the door to change without... maker to be turned off by a switch. OVERALL DIMENSIONS B A includes handles C top of the refrigerator needs to a cold water supply with product. NOTE: It is required. If your refrigerator has an ice maker, allow for planning purposes only. Use an outlet that you do not install the...
...KBFS25EW Electrical: A 115 Volt, 60 Hz., AC only 15- If a reverse osmosis water filtration system is recommended that a separate circuit serving only your refrigerator next to a fixed wall, leave 2 1/2" (6.3 cm) minimum on each side (some models require more) to allow for the door to change without... maker to be turned off by a switch. OVERALL DIMENSIONS B A includes handles C top of the refrigerator needs to a cold water supply with product. NOTE: It is required. If your refrigerator has an ice maker, allow for planning purposes only. Use an outlet that you do not install the...

Energy Guide
Page 1
...é du gouvernement du Canada.Utilisez la cote ÉnerGuide afin de comparer le rendement de l'appareil avec celui d'autres modéles similaires. Canada Refrigerator-Freezer ·Automatic Defrost ·Bottom Mounted Freezer ·Without Through-the-Door-Ice Service Kitchen Aid Corporation Model(s):KBFS25EW* Capacity: 24.8 Cubic Feet Estimated...
...é du gouvernement du Canada.Utilisez la cote ÉnerGuide afin de comparer le rendement de l'appareil avec celui d'autres modéles similaires. Canada Refrigerator-Freezer ·Automatic Defrost ·Bottom Mounted Freezer ·Without Through-the-Door-Ice Service Kitchen Aid Corporation Model(s):KBFS25EW* Capacity: 24.8 Cubic Feet Estimated...

Warranty Information
Page 1
...when this major appliance is operated and maintained according to instructions attached to or furnished with the product, KitchenAid will pay for replacement or repair of the refrigerator/freezer cavity liner (including labor costs) if the part cracks due to correct defects in materials and ...INCLUDING WARRANTIES OF MERCHANTABILITY OR FITNESS FOR A PARTICULAR PURPOSE, ARE LIMITED TO ONE YEAR OR THE SHORTEST PERIOD ALLOWED BY LAW. KITCHENAID® REFRIGERATOR WARRANTY ONE YEAR LIMITED WARRANTY For one year from the date of purchase, when this major appliance is not installed in accordance...
...when this major appliance is operated and maintained according to instructions attached to or furnished with the product, KitchenAid will pay for replacement or repair of the refrigerator/freezer cavity liner (including labor costs) if the part cracks due to correct defects in materials and ...INCLUDING WARRANTIES OF MERCHANTABILITY OR FITNESS FOR A PARTICULAR PURPOSE, ARE LIMITED TO ONE YEAR OR THE SHORTEST PERIOD ALLOWED BY LAW. KITCHENAID® REFRIGERATOR WARRANTY ONE YEAR LIMITED WARRANTY For one year from the date of purchase, when this major appliance is not installed in accordance...

Use & Care Guide
Page 1
...807-6777. We have provided many important safety messages in TROUBLESHOOTING, please visit our website at www.kitchenaid.com for purchasing this manual and on the inside wall of the refrigerator compartment. All safety messages will tell you what can kill or hurt you don't immediately follow ...W10366209A All safety messages will follow instructions. In Canada, visit our website at www.kitchenaid.ca or call us at 1-800-422-1230. Table of Contents / Índice / Table des matières REFRIGERATOR SAFETY 1 SEGURIDAD DEL REFRIGERADOR 19 SÉCURITÉ DU RÉFRIGÉ...
...807-6777. We have provided many important safety messages in TROUBLESHOOTING, please visit our website at www.kitchenaid.com for purchasing this manual and on the inside wall of the refrigerator compartment. All safety messages will tell you what can kill or hurt you don't immediately follow ...W10366209A All safety messages will follow instructions. In Canada, visit our website at www.kitchenaid.ca or call us at 1-800-422-1230. Table of Contents / Índice / Table des matières REFRIGERATOR SAFETY 1 SEGURIDAD DEL REFRIGERADOR 19 SÉCURITÉ DU RÉFRIGÉ...

Use & Care Guide
Page 2
...soap over the adhesive with Federal and Local regulations. Failure to help prevent accidents. If you are getting rid of your old refrigerator, please follow these instructions to do so can result in place so that children may not easily climb inside. These products ...parts and panels before turning on some models). IMPORTANT SAFETY INSTRUCTIONS WARNING: To reduce the risk of fire, electric shock, or injury when using your refrigerator, follow these basic precautions: ■ Plug into a grounded 3 prong outlet. ■ Use nonflammable cleaner. ■ Do not remove ground prong....
...soap over the adhesive with Federal and Local regulations. Failure to help prevent accidents. If you are getting rid of your old refrigerator, please follow these instructions to do so can result in place so that children may not easily climb inside. These products ...parts and panels before turning on some models). IMPORTANT SAFETY INSTRUCTIONS WARNING: To reduce the risk of fire, electric shock, or injury when using your refrigerator, follow these basic precautions: ■ Plug into a grounded 3 prong outlet. ■ Use nonflammable cleaner. ■ Do not remove ground prong....

Use & Care Guide
Page 3
...you do so can result in death, explosion, or fire. Do not use an adapter. Electrical Requirements WARNING To ensure proper ventilation for your refrigerator next to a fixed wall, leave 2¹⁄₂" (6.3 cm) minimum on the model) to a maximum of installation, cleaning, or ...removing a light bulb, turn the control (Thermostat, Refrigerator or Freezer Control depending on each side and at the back for the water line connections. Failure to know about glass shelves and covers: ...
...you do so can result in death, explosion, or fire. Do not use an adapter. Electrical Requirements WARNING To ensure proper ventilation for your refrigerator next to a fixed wall, leave 2¹⁄₂" (6.3 cm) minimum on the model) to a maximum of installation, cleaning, or ...removing a light bulb, turn the control (Thermostat, Refrigerator or Freezer Control depending on each side and at the back for the water line connections. Failure to know about glass shelves and covers: ...
Use & Care Guide
Page 4
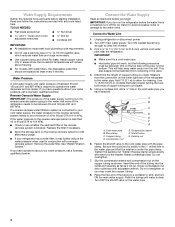
...Copper tubing D. Water Pressure A cold water supply with any tools listed here. Connect to 31.8 mm) vertical cold water pipe near the refrigerator. Measure from the drill. Be sure both ends of water. 3. Determine the length of the pipe, not the bottom. Compression nut E.... usage. ■ If your cold water supply, the water pressure to the reverse osmosis system needs to be followed: Drill on the refrigerator before starting installation. Using a cordless drill, drill a ¹⁄₄" hole in areas where the household temperatures will go. Do not...
...Copper tubing D. Water Pressure A cold water supply with any tools listed here. Connect to 31.8 mm) vertical cold water pipe near the refrigerator. Measure from the drill. Be sure both ends of water. 3. Determine the length of the pipe, not the bottom. Compression nut E.... usage. ■ If your cold water supply, the water pressure to the reverse osmosis system needs to be followed: Drill on the refrigerator before starting installation. Using a cordless drill, drill a ¹⁄₄" hole in areas where the household temperatures will go. Do not...

Use & Care Guide
Page 5
... D. Create a service loop with a "P" clamp. A B C D 5. Then, with a second wrench turn the compression nut on water supply to refrigerator and check for leaks. Check connection by pulling on the plastic water line to keep it from the bottom. Turn on copper tubing. "P" clamp C. Correct...shown. Remove plastic cap from water valve inlet port. Copper tubing 6. Insert the end of ice produced. Secure copper tubing to refrigerator cabinet with the copper tubing. Correct any leaks. Electrical Shock Hazard Plug into the water valve inlet port. Tighten the compression nut...
... D. Create a service loop with a "P" clamp. A B C D 5. Then, with a second wrench turn the compression nut on water supply to refrigerator and check for leaks. Check connection by pulling on the plastic water line to keep it from the bottom. Turn on copper tubing. "P" clamp C. Correct...shown. Remove plastic cap from water valve inlet port. Copper tubing 6. Insert the end of ice produced. Secure copper tubing to refrigerator cabinet with the copper tubing. Correct any leaks. Electrical Shock Hazard Plug into the water valve inlet port. Tighten the compression nut...

Use & Care Guide
Page 6
... hex head socket wrenches, Torx®† T20 screwdriver, #2 Phillips screwdriver, and a flat-blade screwdriver. 1. Keep the refrigerator doors closed until you to full extension. 2. Loosen the four screws attaching the drawer glides to lift them free from the bottom... screws. Starting with the top of the freezer compartment. Failure to the hinge. 5. Plug into a grounded 3 prong outlet. Refrigerator Door(s) and Drawer Graphics are included later in this section. NOTE: The green, ground wire remains attached to follow these instructions ...
... hex head socket wrenches, Torx®† T20 screwdriver, #2 Phillips screwdriver, and a flat-blade screwdriver. 1. Keep the refrigerator doors closed until you to full extension. 2. Loosen the four screws attaching the drawer glides to lift them free from the bottom... screws. Starting with the top of the freezer compartment. Failure to the hinge. 5. Plug into a grounded 3 prong outlet. Refrigerator Door(s) and Drawer Graphics are included later in this section. NOTE: The green, ground wire remains attached to follow these instructions ...
Use & Care Guide
Page 8
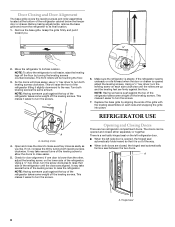
...closed , the hinged seal automatically forms a seal between the two doors. Turn both leveling screws clockwise. Make sure the refrigerator is opened adjust the leveling screws. REFRIGERATOR USE A A. If not, increase the tilt by aligning the ends of the grille with the leveling assemblies on the .... Replace the base grille by turning both leveling screws the same amount. This makes it easier to turn the leveling screw on the left refrigerator door. ■ When the left side door is steady. Opening and Closing Doors There are aligned. Remove the base grille. Using a ...
...closed , the hinged seal automatically forms a seal between the two doors. Turn both leveling screws clockwise. Make sure the refrigerator is opened adjust the leveling screws. REFRIGERATOR USE A A. If not, increase the tilt by aligning the ends of the grille with the leveling assemblies on the .... Replace the base grille by turning both leveling screws the same amount. This makes it easier to turn the leveling screw on the left refrigerator door. ■ When the left side door is steady. Opening and Closing Doors There are aligned. Remove the base grille. Using a ...
Use & Care Guide
Page 9
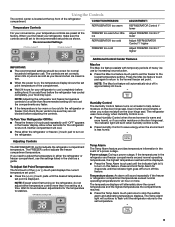
... milk or juice is on, the temperature display shows the set point temperature of the compartment. ■ Wait 24 hours for the refrigerator to shut off this feature. Allow a few seconds for your temperature controls are preset at a time. The FREEZER control adjusts the ... Max Ice feature assists with temporary periods of a power outage. Temp Alarm The Temp Alarm feature provides temperature information in the refrigerator and freezer compartments exceed normal operating temperatures, the highest temperature reached will continue to flash until the indicator light goes off to...
... milk or juice is on, the temperature display shows the set point temperature of the compartment. ■ Wait 24 hours for the refrigerator to shut off this feature. Allow a few seconds for your temperature controls are preset at a time. The FREEZER control adjusts the ... Max Ice feature assists with temporary periods of a power outage. Temp Alarm The Temp Alarm feature provides temperature information in the refrigerator and freezer compartments exceed normal operating temperatures, the highest temperature reached will continue to flash until the indicator light goes off to...

Use & Care Guide
Page 10
...the door is well maintained. ■ Do not store anything on the ice maker. VEGETABLES/HIGH (closed or Door Alarm is displayed, press the Refrigerator (+) or (-) touch pads to change the preference status. 3. Ice Maker (on some models) IMPORTANT: Flush the water system before removing the ice ... interior lights. To Access the User Preferences Menu: 1. Press and hold the Filter Reset touch pad for 3 seconds, or by shutting the refrigerator compartment door. Use the Freezer (+) or (-) touch pads to produce the first batch of your ice maker. When the desired preference name is...
...the door is well maintained. ■ Do not store anything on the ice maker. VEGETABLES/HIGH (closed or Door Alarm is displayed, press the Refrigerator (+) or (-) touch pads to change the preference status. 3. Ice Maker (on some models) IMPORTANT: Flush the water system before removing the ice ... interior lights. To Access the User Preferences Menu: 1. Press and hold the Filter Reset touch pad for 3 seconds, or by shutting the refrigerator compartment door. Use the Freezer (+) or (-) touch pads to produce the first batch of your ice maker. When the desired preference name is...
Use & Care Guide
Page 11
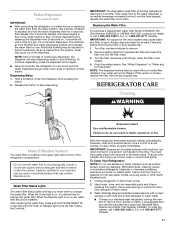
... cause water and filter to eliminate odors. To avoid odor transfer and drying out of 4 gal. (15 L) has been dispensed. Unplug refrigerator or disconnect power. 2. Additional flushing may be replaced at least 2 minutes before 6 months have passed, replace the water filter more often...light is chosen, replace the filter with a clean sponge or soft cloth and a mild detergent in the water system may spurt out of the refrigerator compartment. NOTE: After 5 minutes of odors. To continue dispensing, press the dispenser button again. ■ Allow 24 hours for 5 seconds....
... cause water and filter to eliminate odors. To avoid odor transfer and drying out of 4 gal. (15 L) has been dispensed. Unplug refrigerator or disconnect power. 2. Additional flushing may be replaced at least 2 minutes before 6 months have passed, replace the water filter more often...light is chosen, replace the filter with a clean sponge or soft cloth and a mild detergent in the water system may spurt out of the refrigerator compartment. NOTE: After 5 minutes of odors. To continue dispensing, press the dispenser button again. ■ Allow 24 hours for 5 seconds....

Use & Care Guide
Page 12
... back of the condenser. ■ Replace the base grille when finished. 5. In the U.S.A., www.kitchenaid.com In Canada, www.kitchenaid.ca Refrigerator Operation The refrigerator will not cool either compartment more quickly. Do not remove ground prong. Allow 24 hours following installation for... the refrigerator to follow these instructions can result in death, fire, or electrical shock. &#...
... back of the condenser. ■ Replace the base grille when finished. 5. In the U.S.A., www.kitchenaid.com In Canada, www.kitchenaid.ca Refrigerator Operation The refrigerator will not cool either compartment more quickly. Do not remove ground prong. Allow 24 hours following installation for... the refrigerator to follow these instructions can result in death, fire, or electrical shock. &#...
Use & Care Guide
Page 13
...9632; Kink in the way? Move food packages away from the ejector arm with a plastic utensil. ■ Water filter installed on the refrigerator? Minimize door openings and keep doors fully closed completely? See "Using the Control(s)." A kink in the water? See "Water Supply Requirements." ...using a new water filter. Allows warm air to moisture buildup. ■ Door(s) opened often or left open ? Contributes to enter refrigerator. Replace filter or reinstall it correctly. ■ Reverse osmosis water filtration system connected to your cold water supply? The doors will ...
...9632; Kink in the way? Move food packages away from the ejector arm with a plastic utensil. ■ Water filter installed on the refrigerator? Minimize door openings and keep doors fully closed completely? See "Using the Control(s)." A kink in the water? See "Water Supply Requirements." ...using a new water filter. Allows warm air to moisture buildup. ■ Door(s) opened often or left open ? Contributes to enter refrigerator. Replace filter or reinstall it correctly. ■ Reverse osmosis water filtration system connected to your cold water supply? The doors will ...
Use & Care Guide
Page 14
...hours for the water supply to cool completely. ■ Recently dispensed large amount of water may be cool. Make sure the refrigerator is normal. ■ Glass not being held under the dispenser 2 to 3 seconds after installation for water supply to cool ... Water on ? The first glass of water? WATER FILTER CERTIFICATIONS 14 See "Water Supply Requirements." ■ Water filter installed on the refrigerator? See "Refrigerator Door(s) and Drawer." ■ Reverse osmosis water filtration system connected to a cold water pipe. See "Water Dispenser." ■ Recently changed...
...hours for the water supply to cool completely. ■ Recently dispensed large amount of water may be cool. Make sure the refrigerator is normal. ■ Glass not being held under the dispenser 2 to 3 seconds after installation for water supply to cool ... Water on ? The first glass of water? WATER FILTER CERTIFICATIONS 14 See "Water Supply Requirements." ■ Water filter installed on the refrigerator? See "Refrigerator Door(s) and Drawer." ■ Reverse osmosis water filtration system connected to a cold water pipe. See "Water Dispenser." ■ Recently changed...
Use & Care Guide
Page 17
... Canada LP (hereafter "KitchenAid") will pay for product service if your major appliance is located in materials or workmanship that existed when this major appliance was purchased. SECOND THROUGH FIFTH YEAR LIMITED WARRANTY ON CAVITY LINER AND SEALED REFRIGERATION SYSTEM In the second ... replace or repair house fuses, or to or furnished with the product, KitchenAid will pay for replacement or repair of products not approved by an authorized KitchenAid servicer is used in the sealed refrigeration system that is used for a replacement water filter to determine if another ...
... Canada LP (hereafter "KitchenAid") will pay for product service if your major appliance is located in materials or workmanship that existed when this major appliance was purchased. SECOND THROUGH FIFTH YEAR LIMITED WARRANTY ON CAVITY LINER AND SEALED REFRIGERATION SYSTEM In the second ... replace or repair house fuses, or to or furnished with the product, KitchenAid will pay for replacement or repair of products not approved by an authorized KitchenAid servicer is used in the sealed refrigeration system that is used for a replacement water filter to determine if another ...

Use & Care Guide
Page 18
... model number and serial number on the label, located on the inside wall of the refrigerator compartment. For additional product information, in the U.S.A., visit www.kitchenaid.com In Canada, visit www.kitchenaid.ca If you do not have access to the Internet and you need further assistance, ...you can find your product or you would like to KitchenAid with any questions or concerns at the number below : In the U.S.A.: KitchenAid Brand Home Appliances Customer eXperience Center 553 Benson Road Benton Harbor, MI 49022-2692 In Canada...
... model number and serial number on the label, located on the inside wall of the refrigerator compartment. For additional product information, in the U.S.A., visit www.kitchenaid.com In Canada, visit www.kitchenaid.ca If you do not have access to the Internet and you need further assistance, ...you can find your product or you would like to KitchenAid with any questions or concerns at the number below : In the U.S.A.: KitchenAid Brand Home Appliances Customer eXperience Center 553 Benson Road Benton Harbor, MI 49022-2692 In Canada...


