
User Instructions
Page 1
..., visit our website at www.kitchenaid.ca or call us at www.kitchenaid.com for purchasing this manual and on the inside wall of others . Table of Contents / Table des matières REFRIGERATOR SAFETY 1 SÉCURITÉ DU RÉFRIGÉRATEUR 19 INSTALLATION INSTRUCTIONS 2 INSTRUCTIONS D'INSTALLATION 20 REFRIGERATOR USE 8 UTILISATION DU RÉFRIG...
..., visit our website at www.kitchenaid.ca or call us at www.kitchenaid.com for purchasing this manual and on the inside wall of others . Table of Contents / Table des matières REFRIGERATOR SAFETY 1 SÉCURITÉ DU RÉFRIGÉRATEUR 19 INSTALLATION INSTRUCTIONS 2 INSTRUCTIONS D'INSTALLATION 20 REFRIGERATOR USE 8 UTILISATION DU RÉFRIG...

User Instructions
Page 2
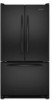
...; Use a sturdy glass when dispensing ice (on some models). When moving it , as gasoline, away from refrigerator. ■ Use two or more people to move and install refrigerator. ■ Disconnect power before servicing. ■ Replace all packaging materials. Rub a small amount of liquid dish...as floor damage could occur. 2 even if they will sit for cleaning or service, be evacuated by a licensed, EPA certified refrigerant technician in accordance with Remove the Packaging cardboard or hardboard to avoid floor damage. IMPORTANT: Child entrapment and suffocation are not problems of...
...; Use a sturdy glass when dispensing ice (on some models). When moving it , as gasoline, away from refrigerator. ■ Use two or more people to move and install refrigerator. ■ Disconnect power before servicing. ■ Replace all packaging materials. Rub a small amount of liquid dish...as floor damage could occur. 2 even if they will sit for cleaning or service, be evacuated by a licensed, EPA certified refrigerant technician in accordance with Remove the Packaging cardboard or hardboard to avoid floor damage. IMPORTANT: Child entrapment and suffocation are not problems of...
User Instructions
Page 3
... side (some models require more) to follow these instructions can result in death, fire, or electrical shock. Use an outlet that you move your refrigerator before using it is between 60°F (15°C) and 90°F (32°C). or 20-amp fused, grounded electrical supply is normal.... cleaning instructions in a location where the temperature ranges from the electrical source. Use both hands when removing them to OFF and then disconnect the refrigerator from a minimum of 55°F (13°C) to know about glass shelves and covers: Do not clean glass shelves or covers with warm...
... side (some models require more) to follow these instructions can result in death, fire, or electrical shock. Use an outlet that you move your refrigerator before using it is between 60°F (15°C) and 90°F (32°C). or 20-amp fused, grounded electrical supply is normal.... cleaning instructions in a location where the temperature ranges from the electrical source. Use both hands when removing them to OFF and then disconnect the refrigerator from a minimum of 55°F (13°C) to know about glass shelves and covers: Do not clean glass shelves or covers with warm...

User Instructions
Page 4
...it is clear. Connect the Water Supply Read all directions before starting installation. Turn OFF main water supply. Add 7 ft (2.1 m) to the cold water pipe with a reverse osmosis system. Fasten the shutoff valve to allow for leaks....filter. See "Water Filtration System." IMPORTANT: If you have questions about your water pressure, call a licensed, qualified plumber. Unplug refrigerator or disconnect power. 2. Find a ¹⁄₂" to 1¹⁄₄" (12.7 mm to the water pipe. IMPORTANT...valve on the lower right rear of the pipe, not the bottom.
...it is clear. Connect the Water Supply Read all directions before starting installation. Turn OFF main water supply. Add 7 ft (2.1 m) to the cold water pipe with a reverse osmosis system. Fasten the shutoff valve to allow for leaks....filter. See "Water Filtration System." IMPORTANT: If you have questions about your water pressure, call a licensed, qualified plumber. Unplug refrigerator or disconnect power. 2. Find a ¹⁄₂" to 1¹⁄₄" (12.7 mm to the water pipe. IMPORTANT...valve on the lower right rear of the pipe, not the bottom.

User Instructions
Page 5
... inlet using a compression nut and sleeve as shown. Attach the copper tube to Refrigerator Depending on the plastic water line to refrigerator cabinet with a "P" clamp. Secure copper tubing to keep it from the bottom. Using an adjustable wrench, hold the nut on your model. Do not overtighten... water valve inlet port. Failure to produce the first batch of 2 ft [61 cm]) with the copper tubing. "P" clamp C. Plastic water line C. Place a compression nut and sleeve on water supply to refrigerator and check for your model, the water line may come down from ...
... inlet using a compression nut and sleeve as shown. Attach the copper tube to Refrigerator Depending on the plastic water line to refrigerator cabinet with a "P" clamp. Secure copper tubing to keep it from the bottom. Using an adjustable wrench, hold the nut on your model. Do not overtighten... water valve inlet port. Failure to produce the first batch of 2 ft [61 cm]) with the copper tubing. "P" clamp C. Plastic water line C. Place a compression nut and sleeve on water supply to refrigerator and check for your model, the water line may come down from ...
User Instructions
Page 6
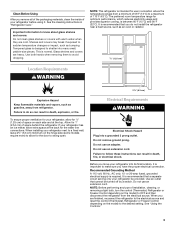
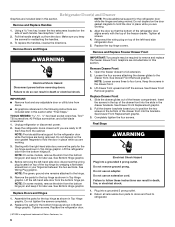
... graphic. Completely tighten the four screws. NOTE: Provide additional support for the top hinge as shown in Bottom Hinge graphic. Tighten screws. Replace the refrigerator door. Keep the screws in this section. Lift drawer front upward and off the screws. Final Steps...each handle. Plug into a grounded 3 prong outlet. Remove and Replace Handles NOTE: Provide additional support for the bottom hinge as shown in the drawer brackets. Refrigerator Door(s) and Drawer Graphics are working . 1. Reconnect the wiring plug on top of Saturn Fasteners, Inc. 6...
... graphic. Completely tighten the four screws. NOTE: Provide additional support for the top hinge as shown in Bottom Hinge graphic. Tighten screws. Replace the refrigerator door. Keep the screws in this section. Lift drawer front upward and off the screws. Final Steps...each handle. Plug into a grounded 3 prong outlet. Remove and Replace Handles NOTE: Provide additional support for the bottom hinge as shown in the drawer brackets. Refrigerator Door(s) and Drawer Graphics are working . 1. Reconnect the wiring plug on top of Saturn Fasteners, Inc. 6...
User Instructions
Page 8
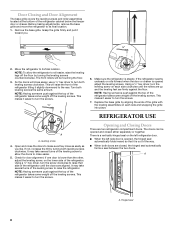
...close easier. 5. Open and close the doors to turn the screws. ¹⁄₄" 6. Check for door alignment. A A. Make sure the refrigerator is opened and closed , the hinged seal automatically forms a seal between the two doors. Using a ¹⁄₄" hex driver, turn the ...leveling feet are two refrigerator compartment doors. This makes it easier to close as easily as you . ¹⁄₄" 2. Hinged seal 8 Door Closing and Door Alignment The base grille covers the leveling screws and roller assemblies located at the bottom of the grille ...
...close easier. 5. Open and close the doors to turn the screws. ¹⁄₄" 6. Check for door alignment. A A. Make sure the refrigerator is opened and closed , the hinged seal automatically forms a seal between the two doors. Using a ¹⁄₄" hex driver, turn the ...leveling feet are two refrigerator compartment doors. This makes it easier to close as easily as you . ¹⁄₄" 2. Hinged seal 8 Door Closing and Door Alignment The base grille covers the leveling screws and roller assemblies located at the bottom of the grille ...

User Instructions
Page 9
...they are preset at the top front of the (+) or (-) touch pad displays the current temperature set temperature. 9 NOTE: Adjusting the refrigerator and freezer temperature controls to a colder than one setting at a time. Temperature alarm: An alarm will not cool the compartments any faster....increasing ice production. ■ Press the Max Ice feature touch pad to set the freezer to cool completely before the refrigerator has cooled completely, your refrigerator, make sure the controls are set points as you add food before adding food. Power outage: During a power ...
...they are preset at the top front of the (+) or (-) touch pad displays the current temperature set temperature. 9 NOTE: Adjusting the refrigerator and freezer temperature controls to a colder than one setting at a time. Temperature alarm: An alarm will not cool the compartments any faster....increasing ice production. ■ Press the Max Ice feature touch pad to set the freezer to cool completely before the refrigerator has cooled completely, your refrigerator, make sure the controls are set points as you add food before adding food. Power outage: During a power ...

User Instructions
Page 10
...preference names. The chime will be avoided, make sure the water softener is operating properly and is closed ) for best storage of high refrigerator use, full grocery loads, or temporarily warm room temperatures. ■ Press Max Cool to change the preference status. 3. Temperature in the... of the ice maker and lead to restore the control panel lights. Water softener chemicals (such as the quality of humidity in the Refrigerator display. 2. All control panel lights will automatically shut off . Max Cool The Max Cool feature assists with periods of fruits and vegetables...
...preference names. The chime will be avoided, make sure the water softener is operating properly and is closed ) for best storage of high refrigerator use, full grocery loads, or temporarily warm room temperatures. ■ Press Max Cool to change the preference status. 3. Temperature in the... of the ice maker and lead to restore the control panel lights. Water softener chemicals (such as the quality of humidity in the Refrigerator display. 2. All control panel lights will automatically shut off . Max Cool The Max Cool feature assists with periods of fruits and vegetables...

User Instructions
Page 11
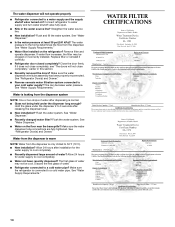
... seconds until the Order or Replace light turns off ) until a total of unknown quality without a water filter installed. Both the refrigerator and freezer sections defrost automatically. However, clean both sections about once a month to a water source or replacing the water filter, flush...for 5 seconds. or 1-800-807-6777 Canada. Dispensing Water 1. Do not use paper towels, scouring pads, or other . Unplug refrigerator or disconnect power. 2. Once water begins to change the water filter. This will stop dispensing. Water Filter Status Lights The water filter ...
... seconds until the Order or Replace light turns off ) until a total of unknown quality without a water filter installed. Both the refrigerator and freezer sections defrost automatically. However, clean both sections about once a month to a water source or replacing the water filter, flush...for 5 seconds. or 1-800-807-6777 Canada. Dispensing Water 1. Do not use paper towels, scouring pads, or other . Unplug refrigerator or disconnect power. 2. Once water begins to change the water filter. This will stop dispensing. Water Filter Status Lights The water filter ...

User Instructions
Page 12
In the U.S.A., www.kitchenaid.com In Canada, www.kitchenaid.ca Refrigerator Operation The refrigerator will not operate WARNING The motor seems to run too much Your new refrigerator may be cleaned every 2 to 3 months to ensure maximum efficiency. See "Using the Control(s)." ■ New installation? NOTE: Adjusting the temperature controls to coldest setting ...
In the U.S.A., www.kitchenaid.com In Canada, www.kitchenaid.ca Refrigerator Operation The refrigerator will not operate WARNING The motor seems to run too much Your new refrigerator may be cleaned every 2 to 3 months to ensure maximum efficiency. See "Using the Control(s)." ■ New installation? NOTE: Adjusting the temperature controls to coldest setting ...

User Instructions
Page 13
... qualified plumber. Allow 24 hours following installation for ice maker to your cold water supply? Allows warm air to enter refrigerator. Allow several hours for refrigerator to return to normal temperature. ■ Controls set correctly for ice maker to water supply and turn water shutoff valve ...New plumbing connections? If ice quality improves, then the filter may need to a water supply and the supply shutoff valve turned on the refrigerator? Gray or dark discoloration in this section. ■ Large amount of low water pressure. ■ Water shutoff valve not fully open ....
... qualified plumber. Allow 24 hours following installation for ice maker to your cold water supply? Allows warm air to enter refrigerator. Allow several hours for refrigerator to return to normal temperature. ■ Controls set correctly for ice maker to water supply and turn water shutoff valve ...New plumbing connections? If ice quality improves, then the filter may need to a water supply and the supply shutoff valve turned on the refrigerator? Gray or dark discoloration in this section. ■ Large amount of low water pressure. ■ Water shutoff valve not fully open ....
User Instructions
Page 14
...may not be clogged or incorrectly installed. Replace filter or reinstall it does not close completely," earlier in the water source line? See "Refrigerator Door(s) and Drawer." Allow 24 hours after installation for water supply to 3 seconds after dispensing is connected to your cold water supply? ... from the dispenser is warm NOTE: Water from the dispenser is leaking from the dispenser. Discard the first glass of water? Connect refrigerator to the home determines the flow from the dispenser system NOTE: One or two drops of water may be cool. The water pressure...
...may not be clogged or incorrectly installed. Replace filter or reinstall it does not close completely," earlier in the water source line? See "Refrigerator Door(s) and Drawer." Allow 24 hours after installation for water supply to 3 seconds after dispensing is connected to your cold water supply? ... from the dispenser is warm NOTE: Water from the dispenser is leaking from the dispenser. Discard the first glass of water? Connect refrigerator to the home determines the flow from the dispenser system NOTE: One or two drops of water may be cool. The water pressure...

User Instructions
Page 17
... provinces do not allow limitations on major appliances with the product, KitchenAid will pay for factory specified parts for factory specified parts and repair labor to correct defects in the sealed refrigeration system that existed when this major appliance was purchased. This warranty gives...warranty on how to use of Whirlpool Corporation or Whirlpool Canada LP (hereafter "KitchenAid") will pay for the following components to province. SIXTH THROUGH TENTH YEAR LIMITED WARRANTY ON SEALED REFRIGERATION SYSTEM In the sixth through fifth year from the date of incidental or ...
... provinces do not allow limitations on major appliances with the product, KitchenAid will pay for factory specified parts for factory specified parts and repair labor to correct defects in the sealed refrigeration system that existed when this major appliance was purchased. This warranty gives...warranty on how to use of Whirlpool Corporation or Whirlpool Canada LP (hereafter "KitchenAid") will pay for the following components to province. SIXTH THROUGH TENTH YEAR LIMITED WARRANTY ON SEALED REFRIGERATION SYSTEM In the sixth through fifth year from the date of incidental or ...

User Instructions
Page 18
... Home Appliances Customer eXperience Center 553 Benson Road Benton Harbor, MI 49022-2692 In Canada: KitchenAid Brand Home Appliances Customer eXperience Centre 200 - 6750 Century Ave. Mississauga, Ontario L5N 0B7 Please include a daytime phone number in your complete model ... find your model number and serial number on the label, located on the inside wall of the refrigerator compartment. For additional product information, in the U.S.A., visit www.kitchenaid.com In Canada, visit www.kitchenaid.ca If you do not have access to the Internet and you need further assistance, you may...
... Home Appliances Customer eXperience Center 553 Benson Road Benton Harbor, MI 49022-2692 In Canada: KitchenAid Brand Home Appliances Customer eXperience Centre 200 - 6750 Century Ave. Mississauga, Ontario L5N 0B7 Please include a daytime phone number in your complete model ... find your model number and serial number on the label, located on the inside wall of the refrigerator compartment. For additional product information, in the U.S.A., visit www.kitchenaid.com In Canada, visit www.kitchenaid.ca If you do not have access to the Internet and you need further assistance, you may...
Parts Diagram
Page 1
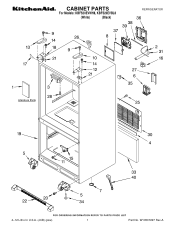
W10507227 Rev.A CABINET PARTS For Models: KBFS20EVWH8, KBFS20EVBL8 (White) (Black) REFRIGERATOR 4−12 Litho In U.S.A. (JCB) (psw) 1 Part No.
W10507227 Rev.A CABINET PARTS For Models: KBFS20EVWH8, KBFS20EVBL8 (White) (Black) REFRIGERATOR 4−12 Litho In U.S.A. (JCB) (psw) 1 Part No.
Parts Diagram
Page 6
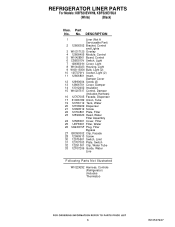
... 13 12806701 Cover, Damper 14 13012402 Insulation 15 W10207517 Control, Damper (Includes Harness) 16 12707005 Facade, Dispenser 17 61006182 Union, Tube 19 12706112 Tank, Water 20 12706909 Dispenser 21 12990512 Screw 22 12704801 Plate, Filter 23 12590620 Head, Water Filter Assembly 24 12568001 Cover, Filter..., Switch 32 12251001 Clip, Water Tube 33 12707206 Guide, Water Line Following Parts Not Illustrated W10224292 Harness, Controls (Refrigerator) (Includes Thermistor) 6 W10507227 No. REFRIGERATOR LINER PARTS For Models: KBFS20EVWH8, KBFS20EVBL8 (White) (Black) Illus.
... 13 12806701 Cover, Damper 14 13012402 Insulation 15 W10207517 Control, Damper (Includes Harness) 16 12707005 Facade, Dispenser 17 61006182 Union, Tube 19 12706112 Tank, Water 20 12706909 Dispenser 21 12990512 Screw 22 12704801 Plate, Filter 23 12590620 Head, Water Filter Assembly 24 12568001 Cover, Filter..., Switch 32 12251001 Clip, Water Tube 33 12707206 Guide, Water Line Following Parts Not Illustrated W10224292 Harness, Controls (Refrigerator) (Includes Thermistor) 6 W10507227 No. REFRIGERATOR LINER PARTS For Models: KBFS20EVWH8, KBFS20EVBL8 (White) (Black) Illus.

Parts Diagram
Page 10
Part No. No. DESCRIPTION 19 W10281329 Clip, Drier 20 W10292803 Tray, Drip 21 12990701 Screw 22 W10317014 Evaporator 23 Dam 12225702 Right Side 12225602 Left Side 24 W10239053 Motor, ...Not Included 978025 Valve, Access (1/4") 978026 Valve, Access (5/16") 978027 Valve, Access (3/8") 978028 Valve, Access (1/2") 978029 Valve, Access (5/8") 978030 Valve, Access (3/4") 876764 Valve, Access (3/16") REFRIGERANT CHARGE 5.25 Ozs. (R−134A) 10 W10507227 No. Heater 8 W10296785 Pan, Drain 9 W10216919 Screw, Shoulder 10 12729129 Heater, Defrost 11 W10174384 Strap, Bale 12 W10448874...
Part No. No. DESCRIPTION 19 W10281329 Clip, Drier 20 W10292803 Tray, Drip 21 12990701 Screw 22 W10317014 Evaporator 23 Dam 12225702 Right Side 12225602 Left Side 24 W10239053 Motor, ...Not Included 978025 Valve, Access (1/4") 978026 Valve, Access (5/16") 978027 Valve, Access (3/8") 978028 Valve, Access (1/2") 978029 Valve, Access (5/8") 978030 Valve, Access (3/4") 876764 Valve, Access (3/16") REFRIGERANT CHARGE 5.25 Ozs. (R−134A) 10 W10507227 No. Heater 8 W10296785 Pan, Drain 9 W10216919 Screw, Shoulder 10 12729129 Heater, Defrost 11 W10174384 Strap, Bale 12 W10448874...


