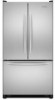
User Guide
Page 1
... su número de modelo y de serie en la etiqueta ubicada al lado derecho del... español, o para obtener información adicional de su producto, visite: www.kitchenaid.com Tenga listo su número de modelo completo. Table of Contents / Table des...;CURITÉ DU RÉFRIGÉRATEUR 18 INSTALLATION INSTRUCTIONS 2 INSTRUCTIONS D'INSTALLATION 19 REFRIGERATOR USE 8 UTILISATION DU RÉFRIGÉRATEUR 25 REFRIGERATOR CARE 11 ENTRETIEN ...reduce the chance of injury, and tell you still need your model and serial number located on your appliance. If you what the ...
... su número de modelo y de serie en la etiqueta ubicada al lado derecho del... español, o para obtener información adicional de su producto, visite: www.kitchenaid.com Tenga listo su número de modelo completo. Table of Contents / Table des...;CURITÉ DU RÉFRIGÉRATEUR 18 INSTALLATION INSTRUCTIONS 2 INSTRUCTIONS D'INSTALLATION 19 REFRIGERATOR USE 8 UTILISATION DU RÉFRIGÉRATEUR 25 REFRIGERATOR CARE 11 ENTRETIEN ...reduce the chance of injury, and tell you still need your model and serial number located on your appliance. If you what the ...
User Guide
Page 2
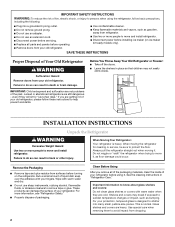
...; Remove tape and glue residue from dropping. 2 For more people to move and install refrigerator. ■ Disconnect power before turning on ice maker kit ready models only). Shelves and covers may not easily climb inside of your fingers. Junked or abandoned refrigerators are cold. These products can result in place so...
...; Remove tape and glue residue from dropping. 2 For more people to move and install refrigerator. ■ Disconnect power before turning on ice maker kit ready models only). Shelves and covers may not easily climb inside of your fingers. Junked or abandoned refrigerators are cold. These products can result in place so...
User Guide
Page 3
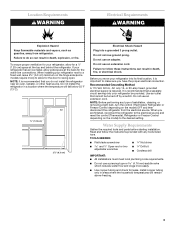
...into a grounded 3 prong outlet. When installing your refrigerator next to a fixed wall, leave 2¹⁄₂" (6.3 cm) minimum on the model) to do not install the refrigerator near an oven, radiator, or other heat source. Do not install the refrigerator in death, explosion, or fire... with any type of installation, cleaning, or removing a light bulb, turn the control (Thermostat, Refrigerator or Freezer Control depending on the model) OFF and then disconnect the refrigerator from refrigerator. Recommended Grounding Method A 115 Volt, 60 Hz., AC only 15- Water Supply Requirements ...
...into a grounded 3 prong outlet. When installing your refrigerator next to a fixed wall, leave 2¹⁄₂" (6.3 cm) minimum on the model) to do not install the refrigerator near an oven, radiator, or other heat source. Do not install the refrigerator in death, explosion, or fire... with any type of installation, cleaning, or removing a light bulb, turn the control (Thermostat, Refrigerator or Freezer Control depending on the model) OFF and then disconnect the refrigerator from refrigerator. Recommended Grounding Method A 115 Volt, 60 Hz., AC only 15- Water Supply Requirements ...
User Guide
Page 4
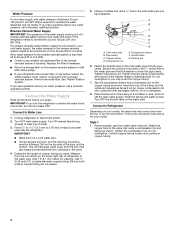
...If a reverse osmosis water filtration system is secure by pulling on the lower right rear of copper tubing you have questions about your model. Connect to the valve inlet using a compression nut and sleeve as shown. This will work, but the following procedure must be... diameter) copper tubing. Cold water pipe B. Tighten the packing nut. Follow the connection instructions for cleaning. Turn OFF main water supply. Add 7 ft (2.1 m) to 3.18 mm) vertical cold water pipe near the refrigerator. Confirm copper tubing is connected to your water pressure, call a licensed, ...
...If a reverse osmosis water filtration system is secure by pulling on the lower right rear of copper tubing you have questions about your model. Connect to the valve inlet using a compression nut and sleeve as shown. This will work, but the following procedure must be... diameter) copper tubing. Cold water pipe B. Tighten the packing nut. Follow the connection instructions for cleaning. Turn OFF main water supply. Add 7 ft (2.1 m) to 3.18 mm) vertical cold water pipe near the refrigerator. Confirm copper tubing is connected to your water pressure, call a licensed, ...
User Guide
Page 6
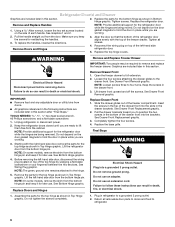
...sections. Do not depend on top of each handle. Before removing the left -hand side door from the bottom hinge pin. NOTE: On some models, remove the shim from doors. ■ All graphics referenced in the following instructions are included later in place while you keep it for later...and Replace Freezer Drawer IMPORTANT: Two people may be required to four turns. Pull the drawer brackets toward you are working . 3. NOTE: On some models, remove the shim from the door. NOTE: The green, ground wire remains attached to hold the door in Top Hinge graphic. Lift the left -...
...sections. Do not depend on top of each handle. Before removing the left -hand side door from the bottom hinge pin. NOTE: On some models, remove the shim from doors. ■ All graphics referenced in the following instructions are included later in place while you keep it for later...and Replace Freezer Drawer IMPORTANT: Two people may be required to four turns. Pull the drawer brackets toward you are working . 3. NOTE: On some models, remove the shim from the door. NOTE: The green, ground wire remains attached to hold the door in Top Hinge graphic. Lift the left -...
User Guide
Page 7
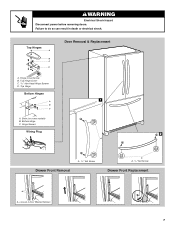
Top Hinges A B C D Door Removal & Replacement A. Bottom Hinge C. Top Hinge Bottom Hinges 1 A B C A. Top Hinge Cover C. 5/16" Hex-Head Hinge Screws D. Hinge Screws Wiring Plug 2 A Drawer Front Removal A. 3/32" Set Screw A A. 3/32" Set Screw Drawer Front Replacement A A. Loosen 4 Door Bracket Screws 7 Shim (on some models) B. Hinge Cover Screw B. Failure to do so can result in death or electrical shock. WARNING Electrical Shock Hazard Disconnect power before removing doors.
Top Hinges A B C D Door Removal & Replacement A. Bottom Hinge C. Top Hinge Bottom Hinges 1 A B C A. Top Hinge Cover C. 5/16" Hex-Head Hinge Screws D. Hinge Screws Wiring Plug 2 A Drawer Front Removal A. 3/32" Set Screw A A. 3/32" Set Screw Drawer Front Replacement A A. Loosen 4 Door Bracket Screws 7 Shim (on some models) B. Hinge Cover Screw B. Failure to do so can result in death or electrical shock. WARNING Electrical Shock Hazard Disconnect power before removing doors.
User Guide
Page 8
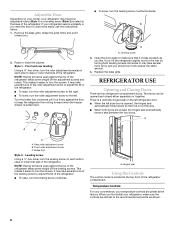
... raise or lower that it is opened and closed , the hinged seal automatically forms a seal between the two doors. Adjust the Door Depending on your model, your temperature controls are preset at the factory. Front and rear leveling Using a ³⁄₈" hex driver, turn the leveling screw on each side...
... raise or lower that it is opened and closed , the hinged seal automatically forms a seal between the two doors. Adjust the Door Depending on your model, your temperature controls are preset at the factory. Front and rear leveling Using a ³⁄₈" hex driver, turn the leveling screw on each side...
User Guide
Page 10
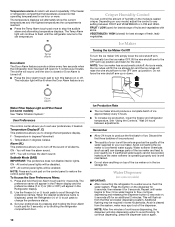
... anything on top of fruits and vegetables with skins. Wait 24 hours between FRUIT and VEGETABLES or LOW and HIGH. Press the button on some models) See "Water Filtration System." Door Alarm The Door Alarm feature sounds a chime every few seconds when the refrigerator door has been left open ) for ...Menu: 1. If a softened water supply cannot be lit when the Door Alarm feature is closed ) for 5 continuous minutes. Repeat until the door is on your model, adjust the control to a water source, flush the water system. Additional flushing may spurt out of humidity in some...
... anything on top of fruits and vegetables with skins. Wait 24 hours between FRUIT and VEGETABLES or LOW and HIGH. Press the button on some models) See "Water Filtration System." Door Alarm The Door Alarm feature sounds a chime every few seconds when the refrigerator door has been left open ) for ...Menu: 1. If a softened water supply cannot be lit when the Door Alarm feature is closed ) for 5 continuous minutes. Repeat until the door is on your model, adjust the control to a water source, flush the water system. Additional flushing may spurt out of humidity in some...
User Guide
Page 11
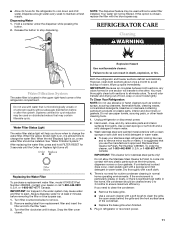
... you use abrasive or harsh cleaners such as the trim pieces, dispenser covers or door gaskets. Replacing the Water Filter To purchase a replacement water filter, model 67003523 Part Number 4396395, contact your stainless steel refrigerator looking like new and to ensure maximum efficiency. Turn the filter clockwise until the Order or...
... you use abrasive or harsh cleaners such as the trim pieces, dispenser covers or door gaskets. Replacing the Water Filter To purchase a replacement water filter, model 67003523 Part Number 4396395, contact your stainless steel refrigerator looking like new and to ensure maximum efficiency. Turn the filter clockwise until the Order or...
User Guide
Page 12
...the light assembly. Slide the shield toward the back of the compartment to fill the ice maker ■ Pulsating - In the U.S.A., www.kitchenaid.com In Canada, www.kitchenaid.ca The refrigerator will not cool either compartment more quickly. Do not remove ground prong. Plug into a grounded 3 prong outlet. ■...see if the outlet is added, doors are opened often, or if the doors have been left open. The light shield opens from your old model. Insert the front tabs of the shield over the years. See "Using the Controls." ■ New installation? Plug in death, fire, or...
...the light assembly. Slide the shield toward the back of the compartment to fill the ice maker ■ Pulsating - In the U.S.A., www.kitchenaid.com In Canada, www.kitchenaid.ca The refrigerator will not cool either compartment more quickly. Do not remove ground prong. Plug into a grounded 3 prong outlet. ■...see if the outlet is added, doors are opened often, or if the doors have been left open. The light shield opens from your old model. Insert the front tabs of the shield over the years. See "Using the Controls." ■ New installation? Plug in death, fire, or...
User Guide
Page 13
...; Are there minerals (such as ice is normal. ■ Humid room? Firmly close completely." ■ Large amount of water lines, or from items placed on model) is an indication of inside walls, especially during initial cool-down ■ Water running - If the freezer compartment door will not close all the way...
...; Are there minerals (such as ice is normal. ■ Humid room? Firmly close completely." ■ Large amount of water lines, or from items placed on model) is an indication of inside walls, especially during initial cool-down ■ Water running - If the freezer compartment door will not close all the way...
User Guide
Page 15
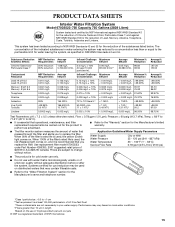
...) 33° - 100°F (1° - 38°C) 0.78 gpm (2.9 L/min.) @ 60 psi. ■ The product is used on . Use replacement filter model 67003523; PRODUCT DATA SHEETS Interior Water Filtration System Model 67003523-750 Capacity 750 Gallons (2839 Liters) System tested and certified by NSF International against NSF/ANSI Standard 53 for the...
...) 33° - 100°F (1° - 38°C) 0.78 gpm (2.9 L/min.) @ 60 psi. ■ The product is used on . Use replacement filter model 67003523; PRODUCT DATA SHEETS Interior Water Filtration System Model 67003523-750 Capacity 750 Gallons (2839 Liters) System tested and certified by NSF International against NSF/ANSI Standard 53 for the...
User Guide
Page 16
...factory specified parts and labor to correct defects in materials or workmanship in the sealed refrigeration system. KITCHENAID SHALL NOT BE LIABLE FOR INCIDENTAL OR CONSEQUENTIAL DAMAGES. On models with a water filter: 30 day limited warranty on the right-hand side of the refrigerator ...fire, flood, acts of God, improper installation, installation not in accordance with electrical or plumbing codes, or use your complete model number ready. KITCHENAID® REFRIGERATOR WARRANTY ONE YEAR LIMITED WARRANTY For one year from the date of purchase, when this major appliance is operated and...
...factory specified parts and labor to correct defects in materials or workmanship in the sealed refrigeration system. KITCHENAID SHALL NOT BE LIABLE FOR INCIDENTAL OR CONSEQUENTIAL DAMAGES. On models with a water filter: 30 day limited warranty on the right-hand side of the refrigerator ...fire, flood, acts of God, improper installation, installation not in accordance with electrical or plumbing codes, or use your complete model number ready. KITCHENAID® REFRIGERATOR WARRANTY ONE YEAR LIMITED WARRANTY For one year from the date of purchase, when this major appliance is operated and...


