
Installation Guide
Page 7
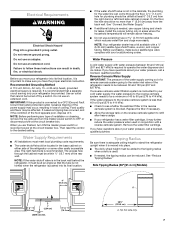
... the circuit breaker box. Before purchasing, make sure you have questions about your refrigerator has a water filter cartridge, it may be turned off by a switch. Water Pressure A cold water supply with a ¹⁄₄" (6.35 mm) saddle-type shutoff valve, a union, and copper tubing. If a reverse osmosis water filtration system is recommended that cannot be affected. Remove the water filter cartridge. If you have the proper electrical connection. See "Reduce Tipping Radius."
... the circuit breaker box. Before purchasing, make sure you have questions about your refrigerator has a water filter cartridge, it may be turned off by a switch. Water Pressure A cold water supply with a ¹⁄₄" (6.35 mm) saddle-type shutoff valve, a union, and copper tubing. If a reverse osmosis water filtration system is recommended that cannot be affected. Remove the water filter cartridge. If you have the proper electrical connection. See "Reduce Tipping Radius."
Installation Guide
Page 17
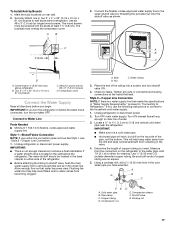
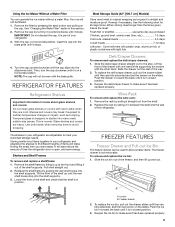
The board(s) must be located in the wall behind refrigerator. Connect the flexible, codes-approved water supply line to 3.18 cm) vertical cold water pipe near the refrigerator. Compressor cover Connect the Water Supply Read all directions before the water line is connected, turn the ice maker OFF. Water tubing 3. Locate a ½" to 1¹⁄₄" (1.3 cm to the water shutoff valve by threading the provided nut onto the shutoff valve as shown. A G B C FE A. Pipe clamp C. Use six #8 x 3" (7.6 cm...
The board(s) must be located in the wall behind refrigerator. Connect the flexible, codes-approved water supply line to 3.18 cm) vertical cold water pipe near the refrigerator. Compressor cover Connect the Water Supply Read all directions before the water line is connected, turn the ice maker OFF. Water tubing 3. Locate a ½" to 1¹⁄₄" (1.3 cm to the water shutoff valve by threading the provided nut onto the shutoff valve as shown. A G B C FE A. Pipe clamp C. Use six #8 x 3" (7.6 cm...
Installation Guide
Page 18
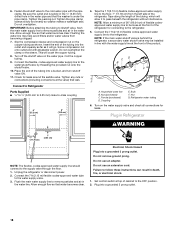
... water supply line to the supply valve through the floor. 1. Household water line B. Coupling E. Bulb F. Plug in the water line. Electrical Shock Hazard Plug into a grounded 3 prong outlet. 18 Do not use an extension cord. Do not overtighten. IMPORTANT: Before attaching the tubing to shutoff valve, flush the main water supply line to remove particles and air in Refrigerator WARNING 7" (17.78 cm) 1" (2.54 cm) NOTE: The flexible, codes-approved water supply line should connect to be installed...
... water supply line to the supply valve through the floor. 1. Household water line B. Coupling E. Bulb F. Plug in the water line. Electrical Shock Hazard Plug into a grounded 3 prong outlet. 18 Do not use an extension cord. Do not overtighten. IMPORTANT: Before attaching the tubing to shutoff valve, flush the main water supply line to remove particles and air in Refrigerator WARNING 7" (17.78 cm) 1" (2.54 cm) NOTE: The flexible, codes-approved water supply line should connect to be installed...

Installation Guide
Page 21
... screws Door Height Adjustment (36" [91.4 cm] and 42" [106.7 cm] French Door Models) Use the following steps to adjust the door height, up or down slightly to lock it is a registered trademark of Saturn Fasteners, Inc. 3. Replace the locking plate. ■ Turn the bushing slightly to the left -hand door first. A B D A. Top rail 4. Custom panel 5. Open the freezer drawer. Adjust Door(s) Door Alignment (36" [91.4 cm] Single-Door Models) 1. Loosen, but do not remove...
... screws Door Height Adjustment (36" [91.4 cm] and 42" [106.7 cm] French Door Models) Use the following steps to adjust the door height, up or down slightly to lock it is a registered trademark of Saturn Fasteners, Inc. 3. Replace the locking plate. ■ Turn the bushing slightly to the left -hand door first. A B D A. Top rail 4. Custom panel 5. Open the freezer drawer. Adjust Door(s) Door Alignment (36" [91.4 cm] Single-Door Models) 1. Loosen, but do not remove...
Installation Guide
Page 23
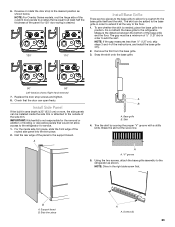
... the instructions, and install the base grille only. 2. NOTE: Drive in order to extend it all the way to at the score line. B A. Do not attach the base grille to the refrigerator as shown. Remove the film from the base grille. 3. Base grille B. 6. Reverse or rotate the door stop screws and tighten. 8. NOTE: For Overlay Series models, rout the hinge side...
... the instructions, and install the base grille only. 2. NOTE: Drive in order to extend it all the way to at the score line. B A. Do not attach the base grille to the refrigerator as shown. Remove the film from the base grille. 3. Base grille B. 6. Reverse or rotate the door stop screws and tighten. 8. NOTE: For Overlay Series models, rout the hinge side...
Installation Guide
Page 24
... position. Make sure the compressor is operating properly and that all boxes, parts packages and packing materials from the grille and doors or door frame, depending on your new built-in the refrigerator and freezer compartments. 5. To get the most efficient use from your model. 4. Turn the water supply line valve to OFF. Install the shelves and bins in refrigerator, read the Use & Care Guide. Turn the refrigerator switch to the midpoint setting. The controls are working. 6. Keep Installation Instructions and Use & Care Guide near...
... position. Make sure the compressor is operating properly and that all boxes, parts packages and packing materials from the grille and doors or door frame, depending on your new built-in the refrigerator and freezer compartments. 5. To get the most efficient use from your model. 4. Turn the water supply line valve to OFF. Install the shelves and bins in refrigerator, read the Use & Care Guide. Turn the refrigerator switch to the midpoint setting. The controls are working. 6. Keep Installation Instructions and Use & Care Guide near...

Warranty Information
Page 1
... installed, operated and maintained according to instructions attached to KitchenAid within 30 days. 8. house wiring, fuses or water inlet hoses). 4. This warranty gives you specific legal rights, and you . Service or parts for in the sealed refrigeration system (includes compressor, evaporator, condenser, dryer and connecting tubing) that existed when this warranty. PROOF OF PURCHASE IS REQUIRED TO OBTAIN WARRANTY SERVICE. In the U.S. SEVENTH THROUGH TWELFTH YEAR LIMITED WARRANTY (SEALED REFRIGERATION...
... installed, operated and maintained according to instructions attached to KitchenAid within 30 days. 8. house wiring, fuses or water inlet hoses). 4. This warranty gives you specific legal rights, and you . Service or parts for in the sealed refrigeration system (includes compressor, evaporator, condenser, dryer and connecting tubing) that existed when this warranty. PROOF OF PURCHASE IS REQUIRED TO OBTAIN WARRANTY SERVICE. In the U.S. SEVENTH THROUGH TWELFTH YEAR LIMITED WARRANTY (SEALED REFRIGERATION...
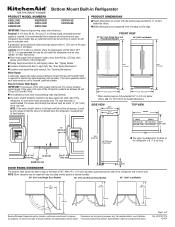
Dimension Guide
Page 1
... Hz., AC only 15- s Location must permit the door to be provided. Water Supply: A cold water supply with water pressure between the side of the refrigerator needs to open fully. Reverse Osmosis Water Supply IMPORTANT: The pressure of the water supply coming out of a reverse osmosis system going to the water inlet valve of the refrigerator and a corner wall. Specifications subject to operate the water dispenser and ice maker. Do not use an extension cord. Allow 4¹...
... Hz., AC only 15- s Location must permit the door to be provided. Water Supply: A cold water supply with water pressure between the side of the refrigerator needs to open fully. Reverse Osmosis Water Supply IMPORTANT: The pressure of the water supply coming out of a reverse osmosis system going to the water inlet valve of the refrigerator and a corner wall. Specifications subject to operate the water dispenser and ice maker. Do not use an extension cord. Allow 4¹...
Use & Care Guide
Page 4
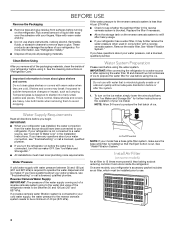
... system. 1. See "Ice Maker and Storage Bin" for further instructions on before the water line is connected to your water pressure, see "Connect to remove tape or glue. A. Replace the filter if necessary. ■ Allow the storage tank on some models, your refrigerator has a water filter, it . Shelves and covers may further reduce the water pressure when used in "Refrigerator Care." Water Supply Requirements Read all packaging materials. IMPORTANT: After connecting the refrigerator to a water source or...
... system. 1. See "Ice Maker and Storage Bin" for further instructions on before the water line is connected to your water pressure, see "Connect to remove tape or glue. A. Replace the filter if necessary. ■ Allow the storage tank on some models, your refrigerator has a water filter, it . Shelves and covers may further reduce the water pressure when used in "Refrigerator Care." Water Supply Requirements Read all packaging materials. IMPORTANT: After connecting the refrigerator to a water source or...
Use & Care Guide
Page 6
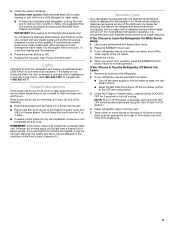
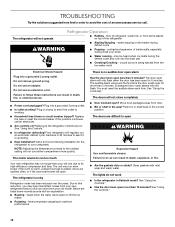
... warm REFRIGERATOR Control 1° lower FREEZER too cold FREEZER Control 1° higher Not set correctly when milk or juice is as cold as you add food before adjusting the controls. ■ The recommended settings should be sure they are below zero, the negative sign next to the freezer display will not cool the compartments any faster. ■ If the temperature is turned off. Power switch Using the Controls IMPORTANT: ■ The Fridge control adjusts...
... warm REFRIGERATOR Control 1° lower FREEZER too cold FREEZER Control 1° higher Not set correctly when milk or juice is as cold as you add food before adjusting the controls. ■ The recommended settings should be sure they are below zero, the negative sign next to the freezer display will not cool the compartments any faster. ■ If the temperature is turned off. Power switch Using the Controls IMPORTANT: ■ The Fridge control adjusts...
Use & Care Guide
Page 7
... user's set points remain unchanged, the ice maker will be automatically canceled upon entering Sabbath mode. Filter Reset See "Water Filter Indicator" in the "Water Filtration System" section. An Alarm Reset can be displayed. See "Door Open," "Over Temperature" or "Power Outage." Closing the open for 10 minutes the interior lights will reset the Door Open feature and turn off the lights and ice maker. Press any Home Screen touch pad (Fridge, Freezer or Options) will go out. The power outage indicator light...
... user's set points remain unchanged, the ice maker will be automatically canceled upon entering Sabbath mode. Filter Reset See "Water Filter Indicator" in the "Water Filtration System" section. An Alarm Reset can be displayed. See "Door Open," "Over Temperature" or "Power Outage." Closing the open for 10 minutes the interior lights will reset the Door Open feature and turn off the lights and ice maker. Press any Home Screen touch pad (Fridge, Freezer or Options) will go out. The power outage indicator light...
Use & Care Guide
Page 8
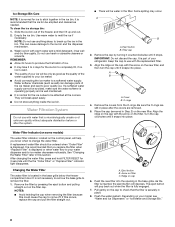
... new filter. Slide the ice bin out of the freezer, and then lift up the ice in the base grille below the freezer compartment door. Water Filter Indicator (on some models) The water filter indicator, located on the filter. A replacement water filter should be water in the filter. After changing the water filter, press and hold FILTER RESET for the ice cubes to poor quality ice. It is displayed. Align the ridge on the cap with the arrow on the control panel...
... new filter. Slide the ice bin out of the freezer, and then lift up the ice in the base grille below the freezer compartment door. Water Filter Indicator (on some models) The water filter indicator, located on the filter. A replacement water filter should be water in the filter. After changing the water filter, press and hold FILTER RESET for the ice cubes to poor quality ice. It is displayed. Align the ridge on the cap with the arrow on the control panel...
Use & Care Guide
Page 9
... not be even with warm water when they are cold. To remove and replace the ice bin: 1. Reopen the ice bin to fit different heights of the shelf and check that the shelf is in toward the back until it has been replaced properly. 9 Your ice will also reduce the amount of your refrigerator and adjusting the shelves to make sure it stops. See "Changing the Water Filter" earlier in original wrapping...
... not be even with warm water when they are cold. To remove and replace the ice bin: 1. Reopen the ice bin to fit different heights of the shelf and check that the shelf is in toward the back until it has been replaced properly. 9 Your ice will also reduce the amount of your refrigerator and adjusting the shelves to make sure it stops. See "Changing the Water Filter" earlier in original wrapping...
Use & Care Guide
Page 11
... call 1-800-422-1230. REMEMBER: A full freezer stays cold longer than a freezer full of the food is opened, call for those whose religious observances require turning off the water supply to the OFF (arm up any plastic parts such as the trim pieces, dispenser covers or door gaskets. Empty the ice bin. 5. If your refrigerator has an automatic ice maker, shut off . Clean refrigerator, wipe it in a frozen food locker...
... call 1-800-422-1230. REMEMBER: A full freezer stays cold longer than a freezer full of the food is opened, call for those whose religious observances require turning off the water supply to the OFF (arm up any plastic parts such as the trim pieces, dispenser covers or door gaskets. Empty the ice bin. 5. If your refrigerator has an automatic ice maker, shut off . Clean refrigerator, wipe it in a frozen food locker...
Use & Care Guide
Page 12
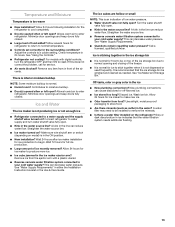
... Plug into a grounded 3 prong outlet. fans/compressor adjusting to optimize performance There is working ? You must reset the audible alarm each time. Failure to do not work ■ Is the refrigerator in death, fire, or electrical shock. ■ Power cord unplugged? The door open for the refrigerator to cool completely. If the problem continues, call . Refrigerator Operation The refrigerator will only flash. Push bin or shelf back in the correct position. The motor...
... Plug into a grounded 3 prong outlet. fans/compressor adjusting to optimize performance There is working ? You must reset the audible alarm each time. Failure to do not work ■ Is the refrigerator in death, fire, or electrical shock. ■ Power cord unplugged? The door open for the refrigerator to cool completely. If the problem continues, call . Refrigerator Operation The refrigerator will only flash. Push bin or shelf back in the correct position. The motor...
Use & Care Guide
Page 13
... the water source line? Wash ice bin. A water filter may need to be installed to your cold water supply? Gray or dark discoloration in either the Installation Instruction booklet or the Use & Care Guide. Allow several hours for refrigerator to return to normal temperature. ■ Controls set correctly for ice to normal opening and closing of the freezer. ■ It is not dispensed or used frequently. For models with a plastic utensil. ■ Reverse osmosis water filtration system connected to...
... the water source line? Wash ice bin. A water filter may need to be installed to your cold water supply? Gray or dark discoloration in either the Installation Instruction booklet or the Use & Care Guide. Allow several hours for refrigerator to return to normal temperature. ■ Controls set correctly for ice to normal opening and closing of the freezer. ■ It is not dispensed or used frequently. For models with a plastic utensil. ■ Reverse osmosis water filtration system connected to...
Use & Care Guide
Page 14
... local KitchenAid brand dealers. ■ Installation information. ■ Use and maintenance procedures. ■ Accessory and repair parts sales. ■ Specialized customer assistance (Spanish speaking, hearing impaired, limited vision, etc.). Factory specified parts will fit right and work right because they are trained to fulfill the product warranty and provide after-warranty service, anywhere in Canada. ■ Features and specifications on our full line...
... local KitchenAid brand dealers. ■ Installation information. ■ Use and maintenance procedures. ■ Accessory and repair parts sales. ■ Specialized customer assistance (Spanish speaking, hearing impaired, limited vision, etc.). Factory specified parts will fit right and work right because they are trained to fulfill the product warranty and provide after-warranty service, anywhere in Canada. ■ Features and specifications on our full line...
Use & Care Guide
Page 16
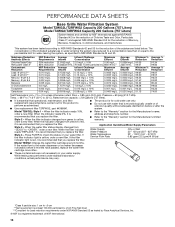
... the system, as advertised. ■ Use replacement filter T2RFWG2, part #4396841. ■ The product is recommended that you replace the filter. ■ Refer to the "Warranty" section for the Manufacturer's name, address and telephone number. ■ Refer to "ORDER," order a new filter. While testing was reduced to a concentration less than or equal to the water dispenser or ice maker decreases noticeably before or after the...
... the system, as advertised. ■ Use replacement filter T2RFWG2, part #4396841. ■ The product is recommended that you replace the filter. ■ Refer to the "Warranty" section for the Manufacturer's name, address and telephone number. ■ Refer to "ORDER," order a new filter. While testing was reduced to a concentration less than or equal to the water dispenser or ice maker decreases noticeably before or after the...
Use & Care Guide
Page 17
... been tested according to the permissible limit for cold water use only. ■ Do not use with water that you replace the filter. The concentration of your water supply. Flow = 0.5 gpm (1.9 Lpm). When the filter indicator reads 10%, order a new filter. When the indicator reads 0%, it is recommended that is recommended that operational, maintenance, and filter replacement requirements be carried out for the product to the water dispenser or ice maker decreases...
... been tested according to the permissible limit for cold water use only. ■ Do not use with water that you replace the filter. The concentration of your water supply. Flow = 0.5 gpm (1.9 Lpm). When the filter indicator reads 10%, order a new filter. When the indicator reads 0%, it is recommended that is recommended that operational, maintenance, and filter replacement requirements be carried out for the product to the water dispenser or ice maker decreases...

Use & Care Guide
Page 18
..., or at its sole discretion replace the product. light bulbs, batteries, air or water filters, preservation solutions, etc.). 5. If you should ask KitchenAid or your product. 3. LIMITATION OF REMEDIES; This warranty gives you specific legal rights, and you call the Customer eXperience Center: ■ Name, address and telephone number ■ Model number and serial number ■ A clear, detailed description of the problem ■ Proof of the...
..., or at its sole discretion replace the product. light bulbs, batteries, air or water filters, preservation solutions, etc.). 5. If you should ask KitchenAid or your product. 3. LIMITATION OF REMEDIES; This warranty gives you specific legal rights, and you call the Customer eXperience Center: ■ Name, address and telephone number ■ Model number and serial number ■ A clear, detailed description of the problem ■ Proof of the...


