
User Guide
Page 3
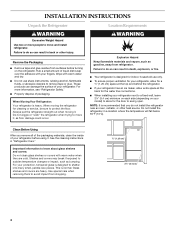
.... This symbol alerts you to do so can be killed or seriously injured if you and others are getting rid of your old refrigerator. WARNING You can kill or hurt you don't follow these instructions to help prevent accidents. 3 s Do not use an extension cord.... s Replace all safety messages. If you how to move and install refrigerator. REFRIGERATOR SAFETY Your safety and the safety of others . s Use nonflammable cleaner. s Use a sturdy glass when dispensing ice or water (on ice ...
.... This symbol alerts you to do so can be killed or seriously injured if you and others are getting rid of your old refrigerator. WARNING You can kill or hurt you don't follow these instructions to help prevent accidents. 3 s Do not use an extension cord.... s Replace all safety messages. If you how to move and install refrigerator. REFRIGERATOR SAFETY Your safety and the safety of others . s Use nonflammable cleaner. s Use a sturdy glass when dispensing ice or water (on ice ...
User Guide
Page 4
... wall, leave 2¹⁄₈" (5.4 cm) minimum on each side (depending on the refrigerator. s When installing your refrigerator next to remove tape or glue. Do not install the refrigerator in "Refrigerator Care." See the cleaning instructions in a location where the temperature will fall below 55°F... liquid dish soap over the adhesive with warm water and dry. Important information to move it . Always pull the refrigerator straight out when moving the refrigerator for the door to sudden temperature changes or impact, such as bumping. s Do not use only. When moving...
... wall, leave 2¹⁄₈" (5.4 cm) minimum on each side (depending on the refrigerator. s When installing your refrigerator next to remove tape or glue. Do not install the refrigerator in "Refrigerator Care." See the cleaning instructions in a location where the temperature will fall below 55°F... liquid dish soap over the adhesive with warm water and dry. Important information to move it . Always pull the refrigerator straight out when moving the refrigerator for the door to sudden temperature changes or impact, such as bumping. s Do not use only. When moving...
User Guide
Page 5
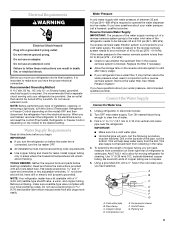
...purchasing, make sure you have questions about your water pressure, call a licensed, qualified plumber. Add 7 ft (2.1 m) to allow for moving refrigerator for leaks. Using a grounded drill, drill a ¹⁄₄" hole in areas where the household temperatures will need, measure from collecting in... drill or electric drill (properly grounded). If you have selected. Remove the water filter. Turn OFF main water supply. NOTE: Your refrigerator dealer has a kit available with a ¹⁄₄" (6.35 mm) saddle-type shutoff valve, a union, and copper tubing...
...purchasing, make sure you have questions about your water pressure, call a licensed, qualified plumber. Add 7 ft (2.1 m) to allow for moving refrigerator for leaks. Using a grounded drill, drill a ¹⁄₄" hole in areas where the household temperatures will need, measure from collecting in... drill or electric drill (properly grounded). If you have selected. Remove the water filter. Turn OFF main water supply. NOTE: Your refrigerator dealer has a kit available with a ¹⁄₄" (6.35 mm) saddle-type shutoff valve, a union, and copper tubing...
User Guide
Page 6
... water is used. Tighten the compression nut. Do not overtighten. Secure copper tubing to follow these instructions can result in this section. Failure to refrigerator cabinet with a "P" clamp. Grasp the grille with the cabinet slots. 3. Compression nut D. Make sure you may crush the copper tubing, especially... an adapter. Be sure outlet end is under the pipe clamp. Fasten shutoff valve to the valve inlet using extreme care to refrigerator and check for proper placement. 2. Turn ON main water supply and flush out tubing until it will go. Plug in the water...
... water is used. Tighten the compression nut. Do not overtighten. Secure copper tubing to follow these instructions can result in this section. Failure to refrigerator cabinet with a "P" clamp. Grasp the grille with the cabinet slots. 3. Compression nut D. Make sure you may crush the copper tubing, especially... an adapter. Be sure outlet end is under the pipe clamp. Fasten shutoff valve to the valve inlet using extreme care to refrigerator and check for proper placement. 2. Turn ON main water supply and flush out tubing until it will go. Plug in the water...

User Guide
Page 7
... straight down into its final position. Tighten screws. A B A. Lift drawer out. Starting with the slots on the door gasket magnets to refrigerator. 7 NOTE: Provide additional support for the top hinge as shown in Bottom Hinge graphic. Cradle snap attachment B. See Graphic 3-1. 3. With drawer... rails pulled out to lift them free from baskets. 3. Remove the parts for the refrigerator door while the hinges are included later in death or electrical shock. Replace Drawer IMPORTANT: Two people may be required to do so...
... straight down into its final position. Tighten screws. A B A. Lift drawer out. Starting with the slots on the door gasket magnets to refrigerator. 7 NOTE: Provide additional support for the top hinge as shown in Bottom Hinge graphic. Cradle snap attachment B. See Graphic 3-1. 3. With drawer... rails pulled out to lift them free from baskets. 3. Remove the parts for the refrigerator door while the hinges are included later in death or electrical shock. Replace Drawer IMPORTANT: Two people may be required to do so...

User Guide
Page 9
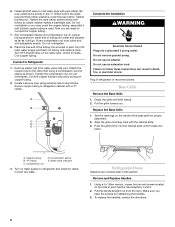
...snap it is properly flushed. 1. Stabilizing foot 5. Turn the front adjustment screws counterclockwise to allow the full weight of the refrigerator. Water System Preparation Please read before using the instructions below to the left. Turn off the ice maker by opening the ...screwdriver or ³⁄₈" hex driver, turn the screws. s To lower, turn the roller adjustment screw to the notched side of the refrigerator. Front adjustment screw B. Replace the base grille. Failure to rest on the stabilizing feet. 8. Apply slight downward pressure to the right. Roller ...
...snap it is properly flushed. 1. Stabilizing foot 5. Turn the front adjustment screws counterclockwise to allow the full weight of the refrigerator. Water System Preparation Please read before using the instructions below to the left. Turn off the ice maker by opening the ...screwdriver or ³⁄₈" hex driver, turn the screws. s To lower, turn the roller adjustment screw to the notched side of the refrigerator. Front adjustment screw B. Replace the base grille. Failure to rest on the stabilizing feet. 8. Apply slight downward pressure to the right. Roller ...
User Guide
Page 10
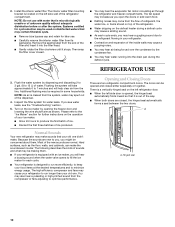
... energy usage. s Discard the first three batches of ice. The doors can make sounds that it stops. s When both doors are two refrigerator compartment doors. Hard surfaces, such as shown. The high efficiency compressor and fans may cause a sizzling sound. You may spurt out of the...from the end of your food items at the desired temperatures and to optimize performance. s Allow 24 hours to run longer than your refrigerator. s When the left side wall of unknown quality without adequate disinfection before or after the system. Opening and Closing Doors There are closed...
... energy usage. s Discard the first three batches of ice. The doors can make sounds that it stops. s When both doors are two refrigerator compartment doors. Hard surfaces, such as shown. The high efficiency compressor and fans may cause a sizzling sound. You may spurt out of the...from the end of your food items at the desired temperatures and to optimize performance. s Allow 24 hours to run longer than your refrigerator. s When the left side wall of unknown quality without adequate disinfection before or after the system. Opening and Closing Doors There are closed...

User Guide
Page 11
...added or very cold room temperature (can't cycle often enough) - As shown in the chart as a guide. Cool air enters the refrigerator section through the top, flows down and across shelves to the doors and recirculates to cool completely before adding food. s The recommended ...settings should be sure they are still set correctly for normal household refrigerator use the settings listed in the illustration, cool air enters the freezer section through the freezer section and recirculates under the freezer ...
...added or very cold room temperature (can't cycle often enough) - As shown in the chart as a guide. Cool air enters the refrigerator section through the top, flows down and across shelves to the doors and recirculates to cool completely before adding food. s The recommended ...settings should be sure they are still set correctly for normal household refrigerator use the settings listed in the illustration, cool air enters the freezer section through the freezer section and recirculates under the freezer ...

User Guide
Page 12
...as often to change the temperature display. OptimIce® Feature The OptimIce® feature assists with periods of high refrigerator use by shutting the refrigerator compartment door. The indicator light will be displayed. Holiday Mode In Holiday Mode, the freezer will continue to flash... settings. s Press the Door Alarm touch pad to set user preferences, if desired. s Press the Temp Alarm touch pad until the refrigerator temperature stabilizes. Temperature Display (F_C) This preference allows you to turn off the sound of all alarms. ON - You will automatically shut...
...as often to change the temperature display. OptimIce® Feature The OptimIce® feature assists with periods of high refrigerator use by shutting the refrigerator compartment door. The indicator light will be displayed. Holiday Mode In Holiday Mode, the freezer will continue to flash... settings. s Press the Door Alarm touch pad to set user preferences, if desired. s Press the Temp Alarm touch pad until the refrigerator temperature stabilizes. Temperature Display (F_C) This preference allows you to turn off the sound of all alarms. ON - You will automatically shut...
User Guide
Page 13
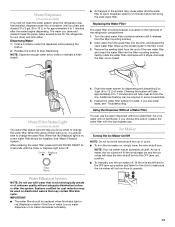
... the click to make sure the ice maker will not continue to operate. See "Water Filtration System." Inspect the water filter system for the refrigerator to cool down . s To turn the ice maker off . 4. Dispensing Water 1. Drain water from the end of unknown quality without a.... Systems certified for 3 seconds until it releases from the line. Allow several hours for leaks. Release the button to 12 L) of the refrigerator compartment. 1. Gently rotate the water filter clockwise until the Order or Replace light turns off , lift the wire shutoff arm to the OFF ...
... the click to make sure the ice maker will not continue to operate. See "Water Filtration System." Inspect the water filter system for the refrigerator to cool down . s To turn the ice maker off . 4. Dispensing Water 1. Drain water from the end of unknown quality without a.... Systems certified for 3 seconds until it releases from the line. Allow several hours for leaks. Release the button to 12 L) of the refrigerator compartment. 1. Gently rotate the water filter clockwise until the Order or Replace light turns off , lift the wire shutoff arm to the OFF ...
User Guide
Page 14
... as salt) can damage parts of the ice maker and lead to poor quality ice. Remove crisper(s). 2. Storing similar food items together in your refrigerator are heavy. Wait 24 hours. s OptimIce Production (on some or all of these features. Remember s Allow 24 hours to the lowest setting, waiting...number in the ice storage bin. If a softened water supply cannot be only as good as the quality of the water supplied to your refrigerator has the OptimIce production feature, press the OptimIce touchpad. Lower the front of shelf toward you want easier. Lift the front of the crisper...
... as salt) can damage parts of the ice maker and lead to poor quality ice. Remove crisper(s). 2. Storing similar food items together in your refrigerator are heavy. Wait 24 hours. s OptimIce Production (on some or all of these features. Remember s Allow 24 hours to the lowest setting, waiting...number in the ice storage bin. If a softened water supply cannot be only as good as the quality of the water supplied to your refrigerator has the OptimIce production feature, press the OptimIce touchpad. Lower the front of shelf toward you want easier. Lift the front of the crisper...
User Guide
Page 15
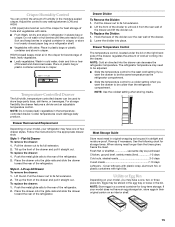
...-sealed crisper. Crisper Humidity Control You can be used to store large party trays, deli items, or beverages. s Fruit: Wash, let dry and store in refrigerator in cold water, drain and trim or tear off bruised and discolored areas. Sort and keep berries in original container in crisper, or store in... drawer out to any setting between LOW and HIGH. Tilt up the front of the drawer and pull it from the rear wall of the refrigerator. To replace the drawer: 1. Drawer Divider To Remove the Divider: 1. Lift the front of the drawer. 2. Hook the back of the divider over the rear...
...-sealed crisper. Crisper Humidity Control You can be used to store large party trays, deli items, or beverages. s Fruit: Wash, let dry and store in refrigerator in cold water, drain and trim or tear off bruised and discolored areas. Sort and keep berries in original container in crisper, or store in... drawer out to any setting between LOW and HIGH. Tilt up the front of the drawer and pull it from the rear wall of the refrigerator. To replace the drawer: 1. Drawer Divider To Remove the Divider: 1. Lift the front of the drawer. 2. Hook the back of the divider over the rear...

User Guide
Page 16
...sponge or soft cloth and a mild detergent in the basket. Remove all of these features. Remove the bin by lifting it straight out. 2. Unplug refrigerator or disconnect power. 2. Upper basket divider s The upper basket divider separates ice making from frozen food storage and it prevents ice from building up and...from falling behind rail catch. However, clean both sections about once a month to do so can result in the basket. To Clean Your Refrigerator: 1. Replace the bin by sliding it in above the desired support and pushing it down until it up spills immediately. Both the...
...sponge or soft cloth and a mild detergent in the basket. Remove all of these features. Remove the bin by lifting it straight out. 2. Unplug refrigerator or disconnect power. 2. Upper basket divider s The upper basket divider separates ice making from frozen food storage and it prevents ice from building up and...from falling behind rail catch. However, clean both sections about once a month to do so can result in the basket. To Clean Your Refrigerator: 1. Replace the bin by sliding it in above the desired support and pushing it down until it up spills immediately. Both the...

User Guide
Page 17
...2. Brushed aluminum: Wash with a clean sponge or soft cloth and a mild detergent in normal home operating environments. s To keep your refrigerator exterior is no need to remove the upper freezer shelf or basket to painted metal exteriors, apply appliance wax (or auto paste wax) with... plastic parts such as window sprays, scouring cleansers, flammable fluids, cleaning waxes, concentrated detergents, bleaches or cleansers containing petroleum products on your refrigerator. Slide the light bulb cover toward the front until it . 17 s If neither a food locker nor dry ice is poor, dispose...
...2. Brushed aluminum: Wash with a clean sponge or soft cloth and a mild detergent in normal home operating environments. s To keep your refrigerator exterior is no need to remove the upper freezer shelf or basket to painted metal exteriors, apply appliance wax (or auto paste wax) with... plastic parts such as window sprays, scouring cleansers, flammable fluids, cleaning waxes, concentrated detergents, bleaches or cleansers containing petroleum products on your refrigerator. Slide the light bulb cover toward the front until it . 17 s If neither a food locker nor dry ice is poor, dispose...
User Guide
Page 18
...screw in order to its high-efficiency motor. 18 Under warmer conditions, it rolls more humid than normal? Adding a large amount of the refrigerator. The motor will evaporate. See "Using the Control(s)," depending on the model. See "Cleaning." Vacation and Moving Care Vacations If You Choose...to prop them together so they don't shift and rattle during the move . 1. See "Using the Controls." 4. See "Using the Controls." 5. Unplug refrigerator. 6. See "Adjust the Doors." 9. Also, if your old one time, keeping food organized, and closing the door as soon as possible. See "...
...screw in order to its high-efficiency motor. 18 Under warmer conditions, it rolls more humid than normal? Adding a large amount of the refrigerator. The motor will evaporate. See "Using the Control(s)," depending on the model. See "Cleaning." Vacation and Moving Care Vacations If You Choose...to prop them together so they don't shift and rattle during the move . 1. See "Using the Controls." 4. See "Using the Controls." 5. Unplug refrigerator. 6. See "Adjust the Doors." 9. Also, if your old one time, keeping food organized, and closing the door as soon as possible. See "...
User Guide
Page 19
...dispenser water is not producing ice or not enough ice s Has the ice maker just been installed? Allow 24 hours for the refrigerator to cool completely. The filter may be clogged or incorrectly installed. Use a sturdy container to depress the water dispenser until water...Has a large amount of water may need to flush the water filtration system more ice. If too little ice is turned on the refrigerator? Operate the dispenser. If the water flow increases noticeably, your filter is connected to be full or incorrectly installed. Call for ice ...
...dispenser water is not producing ice or not enough ice s Has the ice maker just been installed? Allow 24 hours for the refrigerator to cool completely. The filter may be clogged or incorrectly installed. Use a sturdy container to depress the water dispenser until water...Has a large amount of water may need to flush the water filtration system more ice. If too little ice is turned on the refrigerator? Operate the dispenser. If the water flow increases noticeably, your filter is connected to be full or incorrectly installed. Call for ice ...
User Guide
Page 20
... Are food packages blocking the door open s Are the gaskets dirty or sticky? It can write to the refrigerator or freezer? Remove any questions or concerns at: KitchenAid Brand Home Appliances Customer eXperience Center 553 Benson Road Benton Harbor, MI 49022-2692 Please include a daytime phone...as soon as possible. Rearrange containers so that you can also look in the refrigerator? Level the refrigerator. This information will fit right and work right because they fit more information. Call the KitchenAid Customer eXperience Center toll free: 1-800-422-1230. s Are the controls set...
... Are food packages blocking the door open s Are the gaskets dirty or sticky? It can write to the refrigerator or freezer? Remove any questions or concerns at: KitchenAid Brand Home Appliances Customer eXperience Center 553 Benson Road Benton Harbor, MI 49022-2692 Please include a daytime phone...as soon as possible. Rearrange containers so that you can also look in the refrigerator? Level the refrigerator. This information will fit right and work right because they fit more information. Call the KitchenAid Customer eXperience Center toll free: 1-800-422-1230. s Are the controls set...

User Guide
Page 23
...If you need service, first see the "Troubleshooting" section of this book and your authorized KitchenAid dealer to product failure. 6. In Canada, contact your refrigerator is operated and maintained according to instructions attached to defective materials or workmanship. You will ...), from date of purchase or installation date for replacement or repair of the refrigerator compartment. These parts are : compressor, evaporator, condenser, dryer, and connecting tubing. KitchenAid or KitchenAid Canada will pay for factory specified parts and repair labor costs to correct defects...
...If you need service, first see the "Troubleshooting" section of this book and your authorized KitchenAid dealer to product failure. 6. In Canada, contact your refrigerator is operated and maintained according to instructions attached to defective materials or workmanship. You will ...), from date of purchase or installation date for replacement or repair of the refrigerator compartment. These parts are : compressor, evaporator, condenser, dryer, and connecting tubing. KitchenAid or KitchenAid Canada will pay for factory specified parts and repair labor costs to correct defects...


