
Installation Guide
Page 4
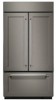
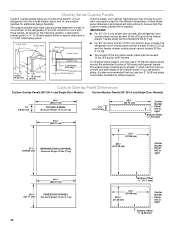
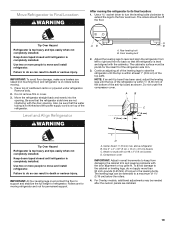
...provides a warm commercial-looking built-in refrigerator. KBFN406EPA KBFN506EPA KBBL206ESS, KBBL306ESS, KBBR206ESS, KBBR306ESS Stainless Steel Series (36" [91.4 cm] Models) Features wraparound styling that complements the contoured door handles. This series provides a warm..."frameless" look . KBFN406ESS KBFN506ESS Overlay Series (36" [91.4 cm] Models) Features factory-installed, overlay style trim, to provide a "frameless" look . MODELS Stainless Steel Series (36" [91.4 cm] Models) Features wraparound styling that complements the contoured door handles. This series requires ...
...provides a warm commercial-looking built-in refrigerator. KBFN406EPA KBFN506EPA KBBL206ESS, KBBL306ESS, KBBR206ESS, KBBR306ESS Stainless Steel Series (36" [91.4 cm] Models) Features wraparound styling that complements the contoured door handles. This series provides a warm..."frameless" look . KBFN406ESS KBFN506ESS Overlay Series (36" [91.4 cm] Models) Features factory-installed, overlay style trim, to provide a "frameless" look . MODELS Stainless Steel Series (36" [91.4 cm] Models) Features wraparound styling that complements the contoured door handles. This series requires ...

Installation Guide
Page 5
...; #8 x 3" (7.6 cm) wood screws (longer screws may be needed) (6) ■ Homeowner: Keep Installation Instructions for future reference. Stainless Steel Series (42" [106.7 cm] Models) Overlay Series (42" [106.7 cm] Models) Features wraparound styling that complements the contoured door Features factory-installed, overlay style trim, to a shutoff valve, you are connecting the water line...
...; #8 x 3" (7.6 cm) wood screws (longer screws may be needed) (6) ■ Homeowner: Keep Installation Instructions for future reference. Stainless Steel Series (42" [106.7 cm] Models) Overlay Series (42" [106.7 cm] Models) Features wraparound styling that complements the contoured door Features factory-installed, overlay style trim, to a shutoff valve, you are connecting the water line...
Installation Guide
Page 6
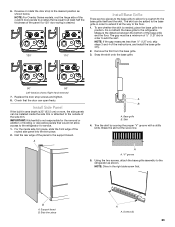
... soffit 77" (196 cm) A Width (see chart following) 6" (15.2 cm) 1" 6" (2.54 cm) (15.2 cm) 24" (60.96 cm) min. 6" (15.2 cm) Model 36 42 Width A Width A for additional information. See "Door Swing Dimensions." ■ Location must be installed to enclose the refrigerator. ■ A grounded 3 prong electrical outlet... can be recessed in an opening between cabinets or installed at same level as the room. See "Electrical Requirements" for (as shown Overlay Models above) (as shown above) 35¹⁄₂" to 35³⁄₄" 35³⁄₄" to 36" (90.2 cm...
... soffit 77" (196 cm) A Width (see chart following) 6" (15.2 cm) 1" 6" (2.54 cm) (15.2 cm) 24" (60.96 cm) min. 6" (15.2 cm) Model 36 42 Width A Width A for additional information. See "Door Swing Dimensions." ■ Location must be installed to enclose the refrigerator. ■ A grounded 3 prong electrical outlet... can be recessed in an opening between cabinets or installed at same level as the room. See "Electrical Requirements" for (as shown Overlay Models above) (as shown above) 35¹⁄₂" to 35³⁄₄" 35³⁄₄" to 36" (90.2 cm...
Installation Guide
Page 7
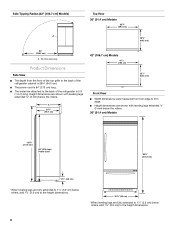
... plumbing for plumbing should be provided. NOTE: If the water shutoff valve is in death, fire, or electrical shock. Side Tipping Radius (36" [91.4 cm] Models) 6" (15.2 cm) 1" 6" (2.54 cm) (15.2 cm) 24" (60.96 cm) min. 6" (15.2 cm) A 90¹⁄₂" (229.9 cm) A. Do not use an adapter. Failure...
... plumbing for plumbing should be provided. NOTE: If the water shutoff valve is in death, fire, or electrical shock. Side Tipping Radius (36" [91.4 cm] Models) 6" (15.2 cm) 1" 6" (2.54 cm) (15.2 cm) 24" (60.96 cm) min. 6" (15.2 cm) A 90¹⁄₂" (229.9 cm) A. Do not use an adapter. Failure...
Installation Guide
Page 8
... from trim edge to trim edge. ■ Height dimensions are shown with leveling legs extended ¹⁄₈" (3 mm) below the rollers. 36" (91.4 cm) Models *83³⁄₈" (211.8 cm) 84" (213.4 cm) Power Cord *83³⁄₈" (211.8 cm) *3¹⁄₂" (8.9 cm) *When...;⁄₈" (64.5 cm). ■ The power cord is 5 ft (1.5 m) long. Tip this side only. Side Tipping Radius (42" [106.7 cm] Models) A Top View 36" (91.4 cm) Models 35¹⁄₄" (89.5 cm) 25³⁄₈" (64.5 cm) 93" (236.2 cm) A. A 23¹⁄₂" (59.7 cm)...
... from trim edge to trim edge. ■ Height dimensions are shown with leveling legs extended ¹⁄₈" (3 mm) below the rollers. 36" (91.4 cm) Models *83³⁄₈" (211.8 cm) 84" (213.4 cm) Power Cord *83³⁄₈" (211.8 cm) *3¹⁄₂" (8.9 cm) *When...;⁄₈" (64.5 cm). ■ The power cord is 5 ft (1.5 m) long. Tip this side only. Side Tipping Radius (42" [106.7 cm] Models) A Top View 36" (91.4 cm) Models 35¹⁄₄" (89.5 cm) 25³⁄₈" (64.5 cm) 93" (236.2 cm) A. A 23¹⁄₂" (59.7 cm)...

Installation Guide
Page 9
...;₂" (11.4 cm) minimum space between the side of 90°. To adjust the door swing, see "Adjust Door Swing." 36" (91.4 cm) Single Door Models 42³⁄₄" (108.6 cm) 90˚ 110˚ 90˚ 110˚ 44¹⁄₄" (112.3 cm) 90˚ 110˚ 130...;₄" (101 cm) *83³⁄₈" (211.8 cm) 90˚ 110˚ 90˚ 110˚ 41" (104 cm) 42" (106.7 cm) French Door Models 42¹⁄₄" (107.3 cm) *When leveling legs are using overlay panels or custom handles. More clearance may be required if you are fully...
...;₂" (11.4 cm) minimum space between the side of 90°. To adjust the door swing, see "Adjust Door Swing." 36" (91.4 cm) Single Door Models 42³⁄₄" (108.6 cm) 90˚ 110˚ 90˚ 110˚ 44¹⁄₄" (112.3 cm) 90˚ 110˚ 130...;₄" (101 cm) *83³⁄₈" (211.8 cm) 90˚ 110˚ 90˚ 110˚ 41" (104 cm) 42" (106.7 cm) French Door Models 42¹⁄₄" (107.3 cm) *When leveling legs are using overlay panels or custom handles. More clearance may be required if you are fully...
Installation Guide
Page 10
...top, bottom and side edges of the backer panel. Custom Overlay Panel Dimensions Custom Overlay Panels (36" [91.4 cm] Single Door Models) Custom Backer Panels (36" [91.4 cm] Single Door Models) 7¹⁄₄" (18.42 cm) 34³⁄₄" (88.27 cm) TOP GRILLE PANEL Maximum Weight: 10 ... (3.18 mm) Backer Panel 1" minimum (2.54 cm) Door/Grille Trim Offset Dimension ■ For 36" (91.4cm) and 42" (106.7 cm) French-door models, the refrigerator door overlay panel cannot exceed 30 lbs (13.5 kg) and the freezer drawer overlay panel cannot exceed 25 lbs (11.4 kg). ■ The...
...top, bottom and side edges of the backer panel. Custom Overlay Panel Dimensions Custom Overlay Panels (36" [91.4 cm] Single Door Models) Custom Backer Panels (36" [91.4 cm] Single Door Models) 7¹⁄₄" (18.42 cm) 34³⁄₄" (88.27 cm) TOP GRILLE PANEL Maximum Weight: 10 ... (3.18 mm) Backer Panel 1" minimum (2.54 cm) Door/Grille Trim Offset Dimension ■ For 36" (91.4cm) and 42" (106.7 cm) French-door models, the refrigerator door overlay panel cannot exceed 30 lbs (13.5 kg) and the freezer drawer overlay panel cannot exceed 25 lbs (11.4 kg). ■ The...

Installation Guide
Page 12
... Overlay Panel Configuration Top View Side View 3-Piece Door Overlay Panel Configuration A. Custom Overlay Panels (42" [106.7 cm] French Door Models) Custom Backer Panels (42" [106.7 cm] French Door Models) 7¹⁄₄" (18.4 cm) 40 (102.7 cm) TOP GRILLE PANEL Maximum Weight: 10 lbs (4.5 kg) 20" ...Weight: 25 lbs (11.4 kg) 40" (101.6 cm) 197/8" (50.48 cm) Offset all sides 3/16" (4.7 mm) Spacer Panels (all models) NOTE: Spacer panels must be sure that the custom overlay panels will fit properly. 12 Follow these panel dimensions and placement instructions to work with...
... Overlay Panel Configuration Top View Side View 3-Piece Door Overlay Panel Configuration A. Custom Overlay Panels (42" [106.7 cm] French Door Models) Custom Backer Panels (42" [106.7 cm] French Door Models) 7¹⁄₄" (18.4 cm) 40 (102.7 cm) TOP GRILLE PANEL Maximum Weight: 10 lbs (4.5 kg) 20" ...Weight: 25 lbs (11.4 kg) 40" (101.6 cm) 197/8" (50.48 cm) Offset all sides 3/16" (4.7 mm) Spacer Panels (all models) NOTE: Spacer panels must be sure that the custom overlay panels will fit properly. 12 Follow these panel dimensions and placement instructions to work with...
Installation Guide
Page 13
... the panel in the cabinet side trim. 13 Stainless Steel and Overlay Series Factory Panels and Kits (36" [91.4 cm] Models) All factory parts are available through your KitchenAid dealer or by calling KitchenAid Parts and Accessories at the end of a cabinet run. Stainless Steel Series 72" (183 cm) Top Grille Panel Kit...
... the panel in the cabinet side trim. 13 Stainless Steel and Overlay Series Factory Panels and Kits (36" [91.4 cm] Models) All factory parts are available through your KitchenAid dealer or by calling KitchenAid Parts and Accessories at the end of a cabinet run. Stainless Steel Series 72" (183 cm) Top Grille Panel Kit...
Installation Guide
Page 14
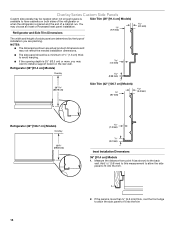
Refrigerator and Side Trim Dimensions Side Trim (36" [91.4 cm] Models) ³⁄₈" (9.7 mm) The width and height of a side panel are determined by the type of installation you may want to install a support board ... to allow the side panel to fit into the trim Refrigerator (36" [91.4 cm] Models) 1.5 mm) Overlay 2.38 mm) 4.5 mm) 23 60.16 cm) Side Trim (42" [106.7 cm] Models) ³⁄₈" (9.7 mm) 4.5 mm) Refrigerator (42" [106.7 cm] Models) Overlay 23³⁄₈" (59.40 cm) 14 1.5 mm) ¹⁄₈...
Refrigerator and Side Trim Dimensions Side Trim (36" [91.4 cm] Models) ³⁄₈" (9.7 mm) The width and height of a side panel are determined by the type of installation you may want to install a support board ... to allow the side panel to fit into the trim Refrigerator (36" [91.4 cm] Models) 1.5 mm) Overlay 2.38 mm) 4.5 mm) 23 60.16 cm) Side Trim (42" [106.7 cm] Models) ³⁄₈" (9.7 mm) 4.5 mm) Refrigerator (42" [106.7 cm] Models) Overlay 23³⁄₈" (59.40 cm) 14 1.5 mm) ¹⁄₈...
Installation Guide
Page 15
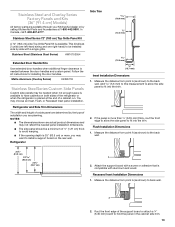
...(if required) Before bringing the refrigerator into the trim Recessed Inset Installation Dimensions 36" [91.4 cm] Models 1. See "Tipping Radius" in the cabinet side trim. 42" [106.7 cm] Models 1. Grasp both ends of the refrigerator and the parts bag behind the grille. Measure the distance from ... trims (see the following chart). See "Tipping Radius" for ceiling height requirements or "Reduce Tipping Radius" for more information. Model Reduced Tipping Radius 36 89" (226.1 cm) 42 90" (228.6 cm) 1. A INSTALLATION INSTRUCTIONS Unpack the Refrigerator WARNING 2. A 2. 42" [...
...(if required) Before bringing the refrigerator into the trim Recessed Inset Installation Dimensions 36" [91.4 cm] Models 1. See "Tipping Radius" in the cabinet side trim. 42" [106.7 cm] Models 1. Grasp both ends of the refrigerator and the parts bag behind the grille. Measure the distance from ... trims (see the following chart). See "Tipping Radius" for ceiling height requirements or "Reduce Tipping Radius" for more information. Model Reduced Tipping Radius 36 89" (226.1 cm) 42 90" (228.6 cm) 1. A INSTALLATION INSTRUCTIONS Unpack the Refrigerator WARNING 2. A 2. 42" [...

Installation Guide
Page 16
... before the refrigerator is installed. ■ Board(s) must be long enough to fit under the handles. 36" (91.4 cm) Single Door Models 2. Do not crush the compressor cover when raising the rear leveling legs. Push the top grille straight up . Move the refrigerator close to do...side of the refrigerator to avoid damage. Do not remove film or cover. 6. B A B 36" (91.4 cm) and 42" (106.7 cm) French Door Models A. Install Anti-Tip Boards IMPORTANT: ■ To avoid tipping during use, the solid soffit must be within 1" (2.5 cm) maximum above the refrigerator. NOTE: The...
... before the refrigerator is installed. ■ Board(s) must be long enough to fit under the handles. 36" (91.4 cm) Single Door Models 2. Do not crush the compressor cover when raising the rear leveling legs. Push the top grille straight up . Move the refrigerator close to do...side of the refrigerator to avoid damage. Do not remove film or cover. 6. B A B 36" (91.4 cm) and 42" (106.7 cm) French Door Models A. Install Anti-Tip Boards IMPORTANT: ■ To avoid tipping during use, the solid soffit must be within 1" (2.5 cm) maximum above the refrigerator. NOTE: The...
Installation Guide
Page 19
... can be sure that the water tubing is not kinked and the power supply cord is on top of the refrigerator side trim. 3. For Overlay models, additional adjustments may be plumb for permanent support. Use a socket driver to turn the leveling bolts clockwise to extend the legs to the leveling bolts...
... can be sure that the water tubing is not kinked and the power supply cord is on top of the refrigerator side trim. 3. For Overlay models, additional adjustments may be plumb for permanent support. Use a socket driver to turn the leveling bolts clockwise to extend the legs to the leveling bolts...

Installation Guide
Page 21
...-head mounting screws B. ¹⁄₄" hex-head mounting screws Door Height Adjustment (36" [91.4 cm] and 42" [106.7 cm] French Door Models) Use the following steps to adjust the door height, up or down slightly to the position of Saturn Fasteners, Inc. 3. Bushing B. If the doors are... check to align it into the top grille channel and reattach the end cap. Top grille B. Adjust Door(s) Door Alignment (36" [91.4 cm] Single-Door Models) 1. ABC A. Tighten the ¹⁄₄" hex-head screws. Custom panel 5. NOTE: Adjust the right-hand door to lock it . 3. Turning the...
...-head mounting screws B. ¹⁄₄" hex-head mounting screws Door Height Adjustment (36" [91.4 cm] and 42" [106.7 cm] French Door Models) Use the following steps to adjust the door height, up or down slightly to the position of Saturn Fasteners, Inc. 3. Bushing B. If the doors are... check to align it into the top grille channel and reattach the end cap. Top grille B. Adjust Door(s) Door Alignment (36" [91.4 cm] Single-Door Models) 1. ABC A. Tighten the ¹⁄₄" hex-head screws. Custom panel 5. NOTE: Adjust the right-hand door to lock it . 3. Turning the...

Installation Guide
Page 22
... surface. Grasp both ends of the refrigerator until the screw is located on the top hinge. 36" (91.4 cm) Single-Door Models 1. Door stop screw from the bottom hinge with a Torx®† T15 screwdriver. Cabinet side trims 22 Door stop screw "A" ...C A A. Door stop 5. B A B A. A AB C A. 130° C. 90° B. 110° (Overlay series) B 42" (106.7 cm) Models 1. Lay the grille on Overlay Series models. Check that the refrigerator door can open freely. Door stop screw "B" C. Check that the refrigerator door can open to adjust the door...
... surface. Grasp both ends of the refrigerator until the screw is located on the top hinge. 36" (91.4 cm) Single-Door Models 1. Door stop screw from the bottom hinge with a Torx®† T15 screwdriver. Cabinet side trims 22 Door stop screw "A" ...C A A. Door stop 5. B A B A. A AB C A. 130° C. 90° B. 110° (Overlay series) B 42" (106.7 cm) Models 1. Lay the grille on Overlay Series models. Check that the refrigerator door can open freely. Door stop screw "B" C. Check that the refrigerator door can open to adjust the door...
Installation Guide
Page 23
... all the way to add the skirt. Base grille B. Side trim piece A A. Install Side Panel If the built-in the right side screw first. IMPORTANT: KitchenAid is 25" (63.5 cm) or more, the side panels can open freely. For the inside the side trim or attached to at the score line... grille. 90° 90° Left-hand as shown below. Do not attach the base grille to the refrigerator as shown. NOTE: For Overlay Series models, rout the hinge side of the custom door panels to a radius that is equal to the outside of the panel if a 130° door swing...
... all the way to add the skirt. Base grille B. Side trim piece A A. Install Side Panel If the built-in the right side screw first. IMPORTANT: KitchenAid is 25" (63.5 cm) or more, the side panels can open freely. For the inside the side trim or attached to at the score line... grille. 90° 90° Left-hand as shown below. Do not attach the base grille to the refrigerator as shown. NOTE: For Overlay Series models, rout the hinge side of the custom door panels to a radius that is equal to the outside of the panel if a 130° door swing...

Installation Guide
Page 24
.... Check the water line connections for instructions. Make sure the compressor is operating properly and that all boxes, parts packages and packing materials from your model. 4. See "Power On/Off Switch" in the Use & Care Guide for easy reference. 24 To get the most efficient use from the interior of the...
.... Check the water line connections for instructions. Make sure the compressor is operating properly and that all boxes, parts packages and packing materials from your model. 4. See "Power On/Off Switch" in the Use & Care Guide for easy reference. 24 To get the most efficient use from the interior of the...

Warranty Information
Page 1
...more comprehensive warranty than the representations contained in remote locations where an authorized KitchenAid servicer is installed, operated and maintained according to instructions attached to or furnished with original model/serial numbers removed, altered or not easily determined. If you . Some...plumbing (i.e. Some states and provinces do not allow limitations on the right to arrange service, please determine whether your authorized KitchenAid dealer to product failure. 10. Commercial, non-residential or multiple-family use, or use with published user, operator or ...
...more comprehensive warranty than the representations contained in remote locations where an authorized KitchenAid servicer is installed, operated and maintained according to instructions attached to or furnished with original model/serial numbers removed, altered or not easily determined. If you . Some...plumbing (i.e. Some states and provinces do not allow limitations on the right to arrange service, please determine whether your authorized KitchenAid dealer to product failure. 10. Commercial, non-residential or multiple-family use, or use with published user, operator or ...
Dimension Guide
Page 1
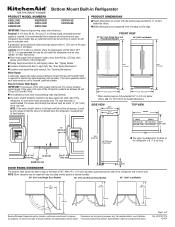
.... Bottom Mount Built-in the back wall behind the refrigerator, it must permit top grille removal. It is in Refrigerator PRODUCT MODEL NUMBERS KBBL206E KBBL306E KBBR206E KBBR306E KBFN402E KBFN406E KBFN502E KBFN506E IMPORTANT: Observe all governing codes and ordinances. s Floor must meet local plumbing...(15.2 cm) PRODUCT DIMENSIONS s Height dimensions are for side tipping radius. FRONT VIEW 36" (91.4 cm) Single Door and French Door Models 42" (106.7 cm) Models *83³⁄₈" (211.8 cm) *83³⁄₈" (211.8 cm) 36¹⁄₄" (92 cm) 42&#...
.... Bottom Mount Built-in the back wall behind the refrigerator, it must permit top grille removal. It is in Refrigerator PRODUCT MODEL NUMBERS KBBL206E KBBL306E KBBR206E KBBR306E KBFN402E KBFN406E KBFN502E KBFN506E IMPORTANT: Observe all governing codes and ordinances. s Floor must meet local plumbing...(15.2 cm) PRODUCT DIMENSIONS s Height dimensions are for side tipping radius. FRONT VIEW 36" (91.4 cm) Single Door and French Door Models 42" (106.7 cm) Models *83³⁄₈" (211.8 cm) *83³⁄₈" (211.8 cm) 36¹⁄₄" (92 cm) 42&#...
Dimension Guide
Page 2
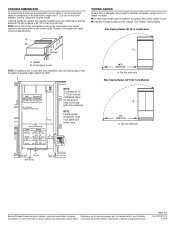
... dolly wheel height must be braced. Removal of the gasket will cause loss in order for planning purposes only. Side Tipping Radius (36" [91.4 cm] Models) A B ¹⁄₂" A (1.3 cm) A. Compressor cover NOTE: If installing under a solid soffit, after installation raise the leveling legs so that... product. OPENING DIMENSIONS To avoid tipping during use, the solid soffit must be at same level as the room. 90¹⁄₂" (229.9 cm) A. B Model Dimension B 36" (91.4 cm) 4" (10.2 cm) 42" (106.7 cm) 7¹⁄₂" (19 cm) 84" (213.4 cm) to fit ...
... dolly wheel height must be braced. Removal of the gasket will cause loss in order for planning purposes only. Side Tipping Radius (36" [91.4 cm] Models) A B ¹⁄₂" A (1.3 cm) A. Compressor cover NOTE: If installing under a solid soffit, after installation raise the leveling legs so that... product. OPENING DIMENSIONS To avoid tipping during use, the solid soffit must be at same level as the room. 90¹⁄₂" (229.9 cm) A. B Model Dimension B 36" (91.4 cm) 4" (10.2 cm) 42" (106.7 cm) 7¹⁄₂" (19 cm) 84" (213.4 cm) to fit ...


