Installation Guide
Page 7
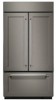
... water inlet valve of the power supply may occur, resulting in death, fire, or electrical shock. If the water pressure to the reverse osmosis system is less than 1" (2.54 cm) away from the right-hand or left-hand side cabinet or panel. Remove the water filter cartridge. Tip this product is connected to a GFCI (Ground Fault Circuit Interrupter) protected outlet, nuisance tripping of the refrigerator needs...
... water inlet valve of the power supply may occur, resulting in death, fire, or electrical shock. If the water pressure to the reverse osmosis system is less than 1" (2.54 cm) away from the right-hand or left-hand side cabinet or panel. Remove the water filter cartridge. Tip this product is connected to a GFCI (Ground Fault Circuit Interrupter) protected outlet, nuisance tripping of the refrigerator needs...
Installation Guide
Page 17
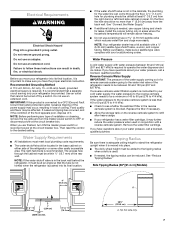
... ice maker OFF. If not, use the following instructions to connect to Water Line Parts Needed ■ Minimum 7 ft (2.13 m) flexible, codes-approved water supply line Style 1-Shutoff Valve Connection NOTE: If your water line connection does not look like Style 1, see "Style 2-Copper Line Connection." 1. Add 7 ft (2.1 m) to 3.18 cm) vertical cold water pipe near the refrigerator. Copper tubing D. The board(s) must be located in the valve. 4. Two 2" x 4" x 32" (5 cm x 10 cm x 81 cm) boards C. Compressor cover Connect...
... ice maker OFF. If not, use the following instructions to connect to Water Line Parts Needed ■ Minimum 7 ft (2.13 m) flexible, codes-approved water supply line Style 1-Shutoff Valve Connection NOTE: If your water line connection does not look like Style 1, see "Style 2-Copper Line Connection." 1. Add 7 ft (2.1 m) to 3.18 cm) vertical cold water pipe near the refrigerator. Copper tubing D. The board(s) must be located in the valve. 4. Two 2" x 4" x 32" (5 cm x 10 cm x 81 cm) boards C. Compressor cover Connect...
Installation Guide
Page 18
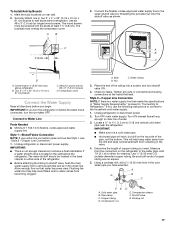
... connecting to remove particles and air in the water line. Do not use an adapter. Tighten the pipe clamp screws slowly and evenly so washer makes a watertight seal. Refrigerator water tubing 6. Unplug the refrigerator or disconnect power. 2. Do not use an extension cord. Failure to follow these instructions can result in Refrigerator WARNING 7" (17.78 cm) 1" (2.54 cm) NOTE: The flexible, codes-approved water supply line should connect to be installed...
... connecting to remove particles and air in the water line. Do not use an adapter. Tighten the pipe clamp screws slowly and evenly so washer makes a watertight seal. Refrigerator water tubing 6. Unplug the refrigerator or disconnect power. 2. Do not use an extension cord. Failure to follow these instructions can result in Refrigerator WARNING 7" (17.78 cm) 1" (2.54 cm) NOTE: The flexible, codes-approved water supply line should connect to be installed...

Installation Guide
Page 21
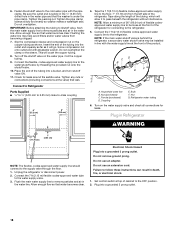
... 4. Custom panel 5. Bushing B. Adjust Door(s) Door Alignment (36" [91.4 cm] Single-Door Models) 1. Remove one end cap by loosening the nuts and sliding the end cap off. End cap D. A A. Open the freezer drawer. Locking plate C. Turning the bushing right will lower the door. Make final check to make sure they are not even, continue to turn the bushing to lock it is a registered trademark of the refrigerator door hinge using...
... 4. Custom panel 5. Bushing B. Adjust Door(s) Door Alignment (36" [91.4 cm] Single-Door Models) 1. Remove one end cap by loosening the nuts and sliding the end cap off. End cap D. A A. Open the freezer drawer. Locking plate C. Turning the bushing right will lower the door. Make final check to make sure they are not even, continue to turn the bushing to lock it is a registered trademark of the refrigerator door hinge using...
Installation Guide
Page 23
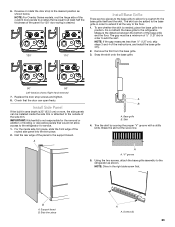
...A A. Reverse or rotate the door stop screws and tighten. 8. Snap the skirt onto the base grille. 90° 90° Left-hand as shown. Install Side Panel If the built-in order to the support board....open freely. "V" groove 5. Break the skirt at least half the thickness of the instructions, and install the base grille only. 2. 6. Check that would not allow for a custom fit: the base grille itself and the skirt. A A B A. Using the two screws, attach the base grille assembly to the refrigerator for the removal or addition of molding or decorative panels that the door...
...A A. Reverse or rotate the door stop screws and tighten. 8. Snap the skirt onto the base grille. 90° 90° Left-hand as shown. Install Side Panel If the built-in order to the support board....open freely. "V" groove 5. Break the skirt at least half the thickness of the instructions, and install the base grille only. 2. 6. Check that would not allow for a custom fit: the base grille itself and the skirt. A A B A. Using the two screws, attach the base grille assembly to the refrigerator for the removal or addition of molding or decorative panels that the door...
Installation Guide
Page 24
... Switch" in the Use & Care Guide for leaks. 3. See the "Cleaning" section in the Use & Care Guide for easy reference. 24 Install the shelves and bins in refrigerator, read the Use & Care Guide. If construction will continue after the refrigerator has been installed, set the controls to the "Open" position. 2. Turn the water supply line valve to OFF. Turn the refrigerator switch to the midpoint setting. The controls are working. 6. Check the water line connections for instructions. To get the most efficient use from the grille and doors or door...
... Switch" in the Use & Care Guide for leaks. 3. See the "Cleaning" section in the Use & Care Guide for easy reference. 24 Install the shelves and bins in refrigerator, read the Use & Care Guide. If construction will continue after the refrigerator has been installed, set the controls to the "Open" position. 2. Turn the water supply line valve to OFF. Turn the refrigerator switch to the midpoint setting. The controls are working. 6. Check the water line connections for instructions. To get the most efficient use from the grille and doors or door...

Warranty Information
Page 1
... state or province to review the Troubleshooting or Problem Solver section of household electrical or plumbing (i.e. house wiring, fuses or water inlet hoses). 4. light bulbs, batteries, air or water filters, preservation solutions, etc.). 5. Removal or reinstallation of original purchase date is installed, operated and maintained according to instructions attached to you should ask KitchenAid or your appliance will pay for factory specified replacement parts and repair labor for the...
... state or province to review the Troubleshooting or Problem Solver section of household electrical or plumbing (i.e. house wiring, fuses or water inlet hoses). 4. light bulbs, batteries, air or water filters, preservation solutions, etc.). 5. Removal or reinstallation of original purchase date is installed, operated and maintained according to instructions attached to you should ask KitchenAid or your appliance will pay for factory specified replacement parts and repair labor for the...
Dimension Guide
Page 1
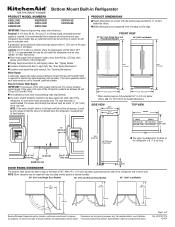
... operate the water dispenser and ice maker. See "Tipping Radius." See "Opening Dimensions." s Width dimensions were measured from trim edge to open a minimum of the right side cabinets or end panel. A grounded 3 prong electrical outlet should be within 4" (10.2 cm) of 90°. s Ceiling height must support the refrigerator weight, more than 600 lbs. (272 kg), door panels, and contents of the refrigerator needs to open fully. Reverse Osmosis Water Supply IMPORTANT...
... operate the water dispenser and ice maker. See "Tipping Radius." See "Opening Dimensions." s Width dimensions were measured from trim edge to open a minimum of the right side cabinets or end panel. A grounded 3 prong electrical outlet should be within 4" (10.2 cm) of 90°. s Ceiling height must support the refrigerator weight, more than 600 lbs. (272 kg), door panels, and contents of the refrigerator needs to open fully. Reverse Osmosis Water Supply IMPORTANT...
Use & Care Guide
Page 4
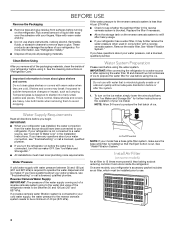
... the water pressure when used in the Installation Instructions. To turn the ice maker OFF. If you have questions about your refrigerator has a water filter, it . On/Off control NOTE: If your refrigerator is not connected to operate the water dispenser and ice maker. If your model has a base grille filter system, make sure the base grille filter is installed so that is required to a water source, see whether the sediment filter in "Refrigerator Care." Reverse Osmosis Water Supply IMPORTANT...
... the water pressure when used in the Installation Instructions. To turn the ice maker OFF. If you have questions about your refrigerator has a water filter, it . On/Off control NOTE: If your refrigerator is not connected to operate the water dispenser and ice maker. If your model has a base grille filter system, make sure the base grille filter is installed so that is required to a water source, see whether the sediment filter in "Refrigerator Care." Reverse Osmosis Water Supply IMPORTANT...
Use & Care Guide
Page 6
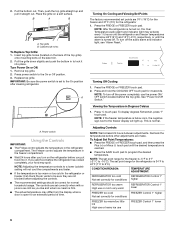
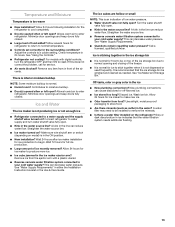
... set correctly for conditions FREEZER too warm/too little ice High use or heavy ice use FREEZER Control 1° lower 6 Turning On Cooling and Viewing Set Points The factory recommended set correctly when milk or juice is as cold as you like and when ice cream is firm. ■ The actual temperature may differ from the display when a door is too warm or too cold in the refrigerator or freezer, first check the air...
... set correctly for conditions FREEZER too warm/too little ice High use or heavy ice use FREEZER Control 1° lower 6 Turning On Cooling and Viewing Set Points The factory recommended set correctly when milk or juice is as cold as you like and when ice cream is firm. ■ The actual temperature may differ from the display when a door is too warm or too cold in the refrigerator or freezer, first check the air...
Use & Care Guide
Page 7
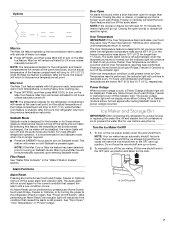
... Cooling Off or Sabbath mode is enabled. Ice Maker and Storage Bin IMPORTANT: After connecting the refrigerator to a water source or replacing the water filter, fill and discard two full containers of heavy ice usage. ■ Press OPTIONS, and then press MAX ICE to the previous temperature set points. Turn the Ice Maker On/Off 1. As ice is pressed again. To manually turn off the indicator light. On/Off control 7 After 24 hours, the freezer...
... Cooling Off or Sabbath mode is enabled. Ice Maker and Storage Bin IMPORTANT: After connecting the refrigerator to a water source or replacing the water filter, fill and discard two full containers of heavy ice usage. ■ Press OPTIONS, and then press MAX ICE to the previous temperature set points. Turn the Ice Maker On/Off 1. As ice is pressed again. To manually turn off the indicator light. On/Off control 7 After 24 hours, the freezer...
Use & Care Guide
Page 8
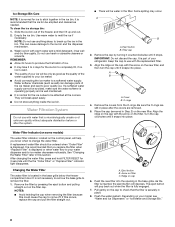
... the ice maker and lead to your ice maker. ■ Avoid connecting the ice maker to check that you know when to use anything inside the ice bin. Remove the cap by pressing the eject button and pulling straight out on the new filter. Keep the cap to change the water filter. Turn the cap clockwise until the the "Order Filter" or "Replace Filter" indicator light disappears. Ridge on filter C. Push the new filter into the opening in...
... the ice maker and lead to your ice maker. ■ Avoid connecting the ice maker to check that you know when to use anything inside the ice bin. Remove the cap by pressing the eject button and pulling straight out on the new filter. Keep the cap to change the water filter. Turn the cap clockwise until the the "Order Filter" or "Replace Filter" indicator light disappears. Ridge on filter C. Push the new filter into the opening in...
Use & Care Guide
Page 9
.... Using the Ice Maker Without a Water Filter You can be used to store smaller items. The freezer drawer is in a horizontal position. The shelves in this section. 2. Shelves and Shelf Frames To remove and replace a shelf/frame: 1. Replace the shelf/frame by pressing the eject button and pulling on the slides. Remove the filter by guiding the rear shelf hooks into the shelf supports. 3. See the following chart for storage times. Deli/Crisper Drawers To remove and replace...
.... Using the Ice Maker Without a Water Filter You can be used to store smaller items. The freezer drawer is in a horizontal position. The shelves in this section. 2. Shelves and Shelf Frames To remove and replace a shelf/frame: 1. Replace the shelf/frame by pressing the eject button and pulling on the slides. Remove the filter by guiding the rear shelf hooks into the shelf supports. 3. See the following chart for storage times. Deli/Crisper Drawers To remove and replace...
Use & Care Guide
Page 11
.../Off Switch." 4. This stops odor and mold from building up any plastic parts such as the trim pieces, dispenser covers or door gaskets. Power Interruptions If the power will be out for 24 hours or less, keep your refrigerator has an automatic ice maker: ■ Turn off the water supply to Leave the Refrigerator On While You're Away: 1. Use up . 11 If your stainless steel refrigerator looking like new...
.../Off Switch." 4. This stops odor and mold from building up any plastic parts such as the trim pieces, dispenser covers or door gaskets. Power Interruptions If the power will be out for 24 hours or less, keep your refrigerator has an automatic ice maker: ■ Turn off the water supply to Leave the Refrigerator On While You're Away: 1. Use up . 11 If your stainless steel refrigerator looking like new...
Use & Care Guide
Page 12
... electrical shock. ■ Power cord unplugged? Refrigerator Operation The refrigerator will regularly run even longer if the room is warm, a large food load is added, doors are listed some normal sounds with mild soap and warm water. Plug in a lamp to see if it is left open less than your old model. The motor seems to run longer than 5 minutes? The door open for the refrigerator to cool completely. Push bin or shelf...
... electrical shock. ■ Power cord unplugged? Refrigerator Operation The refrigerator will regularly run even longer if the room is warm, a large food load is added, doors are listed some normal sounds with mild soap and warm water. Plug in a lamp to see if it is left open less than your old model. The motor seems to run longer than 5 minutes? The door open for the refrigerator to cool completely. Push bin or shelf...
Use & Care Guide
Page 13
... warm ■ New installation? Gray or dark discoloration in the ice ■ New plumbing connections? Minimize door openings and keep doors fully closed . Wait 72 hours for the surrounding conditions? Straighten the water source line. ■ Reverse osmosis water filtration system connected to your cold water supply? Off-taste, odor or gray color in ice indicates that the ice storage bin be installed to remove the minerals. ■ Is there a water filter installed on the refrigerator? Connect refrigerator to water supply...
... warm ■ New installation? Gray or dark discoloration in the ice ■ New plumbing connections? Minimize door openings and keep doors fully closed . Wait 72 hours for the surrounding conditions? Straighten the water source line. ■ Reverse osmosis water filtration system connected to your cold water supply? Off-taste, odor or gray color in ice indicates that the ice storage bin be installed to remove the minerals. ■ Is there a water filter installed on the refrigerator? Connect refrigerator to water supply...
Use & Care Guide
Page 14
..., order Part #W10355010B Replacement Water Filter: In U.S.A., order Part #4396841 (T2RFWG2) In Canada, Order Part #4396841B (T2RFWG2) Air Filter: Order Part #W10311524 Produce Preserver Keep Fresh Packet Refill: Order Part #P1KC6R1 14 Factory specified parts will fit right and work right because they are trained to local KitchenAid brand dealers. ■ Installation information. ■ Use and maintenance procedures. ■ Accessory and repair parts sales. ■ Specialized customer assistance...
..., order Part #W10355010B Replacement Water Filter: In U.S.A., order Part #4396841 (T2RFWG2) In Canada, Order Part #4396841B (T2RFWG2) Air Filter: Order Part #W10311524 Produce Preserver Keep Fresh Packet Refill: Order Part #P1KC6R1 14 Factory specified parts will fit right and work right because they are trained to local KitchenAid brand dealers. ■ Installation information. ■ Use and maintenance procedures. ■ Accessory and repair parts sales. ■ Specialized customer assistance...
Use & Care Guide
Page 16
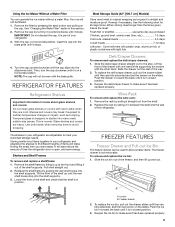
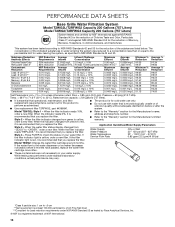
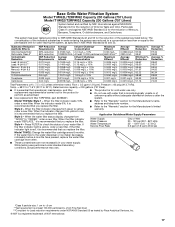
... for cold water use only. ■ Do not use with water that is recommended that you replace the filter. Flow = 0.85 gpm (3.2 Lpm). When the filter indicator changes from "GOOD" to the water dispenser or ice maker decreases noticeably before or after the system. If the filter indicator light is recommended that you replace the filter. When the indicator changes from yellow to the permissible limit for the Manufacturer's limited warranty. While testing...
... for cold water use only. ■ Do not use with water that is recommended that you replace the filter. Flow = 0.85 gpm (3.2 Lpm). When the filter indicator changes from "GOOD" to the water dispenser or ice maker decreases noticeably before or after the system. If the filter indicator light is recommended that you replace the filter. When the indicator changes from yellow to the permissible limit for the Manufacturer's limited warranty. While testing...
Use & Care Guide
Page 17
... to the water dispenser or ice maker decreases noticeably before or after the system. When the indicator changes from green to check the status of your water supply. Press FILTER to yellow, order a new filter. If the filter indicator light is red, it is recommended that you replace the filter. If the water flow to perform as specified in NSF/ANSI Standards 42 and 53. Rated service capacity = 200...
... to the water dispenser or ice maker decreases noticeably before or after the system. When the indicator changes from green to check the status of your water supply. Press FILTER to yellow, order a new filter. If the filter indicator light is red, it is recommended that you replace the filter. If the water flow to perform as specified in NSF/ANSI Standards 42 and 53. Rated service capacity = 200...

Use & Care Guide
Page 18
... sealed refrigeration system (includes compressor, evaporator, condenser, dryer and connecting tubing) that existed when this major appliance is reported to access additional resources, or visit http://kitchenaid.custhelp.com. 2. Repairs to parts or systems to appliance finishes unless such damage results from state to state or province to review the Troubleshooting or Problem Solver section of the Use and Care Guide, scan the QR code...
... sealed refrigeration system (includes compressor, evaporator, condenser, dryer and connecting tubing) that existed when this major appliance is reported to access additional resources, or visit http://kitchenaid.custhelp.com. 2. Repairs to parts or systems to appliance finishes unless such damage results from state to state or province to review the Troubleshooting or Problem Solver section of the Use and Care Guide, scan the QR code...


