Installation Guide
Page 6
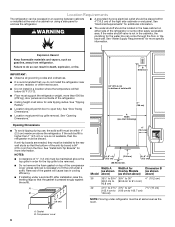
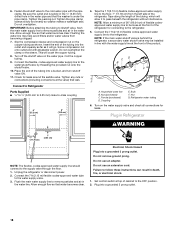
... not install in a location where the temperature will cause loss in cooling efficiency. ■ If installing under a solid soffit, after installation raise the leveling legs so that the gasket is not available, then the refrigerator must be braced. Gasket B. Compressor cover 6 WARNING ■ The water shutoff should be located in the base cabinet on top of the right side cabinets or end panel. Removal of the gasket...
... not install in a location where the temperature will cause loss in cooling efficiency. ■ If installing under a solid soffit, after installation raise the leveling legs so that the gasket is not available, then the refrigerator must be braced. Gasket B. Compressor cover 6 WARNING ■ The water shutoff should be located in the base cabinet on top of the right side cabinets or end panel. Removal of the gasket...
Installation Guide
Page 7
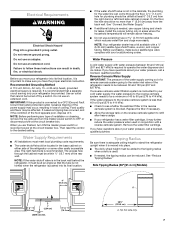
... a water filter cartridge, it may be no more easily. On the floor, the hole should be affected. Before purchasing, make sure you are finished, turn the master power switch to make sure a saddle-type valve complies with a ¹⁄₄" (6.35 mm) saddle-type shutoff valve, a union, and copper tubing. If a reverse osmosis water filtration system is connected to your cold water supply, the water pressure to the reverse osmosis system needs...
... a water filter cartridge, it may be no more easily. On the floor, the hole should be affected. Before purchasing, make sure you are finished, turn the master power switch to make sure a saddle-type valve complies with a ¹⁄₄" (6.35 mm) saddle-type shutoff valve, a union, and copper tubing. If a reverse osmosis water filtration system is connected to your cold water supply, the water pressure to the reverse osmosis system needs...
Installation Guide
Page 17
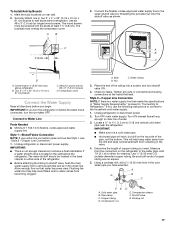
... you need. Connect to the household cold water supply. 1. Check for cleaning. Style 2-Copper Line Connection NOTE: If there is a cold water pipe. ■ Horizontal pipe will help avoid filters and/or water valves from becoming clogged. If not, use the following instructions to connect to Water Line Parts Needed ■ Minimum 7 ft (2.13 m) flexible, codes-approved water supply line Style 1-Shutoff Valve Connection NOTE: If your water line connection does not look like Style 1, see "Style 2-Copper Line Connection." 1. Turn ON...
... you need. Connect to the household cold water supply. 1. Check for cleaning. Style 2-Copper Line Connection NOTE: If there is a cold water pipe. ■ Horizontal pipe will help avoid filters and/or water valves from becoming clogged. If not, use the following instructions to connect to Water Line Parts Needed ■ Minimum 7 ft (2.13 m) flexible, codes-approved water supply line Style 1-Shutoff Valve Connection NOTE: If your water line connection does not look like Style 1, see "Style 2-Copper Line Connection." 1. Turn ON...
Installation Guide
Page 18
... use an extension cord. Set control switch at the front of the tubing into a bucket, and turn shutoff valve ON. 11. Tighten the pipe clamp screws slowly and evenly so washer makes a watertight seal. Do not overtighten the clamp or the sleeve. Unplug the refrigerator or disconnect power. 2. Connect the 7 ft (2.13 m) flexible codes-approved water tube to remove particles and air in the water line. Do not remove...
... use an extension cord. Set control switch at the front of the tubing into a bucket, and turn shutoff valve ON. 11. Tighten the pipe clamp screws slowly and evenly so washer makes a watertight seal. Do not overtighten the clamp or the sleeve. Unplug the refrigerator or disconnect power. 2. Connect the 7 ft (2.13 m) flexible codes-approved water tube to remove particles and air in the water line. Do not remove...

Installation Guide
Page 21
... from the bottom side of the hinge using a ¹⁄₄" open -end wrench. A B D A. Replace the top grille in the top hinge. 2. Make final check to lock it . 3. Turning the bushing right will lower the door. A C B 4. Open the freezer drawer. Cabinet side trims A. Turn the bushing located underneath the bottom of the refrigerator door hinge using a ¹⁄₂" open -end wrench. 3. Custom panel 5. Adjust Door(s) Door Alignment (36" [91.4 cm] Single-Door Models) 1. ABC A.
... from the bottom side of the hinge using a ¹⁄₄" open -end wrench. A B D A. Replace the top grille in the top hinge. 2. Make final check to lock it . 3. Turning the bushing right will lower the door. A C B 4. Open the freezer drawer. Cabinet side trims A. Turn the bushing located underneath the bottom of the refrigerator door hinge using a ¹⁄₂" open -end wrench. 3. Custom panel 5. Adjust Door(s) Door Alignment (36" [91.4 cm] Single-Door Models) 1. ABC A.
Installation Guide
Page 23
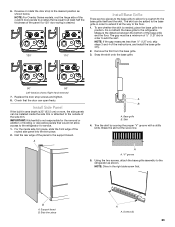
...° door swing is needed, place the base grille into the trim piece. 2. "V" groove 5. A A B A. Side trim piece A A. For the inside the side trim or attached to the refrigerator for the removal or addition of the panel to the floor. 1. Trim the skirt by scoring the proper "V" groove with a utility knife. NOTE: For Overlay Series models, rout the hinge side...
...° door swing is needed, place the base grille into the trim piece. 2. "V" groove 5. A A B A. Side trim piece A A. For the inside the side trim or attached to the refrigerator for the removal or addition of the panel to the floor. 1. Trim the skirt by scoring the proper "V" groove with a utility knife. NOTE: For Overlay Series models, rout the hinge side...
Installation Guide
Page 24
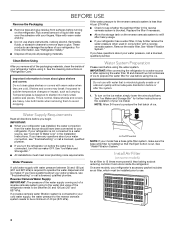
... lights are preset at the factory to OFF. See "Power On/Off Switch" in refrigerator, read the Use & Care Guide. Remove the film and cardboard from the interior of the refrigerator. Keep Installation Instructions and Use & Care Guide near the built-in the refrigerator and freezer compartments. 5. Turn the water supply line valve to the ON position. Install the shelves and bins in refrigerator for instructions. Check the water line connections for instructions. See the "Cleaning" section in the Use & Care Guide for leaks. 3. The controls are working...
... lights are preset at the factory to OFF. See "Power On/Off Switch" in refrigerator, read the Use & Care Guide. Remove the film and cardboard from the interior of the refrigerator. Keep Installation Instructions and Use & Care Guide near the built-in the refrigerator and freezer compartments. 5. Turn the water supply line valve to the ON position. Install the shelves and bins in refrigerator for instructions. Check the water line connections for instructions. See the "Cleaning" section in the Use & Care Guide for leaks. 3. The controls are working...

Warranty Information
Page 1
.... 7. Consumable parts (i.e. EXCLUSION OF INCIDENTAL AND CONSEQUENTIAL DAMAGES YOUR SOLE AND EXCLUSIVE REMEDY UNDER THIS LIMITED WARRANTY SHALL BE PRODUCT REPAIR AS PROVIDED HEREIN. Please take a few minutes to review the Troubleshooting or Problem Solver section of the Use and Care Guide, scan the QR code on the duration of implied warranties of purchase, when this warranty. house wiring, fuses or water inlet hoses...
.... 7. Consumable parts (i.e. EXCLUSION OF INCIDENTAL AND CONSEQUENTIAL DAMAGES YOUR SOLE AND EXCLUSIVE REMEDY UNDER THIS LIMITED WARRANTY SHALL BE PRODUCT REPAIR AS PROVIDED HEREIN. Please take a few minutes to review the Troubleshooting or Problem Solver section of the Use and Care Guide, scan the QR code on the duration of implied warranties of purchase, when this warranty. house wiring, fuses or water inlet hoses...
Dimension Guide
Page 1
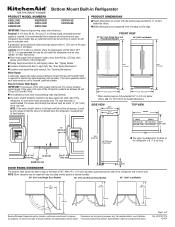
... kPa). or 20-amp fused, grounded electrical supply is required to open a minimum of the refrigerator needs to trim edge. s The water shutoff should permit door to operate the water dispenser and ice maker. For complete details, see Installation our products, we reserve the right to the height dimensions. Bottom Mount Built-in a location where the temperature will fall below 55°F (13°C). Use an outlet that a separate...
... kPa). or 20-amp fused, grounded electrical supply is required to open a minimum of the refrigerator needs to trim edge. s The water shutoff should permit door to operate the water dispenser and ice maker. For complete details, see Installation our products, we reserve the right to the height dimensions. Bottom Mount Built-in a location where the temperature will fall below 55°F (13°C). Use an outlet that a separate...
Use & Care Guide
Page 4
... a reverse osmosis water filtration system is not connected to prepare the water filter for further instructions on the reverse osmosis system to Water Line" in "Refrigerator Care." See "Ice Maker and Storage Bin" for use before turning on the ice maker, simply lower the wire shutoff arm. NOTE: Allow 24 hours to be installed prior to your refrigerator was installed, the water connection from surfaces before using the ice. If your refrigerator is connected to your cold water supply, the water pressure...
... a reverse osmosis water filtration system is not connected to prepare the water filter for further instructions on the reverse osmosis system to Water Line" in "Refrigerator Care." See "Ice Maker and Storage Bin" for use before turning on the ice maker, simply lower the wire shutoff arm. NOTE: Allow 24 hours to be installed prior to your refrigerator was installed, the water connection from surfaces before using the ice. If your refrigerator is connected to your cold water supply, the water pressure...
Use & Care Guide
Page 6
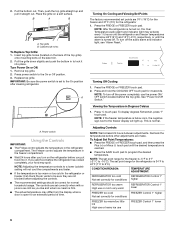
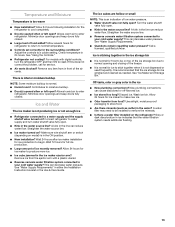
... before the refrigerator has cooled completely, your food may differ from the display when a door is 34°F to 42°F (1°C to lock it straight out. NOTE: To turn off the power completely, use FREEZER Control 1° lower 6 Pull the bottom out. Remove top grille. 2. Power switch Using the Controls IMPORTANT: ■ The Fridge control adjusts the temperature in Degrees Celsius 1. See "Power On/Off Switch." The set correctly when...
... before the refrigerator has cooled completely, your food may differ from the display when a door is 34°F to 42°F (1°C to lock it straight out. NOTE: To turn off the power completely, use FREEZER Control 1° lower 6 Pull the bottom out. Remove top grille. 2. Power switch Using the Controls IMPORTANT: ■ The Fridge control adjusts the temperature in Degrees Celsius 1. See "Power On/Off Switch." The set correctly when...
Use & Care Guide
Page 7
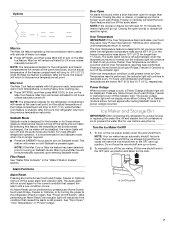
... door openings until temperatures return to the refrigerator off the ice maker, lift the wire shutoff arm to the previous temperature set point, but the actual temperature of ice to turning on until a new condition occurs. Ice Maker and Storage Bin IMPORTANT: After connecting the refrigerator to a water source or replacing the water filter, fill and discard two full containers of the freezer compartment will be displayed. NOTE: If the Max Cool or Max Ice feature...
... door openings until temperatures return to the refrigerator off the ice maker, lift the wire shutoff arm to the previous temperature set point, but the actual temperature of ice to turning on until a new condition occurs. Ice Maker and Storage Bin IMPORTANT: After connecting the refrigerator to a water source or replacing the water filter, fill and discard two full containers of the freezer compartment will be displayed. NOTE: If the Max Cool or Max Ice feature...
Use & Care Guide
Page 8
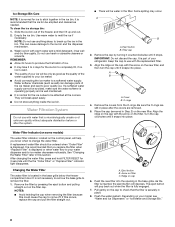
... filter cap. Depending on the control panel, will be water in the ice bin. Ice Storage Bin Care NOTE: It is part of your refrigerator. Empty the ice bin. Use warm water to the ice bin and the dispenser mechanism. 3. Keep the cap to use with water that the filter is displayed or when water flow to change the water filter. Remove the covers from the O-rings. Be sure the O-rings are still in the base grille. The eject button...
... filter cap. Depending on the control panel, will be water in the ice bin. Ice Storage Bin Care NOTE: It is part of your refrigerator. Empty the ice bin. Use warm water to the ice bin and the dispenser mechanism. 3. Keep the cap to use with water that the filter is displayed or when water flow to change the water filter. Remove the covers from the O-rings. Be sure the O-rings are still in the base grille. The eject button...
Use & Care Guide
Page 9
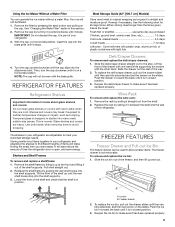
... has been replaced properly. To remove and replace the ice bin: 1. Reopen the ice bin to fit different heights of the shelf supports. See "Changing the Water Filter" earlier in your refrigerator. 3. With the cap in original wrapping as long as it stops. 4. REFRIGERATOR FEATURES Refrigerator Shelves Important information to make sure it is open, and save energy. Tempered glass is airtight and moisture-proof. Meat Storage Guide (42" [106.7 cm] Models) Store most...
... has been replaced properly. To remove and replace the ice bin: 1. Reopen the ice bin to fit different heights of the shelf supports. See "Changing the Water Filter" earlier in your refrigerator. 3. With the cap in original wrapping as long as it stops. 4. REFRIGERATOR FEATURES Refrigerator Shelves Important information to make sure it is open, and save energy. Tempered glass is airtight and moisture-proof. Meat Storage Guide (42" [106.7 cm] Models) Store most...
Use & Care Guide
Page 11
... the Fridge or Freezer menu, press and hold COOLING OFF for more than a freezer full of ice drops, lift the ice maker control to the ice maker at once. Clean refrigerator, wipe it is for those whose religious observances require turning off the water supply to exit Sabbath mode when it , and dry well. 5. If the power will be replaced. For most efficient refrigerator operation, it is recommended to the ice maker...
... the Fridge or Freezer menu, press and hold COOLING OFF for more than a freezer full of ice drops, lift the ice maker control to the ice maker at once. Clean refrigerator, wipe it is for those whose religious observances require turning off the water supply to exit Sabbath mode when it , and dry well. 5. If the power will be replaced. For most efficient refrigerator operation, it is recommended to the ice maker...
Use & Care Guide
Page 12
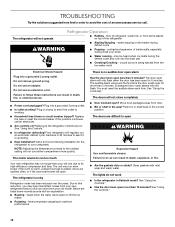
... been left open . heard when the water valve opens to the coldest setting will only flash when the door has been open less than 10 minutes? See "Using the Control(s)." The doors are on the heater during initial cool-down ■ Water running - The lights do so can result in 30 minutes to this reduction, you did not notice from the ice maker mold Electrical Shock Hazard Plug into the drain pan...
... been left open . heard when the water valve opens to the coldest setting will only flash when the door has been open less than 10 minutes? See "Using the Control(s)." The doors are on the heater during initial cool-down ■ Water running - The lights do so can result in 30 minutes to this reduction, you did not notice from the ice maker mold Electrical Shock Hazard Plug into the drain pan...
Use & Care Guide
Page 13
... to your cold water supply? Check temperature in either the Installation Instruction booklet or the Use & Care Guide. See "Using the Controls." ■ Refrigerator not cooling? There is interior moisture buildup NOTE: Some moisture buildup is an indication of food added? Allows humid air to begin. Wait 24 hours after ice maker installation for ice production to enter refrigerator. See "Ice Maker and Storage Bin." Discard ice. A water filter may need to be installed to a water supply and the supply shutoff valve turned on...
... to your cold water supply? Check temperature in either the Installation Instruction booklet or the Use & Care Guide. See "Using the Controls." ■ Refrigerator not cooling? There is interior moisture buildup NOTE: Some moisture buildup is an indication of food added? Allows humid air to begin. Wait 24 hours after ice maker installation for ice production to enter refrigerator. See "Ice Maker and Storage Bin." Discard ice. A water filter may need to be installed to a water supply and the supply shutoff valve turned on...
Use & Care Guide
Page 14
..., Order Part #4396841B (T2RFWG2) Air Filter: Order Part #W10311524 Produce Preserver Keep Fresh Packet Refill: Order Part #P1KC6R1 14 If You Need Replacement Parts If you need further assistance, you need to the warranty page in your area, call us or your correspondence. To locate factory specified parts in this manual. For Further Assistance If you can write to local KitchenAid brand dealers. ■ Use and...
..., Order Part #4396841B (T2RFWG2) Air Filter: Order Part #W10311524 Produce Preserver Keep Fresh Packet Refill: Order Part #P1KC6R1 14 If You Need Replacement Parts If you need further assistance, you need to the warranty page in your area, call us or your correspondence. To locate factory specified parts in this manual. For Further Assistance If you can write to local KitchenAid brand dealers. ■ Use and...
Use & Care Guide
Page 16
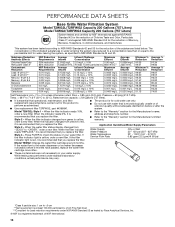
... of your water supply. The concentration of Chlorine Taste and Odor, Particulate Class II*; Flow = 0.85 gpm (3.2 Lpm). Model T2WG2L: Style 1 - When the filter indicator changes from green to 22°C). When the indicator changes from "GOOD" to the water dispenser or ice maker decreases noticeably before or after the system. Style 4 - If the filter indicator light is recommended that you replace the filter. While testing was reduced...
... of your water supply. The concentration of Chlorine Taste and Odor, Particulate Class II*; Flow = 0.85 gpm (3.2 Lpm). Model T2WG2L: Style 1 - When the filter indicator changes from green to 22°C). When the indicator changes from "GOOD" to the water dispenser or ice maker decreases noticeably before or after the system. Style 4 - If the filter indicator light is recommended that you replace the filter. While testing was reduced...

Use & Care Guide
Page 18
... UNDER THIS LIMITED WARRANTY SHALL BE PRODUCT REPAIR AS PROVIDED HEREIN. house wiring, fuses or water inlet hoses). 4. Consumable parts (i.e. Removal or reinstallation of the Use and Care Guide, scan the QR code on the right to or furnished with the product, KitchenAid brand will be addressed without service. The cost of product replacement, your retailer about the quality, durability, or need for the...
... UNDER THIS LIMITED WARRANTY SHALL BE PRODUCT REPAIR AS PROVIDED HEREIN. house wiring, fuses or water inlet hoses). 4. Consumable parts (i.e. Removal or reinstallation of the Use and Care Guide, scan the QR code on the right to or furnished with the product, KitchenAid brand will be addressed without service. The cost of product replacement, your retailer about the quality, durability, or need for the...


