Use & Care Guide
Page 3
... Shield 8 Cleaning the Pouring Shield 8 Using Your KitchenAid® Accessories 9 Mixing Time...9 Stand Mixer Use ...9 Speed Control Guide - 10 Speed Mixers 10 Speed Control Guide - Table of Contents INTRODUCTION Proof of Purchase & Product Registration Inside Front Cover Stand Mixer Safety...3 Important Safeguards ...3 Electrical Requirements 4 FEATURES AND OPERATION Bowl-Lift Stand Mixer Features 5 Assembling Your Bowl-Lift Stand Mixer 7 Pre-Use Cleaning ...7 Attaching and Removing Mixing...
... Shield 8 Cleaning the Pouring Shield 8 Using Your KitchenAid® Accessories 9 Mixing Time...9 Stand Mixer Use ...9 Speed Control Guide - 10 Speed Mixers 10 Speed Control Guide - Table of Contents INTRODUCTION Proof of Purchase & Product Registration Inside Front Cover Stand Mixer Safety...3 Important Safeguards ...3 Electrical Requirements 4 FEATURES AND OPERATION Bowl-Lift Stand Mixer Features 5 Assembling Your Bowl-Lift Stand Mixer 7 Pre-Use Cleaning ...7 Attaching and Removing Mixing...
Use & Care Guide
Page 5
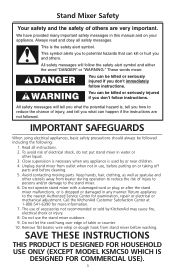
... necessary when any manner. Unplug stand mixer from outlet when not in this manual and on or taking off parts and before washing. Keep hands, hair, clothing, as well as spatulas and other liquid. 3. Do not use of accessories not recommended or sold by or...KitchenAid Customer Satisfaction Center at 1-800-541-6390 for examination, repair or electrical or mechanical adjustment. Do not operate stand mixer with a damaged cord or plug or after the stand mixer malfunctions, or is the safety alert symbol. SAVE THESE INSTRUCTIONS THIS PRODUCT IS DESIGNED FOR HOUSEHOLD USE ONLY (EXCEPT MODEL...
... necessary when any manner. Unplug stand mixer from outlet when not in this manual and on or taking off parts and before washing. Keep hands, hair, clothing, as well as spatulas and other liquid. 3. Do not use of accessories not recommended or sold by or...KitchenAid Customer Satisfaction Center at 1-800-541-6390 for examination, repair or electrical or mechanical adjustment. Do not operate stand mixer with a damaged cord or plug or after the stand mixer malfunctions, or is the safety alert symbol. SAVE THESE INSTRUCTIONS THIS PRODUCT IS DESIGNED FOR HOUSEHOLD USE ONLY (EXCEPT MODEL...
Use & Care Guide
Page 7
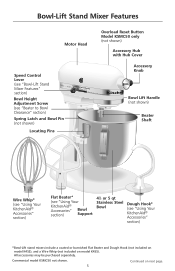
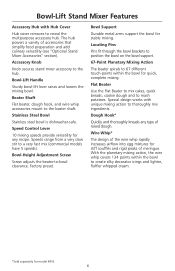
... be purchased separately. Bowl-Lift Stand Mixer Features Motor Head Overload Reset Button Model KSMC50 only (not shown) Accessory Hub with Hub Cover Speed Control Lever (see "Bowl-Lift Stand Mixer Features" section) Bowl Height Adjustment Screw (see "Using Your KitchenAid® Accessories" section) *Bowl-Lift stand mixers include a coated or burnished Flat Beater and Dough Hook (not included on model K4SS), and a Wire Whip (not included on...
... be purchased separately. Bowl-Lift Stand Mixer Features Motor Head Overload Reset Button Model KSMC50 only (not shown) Accessory Hub with Hub Cover Speed Control Lever (see "Bowl-Lift Stand Mixer Features" section) Bowl Height Adjustment Screw (see "Using Your KitchenAid® Accessories" section) *Bowl-Lift stand mixers include a coated or burnished Flat Beater and Dough Hook (not included on model K4SS), and a Wire Whip (not included on...
Use & Care Guide
Page 8
... wire whip covers 134 points within the bowl for model K4SS. 6 Locating Pins Pins fit through the bowl brackets to position the bowl on the bowl support. 67-Point Planetary Mixing Action The beater spirals to 67 different touch-points within the bowl to thoroughly mix ingredients. Bowl-Lift Stand Mixer Features Accessory Hub with unique mixing action to create silky...
... wire whip covers 134 points within the bowl for model K4SS. 6 Locating Pins Pins fit through the bowl brackets to position the bowl on the bowl support. 67-Point Planetary Mixing Action The beater spirals to 67 different touch-points within the bowl to thoroughly mix ingredients. Bowl-Lift Stand Mixer Features Accessory Hub with unique mixing action to create silky...
Use & Care Guide
Page 9
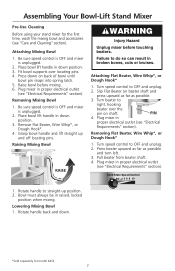
..., wash the mixing bowl and accessories (see "Electrical Requirements" section). Raising Mixing Bowl RAISE WARNING Injury Hazard Unplug mixer before mixing. 6. Attaching Flat Beater, Wire Whip*, or Dough Hook* 1. Slip Flat Beater on shaft. Assembling Your Bowl-Lift Stand Mixer Pre-Use Cleaning Before using your stand mixer for model K4SS. 7 Place bowl lift handle in down position. 3. Plug mixer in proper electrical outlet...
..., wash the mixing bowl and accessories (see "Electrical Requirements" section). Raising Mixing Bowl RAISE WARNING Injury Hazard Unplug mixer before mixing. 6. Attaching Flat Beater, Wire Whip*, or Dough Hook* 1. Slip Flat Beater on shaft. Assembling Your Bowl-Lift Stand Mixer Pre-Use Cleaning Before using your stand mixer for model K4SS. 7 Place bowl lift handle in down position. 3. Plug mixer in proper electrical outlet...
Use & Care Guide
Page 10
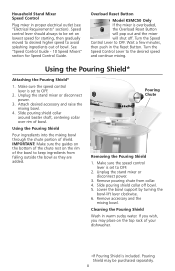
...of bowl. Household Stand Mixer Speed Control Plug mixer in the Reset Button. See "Speed Control Guide - 10 Speed Mixers" section for starting, then gradually moved to desired higher speed to OFF. 2. Overload Reset Button Overload Reset C Model KSMC50 Only If the mixer is included. Attach desired accessory and raise the mixing bowl....Using the Pouring Shield* Attaching the Pouring Shield* 1. Make sure the speed control lever is set on the rim of bowl. Lower the bowl support by turning the bowl-lift lever clockwise. 6. Cleaning the Pouring Shield Wash in warm sudsy water.
...of bowl. Household Stand Mixer Speed Control Plug mixer in the Reset Button. See "Speed Control Guide - 10 Speed Mixers" section for starting, then gradually moved to desired higher speed to OFF. 2. Overload Reset Button Overload Reset C Model KSMC50 Only If the mixer is included. Attach desired accessory and raise the mixing bowl....Using the Pouring Shield* Attaching the Pouring Shield* 1. Make sure the speed control lever is set on the rim of bowl. Lower the bowl support by turning the bowl-lift lever clockwise. 6. Cleaning the Pouring Shield Wash in warm sudsy water.
Use & Care Guide
Page 11
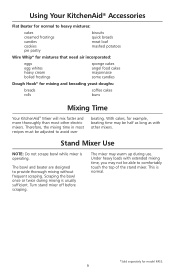
... mixer is normal. *Sold separately for model K4SS. 9 Under heavy loads with other electric mixers. With cakes, for example, beating time may be half as long as with extended mixing time, you may warm up during mixing is usually sufficient. Scraping the bowl once or twice during use. This is operating. Using Your KitchenAid® Accessories...
... mixer is normal. *Sold separately for model K4SS. 9 Under heavy loads with other electric mixers. With cakes, for example, beating time may be half as long as with extended mixing time, you may warm up during mixing is usually sufficient. Scraping the bowl once or twice during use. This is operating. Using Your KitchenAid® Accessories...
Use & Care Guide
Page 19
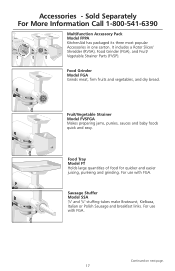
...Accessory Pack Model FPPA KitchenAid has packaged its three most popular Accessories in one carton. JosKepithc,hMeicnhAigiadn USA Solid Off SSttairte2S4pe6e8d C10ontrol Food Grinder Model FGA Grinds meat, firm fruits and vegetables, and dry bread. ® hc,hMeicnhAigiadn USA Solid Off SSttairte2S4pe6e8d C10ontrol Fruit/Vegetable Strainer Model...Strainer Parts (FVSP). ® St. For use with FGA. Continued on next page. 17 Sausage Stuffer Model SSA 3/8" and 5/8" stuffing tubes make Bratwurst, Kielbasa, Italian or Polish Sausage and breakfast links. JosKepithc,...
...Accessory Pack Model FPPA KitchenAid has packaged its three most popular Accessories in one carton. JosKepithc,hMeicnhAigiadn USA Solid Off SSttairte2S4pe6e8d C10ontrol Food Grinder Model FGA Grinds meat, firm fruits and vegetables, and dry bread. ® hc,hMeicnhAigiadn USA Solid Off SSttairte2S4pe6e8d C10ontrol Fruit/Vegetable Strainer Model...Strainer Parts (FVSP). ® St. For use with FGA. Continued on next page. 17 Sausage Stuffer Model SSA 3/8" and 5/8" stuffing tubes make Bratwurst, Kielbasa, Italian or Polish Sausage and breakfast links. JosKepithc,...
Use & Care Guide
Page 21
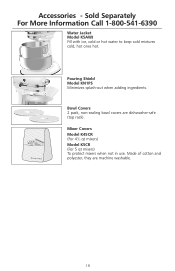
... cotton and polyester, they are dishwasher-safe (top rack). Mixer Covers Model K45CR (For 41/2 qt mixers) Model K5CR (For 5 qt mixers) To protect mixers when not in use. Bowl Covers 2 pack, non-sealing bowl covers are machine washable. 19 Sold Separately For More Information ...Model K5AWJ Fill with ice, cold or hot water to keep cold mixtures cold, hot ones hot. JosKeipthc,hMeicnhAigiadn USA Solid Off SStatirte2S4pe6ed8 Control 10 CAUTION: Unplug before inserting of removing parts &PSaasutaces Pouring Shield Model KN1PS Minimizes splash-out when adding ingredients. Accessories...
... cotton and polyester, they are dishwasher-safe (top rack). Mixer Covers Model K45CR (For 41/2 qt mixers) Model K5CR (For 5 qt mixers) To protect mixers when not in use. Bowl Covers 2 pack, non-sealing bowl covers are machine washable. 19 Sold Separately For More Information ...Model K5AWJ Fill with ice, cold or hot water to keep cold mixtures cold, hot ones hot. JosKeipthc,hMeicnhAigiadn USA Solid Off SStatirte2S4pe6ed8 Control 10 CAUTION: Unplug before inserting of removing parts &PSaasutaces Pouring Shield Model KN1PS Minimizes splash-out when adding ingredients. Accessories...
Use & Care Guide
Page 49
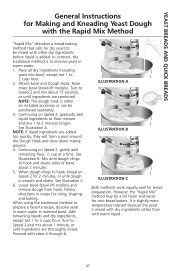
Raise mixer bowl (bowl-lift models). Continuing on Speed 2, ... ingredients, except last 1 to 2 cups flour. 2. Place all dry ingredients including yeast into bowl, except last 1 to 2 cups flour. Turn to Speed 2 and mix about 2 minutes....accessory or can be a bit faster and easier for new bread bakers. NOTE: If liquid ingredients are added too quickly, they will form a pool around the Dough Hook and slow down mixing process. 4. When using the traditional method to dissolve yeast in warmed bowl. Proceed with steps 4 through 6. See Illustration B. Lower bowl (bowl-lift models...
Raise mixer bowl (bowl-lift models). Continuing on Speed 2, ... ingredients, except last 1 to 2 cups flour. 2. Place all dry ingredients including yeast into bowl, except last 1 to 2 cups flour. Turn to Speed 2 and mix about 2 minutes....accessory or can be a bit faster and easier for new bread bakers. NOTE: If liquid ingredients are added too quickly, they will form a pool around the Dough Hook and slow down mixing process. 4. When using the traditional method to dissolve yeast in warmed bowl. Proceed with steps 4 through 6. See Illustration B. Lower bowl (bowl-lift models...
Use & Care Guide
Page 50
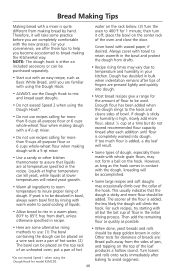
... for the amount of flour to 400°F for model KSMC50. Bread Making Tips Making bread with a mixer is added, a dry loaf will result. •...flour when making the KitchenAid way. If too much flour is quite different from draft, unless otherwise specified in contact with a 41/2-qt mixer. • Do not...when using the Dough Hook*. • Do not use : (1) The bowl containing the dough can be placed on a wire rack over the collar of...not exceed recommended flour capacity. If yeast is either an included accessory or can kill yeast, while liquids at lower temperatures will take...
... for the amount of flour to 400°F for model KSMC50. Bread Making Tips Making bread with a mixer is added, a dry loaf will result. •...flour when making the KitchenAid way. If too much flour is quite different from draft, unless otherwise specified in contact with a 41/2-qt mixer. • Do not...when using the Dough Hook*. • Do not use : (1) The bowl containing the dough can be placed on a wire rack over the collar of...not exceed recommended flour capacity. If yeast is either an included accessory or can kill yeast, while liquids at lower temperatures will take...


