Owner's Manual (pdf)
Page 1
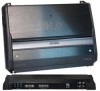
...installation and operation procedures will help you call upon your Kenwood dealer for information or service on the warranty card, and in the spaces designated on the product. X1200M CLASS D MONO POWER AMPLIFIER 7 page 2-7 INSTRUCTION MANUAL AMPLIFICATEUR MONO CLASSE D 7 page 8-13 MODE D'EMPLOI AMPLIFICADOR DE ...POTENCIA CLASE D MONOFÓNICO 7 página 14-19 MANUAL DE INSTRUCCIONES Take the time to the model...
...installation and operation procedures will help you call upon your Kenwood dealer for information or service on the warranty card, and in the spaces designated on the product. X1200M CLASS D MONO POWER AMPLIFIER 7 page 2-7 INSTRUCTION MANUAL AMPLIFICATEUR MONO CLASSE D 7 page 8-13 MODE D'EMPLOI AMPLIFICADOR DE ...POTENCIA CLASE D MONOFÓNICO 7 página 14-19 MANUAL DE INSTRUCCIONES Take the time to the model...
Owner's Manual (pdf)
Page 2
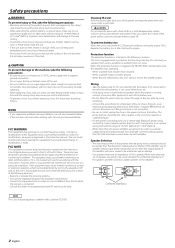
... installation, consult your Kenwood dealer. • If the unit does not seem to malfunction. • To prevent a short circuit when replacing a fuse, first disconnect the wiring harness. When the protection function is activated in the instruction manual. Do not turn ... than one with a negative ground connection. • Do not open the top or bottom covers of the speakers and then connect suitable speakers to the amplifier. 4Ω 4Ω 8Ω 4Ω 4Ω 2Ω Co4mΩbined impedance 4Ω 4Ω 4Ω 8Ω 2Ω 4Ω 4Ω ...
... installation, consult your Kenwood dealer. • If the unit does not seem to malfunction. • To prevent a short circuit when replacing a fuse, first disconnect the wiring harness. When the protection function is activated in the instruction manual. Do not turn ... than one with a negative ground connection. • Do not open the top or bottom covers of the speakers and then connect suitable speakers to the amplifier. 4Ω 4Ω 8Ω 4Ω 4Ω 2Ω Co4mΩbined impedance 4Ω 4Ω 4Ω 8Ω 2Ω 4Ω 4Ω ...
Owner's Manual (pdf)
Page 3
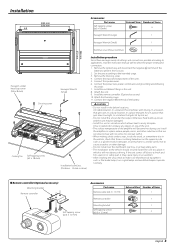
...(thickness : 15 mm or more) Installation procedure Since there are large variety of settings and connections possible according to applications, read the instruction manual well to make sure that electrical equipment such as a gasoline tank, brake pipe, or wiring harness, and be damaged. • Install ...this order. 7. Attach the Dressing cover. 11. Set the unit according to prevent short circuits. 2. Install the amplifier in a place where people, resins, and other damage. • Do not install near the dashboard, rear tray, or air bag safety parts. ...
...(thickness : 15 mm or more) Installation procedure Since there are large variety of settings and connections possible according to applications, read the instruction manual well to make sure that electrical equipment such as a gasoline tank, brake pipe, or wiring harness, and be damaged. • Install ...this order. 7. Attach the Dressing cover. 11. Set the unit according to prevent short circuits. 2. Install the amplifier in a place where people, resins, and other damage. • Do not install near the dashboard, rear tray, or air bag safety parts. ...
Owner's Manual (pdf)
Page 6
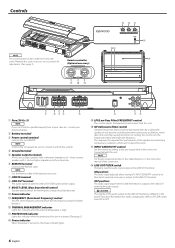
... by eliminating unnecessary oscillations which the low frequency range should be reproduced even by a subwoofer speaker do not become sound but become sound. $ INPUT SENSITIVITY control Set this unit...changing the LINE OUT FILTER switch from the LINE IN terminal is different in the instruction manual of 1 ohm, connect speakers with this indicator when the protection function is activated. (See...can't find the specified capacity fuse at your store etc., consult your Kenwood dealer. 2 Battery terminal 3 Power control terminal Controls the unit ON/OFF. NOTE Controls the unit power.
... by eliminating unnecessary oscillations which the low frequency range should be reproduced even by a subwoofer speaker do not become sound but become sound. $ INPUT SENSITIVITY control Set this unit...changing the LINE OUT FILTER switch from the LINE IN terminal is different in the instruction manual of 1 ohm, connect speakers with this indicator when the protection function is activated. (See...can't find the specified capacity fuse at your store etc., consult your Kenwood dealer. 2 Battery terminal 3 Power control terminal Controls the unit ON/OFF. NOTE Controls the unit power.


