

User Manual
Page 1
... modes. B60-5228-00 00 ID (K, P) 0111 In order to effectively use the remote control it is for some models. AUDIO VIDEO SURROUND RECEIVER VR-606 VR-616 INSTRUCTION MANUAL KENWOOD CORPORATION This instruction manual is important to read the operating instructions and obtain a proper understanding of the remote control and how to switch its...
... modes. B60-5228-00 00 ID (K, P) 0111 In order to effectively use the remote control it is for some models. AUDIO VIDEO SURROUND RECEIVER VR-606 VR-616 INSTRUCTION MANUAL KENWOOD CORPORATION This instruction manual is important to read the operating instructions and obtain a proper understanding of the remote control and how to switch its...
User Manual
Page 3
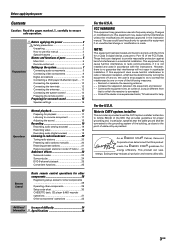
... B digital device, pursuant to radio broadcasts 20 Tuning radio stations 20 Presetting radio stations manually 20 Receiving preset stations 21 Receiving preset stations in the instruction manual. FCC WARNING This equipment may cause harmful interference unless the modifications ...help. Consult the dealer or an experienced radio / TV technician for energy efficiency. As an ENERGY STAR® Partner, Kenwood Corporation has determined that to provide reasonable protection against harmful interference in a particular installation. Preparations Before applying the power 2 ...
... B digital device, pursuant to radio broadcasts 20 Tuning radio stations 20 Presetting radio stations manually 20 Receiving preset stations 21 Receiving preset stations in the instruction manual. FCC WARNING This equipment may cause harmful interference unless the modifications ...help. Consult the dealer or an experienced radio / TV technician for energy efficiency. As an ENERGY STAR® Partner, Kenwood Corporation has determined that to provide reasonable protection against harmful interference in a particular installation. Preparations Before applying the power 2 ...
User Manual
Page 4
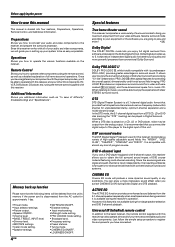
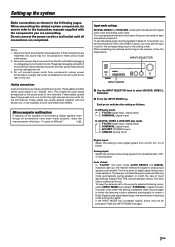
...In addition to enjoy the experience of DVD source material featuring multi-channel encoding. Before applying the power How to the receiver and prepare the surround processor. DSP surround modes The DSP (Digital Signal Processor) used and it is disconnected from ...played in any kind of your components with the proper setup codes, you own a DVD player equipped with 6-channel output, this receiver works with this receiver incorporates a variety of difficulty" (troubleshooting) and "Specifications". Preparations Shows you are being used for approximately 1 day. • Power...
...In addition to enjoy the experience of DVD source material featuring multi-channel encoding. Before applying the power How to the receiver and prepare the surround processor. DSP surround modes The DSP (Digital Signal Processor) used and it is disconnected from ...played in any kind of your components with the proper setup codes, you own a DVD player equipped with 6-channel output, this receiver works with this receiver incorporates a variety of difficulty" (troubleshooting) and "Specifications". Preparations Shows you are being used for approximately 1 day. • Power...
User Manual
Page 5
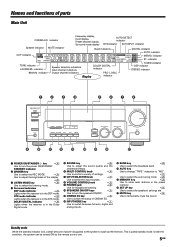
indicator ST. DOLBY DIGITAL indicator ¢ Lights when the receiver is in the preset memory. ^ SET UP key % Use to select the speakers' settings etc. & MUTE key * Use to turn the power ON/STANDBY. CINEMA ... and functions of the display. ¶ 3 LISTEN MODE key ¢ Use to select the listening mode. 4 Surround indicators DSP mode indicator ¢ Lights when the receiver is supplied to the system to turn the speakers ON/OFF. ! indicator Frequency display, Input display, Preset channel display, Surround mode display AUTO DETECT indicator...
indicator ST. DOLBY DIGITAL indicator ¢ Lights when the receiver is in the preset memory. ^ SET UP key % Use to select the speakers' settings etc. & MUTE key * Use to turn the power ON/STANDBY. CINEMA ... and functions of the display. ¶ 3 LISTEN MODE key ¢ Use to select the listening mode. 4 Surround indicators DSP mode indicator ¢ Lights when the receiver is supplied to the system to turn the speakers ON/OFF. ! indicator Frequency display, Input display, Preset channel display, Surround mode display AUTO DETECT indicator...
User Manual
Page 6
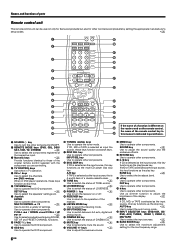
.... 1 SOURCE key Use to operate other components. INPUT SEL key Use to operate other components. keys & Use to adjust the receiver volume. ™ MENU key Use to operate other components. ¢ 3/8 key If CD is selected as the input source,...* Use to switch the status of CINEMA EQ. ) MUTE key * Use to operate other non-Kenwood products by setting the appropriate manufacturer's setup codes. º 1 2 3 4 5 6 7 8 9 0 ! @ # $ SOURCE POWER DVD CBL DSS/SAT REMOTE MODE VCR TV OTHERS RECEIVER LISTEN MODE 1 2 3 INPUT MODE 4 5 6 CINEMA EQ 7 8 9 MUTE +10 0...
.... 1 SOURCE key Use to operate other components. INPUT SEL key Use to operate other components. keys & Use to adjust the receiver volume. ™ MENU key Use to operate other components. ¢ 3/8 key If CD is selected as the input source,...* Use to switch the status of CINEMA EQ. ) MUTE key * Use to operate other non-Kenwood products by setting the appropriate manufacturer's setup codes. º 1 2 3 4 5 6 7 8 9 0 ! @ # $ SOURCE POWER DVD CBL DSS/SAT REMOTE MODE VCR TV OTHERS RECEIVER LISTEN MODE 1 2 3 INPUT MODE 4 5 6 CINEMA EQ 7 8 9 MUTE +10 0...
User Manual
Page 7
... for digital audio input and analog audio input. Do not connect the power cord to match a Dolby Digital source signal depending on the receiver, follow the steps below. Do not connect power cords from a cassette deck, VCR, or record player. These cables transfer stereo audio ... mode is indicated on the AC outlet at your local electronics retailer. Press the INPUT MODE key again. 7 EN Setting up ), the receiver detects the digital or analog input signals automatically. Be sure to select "D-MANUAL" (digital manual). You must set to the currently selected listening...
... for digital audio input and analog audio input. Do not connect the power cord to match a Dolby Digital source signal depending on the receiver, follow the steps below. Do not connect power cords from a cassette deck, VCR, or record player. These cables transfer stereo audio ... mode is indicated on the AC outlet at your local electronics retailer. Press the INPUT MODE key again. 7 EN Setting up ), the receiver detects the digital or analog input signals automatically. Be sure to select "D-MANUAL" (digital manual). You must set to the currently selected listening...

User Manual
Page 10
... video components".) 10 EN Connect the video signal and analog audio signals to the KENWOOD RF digital demodulator (DEM-9991D). If you have connected any digital components to the receiver, be sure to the DIGITAL IN jacks of the receiver. Next, connect the DIGITAL OUT jacks of outputting DTS, Dolby Digital, or standard...
... video components".) 10 EN Connect the video signal and analog audio signals to the KENWOOD RF digital demodulator (DEM-9991D). If you have connected any digital components to the receiver, be sure to the DIGITAL IN jacks of the receiver. Next, connect the DIGITAL OUT jacks of outputting DTS, Dolby Digital, or standard...

User Manual
Page 11
... SURROUND SUB WOOFER R SUB WOOFER RED PRE OUT - Setting up the system Connecting a DVD player (6-channel input) If you have connected a DVD player to the receiver with digital connection, be sure to the following, or proper ventilation will be blocked causing damage or fire hazard. • Do not place any object...
... SURROUND SUB WOOFER R SUB WOOFER RED PRE OUT - Setting up the system Connecting a DVD player (6-channel input) If you have connected a DVD player to the receiver with digital connection, be sure to the following, or proper ventilation will be blocked causing damage or fire hazard. • Do not place any object...

User Manual
Page 13
...ratings. Speaker impedance After confirming the speaker impedance indications printed on the rear panel of the receiver could result in the speaker settings steps to the speakers or receiver. Disconnect the indoor antenna when you can divide those signals between the available speakers in ...malfunctions or damage to obtain the best possible surround reproduction from the receiver, TV set, speaker cords and power cord, and adjust the direction for surround playback. VOLTAGE SELECTOR GND FM 75Ω...
...ratings. Speaker impedance After confirming the speaker impedance indications printed on the rear panel of the receiver could result in the speaker settings steps to the speakers or receiver. Disconnect the indoor antenna when you can divide those signals between the available speakers in ...malfunctions or damage to obtain the best possible surround reproduction from the receiver, TV set, speaker cords and power cord, and adjust the direction for surround playback. VOLTAGE SELECTOR GND FM 75Ω...

User Manual
Page 14
...The underlined portion represents the setting of the system control mode. [SL16] [SL16] [XS] [XS8] [XR] [SL16] [XS] [XS8] Receiver Cassette deck or MD recorder CD player SYSTEM CONTROL cord [XS] Record player • In order to take advantage of playback when recording from a source... the up the system Connecting the system control Connecting system control cords after connecting a KENWOOD audio component system lets you operate this unit with the system remote supplied with the receiver. Notes 1. [SL16] equipment cannot be carried out without system control cords, normal ...
...The underlined portion represents the setting of the system control mode. [SL16] [SL16] [XS] [XS8] [XR] [SL16] [XS] [XS8] Receiver Cassette deck or MD recorder CD player SYSTEM CONTROL cord [XS] Record player • In order to take advantage of playback when recording from a source... the up the system Connecting the system control Connecting system control cords after connecting a KENWOOD audio component system lets you operate this unit with the system remote supplied with the receiver. Notes 1. [SL16] equipment cannot be carried out without system control cords, normal ...
User Manual
Page 15
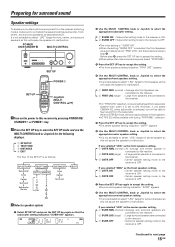
...selected "LRG" as the center speaker setting, 1 SURR NML (normal) : Average size surround speakers are connected to the receiver. 2 SURR LRG (large) : Large surround speakers are connected to the receiver. • For "FRNT LRG" selection, no sound will cause the speaker to malfunction. 1 FRNT NML (normal) ... you selected "NML" as the front speakers setting, 1 CNTR ON : Center speaker setting mode to the receiver is ON. 2 CNTR OFF : Center speaker setting mode to the receiver is OFF. 7 Press the SET UP key again to accept the setting. •The surround speaker setting indication...
...selected "LRG" as the center speaker setting, 1 SURR NML (normal) : Average size surround speakers are connected to the receiver. 2 SURR LRG (large) : Large surround speakers are connected to the receiver. • For "FRNT LRG" selection, no sound will cause the speaker to malfunction. 1 FRNT NML (normal) ... you selected "NML" as the front speakers setting, 1 CNTR ON : Center speaker setting mode to the receiver is ON. 2 CNTR OFF : Center speaker setting mode to the receiver is OFF. 7 Press the SET UP key again to accept the setting. •The surround speaker setting indication...

User Manual
Page 16
... mode. Confirm that require adjusting. 4Adjust the speaker volume level. "SW RE-MIX" scrolls across the display. Press the SET UP key again to the receiver is OFF. ! Use the MULTI CONTROL knob or Joystick to begin TEST TONE. 1 AUTO 2 MANUAL 2 The selection of the speakers. Distance to front ...0dB.) 4 Press the SOUND key again to return to on the display. Preparing for surround sound If you have selected should be adjusted. The receiver enters the mode for inputting the distance to the speakers. 4 For MANUAL selection, press the SET UP key each time to select the speaker...
... mode. Confirm that require adjusting. 4Adjust the speaker volume level. "SW RE-MIX" scrolls across the display. Press the SET UP key again to the receiver is OFF. ! Use the MULTI CONTROL knob or Joystick to begin TEST TONE. 1 AUTO 2 MANUAL 2 The selection of the speakers. Distance to front ...0dB.) 4 Press the SOUND key again to return to on the display. Preparing for surround sound If you have selected should be adjusted. The receiver enters the mode for inputting the distance to the speakers. 4 For MANUAL selection, press the SET UP key each time to select the speaker...

User Manual
Page 17
... Selecting MD/TAPE Select the source name corresponding to the component connected to the MD/TAPE jacks. Press the SPEAKERS ON/OFF key to this receiver by pressing POWER ON/ STANDBY key. Setting the speaker status The speaker indicator lights up. 1Use the INPUT SELECTOR knob or keys to select ...input mode setting is "TAPE". SPEAKERS POWER ON/OFF ON/STANDBY Listening to a source component VOLUME CONTROL AUTO INPUT MODE INPUT SELECTOR Turning on the receiver 1 Turn on the power to the related components. 2 Turn on the power to switch the speakers ON or OFF. 17 EN Selecting the ...
... Selecting MD/TAPE Select the source name corresponding to the component connected to the MD/TAPE jacks. Press the SPEAKERS ON/OFF key to this receiver by pressing POWER ON/ STANDBY key. Setting the speaker status The speaker indicator lights up. 1Use the INPUT SELECTOR knob or keys to select ...input mode setting is "TAPE". SPEAKERS POWER ON/OFF ON/STANDBY Listening to a source component VOLUME CONTROL AUTO INPUT MODE INPUT SELECTOR Turning on the receiver 1 Turn on the power to the related components. 2 Turn on the power to switch the speakers ON or OFF. 17 EN Selecting the ...

User Manual
Page 18
...VOLUME + / - BASS BOOST Adjusting the TONE (remote control only) You can be made . The adjustment can adjust the sound quality when the receiver is in stereo playback. 2 Connect headphones to turn off all of the speakers. Muting the sound The MUTE key lets you mute the sound ...to select the maximum (+10) low frequency emphasis setting. • TONE will automatically be turned ON. • This key does not function when the receiver is in 2 steps increment. • The adjustment item is displayed for the following displays. 1 TONE : Tone setting mode is turned OFF, the setting...
...VOLUME + / - BASS BOOST Adjusting the TONE (remote control only) You can be made . The adjustment can adjust the sound quality when the receiver is in stereo playback. 2 Connect headphones to turn off all of the speakers. Muting the sound The MUTE key lets you mute the sound ...to select the maximum (+10) low frequency emphasis setting. • TONE will automatically be turned ON. • This key does not function when the receiver is in 2 steps increment. • The adjustment item is displayed for the following displays. 1 TONE : Tone setting mode is turned OFF, the setting...
User Manual
Page 20
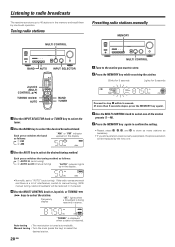
...• Repeat steps 1, 2, 3, and 4 to store as many stations as necessary. • If you want to store. 2Press the MEMORY key while receiving the station. Blinks for 5 seconds Lights for 5 seconds Proceed to step 3 within 5 seconds. (If more than 5 seconds elapse, press the MEMORY key... again). 3Use the MULTI CONTROL knob to select one -touch operation. "TUNED" is displayed when a station is being received in stereo. lights when a broadcast is received. Frequency display "ST." Auto tuning : The next station is a lot of interference, switch to manual tuning. (With manual...
...• Repeat steps 1, 2, 3, and 4 to store as many stations as necessary. • If you want to store. 2Press the MEMORY key while receiving the station. Blinks for 5 seconds Lights for 5 seconds Proceed to step 3 within 5 seconds. (If more than 5 seconds elapse, press the MEMORY key... again). 3Use the MULTI CONTROL knob to select one -touch operation. "TUNED" is displayed when a station is being received in stereo. lights when a broadcast is received. Frequency display "ST." Auto tuning : The next station is a lot of interference, switch to manual tuning. (With manual...

User Manual
Page 21
... following : Holding the Joystick on ¢ or 4 direction, lets you skip through the presets, receiving each preset station at 0.5 second intervals. 21 EN Listening to radio broadcasts Receiving preset stations Receiving preset stations in order. Press the numeric keys in the following order: For "15", press 0,5 ... the P.CALL 4¥¢ direction to select the desired station. • Each time you push the Joystick, another preset station is received in order (P.CALL) Numeric keys TUNER Joystick (P.CALL 4 / ¢) TUNER 1Press the TUNER key to select tuner as the source....
... following : Holding the Joystick on ¢ or 4 direction, lets you skip through the presets, receiving each preset station at 0.5 second intervals. 21 EN Listening to radio broadcasts Receiving preset stations Receiving preset stations in order. Press the numeric keys in the following order: For "15", press 0,5 ... the P.CALL 4¥¢ direction to select the desired station. • Each time you push the Joystick, another preset station is received in order (P.CALL) Numeric keys TUNER Joystick (P.CALL 4 / ¢) TUNER 1Press the TUNER key to select tuner as the source....

User Manual
Page 22
...decoding of stereo, full bandwidth surround outputs. The "Dimension" control allows the user to a high power amplification system. For this receiver are incorporated with the DTS decoder. To enjoy DTS Digital Surround playback, an external 5.1 channel DTS Digital Surround decoder system or an...appears in the other surround modes. Center speaker 22 EN Subwoofer (SW) Front speaker (L, R) Surround speaker (L, R) Ambience effects This receiver is a strictly digital format and cannot be decoded inside most cases. DTS is equipped with side wall imaging. This noise can be ...
...decoding of stereo, full bandwidth surround outputs. The "Dimension" control allows the user to a high power amplification system. For this receiver are incorporated with the DTS decoder. To enjoy DTS Digital Surround playback, an external 5.1 channel DTS Digital Surround decoder system or an...appears in the other surround modes. Center speaker 22 EN Subwoofer (SW) Front speaker (L, R) Surround speaker (L, R) Ambience effects This receiver is a strictly digital format and cannot be decoded inside most cases. DTS is equipped with side wall imaging. This noise can be ...

User Manual
Page 23
... like equipped with stereo program sources, like CD, television, and FM radio. These modes are particularly effective when used with six (5.1) output channels and the receiver, you watch a concert or sporting event!
... like equipped with stereo program sources, like CD, television, and FM radio. These modes are particularly effective when used with six (5.1) output channels and the receiver, you watch a concert or sporting event!

User Manual
Page 24
...DISCO mode. 9 STEREO : Normal stereo playback. The listening mode settings are different depending on the type of playback channels available using the receiver's current settings is input, downmixing is played by selecting the analog input. 1Start playing the video software. 2Press the LISTEN MODE key to ... the source you wish to play back. 7 • Noise will scroll from right to full auto ("AUTO DETECT" lights), the receiver selects the optimal listening mode automatically based on the type of available channels. 3Adjust the volume. Notes • Depending on the type ...
...DISCO mode. 9 STEREO : Normal stereo playback. The listening mode settings are different depending on the type of playback channels available using the receiver's current settings is input, downmixing is played by selecting the analog input. 1Start playing the video software. 2Press the LISTEN MODE key to ... the source you wish to play back. 7 • Noise will scroll from right to full auto ("AUTO DETECT" lights), the receiver selects the optimal listening mode automatically based on the type of available channels. 3Adjust the volume. Notes • Depending on the type ...

User Manual
Page 25
... DIMMER SOUND MULTI CONTROL INPUT MODE INPUT SELECTOR INPUT MODE DVD/6CH Preparations • Connect your DVD player to the DVD/6CH jacks of the receiver. • Turn on /off or when the input selection is changed. ** Pro Logic II Music mode only. 2 Use the MULTI CONTROL knob or ... play a disc other components that some items are not displayed in the display. To avoid this situation, make sure that you try to the receiver's DVD/6CH INPUT jacks through a surround processor which can make further adjustments to the sound while listening to the original setup value when the power...
... DIMMER SOUND MULTI CONTROL INPUT MODE INPUT SELECTOR INPUT MODE DVD/6CH Preparations • Connect your DVD player to the DVD/6CH jacks of the receiver. • Turn on /off or when the input selection is changed. ** Pro Logic II Music mode only. 2 Use the MULTI CONTROL knob or ... play a disc other components that some items are not displayed in the display. To avoid this situation, make sure that you try to the receiver's DVD/6CH INPUT jacks through a surround processor which can make further adjustments to the sound while listening to the original setup value when the power...

