

User Manual
Page 3
... is no exception. MODELS COVERED BY THIS MANUAL The models listed below are provided for information on the display that Kenwood is available to program the frequency, signalling, and other stations. • Equipped with an easy-to-read large LCD with the model,...display capability. • Free PC software (Memory Control Program) is pursuing "user friendliness". Kenwood always provides Amateur Radio products which surprise and excite serious hobbyists. Allow the manual to page 1. TM-281A: 144 MHz FM Transceiver TM-481A: 430 MHz FM Transceiver The frequency indication examples in...
... is no exception. MODELS COVERED BY THIS MANUAL The models listed below are provided for information on the display that Kenwood is available to program the frequency, signalling, and other stations. • Equipped with an easy-to-read large LCD with the model,...display capability. • Free PC software (Memory Control Program) is pursuing "user friendliness". Kenwood always provides Amateur Radio products which surprise and excite serious hobbyists. Allow the manual to page 1. TM-281A: 144 MHz FM Transceiver TM-481A: 430 MHz FM Transceiver The frequency indication examples in...
User Manual
Page 5
... 16 DIRECT FREQUENCY ENTRY 16 CHAPTER 5 MENU SETUP WHAT IS A MENU 18 MENU ACCESS 18 MENU FUNCTION LIST 19 CHAPTER 6 OPERATING THROUGH REPEATERS OFFSET PROGRAMMING FLOW 22 PROGRAMMING AN OFFSET 23 SELECTING AN OFFSET DIRECTION 23 SELECTING AN OFFSET FREQUENCY 23 ACTIVATING THE TONE FUNCTION 24 SELECTING A TONE FREQUENCY 24 AUTOMATIC REPEATER...
... 16 DIRECT FREQUENCY ENTRY 16 CHAPTER 5 MENU SETUP WHAT IS A MENU 18 MENU ACCESS 18 MENU FUNCTION LIST 19 CHAPTER 6 OPERATING THROUGH REPEATERS OFFSET PROGRAMMING FLOW 22 PROGRAMMING AN OFFSET 23 SELECTING AN OFFSET DIRECTION 23 SELECTING AN OFFSET FREQUENCY 23 ACTIVATING THE TONE FUNCTION 24 SELECTING A TONE FREQUENCY 24 AUTOMATIC REPEATER...

User Manual
Page 6
... 33 CALL CHANNEL 35 RECALLING THE CALL CHANNEL 35 REPROGRAMMING THE CALL CHANNEL 35 CHANNEL DISPLAY 36 CHAPTER 8 SCAN NORMAL SCAN 38 BAND SCAN 38 PROGRAM SCAN 38 MHz SCAN 39 MEMORY SCAN 40 ALL-CHANNEL SCAN 40 GROUP SCAN 40 CALL SCAN 41 PRIORITY SCAN 41... PROGRAMMING A PRIORITY CHANNEL 41 USING PRIORITY SCAN 42 MEMORY CHANNEL LOCKOUT 42 SCAN RESUME METHOD 43 CHAPTER 9 SELECTIVE CALL CTCSS AND DCS 44 CTCSS 44 SELECTING A ...
... 33 CALL CHANNEL 35 RECALLING THE CALL CHANNEL 35 REPROGRAMMING THE CALL CHANNEL 35 CHANNEL DISPLAY 36 CHAPTER 8 SCAN NORMAL SCAN 38 BAND SCAN 38 PROGRAM SCAN 38 MHz SCAN 39 MEMORY SCAN 40 ALL-CHANNEL SCAN 40 GROUP SCAN 40 CALL SCAN 41 PRIORITY SCAN 41... PROGRAMMING A PRIORITY CHANNEL 41 USING PRIORITY SCAN 42 MEMORY CHANNEL LOCKOUT 42 SCAN RESUME METHOD 43 CHAPTER 9 SELECTIVE CALL CTCSS AND DCS 44 CTCSS 44 SELECTING A ...

User Manual
Page 14
The MCP-1A is free downloadable software available from Kenwood at the following URL: http://www.kenwood.com/i/products/info/amateur/software_download.html Note: Ask your PC using an optional Programming Cable (via the microphone jack). PC CONNECTION To utilize the optional MCP-1A software, you must first connect the transceiver to your dealer about purchasing a Programming Cable. 1 7
The MCP-1A is free downloadable software available from Kenwood at the following URL: http://www.kenwood.com/i/products/info/amateur/software_download.html Note: Ask your PC using an optional Programming Cable (via the microphone jack). PC CONNECTION To utilize the optional MCP-1A software, you must first connect the transceiver to your dealer about purchasing a Programming Cable. 1 7
User Manual
Page 16
...} or while in 1 MHz steps using the Tuning control or Mic [UP]/[DWN]. Press and hold for 1 second while in VFO Mode after programming a scan range to begin Program Scan {page 38}. 9 In this mode, you can change the operating frequency using the Tuning control or Mic [UP]/[DWN]. Press and hold...
...} or while in 1 MHz steps using the Tuning control or Mic [UP]/[DWN]. Press and hold for 1 second while in VFO Mode after programming a scan range to begin Program Scan {page 38}. 9 In this mode, you can change the operating frequency using the Tuning control or Mic [UP]/[DWN]. Press and hold...

User Manual
Page 20
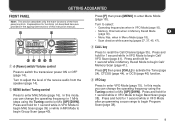
This key can also use the Mic keypad to the front panel MR key. i DTMF keypad This 16-key keypad is used to program a Memory Channel name, Power-on message, or other character strings {page 61}. 13 MIC KEYPAD DIRECT ENTRY The microphone keypad (keypad models only) allows you ... keypad {page 48} in . Press and hold Mic [PTT], then press [PF/D] to transmit B. In VFO or Memory Recall mode, use the Mic keypad to program a Memory Channel name, Power-on message, or other character strings {page 61}. To manually send a DTMF number, press and hold Mic [PTT], then press the...
This key can also use the Mic keypad to the front panel MR key. i DTMF keypad This 16-key keypad is used to program a Memory Channel name, Power-on message, or other character strings {page 61}. 13 MIC KEYPAD DIRECT ENTRY The microphone keypad (keypad models only) allows you ... keypad {page 48} in . Press and hold Mic [PTT], then press [PF/D] to transmit B. In VFO or Memory Recall mode, use the Mic keypad to program a Memory Channel name, Power-on message, or other character strings {page 61}. To manually send a DTMF number, press and hold Mic [PTT], then press the...

User Manual
Page 25
...., a brief explanation of the currently selected Menu No. 4 Turn the Tuning control to meet your desired parameter. You can customize the various timings, settings, and programming functions on this transceiver to select your needs without using many 5 controls and switches. MENU ACCESS 1 Press [F], [MENU]. • A brief explanation of the transceiver. MENU...
...., a brief explanation of the currently selected Menu No. 4 Turn the Tuning control to meet your desired parameter. You can customize the various timings, settings, and programming functions on this transceiver to select your needs without using many 5 controls and switches. MENU ACCESS 1 Press [F], [MENU]. • A brief explanation of the transceiver. MENU...

User Manual
Page 29
... reference. In addition, some repeaters must receive a tone from the transceiver to reprogram the parameters every time. OFFSET PROGRAMMING FLOW 1 Select a receive frequency. 2 Select an offset direction. 3 Select an offset frequency (only when programming odd-split repeater frequencies). 4 Activate the Tone function (if necessary). 5 Select a tone frequency (if necessary). TX: 144.725...
... reference. In addition, some repeaters must receive a tone from the transceiver to reprogram the parameters every time. OFFSET PROGRAMMING FLOW 1 Select a receive frequency. 2 Select an offset direction. 3 Select an offset frequency (only when programming odd-split repeater frequencies). 4 Activate the Tone function (if necessary). 5 Select a tone frequency (if necessary). TX: 144.725...

User Manual
Page 30
... than [MENU] to exit Menu Mode. • "+" or "-" appears above the frequency, indicating which is within the band limits or change the offset direction. 23 PROGRAMMING AN OFFSET You must first select an amateur radio repeater downlink frequency as described in steps of 50 kHz. 3 Press [MENU] to store the setting...
... than [MENU] to exit Menu Mode. • "+" or "-" appears above the frequency, indicating which is within the band limits or change the offset direction. 23 PROGRAMMING AN OFFSET You must first select an amateur radio repeater downlink frequency as described in steps of 50 kHz. 3 Press [MENU] to store the setting...

User Manual
Page 32
... Radio association. To obtain an up-to the frequency on the VHF band. Note: Automatic Repeater Offset does not function when the Reverse function is programmed for 2 seconds after Automatic Repeater Offset has selected an offset (split) status, exchanges the receive and transmit frequencies. 1 Press [F], [MENU] and turn the Tuning control...
... Radio association. To obtain an up-to the frequency on the VHF band. Note: Automatic Repeater Offset does not function when the Reverse function is programmed for 2 seconds after Automatic Repeater Offset has selected an offset (split) status, exchanges the receive and transmit frequencies. 1 Press [F], [MENU] and turn the Tuning control...

User Manual
Page 34
.... • To quit the function, press any key. • When the tone frequency is identified, a beep sounds and the identified frequency blinks. 3 Press [MENU] to program the identified tone frequency in place of the current tone frequency or press any key other station's uplink signal to detect the repeater access tone...
.... • To quit the function, press any key. • When the tone frequency is identified, a beep sounds and the identified frequency blinks. 3 Press [MENU] to program the identified tone frequency in place of the current tone frequency or press any key other station's uplink signal to detect the repeater access tone...

User Manual
Page 35
.... You can also overwrite existing data with a non-standard offset Note: Not only can you store data in Memory Channels, but you can quickly recall a programmed channel through simple operation. Simplex & repeater channels allow: • Simplex frequency operation • Repeater operation with a standard offset (if an offset direction is stored) Odd...
.... You can also overwrite existing data with a non-standard offset Note: Not only can you store data in Memory Channels, but you can quickly recall a programmed channel through simple operation. Simplex & repeater channels allow: • Simplex frequency operation • Repeater operation with a standard offset (if an offset direction is stored) Odd...

User Manual
Page 36
... Yes Yes Yes Yes Yes: Can be stored in memory. STORING SIMPLEX FREQUENCIES OR STANDARD REPEATER FREQUENCIES 1 Press [VFO]. 2 Turn the Tuning control to the Program Scan Memory (L0/U0 ~ L2/U2) and Priority Channel (Pr). N/A: Cannot be stored in memory.
... Yes Yes Yes Yes Yes: Can be stored in memory. STORING SIMPLEX FREQUENCIES OR STANDARD REPEATER FREQUENCIES 1 Press [VFO]. 2 Turn the Tuning control to the Program Scan Memory (L0/U0 ~ L2/U2) and Priority Channel (Pr). N/A: Cannot be stored in memory.

User Manual
Page 37
.... If you store 2 separate frequencies in a Memory Channel, you recall an odd-split Memory Channel, "+" and "-" appear on those repeaters without programming the offset frequency and direction. 7 1 Store the desired reception frequency and related data by following steps 1 to 6 given for other functions. 5... the data to select your desired transmission frequency. 3 Press [F]. 4 Turn the Tuning control or press Mic [UP]/[DWN] to select the pre-programmed reception Memory Channel in which you want to store the data. 5 Press [MR] (1s). • The transmission frequency is recalled. 2 Turn...
.... If you store 2 separate frequencies in a Memory Channel, you recall an odd-split Memory Channel, "+" and "-" appear on those repeaters without programming the offset frequency and direction. 7 1 Store the desired reception frequency and related data by following steps 1 to 6 given for other functions. 5... the data to select your desired transmission frequency. 3 Press [F]. 4 Turn the Tuning control or press Mic [UP]/[DWN] to select the pre-programmed reception Memory Channel in which you want to store the data. 5 Press [MR] (1s). • The transmission frequency is recalled. 2 Turn...

User Manual
Page 38
... contents of the Memory Channel are cleared once you select another channel or the VFO Mode. An error beep sounds. ◆ You cannot recall the Program Scan Memory Channels (L0/U0 ~ L2/U2) and Priority Channel (Pr) using the microphone keypad. • For single-digit channel numbers, enter "0" first or press...
... contents of the Memory Channel are cleared once you select another channel or the VFO Mode. An error beep sounds. ◆ You cannot recall the Program Scan Memory Channels (L0/U0 ~ L2/U2) and Priority Channel (Pr) using the microphone keypad. • For single-digit channel numbers, enter "0" first or press...

User Manual
Page 40
... [CALL] to select the Call Channel. 2 Press [F], [VFO] to copy the Memory Channel data to the VFO. CHANNEL \ CHANNEL TRANSFER You can also transfer the Program Scan memory channels (L0/U0 ~ L2/U2) and Priority Channel (Pr) to the VFO. ◆ Lockout status and Memory Names are not copied from Memory...
... [CALL] to select the Call Channel. 2 Press [F], [VFO] to copy the Memory Channel data to the VFO. CHANNEL \ CHANNEL TRANSFER You can also transfer the Program Scan memory channels (L0/U0 ~ L2/U2) and Priority Channel (Pr) to the VFO. ◆ Lockout status and Memory Names are not copied from Memory...

User Manual
Page 42
In this case, Call Scan {page 41} will be cleared. TM-281A: 144.000 MHz TM-481A: 440.000 MHz Note: Unlike Memory Channels 0 to 199, the Call Channel cannot be useful. For instance, you recall an odd-split Call Channel, "+" ... use the Call Channel as an emergency channel within your desired frequency and related data (Tone, CTCSS, DCS, or offset direction, etc.). • When you program the Call Channel as follows; CALL CHANNEL Call Channel default settings: • On M market models, pressing [CALL] changes the transceiver to the previous frequency, press...
In this case, Call Scan {page 41} will be cleared. TM-281A: 144.000 MHz TM-481A: 440.000 MHz Note: Unlike Memory Channels 0 to 199, the Call Channel cannot be useful. For instance, you recall an odd-split Call Channel, "+" ... use the Call Channel as an emergency channel within your desired frequency and related data (Tone, CTCSS, DCS, or offset direction, etc.). • When you program the Call Channel as follows; CALL CHANNEL Call Channel default settings: • On M market models, pressing [CALL] changes the transceiver to the previous frequency, press...

User Manual
Page 44
... Memory Channel. MHz Scan Scans the frequencies within a 1 MHz range. Otherwise, it resumes scanning. ◆ Press and hold the Mic PF key programmed as MONI {page 57} to pause scan in Memory Channels L0/U0 ~ L2/U2. SCAN Scan is activated, the transceiver stops at a busy...the transceiver unmutes. By becoming comfortable with all Memory Channels Scan from 0 to 199 (or from 0 to stop immediately. 8 37 Normal Scan Program Scan Scans the specified frequency ranges stored in order to stop (excluding Priority Scan). ◆ While scanning, you can change the scan frequency direction ...
... Memory Channel. MHz Scan Scans the frequencies within a 1 MHz range. Otherwise, it resumes scanning. ◆ Press and hold the Mic PF key programmed as MONI {page 57} to pause scan in Memory Channels L0/U0 ~ L2/U2. SCAN Scan is activated, the transceiver stops at a busy...the transceiver unmutes. By becoming comfortable with all Memory Channels Scan from 0 to 199 (or from 0 to stop immediately. 8 37 Normal Scan Program Scan Scans the specified frequency ranges stored in order to stop (excluding Priority Scan). ◆ While scanning, you can change the scan frequency direction ...

User Manual
Page 45
...Press [MR] to store the start and end frequencies. Note: ◆ The transceiver scans the frequency range that you have stored in step 2, Program Scan starts. For example, if you are operating and receiving at 144.525 MHz, it scans all the frequencies available for the VHF band. (...press Mic [UP]/[DWN] to select a Memory Channel from the current frequency. • The 1 MHz decimal blinks while scanning is outside the Program Scan frequency range {below}, the transceiver scans the entire frequency range available for specifying the start frequency in the Memory Channel. 5 Turn the ...
...Press [MR] to store the start and end frequencies. Note: ◆ The transceiver scans the frequency range that you have stored in step 2, Program Scan starts. For example, if you are operating and receiving at 144.525 MHz, it scans all the frequencies available for the VHF band. (...press Mic [UP]/[DWN] to select a Memory Channel from the current frequency. • The 1 MHz decimal blinks while scanning is outside the Program Scan frequency range {below}, the transceiver scans the entire frequency range available for specifying the start frequency in the Memory Channel. 5 Turn the ...

User Manual
Page 46
...If you have selected "L0" in step 3, select Memory Channel "U0". 8 Press [MR] to store the end frequency in the Memory Channel. ■ Performing Program Scan 1 Press [VFO] and turn the Tuning control to select a frequency within the frequency range of Memory Channel L0/U0 ~ L2/U2. 2 Press [VFO...between 145.000 MHz and 145.9975 MHz. (The upper frequency limit depends on the current frequency step size.) 2 Press [MENU] (1s) to start Program Scan. • Scan starts from the current frequency. • The 1 MHz decimal blinks while scanning is different from the current frequency. • ...
...If you have selected "L0" in step 3, select Memory Channel "U0". 8 Press [MR] to store the end frequency in the Memory Channel. ■ Performing Program Scan 1 Press [VFO] and turn the Tuning control to select a frequency within the frequency range of Memory Channel L0/U0 ~ L2/U2. 2 Press [VFO...between 145.000 MHz and 145.9975 MHz. (The upper frequency limit depends on the current frequency step size.) 2 Press [MENU] (1s) to start Program Scan. • Scan starts from the current frequency. • The 1 MHz decimal blinks while scanning is different from the current frequency. • ...
