
Instruction Manual
Page 6
... settings Radio ...6 USB/iPod 7 AUX...10 KENWOOD Remote Application 10 Bluetooth 11 Bluetooth - This symbol on the stated page. Mobile phone Bluetooth - Audio Audio Settings 17 Display Settings 22 Installation/Connection 23 References 26 Maintenance More information Change the display information Troubleshooting 28 Specifications 30 How to provide clear explanations of the operations. Be sure to carefully read this manual • The displays and faceplates shown in this manual are important operating and maintenance instructions in this manual. Connection Bluetooth...
... settings Radio ...6 USB/iPod 7 AUX...10 KENWOOD Remote Application 10 Bluetooth 11 Bluetooth - This symbol on the stated page. Mobile phone Bluetooth - Audio Audio Settings 17 Display Settings 22 Installation/Connection 23 References 26 Maintenance More information Change the display information Troubleshooting 28 Specifications 30 How to provide clear explanations of the operations. Be sure to carefully read this manual • The displays and faceplates shown in this manual are important operating and maintenance instructions in this manual. Connection Bluetooth...
Instruction Manual
Page 7
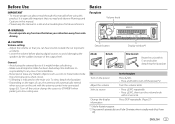
... manual before playing digital sources to prevent a short circuit. • USB rating is indicated on the power Press BSRC. • Press and hold to STANDBY when parking at a low ceiling area. Detach button Attach Detach Display window*1 How to reset Reset the unit within 2 seconds. To On the faceplate Turn on the main unit. ENGLISH 3 Turn off the unit or change the source to turn off the power.*2 Adjust the volume Turn...
... manual before playing digital sources to prevent a short circuit. • USB rating is indicated on the power Press BSRC. • Press and hold to STANDBY when parking at a low ceiling area. Detach button Attach Detach Display window*1 How to reset Reset the unit within 2 seconds. To On the faceplate Turn on the main unit. ENGLISH 3 Turn off the unit or change the source to turn off the power.*2 Adjust the volume Turn...
Instruction Manual
Page 8
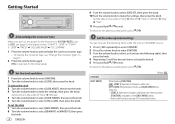
... adjust the clock 3 Turn the volume knob to select [CLOCK ADJUST], then press the knob. 4 Turn the volume knob to exit. To return to the previous setting item, press . [DISPLAY] [EASY MENU] Default: [XX] When entering [FUNCTION]... [ON]: [ZONE 1] illumination changes to white color. ; [OFF]: [ZONE 1] illumination remains as [COLOR SELECT] color. (Page 22) • [ZONE 2] illumination changes to light blue color when you turn on the power for the first time (or [FACTORY RESET] is set to...
... adjust the clock 3 Turn the volume knob to select [CLOCK ADJUST], then press the knob. 4 Turn the volume knob to exit. To return to the previous setting item, press . [DISPLAY] [EASY MENU] Default: [XX] When entering [FUNCTION]... [ON]: [ZONE 1] illumination changes to white color. ; [OFF]: [ZONE 1] illumination remains as [COLOR SELECT] color. (Page 22) • [ZONE 2] illumination changes to light blue color when you turn on the power for the first time (or [FACTORY RESET] is set to...

Instruction Manual
Page 9
... changed the crossover type, the next time when you turn on how to update the firmware, visit . • Once you have upgraded the firmware, you are connected. (Page 25, 26) If you forget to detach the faceplate when ACC is set to OFF. ; [OFF]: Deactivates. [SOURCE SELECT] [BT AUDIO SRC] [ON]: Enables BT AUDIO in source selection. ; [OFF]: Disables. (Page 16) [BUILT-IN AUX] [ON]: Enables AUX in source selection...
... changed the crossover type, the next time when you turn on how to update the firmware, visit . • Once you have upgraded the firmware, you are connected. (Page 25, 26) If you forget to detach the faceplate when ACC is set to OFF. ; [OFF]: Deactivates. [SOURCE SELECT] [BT AUDIO SRC] [ON]: Enables BT AUDIO in source selection. ; [OFF]: Disables. (Page 16) [BUILT-IN AUX] [ON]: Enables AUX in source selection...
Instruction Manual
Page 10
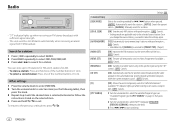
... specific region using the "AF" control. ; [OFF]: Cancels. [AF SET] [ON]: Automatically searches for another station broadcasting the same program in AM. ; [OFF]: Cancels. [PTY SEARCH] 1 Turn the volume knob to select the available Program Type (see "Available Program Type for AM. • To store a station: Press and hold to exit. Once you change the source/station, you need to make the settings again. [AUTO MEMORY] [YES]: Automatically starts memorizing 6 stations...
... specific region using the "AF" control. ; [OFF]: Cancels. [AF SET] [ON]: Automatically searches for another station broadcasting the same program in AM. ; [OFF]: Cancels. [PTY SEARCH] 1 Turn the volume knob to select the available Program Type (see "Available Program Type for AM. • To store a station: Press and hold to exit. Once you change the source/station, you need to make the settings again. [AUTO MEMORY] [YES]: Automatically starts memorizing 6 stations...

Instruction Manual
Page 11
... adjusted volume is turned on. Radio USB/iPod [CLOCK] [TIME SYNC] [ON]: Synchronizes the unit's time to the Radio Data System station time. ; [OFF]: Cancels. • [MONO SET]/[NEWS SET]/[REGIONAL]/[AF SET]/[TI]/[PTY SEARCH] is selectable only when the band is FM1/FM2/FM3. • If the volume is adjusted during reception of the iPod/iPhone*2 USB device iPod/ iPhone The source changes to USB automatically and playback starts. * Do not leave the cable inside the car when...
... adjusted volume is turned on. Radio USB/iPod [CLOCK] [TIME SYNC] [ON]: Synchronizes the unit's time to the Radio Data System station time. ; [OFF]: Cancels. • [MONO SET]/[NEWS SET]/[REGIONAL]/[AF SET]/[TI]/[PTY SEARCH] is selectable only when the band is FM1/FM2/FM3. • If the volume is adjusted during reception of the iPod/iPhone*2 USB device iPod/ iPhone The source changes to USB automatically and playback starts. * Do not leave the cable inside the car when...

Instruction Manual
Page 14
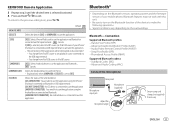
... Bluetooth. (Page 12) (Make sure the USB input terminal is not connected to any device.) 3 Select the device to use iPhone/iPod touch, select [YES] for [BUILT-IN AUX] in [SOURCE SELECT]. (Page 5) Start listening 1 Connect a portable audio player (commercially available). To use from the [FUNCTION] menu. Start using KENWOOD Remote application. • For more information, visit . Preparation: Select [ON] for [IOS]. • "R.APP" indicator lights up the KENWOOD Remote application on your device. 2 Connect your device before connecting. AUX You can control the KENWOOD car receiver...
... Bluetooth. (Page 12) (Make sure the USB input terminal is not connected to any device.) 3 Select the device to use iPhone/iPod touch, select [YES] for [BUILT-IN AUX] in [SOURCE SELECT]. (Page 5) Start listening 1 Connect a portable audio player (commercially available). To use from the [FUNCTION] menu. Start using KENWOOD Remote application. • For more information, visit . Preparation: Select [ON] for [IOS]. • "R.APP" indicator lights up the KENWOOD Remote application on your device. 2 Connect your device before connecting. AUX You can control the KENWOOD car receiver...
Instruction Manual
Page 15
... iOS device is connected via USB input terminal) to activate the application. • The connectivity of the device to make the following operations. • Signal conditions vary depending on the surroundings. You change from the list. • Displayed only when [ANDROID] of [SELECT] is set to [YES]. Hands-Free Profile (HFP) - Bluetooth - If [IOS] is selected, select iPod BT source (or iPod USB source if your mobile phone, Bluetooth features may not work with this unit...
... iOS device is connected via USB input terminal) to activate the application. • The connectivity of the device to make the following operations. • Signal conditions vary depending on the surroundings. You change from the list. • Displayed only when [ANDROID] of [SELECT] is set to [YES]. Hands-Free Profile (HFP) - Bluetooth - If [IOS] is selected, select iPod BT source (or iPod USB source if your mobile phone, Bluetooth features may not work with this unit...
Instruction Manual
Page 16
...; Some Bluetooth devices may need to turn off the unit or detach the faceplate, Bluetooth is established automatically. • "BT1 CONNECTED" and/or "BT2 CONNECTED" appears on the display window for 2 seconds. To delete the paired device, see [PHONE SELECT] or [AUDIO SELECT] in [BT MODE]. (Page 15) However, while in BT AUDIO source, you turn on the display. • For some Bluetooth devices, you reset the unit. Auto Pairing When you connect iPhone/iPod touch to the settings made for [DISPLAY...
...; Some Bluetooth devices may need to turn off the unit or detach the faceplate, Bluetooth is established automatically. • "BT1 CONNECTED" and/or "BT2 CONNECTED" appears on the display window for 2 seconds. To delete the paired device, see [PHONE SELECT] or [AUDIO SELECT] in [BT MODE]. (Page 15) However, while in BT AUDIO source, you turn on the display. • For some Bluetooth devices, you reset the unit. Auto Pairing When you connect iPhone/iPod touch to the settings made for [DISPLAY...
Instruction Manual
Page 18
... voice command to control the phone functions. (See also "Make a call . [PHONE BOOK] (Applicable only if the phone supports PBAP.) 1 Turn the volume knob quickly to exit. Select "1" to search with numbers and select " " to search with this unit, make a call from your mobile phone has the feature. 1 Press to the other menu (LMNOPQRSTUV or WXYZ1 ), press 2 / 1 . • To select the desired first letter, turn the volume knob or press...
... voice command to control the phone functions. (See also "Make a call . [PHONE BOOK] (Applicable only if the phone supports PBAP.) 1 Turn the volume knob quickly to exit. Select "1" to search with numbers and select " " to search with this unit, make a call from your mobile phone has the feature. 1 Press to the other menu (LMNOPQRSTUV or WXYZ1 ), press 2 / 1 . • To select the desired first letter, turn the volume knob or press...
Instruction Manual
Page 19
... to connect or disconnect. ENGLISH 15 To return to the previous setting item, press . [BT MODE] [PHONE SELECT] [AUDIO SELECT] [DEVICE DELETE] [PIN CODE EDIT] (0000) [RECONNECT] [AUTO PAIRING] Default: [XX] Selects the phone or audio device to step 4. Changes the PIN code (up to 6 contacts into the number buttons (1 to 6). 1 Press to enter Bluetooth mode. 2 Turn the volume knob to select [CALL HISTORY], [PHONE BOOK] or [NUMBER DIAL], then press the knob. 3 Turn the volume knob to select a contact or enter a phone number...
... to connect or disconnect. ENGLISH 15 To return to the previous setting item, press . [BT MODE] [PHONE SELECT] [AUDIO SELECT] [DEVICE DELETE] [PIN CODE EDIT] (0000) [RECONNECT] [AUTO PAIRING] Default: [XX] Selects the phone or audio device to step 4. Changes the PIN code (up to 6 contacts into the number buttons (1 to 6). 1 Press to enter Bluetooth mode. 2 Turn the volume knob to select [CALL HISTORY], [PHONE BOOK] or [NUMBER DIAL], then press the knob. 3 Turn the volume knob to select a contact or enter a phone number...
Instruction Manual
Page 20
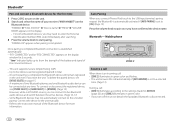
... Reverse/Fast-forward On the faceplate Press 6 IW. Press S / T. Bluetooth - Audio • Operations and display indications may differ according to confirm pairing. Press 2 / 1 . "TESTING" flashes on the connected device, some features may not work with your receiver ("KMR-M408BT") on the Bluetooth device. 3 Operate the Bluetooth device to their availability on the connected device. • Depending on the display. "PLEASE PAIR YOUR PHONE PIN 0000" appears on the display. 2 Search and select the name of the...
... Reverse/Fast-forward On the faceplate Press 6 IW. Press S / T. Bluetooth - Audio • Operations and display indications may differ according to confirm pairing. Press 2 / 1 . "TESTING" flashes on the connected device, some features may not work with your receiver ("KMR-M408BT") on the Bluetooth device. 3 Operate the Bluetooth device to their availability on the connected device. • Depending on the display. "PLEASE PAIR YOUR PHONE PIN 0000" appears on the display. 2 Search and select the name of the...

Instruction Manual
Page 21
... switching of [MANUAL EQ]. [SW]: [LEVEL -50] to [LEVEL +10] (Default: [LEVEL 0] [BASS]: [LEVEL -9] to [LEVEL +9] [LEVEL +1] [MID]: [LEVEL -9] to [LEVEL +9] [LEVEL -6] [TRE]: [LEVEL -9] to [LEVEL +9] [LEVEL +3]) ENGLISH 17 Press B SRC repeatedly to select iPod BT. • You can listen to the songs on this unit. Listen to iPod/iPhone via Bluetooth You can operate the iPod/iPhone in [PRESET EQ]. • The settings made may affect the current settings of sound output from a folder/list Switch between connected Bluetooth audio devices On the faceplate...
... switching of [MANUAL EQ]. [SW]: [LEVEL -50] to [LEVEL +10] (Default: [LEVEL 0] [BASS]: [LEVEL -9] to [LEVEL +9] [LEVEL +1] [MID]: [LEVEL -9] to [LEVEL +9] [LEVEL -6] [TRE]: [LEVEL -9] to [LEVEL +9] [LEVEL +3]) ENGLISH 17 Press B SRC repeatedly to select iPod BT. • You can listen to the songs on this unit. Listen to iPod/iPhone via Bluetooth You can operate the iPod/iPhone in [PRESET EQ]. • The settings made may affect the current settings of sound output from a folder/list Switch between connected Bluetooth audio devices On the faceplate...

Instruction Manual
Page 22
...]: Adjusts the quality factor. [PRESET EQ] [NATURAL]/[ROCK]/[POPS]/[EASY]/[TOP40]/[JAZZ]/[POWERFUL]/ [USER]: Selects a preset equalizer suitable to the music genre. (Select [USER] to use the settings made in [EASY EQ] or [MANUAL EQ].) [BASS BOOST] [LV1] to [LV5]: Selects your preferred bass boost level. ; [OFF]: Cancels. [LOUDNESS] [LV1]/[LV2]: Selects your preferred low or high frequencies boost to produce a well-balanced sound at low volume. ; [OFF]: Cancels. [SUBWOOFER SET] [ON]: Turns on the subwoofer output...
...]: Adjusts the quality factor. [PRESET EQ] [NATURAL]/[ROCK]/[POPS]/[EASY]/[TOP40]/[JAZZ]/[POWERFUL]/ [USER]: Selects a preset equalizer suitable to the music genre. (Select [USER] to use the settings made in [EASY EQ] or [MANUAL EQ].) [BASS BOOST] [LV1] to [LV5]: Selects your preferred bass boost level. ; [OFF]: Cancels. [LOUDNESS] [LV1]/[LV2]: Selects your preferred low or high frequencies boost to produce a well-balanced sound at low volume. ; [OFF]: Cancels. [SUBWOOFER SET] [ON]: Turns on the subwoofer output...

Instruction Manual
Page 23
...]/[R-HPF GAIN]/[SW LPF GAIN]/[GAIN]: Adjusts the output volume of [FRONT]/[REAR]/[SUBWOOFER] - 3-way crossover: [WOOFER] X ' OVER (crossover) • [FRQ]/[F-HPF FRQ]/[R-HPF FRQ]/[SW LPF FRQ]/[HPF FRQ]/[LPF FRQ]: Adjusts the crossover frequency for 2-way crossover and 3-way crossover. ENGLISH 19 Audio Settings Crossover settings Below are the available setting items for the selected speakers (high pass filter or low...
...]/[R-HPF GAIN]/[SW LPF GAIN]/[GAIN]: Adjusts the output volume of [FRONT]/[REAR]/[SUBWOOFER] - 3-way crossover: [WOOFER] X ' OVER (crossover) • [FRQ]/[F-HPF FRQ]/[R-HPF FRQ]/[SW LPF FRQ]/[HPF FRQ]/[LPF FRQ]: Adjusts the crossover frequency for 2-way crossover and 3-way crossover. ENGLISH 19 Audio Settings Crossover settings Below are the available setting items for the selected speakers (high pass filter or low...

Instruction Manual
Page 26
.... 22 ENGLISH Level meter Default: [XX] [DISPLAY] [COLOR SELECT] Selects illumination colors for [ALL ZONE], [ZONE 1] and [ZONE 2] separately. 1 Select a zone. (See the illustration on or off dimmer. 1 Turn the volume knob to adjust the [ON] time, then press the knob. 2 Turn the volume knob to adjust the [OFF] time, then press the knob. Change the display settings 1 Press the volume knob to enter [FUNCTION]. 2 Turn the volume knob to select an item (see...
.... 22 ENGLISH Level meter Default: [XX] [DISPLAY] [COLOR SELECT] Selects illumination colors for [ALL ZONE], [ZONE 1] and [ZONE 2] separately. 1 Select a zone. (See the illustration on or off dimmer. 1 Turn the volume knob to adjust the [ON] time, then press the knob. 2 Turn the volume knob to adjust the [OFF] time, then press the knob. Change the display settings 1 Press the volume knob to enter [FUNCTION]. 2 Turn the volume knob to select an item (see...

Instruction Manual
Page 29
... (Ignition wire) Light blue/yellow (Steering remote control wire) STEERING WHEEL REMOTE INPUT REMOTE CONT To the steering wheel remote control adapter Red (A7) Yellow (A4) Blue/White*2 (Power control wire/ Antenna control wire) ANT CONT P. CONT To the power control terminal when using the optional power amplifier or to the antenna control terminal in the vehicle Brown (Mute control wire) Connect to the device equipped with a commercially available custom wiring harness specific for your car and leave this unit ISO connectors NOTE: Total output for Blue/White wire (*1) + (*2) is...
... (Ignition wire) Light blue/yellow (Steering remote control wire) STEERING WHEEL REMOTE INPUT REMOTE CONT To the steering wheel remote control adapter Red (A7) Yellow (A4) Blue/White*2 (Power control wire/ Antenna control wire) ANT CONT P. CONT To the power control terminal when using the optional power amplifier or to the antenna control terminal in the vehicle Brown (Mute control wire) Connect to the device equipped with a commercially available custom wiring harness specific for your car and leave this unit ISO connectors NOTE: Total output for Blue/White wire (*1) + (*2) is...

Instruction Manual
Page 31
... iPod USB / iPod BT Song title/Artist Album title/Artist Playing time Date back to the beginning BT AUDIO AUX Song title/Artist Album title/Artist Playing time Date back to the beginning Source name Date back to the beginning ENGLISH 27 References About USB devices • You cannot connect a USB device via a USB hub. • Connecting a cable whose rating is other information (eg. iPod touch (6th generation) - Preset color: [INITIAL COLOR...
... iPod USB / iPod BT Song title/Artist Album title/Artist Playing time Date back to the beginning BT AUDIO AUX Song title/Artist Album title/Artist Playing time Date back to the beginning Source name Date back to the beginning ENGLISH 27 References About USB devices • You cannot connect a USB device via a USB hub. • Connecting a cable whose rating is other information (eg. iPod touch (6th generation) - Preset color: [INITIAL COLOR...
Instruction Manual
Page 32
... [SOURCE SELECT] setting. (Page 5) • Sound cannot be sure the terminals of creation (date and time). Playback order is played (USB). This unit cannot support a USB device connected via a USB hub. • The source does not change the source to the nearest service center. "MISWIRING CHECK WIRING THEN PWR ON" appears. Turn the power on the recording process earlier (USB). This depends on again. Make sure the USB device is still preparing the iPod/iPhone music list...
... [SOURCE SELECT] setting. (Page 5) • Sound cannot be sure the terminals of creation (date and time). Playback order is played (USB). This unit cannot support a USB device connected via a USB hub. • The source does not change the source to the nearest service center. "MISWIRING CHECK WIRING THEN PWR ON" appears. Turn the power on the recording process earlier (USB). This depends on again. Make sure the USB device is still preparing the iPod/iPhone music list...
Instruction Manual
Page 33
... again for error recovery. No Bluetooth device is detected. • Search from the Bluetooth device again. • Reset the unit. (Page 3) Bluetooth pairing cannot be trying to connect to the instructions of your iPod/iPhone. Bluetooth audio player. • Turn off, then turn off the power. The connected Bluetooth audio player cannot be • Press 6 IW during a call sound cannot be controlled. • Check whether the connected Bluetooth audio player supports Audio/Video Remote Control Profile (AVRCP). (Refer to the unit. "SWITCHING NG" The connected phones might be...
... again for error recovery. No Bluetooth device is detected. • Search from the Bluetooth device again. • Reset the unit. (Page 3) Bluetooth pairing cannot be trying to connect to the instructions of your iPod/iPhone. Bluetooth audio player. • Turn off, then turn off the power. The connected Bluetooth audio player cannot be • Press 6 IW during a call sound cannot be controlled. • Check whether the connected Bluetooth audio player supports Audio/Video Remote Control Profile (AVRCP). (Refer to the unit. "SWITCHING NG" The connected phones might be...


