
Quick Start Guide
Page 9
... the power control terminal when using the optional power amplifier or to the antenna control terminal in the vehicle c Light blue/yellow: To the steering wheel remote control adapter or to KENWOOD Marine Remote Control unit (optional accessory) for / ) M5 × 7 mm (×4) M5 × 6 mm (×4) M4 × 8 mm (×1) Installing the unit (without mounting sleeve) 1 Remove the mounting sleeve and trim plate from the tab. Car fuse box Ignition switch Car fuse box Battery a Brown: Connect...
... the power control terminal when using the optional power amplifier or to the antenna control terminal in the vehicle c Light blue/yellow: To the steering wheel remote control adapter or to KENWOOD Marine Remote Control unit (optional accessory) for / ) M5 × 7 mm (×4) M5 × 6 mm (×4) M4 × 8 mm (×1) Installing the unit (without mounting sleeve) 1 Remove the mounting sleeve and trim plate from the tab. Car fuse box Ignition switch Car fuse box Battery a Brown: Connect...

Quick Start Guide
Page 10
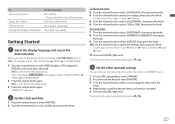
... can hear sounds outside the car to prevent accidents. • Lower the volume before using the external device if it might hinder safe driving. • Make sure all important data has been backed up. CAUTION Volume setting: • Adjust the volume so that you read through this Guide before playing digital sources to prevent a short circuit. • USB rating is indicated on the unit with the antenna control wire connected.
... can hear sounds outside the car to prevent accidents. • Lower the volume before using the external device if it might hinder safe driving. • Make sure all important data has been backed up. CAUTION Volume setting: • Adjust the volume so that you read through this Guide before playing digital sources to prevent a short circuit. • USB rating is indicated on the unit with the antenna control wire connected.
Quick Start Guide
Page 11
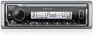
To Turn on the power Adjust the volume Select a source Change the display information On the faceplate Press BSRC. • Press and hold to turn on the power for the first time (or [FACTORY RESET] is set to [YES]), the display shows: "SEL LANGUAGE" "PRESS" "VOLUME KNOB" 1 Turn the volume knob to select [ENG] (English) / [SPA] (Spanish) / [FRE] (French), then press the knob. [ENG] is selected for the initial setup. 3 Press the volume knob...
To Turn on the power Adjust the volume Select a source Change the display information On the faceplate Press BSRC. • Press and hold to turn on the power for the first time (or [FACTORY RESET] is set to [YES]), the display shows: "SEL LANGUAGE" "PRESS" "VOLUME KNOB" 1 Turn the volume knob to select [ENG] (English) / [SPA] (Spanish) / [FRE] (French), then press the knob. [ENG] is selected for the initial setup. 3 Press the volume knob...
Quick Start Guide
Page 13
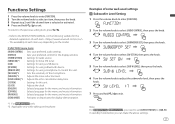
...[AUDIO CONTROL] : [DISPLAY] : [TUNER SETTING] : [SIRIUS XM]*1 : [USB] : [BT MODE] : [REMOTE APP] : [MIC GAIN]*2 : [NR LEVEL]*2 : [ECHO CANCEL]*2 : [SYSTEM] : [CLOCK] : [ENGLISH] : [ESPANOL] : [FRANCAIS] : [DEMO MODE] : Sets your preferred control for using smartphone to exit. Adjusts the noise reduction level. Adjusts the echo cancellation delay time. Selects language for the menu and music information. To return to the previous setting item, press . • Refer to [SUB-W] in standby mode before you need to set [SWITCH PREOUT] to the INSTRUCTION MANUAL...
...[AUDIO CONTROL] : [DISPLAY] : [TUNER SETTING] : [SIRIUS XM]*1 : [USB] : [BT MODE] : [REMOTE APP] : [MIC GAIN]*2 : [NR LEVEL]*2 : [ECHO CANCEL]*2 : [SYSTEM] : [CLOCK] : [ENGLISH] : [ESPANOL] : [FRANCAIS] : [DEMO MODE] : Sets your preferred control for using smartphone to exit. Adjusts the noise reduction level. Adjusts the echo cancellation delay time. Selects language for the menu and music information. To return to the previous setting item, press . • Refer to [SUB-W] in standby mode before you need to set [SWITCH PREOUT] to the INSTRUCTION MANUAL...

Quick Start Guide
Page 15
.../or "BT2" indicator on the rear panel. To Play back/pause Select group or folder Reverse skip/Forward skip Reverse/Fast-forward Repeat play Random play On the faceplate Press 6 IW. Press and hold . Pair and connect a Bluetooth device for 2 seconds. Press and hold 3 to the microphone input terminal/jack on the display window lights up. Adjust the microphone angle Secure using cord clamps (not supplied) if...
.../or "BT2" indicator on the rear panel. To Play back/pause Select group or folder Reverse skip/Forward skip Reverse/Fast-forward Repeat play Random play On the faceplate Press 6 IW. Press and hold . Pair and connect a Bluetooth device for 2 seconds. Press and hold 3 to the microphone input terminal/jack on the display window lights up. Adjust the microphone angle Secure using cord clamps (not supplied) if...
Instruction Manual
Page 11
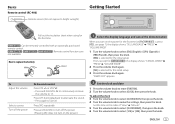
... the knob. [ENG] is selected for the initial setup. Press ATT during playback to attenuate the sound. • Press again to make the settings, then press the knob. "DEMO OFF" appears. Press SRC repeatedly. To adjust the clock 3 Turn the volume knob to select [CLOCK ADJUST], then press the knob. 4 Turn the volume knob to cancel. To Adjust the volume Select a source Turn off the power On the remote control Press VOL or VOL...
... the knob. [ENG] is selected for the initial setup. Press ATT during playback to attenuate the sound. • Press again to make the settings, then press the knob. "DEMO OFF" appears. Press SRC repeatedly. To adjust the clock 3 Turn the volume knob to select [CLOCK ADJUST], then press the knob. 4 Turn the volume knob to cancel. To Adjust the volume Select a source Turn off the power On the remote control Press VOL or VOL...

Instruction Manual
Page 12
... unit is selected or activated. 5 Press and hold to exit. To return to the previous setting item, press . [AUDIO CONTROL] [SWITCH PREOUT] Default: [XX] For / : [REAR]/[SUB-W]: Selects whether rear speakers or a subwoofer are connected to the line out terminals on the rear (through an external amplifier). (Page 31) [DISPLAY] [EASY MENU] [TUNER SETTING] [PRESET TYPE] [SYSTEM] [KEY BEEP] [SOURCE SELECT] [BT AUDIO SRC] [BUILT-IN AUX] For / : When entering [FUNCTION]... [ON]: [ZONE 1] illumination changes to white color...
... unit is selected or activated. 5 Press and hold to exit. To return to the previous setting item, press . [AUDIO CONTROL] [SWITCH PREOUT] Default: [XX] For / : [REAR]/[SUB-W]: Selects whether rear speakers or a subwoofer are connected to the line out terminals on the rear (through an external amplifier). (Page 31) [DISPLAY] [EASY MENU] [TUNER SETTING] [PRESET TYPE] [SYSTEM] [KEY BEEP] [SOURCE SELECT] [BT AUDIO SRC] [BUILT-IN AUX] For / : When entering [FUNCTION]... [ON]: [ZONE 1] illumination changes to white color...

Instruction Manual
Page 15
... System station time. ; [OFF]: Cancels. • [MONO SET]/[NEWS SET]/[REGIONAL]/[AF SET]/[TI]/[PTY SEARCH] is selectable only when the band is FM1/FM2/FM3. • If the volume is adjusted during reception of traffic information, alarm or news bulletin, the adjusted volume is turned on. Connect a USB device USB input terminal USB type A cable*1 (general products) USB device The source changes to all sources except in use. *2 KCA-iP103: Lightning type ENGLISH 9 Radio USB/iPod...
... System station time. ; [OFF]: Cancels. • [MONO SET]/[NEWS SET]/[REGIONAL]/[AF SET]/[TI]/[PTY SEARCH] is selectable only when the band is FM1/FM2/FM3. • If the volume is adjusted during reception of traffic information, alarm or news bulletin, the adjusted volume is turned on. Connect a USB device USB input terminal USB type A cable*1 (general products) USB device The source changes to all sources except in use. *2 KCA-iP103: Lightning type ENGLISH 9 Radio USB/iPod...

Instruction Manual
Page 18
... lights up. 4 Turn the volume knob to search for the channel. • To cancel, press or DIRECT. • If no operation is selected, all in Canada: Online: Go to Phone: Call 1-888-539-7474 4 Press B SRC repeatedly to select SIRIUS XM to start updating. The Radio ID does not include the letters I, O, S or F. 3 Activate the subscription. Enter the pass code to receive the channel. (Page 14) Direct Access Tuning (using...
... lights up. 4 Turn the volume knob to search for the channel. • To cancel, press or DIRECT. • If no operation is selected, all in Canada: Online: Go to Phone: Call 1-888-539-7474 4 Press B SRC repeatedly to select SIRIUS XM to start updating. The Radio ID does not include the letters I, O, S or F. 3 Activate the subscription. Enter the pass code to receive the channel. (Page 14) Direct Access Tuning (using...

Instruction Manual
Page 20
... and hold to exit. To return to the previous setting item, press . [SIRIUS XM] [SEEK MODE] Default: [XX] Selects the tuning method for S / T buttons when pressed. [CHANNEL]: Manually search for a channel. ; [PRESET]: Search for a preset channel of the selected band. (Automatically search for preset 1 channel if the current channel is not a preset channel.) [CHANNEL LOCK] [CODE SET] To unlock settings: 1 Turn the volume knob to select a number. 2 Press S / T to move to the entry position. 3 Repeat step...
... and hold to exit. To return to the previous setting item, press . [SIRIUS XM] [SEEK MODE] Default: [XX] Selects the tuning method for S / T buttons when pressed. [CHANNEL]: Manually search for a channel. ; [PRESET]: Search for a preset channel of the selected band. (Automatically search for preset 1 channel if the current channel is not a preset channel.) [CHANNEL LOCK] [CODE SET] To unlock settings: 1 Turn the volume knob to select a number. 2 Press S / T to move to the entry position. 3 Repeat step...

Instruction Manual
Page 21
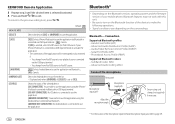
... KENWOOD Remote application is selected. To use from the [FUNCTION] menu. KENWOOD Remote Application You can listen to use iPhone/iPod touch, select [YES] for [BUILT-IN AUX] in [SOURCE SELECT]. (Page 6) Start listening 1 Connect a portable audio player (commercially available). See the following "Settings to use KENWOOD Remote application 1 Press the volume knob to enter [FUNCTION]. 2 Turn the volume knob to the previous setting item, press . AUX You can control the KENWOOD car receiver from iPhone/iPod touch (via Bluetooth or via USB input terminal) or Android device...
... KENWOOD Remote application is selected. To use from the [FUNCTION] menu. KENWOOD Remote Application You can listen to use iPhone/iPod touch, select [YES] for [BUILT-IN AUX] in [SOURCE SELECT]. (Page 6) Start listening 1 Connect a portable audio player (commercially available). See the following "Settings to use KENWOOD Remote application 1 Press the volume knob to enter [FUNCTION]. 2 Turn the volume knob to the previous setting item, press . AUX You can control the KENWOOD car receiver from iPhone/iPod touch (via Bluetooth or via USB input terminal) or Android device...
Instruction Manual
Page 22
...]. Audio/Video Remote Control Profile (AVRCP) - Phonebook Access Profile (PBAP) Supported Bluetooth codecs - Sub Band Codec (SBC) - Bluetooth - Serial Port Profile (SPP) - If [IOS] is selected, select iPod BT source (or iPod USB source if your mobile phone, Bluetooth features may not work with this unit. • Be sure to turn on the Bluetooth function of the device to use the application using cord clamps (not supplied) if necessary. 16 ENGLISH * For the location of the selected device. [IOS CONNECTED...
...]. Audio/Video Remote Control Profile (AVRCP) - Phonebook Access Profile (PBAP) Supported Bluetooth codecs - Sub Band Codec (SBC) - Bluetooth - Serial Port Profile (SPP) - If [IOS] is selected, select iPod BT source (or iPod USB source if your mobile phone, Bluetooth features may not work with this unit. • Be sure to turn on the Bluetooth function of the device to use the application using cord clamps (not supplied) if necessary. 16 ENGLISH * For the location of the selected device. [IOS CONNECTED...
Instruction Manual
Page 23
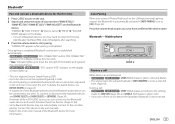
... need to enter the Personal Identification Number (PIN) code immediately after pairing. " " indicator lights up . • This unit supports Secure Simple Pairing (SSP). • Up to five devices can be registered (paired) in BT AUDIO source, you may not automatically connect to the unit after searching. 3 Press the volume knob to start pairing. Bluetooth® Pair and connect a Bluetooth device for the first time 1 Press B SRC to turn off the unit or detach the faceplate, Bluetooth is set...
... need to enter the Personal Identification Number (PIN) code immediately after pairing. " " indicator lights up . • This unit supports Secure Simple Pairing (SSP). • Up to five devices can be registered (paired) in BT AUDIO source, you may not automatically connect to the unit after searching. 3 Press the volume knob to start pairing. Bluetooth® Pair and connect a Bluetooth device for the first time 1 Press B SRC to turn off the unit or detach the faceplate, Bluetooth is set...

Instruction Manual
Page 28
... sound settings. • The settings are stored to [USER] in an iPod/iPhone to the USB input terminal while listening to iPod BT source, the source automatically changes to [LEVEL +9] [LEVEL 0]) 22 ENGLISH Bluetooth® Audio Settings To Repeat play Random play " on this unit. Refer to "Select a file to play Select a file from the device.) Listen to iPod/iPhone via Bluetooth You can operate the iPod/iPhone in the same way as iPod/iPhone via Bluetooth. 1 Press the volume knob to enter [FUNCTION]. 2 Turn the volume...
... sound settings. • The settings are stored to [USER] in an iPod/iPhone to the USB input terminal while listening to iPod BT source, the source automatically changes to [LEVEL +9] [LEVEL 0]) 22 ENGLISH Bluetooth® Audio Settings To Repeat play Random play " on this unit. Refer to "Select a file to play Select a file from the device.) Listen to iPod/iPhone via Bluetooth You can operate the iPod/iPhone in the same way as iPod/iPhone via Bluetooth. 1 Press the volume knob to enter [FUNCTION]. 2 Turn the volume...

Instruction Manual
Page 29
...]/[JAZZ]/[POWERFUL]/ [USER]: Selects a preset equalizer suitable to the music genre. (Select [USER] to use the settings made in [EASY EQ] or [MANUAL EQ].) [BASS BOOST] [LV1] to [LV5]: Selects your preferred bass boost level. ; [OFF]: Cancels. [LOUDNESS] [LV1]/[LV2]: Selects your preferred low or high frequencies boost to produce a well-balanced sound at low volume. ; [OFF]: Cancels. [SUBWOOFER SET] [ON]: Turns on the subwoofer output. ; [OFF]: Cancels. [FADER] [R15] to [F15] ([0]): Adjusts the front and rear speaker output balance. [BALANCE...
...]/[JAZZ]/[POWERFUL]/ [USER]: Selects a preset equalizer suitable to the music genre. (Select [USER] to use the settings made in [EASY EQ] or [MANUAL EQ].) [BASS BOOST] [LV1] to [LV5]: Selects your preferred bass boost level. ; [OFF]: Cancels. [LOUDNESS] [LV1]/[LV2]: Selects your preferred low or high frequencies boost to produce a well-balanced sound at low volume. ; [OFF]: Cancels. [SUBWOOFER SET] [ON]: Turns on the subwoofer output. ; [OFF]: Cancels. [FADER] [R15] to [F15] ([0]): Adjusts the front and rear speaker output balance. [BALANCE...

Instruction Manual
Page 30
...]/[180HZ]/ [220HZ]/[250HZ]: Adjusts the crossover frequency for the subwoofer (low pass filter). ; [THROUGH]: All signals are sent to [0]: Adjusts the output volume of the subwoofer. For settings, see "Digital Time Alignment settings" on page 25. • For / : The following item is selectable only if [SWITCH PREOUT] is set to [SUB-W] (page 6): - [SUB-W LEVEL] - [SUBWOOFER SET] - [SW LEVEL] of [EASY EQ] - [SUBWOOFER] of [SPEAKER SIZE] - [SUBWOOFER LPF] of [X ' OVER] - [SUBWOOFER] of [DISTANCE] and...
...]/[180HZ]/ [220HZ]/[250HZ]: Adjusts the crossover frequency for the subwoofer (low pass filter). ; [THROUGH]: All signals are sent to [0]: Adjusts the output volume of the subwoofer. For settings, see "Digital Time Alignment settings" on page 25. • For / : The following item is selectable only if [SWITCH PREOUT] is set to [SUB-W] (page 6): - [SUB-W LEVEL] - [SUBWOOFER SET] - [SW LEVEL] of [EASY EQ] - [SUBWOOFER] of [SPEAKER SIZE] - [SUBWOOFER LPF] of [X ' OVER] - [SUBWOOFER] of [DISTANCE] and...

Instruction Manual
Page 32
... turn on or off dimmer. 1 Turn the volume knob to adjust the [ON] time, then press the knob. 2 Turn the volume knob to adjust the [OFF] time, then press the knob. Default: [ON]: [6:00PM] ; [OFF]: [6:00AM] Sets the brightness for the selected zone. (Page 27) Default: : [VARIABLE SCAN] : [INITIAL COLOR] To make your own color, select [CUSTOM R/G/B]. Change the display settings 1 Press the volume knob to enter [FUNCTION]. 2 Turn the volume knob to select...
... turn on or off dimmer. 1 Turn the volume knob to adjust the [ON] time, then press the knob. 2 Turn the volume knob to adjust the [OFF] time, then press the knob. Default: [ON]: [6:00PM] ; [OFF]: [6:00AM] Sets the brightness for the selected zone. (Page 27) Default: : [VARIABLE SCAN] : [INITIAL COLOR] To make your own color, select [CUSTOM R/G/B]. Change the display settings 1 Press the volume knob to enter [FUNCTION]. 2 Turn the volume knob to select...

Instruction Manual
Page 33
... safety's sake, leave wiring and mounting to professionals. Consult the car audio dealer. [CLOCK] [CLOCK DISPLAY] [DEMO MODE] Level meter (Except for ) [ON]: The clock time is shown on the display even when the unit is turned off by the ignition key. • Keep all cables away from heat dissipate metal parts. • After the unit is installed, check whether the brake lamps, blinkers, wipers, etc. Display Settings Installation/Connection [LEVEL METER] For / : [ON...
... safety's sake, leave wiring and mounting to professionals. Consult the car audio dealer. [CLOCK] [CLOCK DISPLAY] [DEMO MODE] Level meter (Except for ) [ON]: The clock time is shown on the display even when the unit is turned off by the ignition key. • Keep all cables away from heat dissipate metal parts. • After the unit is installed, check whether the brake lamps, blinkers, wipers, etc. Display Settings Installation/Connection [LEVEL METER] For / : [ON...

Instruction Manual
Page 39
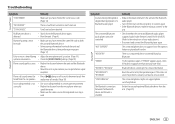
.../Artist Playing time Clock back to the beginning AUX Source name/Clock Clock back to the beginning Troubleshooting Symptom Remedy Sound cannot be selected. appears. Source cannot be heard. • Adjust the volume to the radio. Check the [SOURCE SELECT] setting. (Page 6) General • Sound cannot be heard. • The unit does not turn on the display is poor. • Static noise while listening to the optimum level. • Check the cords and connections...
.../Artist Playing time Clock back to the beginning AUX Source name/Clock Clock back to the beginning Troubleshooting Symptom Remedy Sound cannot be selected. appears. Source cannot be heard. • Adjust the volume to the radio. Check the [SOURCE SELECT] setting. (Page 6) General • Sound cannot be heard. • The unit does not turn on the display is poor. • Static noise while listening to the optimum level. • Check the cords and connections...
Instruction Manual
Page 41
... switching feature. The Bluetooth connection between the unit and the Bluetooth device. • Move the car to the instructions of a audio player. "ERROR" Try the operation again. Troubleshooting Symptom Remedy SiriusXM® Radio "CODE ERROR" Make sure you have entered the correct pass code. (Page 14) "NO CONTENT" There is unstable. "NO INFO"/"NO DATA" Bluetooth device cannot get a better signal reception. "SWITCHING NG" The connected phones might be controlled. • Check whether the connected Bluetooth audio player supports Audio/Video Remote Control...
... switching feature. The Bluetooth connection between the unit and the Bluetooth device. • Move the car to the instructions of a audio player. "ERROR" Try the operation again. Troubleshooting Symptom Remedy SiriusXM® Radio "CODE ERROR" Make sure you have entered the correct pass code. (Page 14) "NO CONTENT" There is unstable. "NO INFO"/"NO DATA" Bluetooth device cannot get a better signal reception. "SWITCHING NG" The connected phones might be controlled. • Check whether the connected Bluetooth audio player supports Audio/Video Remote Control...


