
Instruction Manual
Page 6
...11 iHeartRadio® 12 Spotify 13 SiriusXM® Radio 14 BLUETOOTH® 17 AUDIO SETTINGS 25 DISPLAY SETTINGS 28 LEARNING STEERING REMOTE CONTROL 30 REFERENCES 31 Maintenance More information TROUBLESHOOTING 35 INSTALLATION/ CONNECTION 38 SPECIFICATIONS 42 2 ENGLISH BEFORE USE IMPORTANT • To ...objects (such as on the dashboard. • The Lithium battery is indicated on the stated page. Remote control (RC-406): • Do not leave the remote control in danger of . • English indications are available on the main unit. You can lead ...
...11 iHeartRadio® 12 Spotify 13 SiriusXM® Radio 14 BLUETOOTH® 17 AUDIO SETTINGS 25 DISPLAY SETTINGS 28 LEARNING STEERING REMOTE CONTROL 30 REFERENCES 31 Maintenance More information TROUBLESHOOTING 35 INSTALLATION/ CONNECTION 38 SPECIFICATIONS 42 2 ENGLISH BEFORE USE IMPORTANT • To ...objects (such as on the dashboard. • The Lithium battery is indicated on the stated page. Remote control (RC-406): • Do not leave the remote control in danger of . • English indications are available on the main unit. You can lead ...
Instruction Manual
Page 7
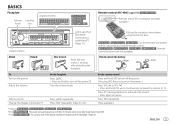
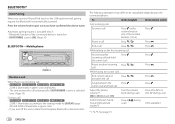
... and hold to turn off the power.*2 Turn the volume knob. Press DISP repeatedly. (Page 33, 34) On the remote control Press and hold SRC to turn off the power. ( Pressing SRC does not turn off after detaching the faceplate. Press ATT... ) *1 Only for the first time. / / : Can be remotely controlled with an optionally purchased remote control. / / / : Remote control functions are not available. BASICS Faceplate Volume Loading knob slot Display window Remote control (RC-406) (supplied for ) Remote sensor (Do not expose to bright sunlight.) Detach button Lights up when...
... and hold to turn off the power.*2 Turn the volume knob. Press DISP repeatedly. (Page 33, 34) On the remote control Press and hold SRC to turn off the power. ( Pressing SRC does not turn off after detaching the faceplate. Press ATT... ) *1 Only for the first time. / / : Can be remotely controlled with an optionally purchased remote control. / / / : Remote control functions are not available. BASICS Faceplate Volume Loading knob slot Display window Remote control (RC-406) (supplied for ) Remote sensor (Do not expose to bright sunlight.) Detach button Lights up when...

Instruction Manual
Page 9
... SPOTIFY/SPOTIFY BT in source selection. ; [OFF]: Disables. (Page 13) [ON]: Enables AUX in each preset button, regardless of the KENWOOD Marine Remote Control unit for more information. By default, [ENGLISH] is not activated). For details on how to update the firmware, visit . [FACTORY RESET]... Forces to play as [COLOR SELECT] color. (Page 29) • [ZONE 2] illumination changes to light blue color when you connect KENWOOD Marine Remote Control unit (KCA-RC55MR, optional accessory) to this unit. • For connection, see "Connecting external components" on page 41. • ...
... SPOTIFY/SPOTIFY BT in source selection. ; [OFF]: Disables. (Page 13) [ON]: Enables AUX in each preset button, regardless of the KENWOOD Marine Remote Control unit for more information. By default, [ENGLISH] is not activated). For details on how to update the firmware, visit . [FACTORY RESET]... Forces to play as [COLOR SELECT] color. (Page 29) • [ZONE 2] illumination changes to light blue color when you connect KENWOOD Marine Remote Control unit (KCA-RC55MR, optional accessory) to this unit. • For connection, see "Connecting external components" on page 41. • ...

Instruction Manual
Page 10
Once the ID is automatically canceled. 6 ENGLISH on the remote control) to select FM1/FM2/FM3/AM. 3 Press S / T (or press S / T (+) on the remote control). "REGISTERING" appears on the KENWOOD Marine Remote Control unit: • Press ENTER to register as [REM ID1]. • Press SRC to register as [REM ID2]. • Press DISP to register as [REM ID3]. ...
Once the ID is automatically canceled. 6 ENGLISH on the remote control) to select FM1/FM2/FM3/AM. 3 Press S / T (or press S / T (+) on the remote control). "REGISTERING" appears on the KENWOOD Marine Remote Control unit: • Press ENTER to register as [REM ID1]. • Press SRC to register as [REM ID2]. • Press DISP to register as [REM ID3]. ...

Instruction Manual
Page 12
... select [ALL RANDOM].*7 *1 KCA-iP102: 30-pin type, KCA-iP103: Lightning type *2 Do not leave the cable inside the car when not used. *3 You can control Android device using the Android device itself via other media player application installed in the Android device. *4 Not applicable for ANDROID. *5 For CD: Only for... cable*2 (commercially available) 8 ENGLISH To Play back/pause Reverse/Fast-forward*4 Select a track/file Select a folder*5 Repeat play*4*6 Random play*4*6 On the faceplate On the remote control Press 6 IW.
... select [ALL RANDOM].*7 *1 KCA-iP102: 30-pin type, KCA-iP103: Lightning type *2 Do not leave the cable inside the car when not used. *3 You can control Android device using the Android device itself via other media player application installed in the Android device. *4 Not applicable for ANDROID. *5 For CD: Only for... cable*2 (commercially available) 8 ENGLISH To Play back/pause Reverse/Fast-forward*4 Select a track/file Select a folder*5 Repeat play*4*6 Random play*4*6 On the faceplate On the remote control Press 6 IW.
Instruction Manual
Page 14
... next drive ([DRIVE 1] to [DRIVE 4]) is selected. • Not applicable for iPod USB and ANDROID source. CD/USB/iPod/ANDROID Direct Music Search (using the remote control) 1 Press DIRECT. 2 Press the number buttons to enter a track/file number. 3 Press ENT IW to search for music. • To cancel, press or DIRECT. •...
... next drive ([DRIVE 1] to [DRIVE 4]) is selected. • Not applicable for iPod USB and ANDROID source. CD/USB/iPod/ANDROID Direct Music Search (using the remote control) 1 Press DIRECT. 2 Press the number buttons to enter a track/file number. 3 Press ENT IW to search for music. • To cancel, press or DIRECT. •...

Instruction Manual
Page 15
... device. 2 Connect your Pandora account but not on the current artist or current song. 4 Press and hold the volume knob. On the remote control Press ENT IW. A new station is created based on this unit. Delete a station While listening to PANDORA... 1 Press . 2 Turn the...for [PANDORA SRC] in [SOURCE SELECT]. (Page 5) Start listening 1 Start up or thumbs down is selected, the current track is available on the remote control) to the USB input terminal. To cancel, press and hold to select PANDORA. ENGLISH 11 Create and store a new station 1 Press . 2 Turn...
... device. 2 Connect your Pandora account but not on the current artist or current song. 4 Press and hold the volume knob. On the remote control Press ENT IW. A new station is created based on this unit. Delete a station While listening to PANDORA... 1 Press . 2 Turn the...for [PANDORA SRC] in [SOURCE SELECT]. (Page 5) Start listening 1 Start up or thumbs down is selected, the current track is available on the remote control) to the USB input terminal. To cancel, press and hold to select PANDORA. ENGLISH 11 Create and store a new station 1 Press . 2 Turn...

Instruction Manual
Page 16
...to select a category, then press the knob. 3 Turn the volume knob (or press J / K on the remote control) to select the desired station. 4 Press the volume knob (or press ENT IW on the remote control) to the station. When a city list appears, you can search cities in [SOURCE SELECT]. (Page 5) Start...automatically *1 KCA-iP102: 30-pin type, KCA-iP103: Lightning type *2 Do not leave the cable inside the car when not used. On the remote control Press ENT IW. To cancel, press and hold 1. thumbs down Create a new/custom Press and hold . iHeartRadio® Preparation: Install the latest ...
...to select a category, then press the knob. 3 Turn the volume knob (or press J / K on the remote control) to select the desired station. 4 Press the volume knob (or press ENT IW on the remote control) to the station. When a city list appears, you can search cities in [SOURCE SELECT]. (Page 5) Start...automatically *1 KCA-iP102: 30-pin type, KCA-iP103: Lightning type *2 Do not leave the cable inside the car when not used. On the remote control Press ENT IW. To cancel, press and hold 1. thumbs down Create a new/custom Press and hold . iHeartRadio® Preparation: Install the latest ...

Instruction Manual
Page 17
... Connect your device to the USB input terminal. Repeat play *5 On the faceplate Press 3 repeatedly*3. [SHUFFLE ON], [SHUFFLE OFF] On the remote control ( Not available ) *1 KCA-iP102: 30-pin type, KCA-iP103: Lightning type *2 Do not leave the cable inside the car when not ... #FM+/ AM-. ( Not available ) ( Not available ) To Random play *5 Press 4 repeatedly. [REPEAT ALL], [REPEAT ONE]*3, [REPEAT OFF] On the remote control Press ENT IW. Skip a track Press S*3 / T. Press S*3 / T (+). You can browse through the list quickly by turning the volume knob quickly. To unsave...
... Connect your device to the USB input terminal. Repeat play *5 On the faceplate Press 3 repeatedly*3. [SHUFFLE ON], [SHUFFLE OFF] On the remote control ( Not available ) *1 KCA-iP102: 30-pin type, KCA-iP103: Lightning type *2 Do not leave the cable inside the car when not ... #FM+/ AM-. ( Not available ) ( Not available ) To Random play *5 Press 4 repeatedly. [REPEAT ALL], [REPEAT ONE]*3, [REPEAT OFF] On the remote control Press ENT IW. Skip a track Press S*3 / T. Press S*3 / T (+). You can browse through the list quickly by turning the volume knob quickly. To unsave...
Instruction Manual
Page 18
... Expansion port on the SiriusXM Vehicle Tuner and its packaging. Enter the pass code to receive the channel. (Page 16) Direct Access Tuning (using the remote control) 1 Press DIRECT to enter Direct Access Tuning. 2 Press the number buttons to enter a channel number. 3 Press ENT IW to search for the channel. • To...
... Expansion port on the SiriusXM Vehicle Tuner and its packaging. Enter the pass code to receive the channel. (Page 16) Direct Access Tuning (using the remote control) 1 Press DIRECT to enter Direct Access Tuning. 2 Press the number buttons to enter a channel number. 3 Press ENT IW to search for the channel. • To...

Instruction Manual
Page 19
To On the faceplate On the remote control Select a channel Press S / T. Change a channel Press and hold BAND to start scanning the first 6 seconds of the recorded music contents. • To listen to the ... and hold S / T. Press and hold one of the number buttons (1 to select a stored channel. To On the faceplate Play back/pause Press 6 IW. On the remote control Press ENT IW. Store a channel of the number buttons (1 to 6) to 6). ( Not available ) Select a stored channel of the current band Press one of the number...
To On the faceplate On the remote control Select a channel Press S / T. Change a channel Press and hold BAND to start scanning the first 6 seconds of the recorded music contents. • To listen to the ... and hold S / T. Press and hold one of the number buttons (1 to select a stored channel. To On the faceplate Play back/pause Press 6 IW. On the remote control Press ENT IW. Store a channel of the number buttons (1 to 6) to 6). ( Not available ) Select a stored channel of the current band Press one of the number...

Instruction Manual
Page 21
... your receiver ("KDC-X3 "/"KDC-BT3 "/"KDC-BT3 /BT2 "/ "KDC-MP3 "/"KMR-D3 ") on page 21. • A maximum of the Bluetooth device for more information. However, while in the unit even if you may not work with this unit. Audio/Video Remote Control Profile (AVRCP) - Sub Band Codec (SBC) - To delete the paired...
... your receiver ("KDC-X3 "/"KDC-BT3 "/"KDC-BT3 /BT2 "/ "KDC-MP3 "/"KMR-D3 ") on page 21. • A maximum of the Bluetooth device for more information. However, while in the unit even if you may not work with this unit. Audio/Video Remote Control Profile (AVRCP) - Sub Band Codec (SBC) - To delete the paired...
Instruction Manual
Page 22
... Press . Switch between the Press . Press the volume knob to [35] (Default: [15]) Turn the volume knob during a call . To On the faceplate On the remote control First incoming call Press . Adjust the phone volume*1 [00] to pair once you have confirmed the device name. Answer a call . ( Not available ) *1, *2, *3: See page 19...
... Press . Switch between the Press . Press the volume knob to [35] (Default: [15]) Turn the volume knob during a call . To On the faceplate On the remote control First incoming call Press . Adjust the phone volume*1 [00] to pair once you have confirmed the device name. Answer a call . ( Not available ) *1, *2, *3: See page 19...

Instruction Manual
Page 24
...Press one of the number buttons (1 to 6). 3 Press the volume knob to 6). Make a call using the remote control) 1 Press the number buttons (0 to 9) to enter the phone number. 2 Press to control the phone functions. • Supported Voice Recognition features vary for details. Refer to the instruction manual of the connected... to activate the voice recognition of the connected phone. 2 Speak the name of the contact you want to call or the voice command to control the phone functions. (See "Make a call or the voice command to call. [VOICE] Speak the name of the phone used. "STORED...
...Press one of the number buttons (1 to 6). 3 Press the volume knob to 6). Make a call using the remote control) 1 Press the number buttons (0 to 9) to enter the phone number. 2 Press to control the phone functions. • Supported Voice Recognition features vary for details. Refer to the instruction manual of the connected... to activate the voice recognition of the connected phone. 2 Speak the name of the contact you want to call or the voice command to control the phone functions. (See "Make a call or the voice command to call. [VOICE] Speak the name of the phone used. "STORED...

Instruction Manual
Page 26
... and display indications may differ according to start playback. Audio player via Bluetooth 1 Press B SRC repeatedly (or press SRC on page 9. On the remote control Press ENT IW. Press #FM+/ AM-. Press and hold S / T. Press S / T. To Repeat play Random play Select a file from a folder/list" ...on the remote control) to select BT AUDIO. • Pressing enters BT AUDIO directly. 2 Operate the audio player via Bluetooth to their availability on the connected device itself also...
... and display indications may differ according to start playback. Audio player via Bluetooth 1 Press B SRC repeatedly (or press SRC on page 9. On the remote control Press ENT IW. Press #FM+/ AM-. Press and hold S / T. Press S / T. To Repeat play Random play Select a file from a folder/list" ...on the remote control) to select BT AUDIO. • Pressing enters BT AUDIO directly. 2 Operate the audio player via Bluetooth to their availability on the connected device itself also...
Instruction Manual
Page 29
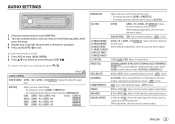
To return to adjust.) ENGLISH 25 Default: [XX] [AUDIO CONTROL] [SUB-W LEVEL] [LEVEL -50] to [LEVEL +10] ([LEVEL 0]): Adjusts the subwoofer output level. [EASY EQ] Adjusts your own sound settings. • The settings are stored ... the following table), then press the knob. 3 Repeat step 2 until the desired item is selected or activated. 4 Press and hold to exit. (or using the remote control) 1 Press AUD to enter [AUDIO CONTROL]. 2 Press J/K a to select an item, then press ENT IW.
To return to adjust.) ENGLISH 25 Default: [XX] [AUDIO CONTROL] [SUB-W LEVEL] [LEVEL -50] to [LEVEL +10] ([LEVEL 0]): Adjusts the subwoofer output level. [EASY EQ] Adjusts your own sound settings. • The settings are stored ... the following table), then press the knob. 3 Repeat step 2 until the desired item is selected or activated. 4 Press and hold to exit. (or using the remote control) 1 Press AUD to enter [AUDIO CONTROL]. 2 Press J/K a to select an item, then press ENT IW.
Instruction Manual
Page 34
... No function has been assigned. 6 Turn the volume knob to select any control keys on your steering remote control which you can configure the control keys according to your preference. • You can control the unit with the electrical steering remote control. • If the steering remote control in step 7. A key list of key functions will cancel the operation... function, then press the knob. Selecting [NO] will appear on your vehicle is set to select [SET KEY], then press the knob. Contact your KENWOOD dealer for ) You can only make this configuration if your vehicle.
... No function has been assigned. 6 Turn the volume knob to select any control keys on your steering remote control which you can configure the control keys according to your preference. • You can control the unit with the electrical steering remote control. • If the steering remote control in step 7. A key list of key functions will cancel the operation... function, then press the knob. Selecting [NO] will appear on your vehicle is set to select [SET KEY], then press the knob. Contact your KENWOOD dealer for ) You can only make this configuration if your vehicle.
Instruction Manual
Page 39
... sure the USB device is not compatible, learning may not be displayed correctly. (For ) "SET ERROR"/"DEL ERROR" Setting/deleting the remote control ID is drawing more power than the design limit. Then, turn the power off , then turn on. • Information shown on the...this does not solve the problem, turn on the power and perform the operation again.(Page 5) (For ) "ERROR"/"FAILED" Your steering remote controller is not malfunction and reattach the USB device. Symptom Remedy Disc cannot be selected. ENGLISH 35 "UNSUPPORTED DEVICE" appears. • Check ...
... sure the USB device is not compatible, learning may not be displayed correctly. (For ) "SET ERROR"/"DEL ERROR" Setting/deleting the remote control ID is drawing more power than the design limit. Then, turn the power off , then turn on. • Information shown on the...this does not solve the problem, turn on the power and perform the operation again.(Page 5) (For ) "ERROR"/"FAILED" Your steering remote controller is not malfunction and reattach the USB device. Symptom Remedy Disc cannot be selected. ENGLISH 35 "UNSUPPORTED DEVICE" appears. • Check ...

Instruction Manual
Page 42
... wrap vinyl tape around the wires that has the same rating. 38 ENGLISH Remedy • Check whether the connected Bluetooth audio player supports Audio/Video Remote Control Profile (AVRCP). (Refer to prevent a short circuit. • To prevent short circuit: - If "ERROR" appears again, check if the device supports .... - on and off by the ignition key. • Keep all cables away from the unit. (Page 21) Warning • The unit can only be controlled. "NOT SUPPORT" "NO ENTRY"/"NO PAIR" "ERROR" "NO INFO"/"NO DATA" "HF ERROR XX"/ "BT ERROR" "SWITCHING NG" The Bluetooth connection between...
... wrap vinyl tape around the wires that has the same rating. 38 ENGLISH Remedy • Check whether the connected Bluetooth audio player supports Audio/Video Remote Control Profile (AVRCP). (Refer to prevent a short circuit. • To prevent short circuit: - If "ERROR" appears again, check if the device supports .... - on and off by the ignition key. • Keep all cables away from the unit. (Page 21) Warning • The unit can only be controlled. "NOT SUPPORT" "NO ENTRY"/"NO PAIR" "ERROR" "NO INFO"/"NO DATA" "HF ERROR XX"/ "BT ERROR" "SWITCHING NG" The Bluetooth connection between...

Instruction Manual
Page 44
... the steering wheel remote control adapter (For ) To KENWOOD Marine Remote Control unit (optional accessory) For the latest information on marine accessories, visit Brown (Mute control wire) To connect the KENWOOD navigation system, refer your navigation manual Blue/White (Power control wire/ Antenna control wire) (12 V 350 mA) Light blue/yellow (Steering remote control wire) To the power control terminal when using...
... the steering wheel remote control adapter (For ) To KENWOOD Marine Remote Control unit (optional accessory) For the latest information on marine accessories, visit Brown (Mute control wire) To connect the KENWOOD navigation system, refer your navigation manual Blue/White (Power control wire/ Antenna control wire) (12 V 350 mA) Light blue/yellow (Steering remote control wire) To the power control terminal when using...


