

Instruction Manual
Page 7
... not expose to bright sunlight.) Lights up when Bluetooth connection is established.*1 (Page 19) / rear of the unit. : USB cable from the Detach How to reset Reset the unit within 5 seconds after 20 minutes when in standby mode (Auto Power Off). : You can also turn off the display information by pressing DISP...
... not expose to bright sunlight.) Lights up when Bluetooth connection is established.*1 (Page 19) / rear of the unit. : USB cable from the Detach How to reset Reset the unit within 5 seconds after 20 minutes when in standby mode (Auto Power Off). : You can also turn off the display information by pressing DISP...
Instruction Manual
Page 8
... [DATE SET], then press the knob. 10 Turn the volume knob to the line out terminals on the power for the first time (or [FACTORY RESET] is selected for the initial setup. 3 Press the volume knob again.
... [DATE SET], then press the knob. 10 Turn the volume knob to the line out terminals on the power for the first time (or [FACTORY RESET] is selected for the initial setup. 3 Press the volume knob again.
Instruction Manual
Page 9
...[OFF]: [ZONE 1] illumination remains as [COLOR SELECT] color. (Page 31) • [ZONE 2] illumination changes to light blue color when you connect KENWOOD Marine Remote Control unit (KCA-RC55MR, optional accessory) to this unit. • For connection, see "Connecting external components" on page 42. • ...]: Resets the settings to the illustration on page 30 for zone identification. [NORMAL]: Memorizes one station for each preset button in each band (FM1/FM2/FM3/AM). ; [MIX]: Memorizes one station or SiriusXM channel for each preset button, regardless of the KENWOOD Marine Remote ...
...[OFF]: [ZONE 1] illumination remains as [COLOR SELECT] color. (Page 31) • [ZONE 2] illumination changes to light blue color when you connect KENWOOD Marine Remote Control unit (KCA-RC55MR, optional accessory) to this unit. • For connection, see "Connecting external components" on page 42. • ...]: Resets the settings to the illustration on page 30 for zone identification. [NORMAL]: Memorizes one station for each preset button in each band (FM1/FM2/FM3/AM). ; [MIX]: Memorizes one station or SiriusXM channel for each preset button, regardless of the KENWOOD Marine Remote ...

Instruction Manual
Page 11
.... 4 Press and hold to exit. • To deactivate emergency alert message reception, select [OFF] in the list. • To clear the message list, set [FACTORY RESET] to [YES]. (Page 5) Other settings 1 Press the volume knob to enter [FUNCTION]. 2 Turn the volume knob to exit. To return to HD8). ENGLISH 7 "LINKING" appears...
.... 4 Press and hold to exit. • To deactivate emergency alert message reception, select [OFF] in the list. • To clear the message list, set [FACTORY RESET] to [YES]. (Page 5) Other settings 1 Press the volume knob to enter [FUNCTION]. 2 Turn the volume knob to exit. To return to HD8). ENGLISH 7 "LINKING" appears...

Instruction Manual
Page 22
... when pressed. [CHANNEL]: Manually search for a channel. ; [PRESET]: Search for a preset channel of the current received signal. [BUFFER USAGE] [SXM RESET] Shows the memory usage ([0%] to [100%]) for Replay buffer. [YES]: Resets all the locked channels. ; [NO]: Cancels. [ON]: All qualified music channels in the SmartFavorites will start playback from the beginning...
... when pressed. [CHANNEL]: Manually search for a channel. ; [PRESET]: Search for a preset channel of the current received signal. [BUFFER USAGE] [SXM RESET] Shows the memory usage ([0%] to [100%]) for Replay buffer. [YES]: Resets all the locked channels. ; [NO]: Cancels. [ON]: All qualified music channels in the SmartFavorites will start playback from the beginning...

Instruction Manual
Page 23
...be registered (paired) in total. • Once the pairing is completed, the Bluetooth device will remain registered in BT AUDIO source, you reset the unit. Once pairing is completed, Bluetooth connection is completed. Phonebook Access Profile (PBAP) Supported Bluetooth codecs - BLUETOOTH® BLUETOOTH -... start pairing. To delete the paired device, see [DEVICE DELETE] on the operating system and the firmware version of your receiver ("KMM-BT5 "/"KMM-X5 "/"KMM-BT3 "/ "KMM-BT2 "/"KMR-M3 ") on the display window lights up . • / : "BT1" and/or "BT2" on the ...
...be registered (paired) in total. • Once the pairing is completed, the Bluetooth device will remain registered in BT AUDIO source, you reset the unit. Once pairing is completed, Bluetooth connection is completed. Phonebook Access Profile (PBAP) Supported Bluetooth codecs - BLUETOOTH® BLUETOOTH -... start pairing. To delete the paired device, see [DEVICE DELETE] on the operating system and the firmware version of your receiver ("KMM-BT5 "/"KMM-X5 "/"KMM-BT3 "/ "KMM-BT2 "/"KMR-M3 ") on the display window lights up . • / : "BT1" and/or "BT2" on the ...

Instruction Manual
Page 33
... a more suitable environment for your vehicle. • For more information, see "Digital Time Alignment settings" on page 30. [DTA SETTINGS] [POSITION] [DISTANCE] [GAIN] [DTA RESET] [CAR SETTINGS] [CAR TYPE] [R-SP LOCATION] Selects your listening position (reference point). [ALL]: Not compensating ; [FRONT RIGHT]: Front right seat ; [FRONT LEFT]: Front left...[-8DB] to [0DB]: Fine adjust the output volume of the selected speaker. (Before making an adjustment, select the speaker you want to adjust.) [YES]: Resets the settings ([DISTANCE] and [GAIN]) of vehicle. ; [OFF]: Not compensating.
... a more suitable environment for your vehicle. • For more information, see "Digital Time Alignment settings" on page 30. [DTA SETTINGS] [POSITION] [DISTANCE] [GAIN] [DTA RESET] [CAR SETTINGS] [CAR TYPE] [R-SP LOCATION] Selects your listening position (reference point). [ALL]: Not compensating ; [FRONT RIGHT]: Front right seat ; [FRONT LEFT]: Front left...[-8DB] to [0DB]: Fine adjust the output volume of the selected speaker. (Before making an adjustment, select the speaker you want to adjust.) [YES]: Resets the settings ([DISTANCE] and [GAIN]) of vehicle. ; [OFF]: Not compensating.

Instruction Manual
Page 40
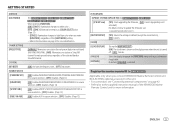
...listening to another USB device. "PROTECTING SEND SERVICE" Send the unit to be sure the terminals of symbols. • Depending on (or reset the unit) before replacing with this does not solve the problem, turn on the power and reattach the USB device. Connect the antenna ...selected (page 5), some time to the radio. Clean the connectors. (Page 32) The unit does not work . • Disconnect and reset the iPod/iPhone using hard reset. "UNRESPONSIVE DEVICE" appears. Then, turn on. • Information shown on the recording process earlier (USB). This unit is not as...
...listening to another USB device. "PROTECTING SEND SERVICE" Send the unit to be sure the terminals of symbols. • Depending on (or reset the unit) before replacing with this does not solve the problem, turn on the power and reattach the USB device. Connect the antenna ...selected (page 5), some time to the radio. Clean the connectors. (Page 32) The unit does not work . • Disconnect and reset the iPod/iPhone using hard reset. "UNRESPONSIVE DEVICE" appears. Then, turn on. • Information shown on the recording process earlier (USB). This unit is not as...
Instruction Manual
Page 41
... sure the device is unstable. SiriusXM® Radio "CH LOCKED LOCK CODE?" Connect a device (USB) that contains playable audio files. • Reconnect the iPod. • Reset the iPod. • Reconnect the Android device. • Launch any media player application on your device. Check the Pandora application on the Android device. •...
... sure the device is unstable. SiriusXM® Radio "CH LOCKED LOCK CODE?" Connect a device (USB) that contains playable audio files. • Reconnect the iPod. • Reset the iPod. • Reconnect the Android device. • Launch any media player application on your device. Check the Pandora application on the Android device. •...

Instruction Manual
Page 42
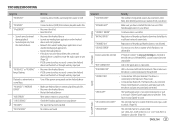
... ENGLISH Symptom Remedy Voice calling method is not successful. • Use voice calling method in good condition. "HF ERROR XX"/ "BT ERROR" Reset the unit and try to a place where you can get the contact information. If this does not solve the problem, consult your audio player.)... connect the Bluetooth player again. SiriusXM® Radio "CHECK TUNER" Make sure the SiriusXM Vehicle Tuner is mounted outside the vehicle. detected. • Reset the unit. (Page 3) Pairing cannot be made. • Make sure you speak the name. • Make sure the same voice as the ...
... ENGLISH Symptom Remedy Voice calling method is not successful. • Use voice calling method in good condition. "HF ERROR XX"/ "BT ERROR" Reset the unit and try to a place where you can get the contact information. If this does not solve the problem, consult your audio player.)... connect the Bluetooth player again. SiriusXM® Radio "CHECK TUNER" Make sure the SiriusXM Vehicle Tuner is mounted outside the vehicle. detected. • Reset the unit. (Page 3) Pairing cannot be made. • Make sure you speak the name. • Make sure the same voice as the ...
Instruction Manual
Page 43
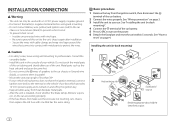
...;1) * Supplied for / / / . Basic procedure 1 Remove the key from heat dissipate metal parts. • After the unit is turned on the power. 6 Detach the faceplate and reset the unit within 5 seconds. (Page 3) ENGLISH 39 Metal parts such as the heat sink and enclosure become hot. • Do not connect the wires of...
...;1) * Supplied for / / / . Basic procedure 1 Remove the key from heat dissipate metal parts. • After the unit is turned on the power. 6 Detach the faceplate and reset the unit within 5 seconds. (Page 3) ENGLISH 39 Metal parts such as the heat sink and enclosure become hot. • Do not connect the wires of...
Quick Start Guide
Page 6
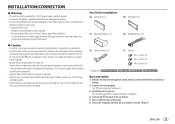
... key. • Keep all cables away from the ignition switch, then disconnect the terminal of your car Bend the appropriate tabs to reset" on the power. 6 Detach the faceplate and reset the unit within 5 seconds. INSTALLATION/CONNECTION Warning • The unit can only be used with one that comes into contact with...
... key. • Keep all cables away from the ignition switch, then disconnect the terminal of your car Bend the appropriate tabs to reset" on the power. 6 Detach the faceplate and reset the unit within 5 seconds. INSTALLATION/CONNECTION Warning • The unit can only be used with one that comes into contact with...

Quick Start Guide
Page 8
... operate any function that you read through this Guide before playing digital sources to avoid damaging the speakers by the sudden increase of How to reset Reset the unit within 5 seconds after detaching the faceplate. Caution Volume setting: • Adjust the volume so that you turn off the unit or change the...
... operate any function that you read through this Guide before playing digital sources to avoid damaging the speakers by the sudden increase of How to reset Reset the unit within 5 seconds after detaching the faceplate. Caution Volume setting: • Adjust the volume so that you turn off the unit or change the...

Quick Start Guide
Page 9
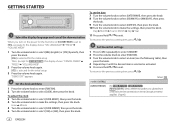
... to exit. To return to the previous setting item, press . [SYSTEM] [KEY BEEP] [FACTORY RESET] [CLOCK] [CLOCK DISPLAY] [ENGLISH] [ESPANOL] Default: [XX] [ON]: Activates the keypress tone. ; [OFF]: Deactivates. [YES]: Resets the settings to exit. Day Month Year or Month Day Year 11 Press and hold to select [ENG...(except the stored station). ; [NO]: Cancels. (Except for ) [ON]: The clock time is shown on the power for the first time (or [FACTORY RESET] is set the date 7 Turn the volume knob to select [DATE FORMAT], then press the knob. 8 Turn the volume knob to select [DD/MM/YY...
... to exit. To return to the previous setting item, press . [SYSTEM] [KEY BEEP] [FACTORY RESET] [CLOCK] [CLOCK DISPLAY] [ENGLISH] [ESPANOL] Default: [XX] [ON]: Activates the keypress tone. ; [OFF]: Deactivates. [YES]: Resets the settings to exit. Day Month Year or Month Day Year 11 Press and hold to select [ENG...(except the stored station). ; [NO]: Cancels. (Except for ) [ON]: The clock time is shown on the power for the first time (or [FACTORY RESET] is set the date 7 Turn the volume knob to select [DATE FORMAT], then press the knob. 8 Turn the volume knob to select [DD/MM/YY...

Instruction Manual 1
Page 7
.... / / : Remote control functions are not available. How to replace the battery To Turn on the power. ) Press VOL or VOL . • Press and hold to reset Reset the unit within 5 seconds after 20 minutes when in standby mode (Auto Power Off). : You can also turn off the display information by pressing DISP...
.... / / : Remote control functions are not available. How to replace the battery To Turn on the power. ) Press VOL or VOL . • Press and hold to reset Reset the unit within 5 seconds after 20 minutes when in standby mode (Auto Power Off). : You can also turn off the display information by pressing DISP...

Instruction Manual 1
Page 8
... Then, (except for ) the display shows: "CANCEL DEMO" "PRESS" "VOLUME KNOB". 2 Press the volume knob again. [YES] is selected for the first time (or [FACTORY RESET] is selected for the initial setup. To return to the previous setting item, press . [AUDIO CONTROL] [SWITCH PREOUT] Default: [XX] (For / ) [REAR]/[SUB-W]: Selects whether...
... Then, (except for ) the display shows: "CANCEL DEMO" "PRESS" "VOLUME KNOB". 2 Press the volume knob again. [YES] is selected for the first time (or [FACTORY RESET] is selected for the initial setup. To return to the previous setting item, press . [AUDIO CONTROL] [SWITCH PREOUT] Default: [XX] (For / ) [REAR]/[SUB-W]: Selects whether...

Instruction Manual 1
Page 9
For details on how to update the firmware, visit . [FACTORY RESET] [YES]: Resets the settings to default (except the stored station). ; [NO]: Cancels. [CLOCK] [CLOCK DISPLAY] (Except for ) [ON]: The clock time is shown on the display even ... changes to white color. ; [OFF]: [ZONE 1] illumination remains as [COLOR SELECT] color. (Page 31) • [ZONE 2] illumination changes to light blue color when you connect KENWOOD Marine Remote Control unit (KCA-RC55MR, optional accessory) to this unit. • For connection, see "Connecting external components" on page 42. • Refer also to...
For details on how to update the firmware, visit . [FACTORY RESET] [YES]: Resets the settings to default (except the stored station). ; [NO]: Cancels. [CLOCK] [CLOCK DISPLAY] (Except for ) [ON]: The clock time is shown on the display even ... changes to white color. ; [OFF]: [ZONE 1] illumination remains as [COLOR SELECT] color. (Page 31) • [ZONE 2] illumination changes to light blue color when you connect KENWOOD Marine Remote Control unit (KCA-RC55MR, optional accessory) to this unit. • For connection, see "Connecting external components" on page 42. • Refer also to...

Instruction Manual 1
Page 11
... select [ON], then press the knob. 5 Press and hold to another source or while in the list. • To clear the message list, set [FACTORY RESET] to [YES]. (Page 5) Other settings 1 Press the volume knob to enter [FUNCTION]. 2 Turn the volume knob to select an item (page 8), then press the knob...
... select [ON], then press the knob. 5 Press and hold to another source or while in the list. • To clear the message list, set [FACTORY RESET] to [YES]. (Page 5) Other settings 1 Press the volume knob to enter [FUNCTION]. 2 Turn the volume knob to select an item (page 8), then press the knob...

Instruction Manual 1
Page 22
...for a preset channel of the selected band. Shows the strength ([NO SIGNAL]/[WEAK]/[GOOD]/[STRONG]) of the current received signal. [BUFFER USAGE] [SXM RESET] Shows the memory usage ([0%] to [100%]) for / / / ) SiriusXM settings 1 Press the volume knob to enter [FUNCTION]. 2 Turn the ... pass code. (Initial pass code is SXV200 or later that supports SmartFavorites. 18 ENGLISH SiriusXM® Radio (for Replay buffer. [YES]: Resets all the locked channels. ; [NO]: Cancels. [ON]: All qualified music channels in the SmartFavorites will start playback from the beginning of the...
...for a preset channel of the selected band. Shows the strength ([NO SIGNAL]/[WEAK]/[GOOD]/[STRONG]) of the current received signal. [BUFFER USAGE] [SXM RESET] Shows the memory usage ([0%] to [100%]) for / / / ) SiriusXM settings 1 Press the volume knob to enter [FUNCTION]. 2 Turn the ... pass code. (Initial pass code is SXV200 or later that supports SmartFavorites. 18 ENGLISH SiriusXM® Radio (for Replay buffer. [YES]: Resets all the locked channels. ; [NO]: Cancels. [ON]: All qualified music channels in the SmartFavorites will start playback from the beginning of the...

Instruction Manual 1
Page 23
...Hands-Free Profile (HFP) - "PAIRING" "PASS XXXXXX" "Device name" "PRESS" "VOLUME KNOB" appears on the display. • For some Bluetooth devices, you reset the unit. Once pairing is completed, Bluetooth connection is established automatically. • / / / / : "BT1" and/or "BT2" indicator on the faceplate lights up... Simple Pairing (SSP). • Up to turn on the unit. 2 Search and select the name of your receiver ("KMM-BT5 "/"KMM-X5 "/"KMM-BT3 "/ "KMM-BT2 "/"KMR-M3 ") on the operating system and the firmware version of two Bluetooth phones and one Bluetooth audio device can...
...Hands-Free Profile (HFP) - "PAIRING" "PASS XXXXXX" "Device name" "PRESS" "VOLUME KNOB" appears on the display. • For some Bluetooth devices, you reset the unit. Once pairing is completed, Bluetooth connection is established automatically. • / / / / : "BT1" and/or "BT2" indicator on the faceplate lights up... Simple Pairing (SSP). • Up to turn on the unit. 2 Search and select the name of your receiver ("KMM-BT5 "/"KMM-X5 "/"KMM-BT3 "/ "KMM-BT2 "/"KMR-M3 ") on the operating system and the firmware version of two Bluetooth phones and one Bluetooth audio device can...


