Instruction Manual
Page 6
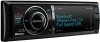
...iPod (press the button). When your voice cannot be recognized due to the low microphone volume or noises in page 8 or later. 6 Microphone (KDC-X994/ KDC-BT945U) The microphone for details. To select menu list item (turn the knob). To turn on this unit (press the button at least 2 seconds... window 13 [FAV] button To recall a registered favorite item (press the button). Component names and functions 1 2 3 4 5 6 AUX 7 8 9 10 11 12 13 14 1 Release button To drop the faceplate down to open and CD can be connected. 6 | KDC-X994/ KDC-BT945U/ KDC-X794/ KDC-MP745U
...iPod (press the button). When your voice cannot be recognized due to the low microphone volume or noises in page 8 or later. 6 Microphone (KDC-X994/ KDC-BT945U) The microphone for details. To select menu list item (turn the knob). To turn on this unit (press the button at least 2 seconds... window 13 [FAV] button To recall a registered favorite item (press the button). Component names and functions 1 2 3 4 5 6 AUX 7 8 9 10 11 12 13 14 1 Release button To drop the faceplate down to open and CD can be connected. 6 | KDC-X994/ KDC-BT945U/ KDC-X794/ KDC-MP745U
Instruction Manual
Page 17
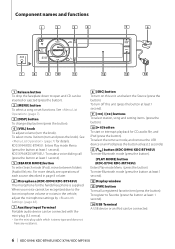
... again to pause or resume playback. Disc ejection Press the [0] button. Music CD/ Audio file Operation Release MENU VOL DISP SEARCH MODE SRC 4 38 ¢ /PLAY MODE Basic Operation Drop open the faceplate Press the Release button. ⁄ • Push the faceplate on the left side, and return it to continuously scroll...
... again to pause or resume playback. Disc ejection Press the [0] button. Music CD/ Audio file Operation Release MENU VOL DISP SEARCH MODE SRC 4 38 ¢ /PLAY MODE Basic Operation Drop open the faceplate Press the Release button. ⁄ • Push the faceplate on the left side, and return it to continuously scroll...

Instruction Manual
Page 34
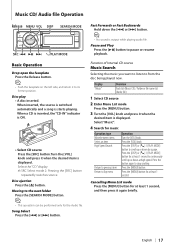
...at least 1 second, and then press it when the desired item is displayed. "English"/ "Français"/ "Español" 34 | KDC-X994/ KDC-BT945U/ KDC-X794/ KDC-MP745U Turn the [VOL] knob to set the hours. 2. Select "Date Mode Select". 8 Select Date format Turn the [VOL] knob and ...press it when the desired item is displayed. Clock and Other Functions Release MENU VOL SRC 4 ¢ Clock and Date Adjustment You can adjust the clock and date. Synchronizing the RDS station time data and this unit's clock. (KDC-X994/ KDC-X794 only) "OFF"/ "ON" Sets the date. When selected...
...at least 1 second, and then press it when the desired item is displayed. "English"/ "Français"/ "Español" 34 | KDC-X994/ KDC-BT945U/ KDC-X794/ KDC-MP745U Turn the [VOL] knob to set the hours. 2. Select "Date Mode Select". 8 Select Date format Turn the [VOL] knob and ...press it when the desired item is displayed. Clock and Other Functions Release MENU VOL SRC 4 ¢ Clock and Date Adjustment You can adjust the clock and date. Synchronizing the RDS station time data and this unit's clock. (KDC-X994/ KDC-X794 only) "OFF"/ "ON" Sets the date. When selected...
Instruction Manual
Page 36
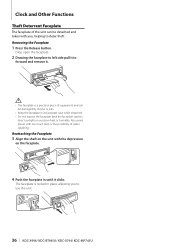
... clicks. The faceplate is a precision piece of the unit can be detached and taken with you to use the unit. 36 | KDC-X994/ KDC-BT945U/ KDC-X794/ KDC-MP745U Removing the Faceplate 1 Press the Release button. Clock and Other Functions Theft Deterrent Faceplate The faceplate of equipment and can be damaged by shocks or jolts. •...
... clicks. The faceplate is a precision piece of the unit can be detached and taken with you to use the unit. 36 | KDC-X994/ KDC-BT945U/ KDC-X794/ KDC-MP745U Removing the Faceplate 1 Press the Release button. Clock and Other Functions Theft Deterrent Faceplate The faceplate of equipment and can be damaged by shocks or jolts. •...
Instruction Manual
Page 57
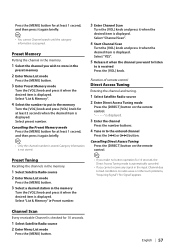
.... Select "List & Memory" > Preset number. 3 Enter Channel Scan Turn the [VOL] knob and press it when the desired item is displayed. English | 57 Select "YES". 5 Release it again briefly. ⁄ • You cannot Channel search until the category information is acquired. Channel Scan Every receivable Channel is not stored. Select "List...
.... Select "List & Memory" > Preset number. 3 Enter Channel Scan Turn the [VOL] knob and press it when the desired item is displayed. English | 57 Select "YES". 5 Release it again briefly. ⁄ • You cannot Channel search until the category information is acquired. Channel Scan Every receivable Channel is not stored. Select "List...
Instruction Manual
Page 63
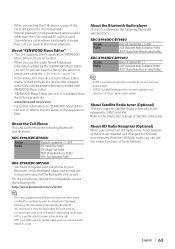
...is not guaranteed when a cable other than 5 m can use the audio file with KENWOOD Music Editor. • "KENWOOD Music Editor Lite ver1.0" is available from the following Bluetooth specifications: KDC-X994/KDC-BT945U Version Bluetooth Standard Ver. 2.1+EDR Profile A2DP (Advanced Audio Distribution Profile) AVRCP (... used to the following the procedure prescribed by an audio player. Make sure to the instruction manual of the unit are released by the "KENWOOD Music Editor Lite ver1.0", you can result in abnormal playback. English | 63 With the HD Radio tuner, you can ...
...is not guaranteed when a cable other than 5 m can use the audio file with KENWOOD Music Editor. • "KENWOOD Music Editor Lite ver1.0" is available from the following Bluetooth specifications: KDC-X994/KDC-BT945U Version Bluetooth Standard Ver. 2.1+EDR Profile A2DP (Advanced Audio Distribution Profile) AVRCP (... used to the following the procedure prescribed by an audio player. Make sure to the instruction manual of the unit are released by the "KENWOOD Music Editor Lite ver1.0", you can result in abnormal playback. English | 63 With the HD Radio tuner, you can ...
Instruction Manual
Page 72
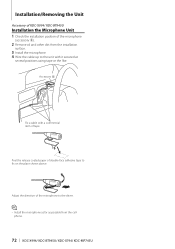
... Peel the release coated paper of double-face adhesive tape to the unit with a commercial item of tape. Accessory 5 Fix a cable with it secured at several positions using tape or the like. Installation/Removing the Unit Accessory of KDC-X994/ KDC-BT945U Installation ...the Microphone Unit 1 Check the installation position of the microphone (accessory 5). 2 Remove oil and other dirt from the cellphone. 72 | KDC-X994/ KDC-BT945U/ KDC-X794/ KDC-MP745U
... Peel the release coated paper of double-face adhesive tape to the unit with a commercial item of tape. Accessory 5 Fix a cable with it secured at several positions using tape or the like. Installation/Removing the Unit Accessory of KDC-X994/ KDC-BT945U Installation ...the Microphone Unit 1 Check the installation position of the microphone (accessory 5). 2 Remove oil and other dirt from the cellphone. 72 | KDC-X994/ KDC-BT945U/ KDC-X794/ KDC-MP745U

Quick Start Guide
Page 6
... is switched automatically and a song starts playing. Playing Music (CD/USB/iPod) [Release] [MENU] [DISP] [VOL] [SEARCH MODE] KDC-X994 KDC-BT945U [SRC] [4] [38] [ ] [¢] USB Terminal KDC-X794 KDC-MP745U [PLAY MODE] Playing Disc Fast Forward or Fast Backward of Press the [Release] button and drop open the faceplate. Pause and play Press the [38] button...
... is switched automatically and a song starts playing. Playing Music (CD/USB/iPod) [Release] [MENU] [DISP] [VOL] [SEARCH MODE] KDC-X994 KDC-BT945U [SRC] [4] [38] [ ] [¢] USB Terminal KDC-X794 KDC-MP745U [PLAY MODE] Playing Disc Fast Forward or Fast Backward of Press the [Release] button and drop open the faceplate. Pause and play Press the [38] button...

Quick Start Guide
Page 7
Removing Disc Press the [Release] button and drop open the faceplate. Removing USB device Press the [38] button for at least 1 second, and then press it again briefly. To cancel ...
Removing Disc Press the [Release] button and drop open the faceplate. Removing USB device Press the [38] button for at least 1 second, and then press it again briefly. To cancel ...
Quick Start Guide
Page 15
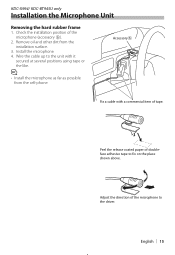
... microphone as far as possible from the installation surface. 3. Check the installation position of doubleface adhesive tape to the driver. Peel the release coated paper of the microphone (accessory 5). 2. English | 15 Remove oil and other dirt from the cell-phone. KDC-X994/ KDC-BT945U only Installation the Microphone Unit Removing the hard rubber frame 1.
... microphone as far as possible from the installation surface. 3. Check the installation position of doubleface adhesive tape to the driver. Peel the release coated paper of the microphone (accessory 5). 2. English | 15 Remove oil and other dirt from the cell-phone. KDC-X994/ KDC-BT945U only Installation the Microphone Unit Removing the hard rubber frame 1.

