Instruction Manual
Page 26
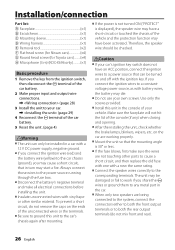
.../connection Part list: A Faceplate 1) B Escutcheon 1) C Mounting sleeve 1) D Wiring harness 1) E Removal tool 2) F Flat head screw (for Nissan cars 4) G Round head screw (for Toyota cars 4) H Microphone (3 m) (KDC-X696 only)B 1) Basic procedure 1 Remove the key from the ignition switch, then disconnect... the · terminal of the car battery. 2 Make proper input and output wire connections. \ (page 28) 3 Install the unit to your car....
.../connection Part list: A Faceplate 1) B Escutcheon 1) C Mounting sleeve 1) D Wiring harness 1) E Removal tool 2) F Flat head screw (for Nissan cars 4) G Round head screw (for Toyota cars 4) H Microphone (3 m) (KDC-X696 only)B 1) Basic procedure 1 Remove the key from the ignition switch, then disconnect... the · terminal of the car battery. 2 Make proper input and output wire connections. \ (page 28) 3 Install the unit to your car....
Instruction Manual
Page 27
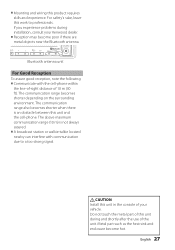
... nearby can interfere with the cell-phone within the line-of-sight distance of your Kenwood dealer. ■■Reception may become hot. For safety's sake, leave this product requires skills and experience. ■■Mounting and wiring this work to a too strong signal. ¤ CAUTION Install this unit and the cell...
... nearby can interfere with the cell-phone within the line-of-sight distance of your Kenwood dealer. ■■Reception may become hot. For safety's sake, leave this product requires skills and experience. ■■Mounting and wiring this work to a too strong signal. ¤ CAUTION Install this unit and the cell...
Instruction Manual
Page 28
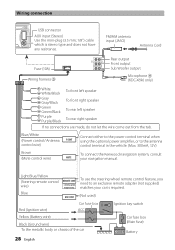
...chassis of the car Car fuse box (Main fuse) - FM/AM antenna input (JASO) Antenna Cord Fuse (10A) Wiring harness D Rear output R L Front output Sub Woofer output Microphone H (KDC-X696 only) White White/Black Gray Gray/Black Green Green/Black Purple Purple/Black To front left speaker To front right speaker...If no connections are made, do not let the wire come out from the tab. CONT To use the steering wheel remote control feature, you need to the antenna control terminal in the vehicle. (Max. 300mA, 12V) To connect the Kenwood navigation system, consult your car is stereo type and...
...chassis of the car Car fuse box (Main fuse) - FM/AM antenna input (JASO) Antenna Cord Fuse (10A) Wiring harness D Rear output R L Front output Sub Woofer output Microphone H (KDC-X696 only) White White/Black Gray Gray/Black Green Green/Black Purple Purple/Black To front left speaker To front right speaker...If no connections are made, do not let the wire come out from the tab. CONT To use the steering wheel remote control feature, you need to the antenna control terminal in the vehicle. (Max. 300mA, 12V) To connect the Kenwood navigation system, consult your car is stereo type and...

Instruction Manual
Page 29
... unit 1 3 2 1 B A 2 Before attaching, make sure the direction of the escutcheon is correct. (Wider hooks on the bottom side.) Connect the wiring harness to hold the mounting sleeve firmly in the unit (on both sides of C your car 4 5 B Bend the appropriate tabs to the C unit. Other... wiring connection has been completed earlier. (page 28) D 2 1 3 Dashboard of the escutcheon B, then pull it out. 3 Insert the removal tools E deeply ...
... unit 1 3 2 1 B A 2 Before attaching, make sure the direction of the escutcheon is correct. (Wider hooks on the bottom side.) Connect the wiring harness to hold the mounting sleeve firmly in the unit (on both sides of C your car 4 5 B Bend the appropriate tabs to the C unit. Other... wiring connection has been completed earlier. (page 28) D 2 1 3 Dashboard of the escutcheon B, then pull it out. 3 Insert the removal tools E deeply ...
Instruction Manual
Page 30
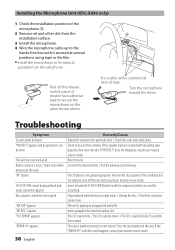
...tape to be skipped. Press the reset button on rough roads. / Change the disc. / Check the cords and connections. Installing the Microphone Unit (KDC-X696 only) 1 Check the installation position of the microphone H. 2 Remove oil and other dirt from the cell-phone. "IN" flashes. The CD ...tape or the like. ■■Install the microphone as far away as possible from the H installation surface. 3 Install the microphone. 4 Wire the microphone cable up to the optimum level. / Check the cords and connections. Remedy/Cause Adjust the volume to the hands-free box ...
...tape to be skipped. Press the reset button on rough roads. / Change the disc. / Check the cords and connections. Installing the Microphone Unit (KDC-X696 only) 1 Check the installation position of the microphone H. 2 Remove oil and other dirt from the cell-phone. "IN" flashes. The CD ...tape or the like. ■■Install the microphone as far away as possible from the H installation surface. 3 Install the microphone. 4 Wire the microphone cable up to the optimum level. / Check the cords and connections. Remedy/Cause Adjust the volume to the hands-free box ...


