Instruction Manual
Page 2
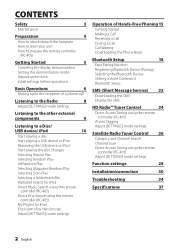
... [SETTINGS] mode settings Listening to the other external components 9 Listening to a Disc/ USB device/ iPod 10 Start playing a disc Start playing a USB device or iPod Removing the USB device or iPod Start playing the disc changer Selecting Repeat Play Selecting Random Play All Random Play Selecting Magazine Random Play Selecting Scan...
... [SETTINGS] mode settings Listening to the other external components 9 Listening to a Disc/ USB device/ iPod 10 Start playing a disc Start playing a USB device or iPod Removing the USB device or iPod Start playing the disc changer Selecting Repeat Play Selecting Random Play All Random Play Selecting Magazine Random Play Selecting Scan...
Instruction Manual
Page 3
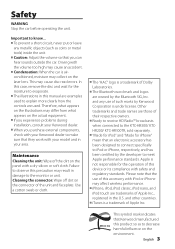
...remove the disc and wait for the moisture to evaporate. ■ The illustrations in your Kenwood dealer. ■ When you can hear sounds outside the car. and any metallic objects (such as to meet Apple performance standards. and other countries. ■ iTunes is a trademark of this accessory with your Kenwood...operation of Apple Inc. Maintenance Cleaning the unit: Wipe off dirt on the laser lens. This symbol mark indicates that Kenwood manufactured this precaution may affect wireless performance. ■ iPhone, iPod, iPod classic, iPod nano, and iPod touch ...
...remove the disc and wait for the moisture to evaporate. ■ The illustrations in your Kenwood dealer. ■ When you can hear sounds outside the car. and any metallic objects (such as to meet Apple performance standards. and other countries. ■ iTunes is a trademark of this accessory with your Kenwood...operation of Apple Inc. Maintenance Cleaning the unit: Wipe off dirt on the laser lens. This symbol mark indicates that Kenwood manufactured this precaution may affect wireless performance. ■ iPhone, iPod, iPod classic, iPod nano, and iPod touch ...

Instruction Manual
Page 10
.... ■ Press to select next folder of CD changer. USB device (commercially available) CA-U1EX (optional accessory) Apple iPod (commercially available) KCA-iP102 (optional accessory) Removing the USB device or iPod 1 Press SRC to the USB terminal. Start playing a USB device or iPod 1 Press SRC to turn on the power. 2 Slide... open the cover. 3 Connect a USB device or iPod to select a source other than "USB" or "iPod". 2 Remove the USB device or iPod. Playback starts automatically. USB terminal Press to pause.
.... ■ Press to select next folder of CD changer. USB device (commercially available) CA-U1EX (optional accessory) Apple iPod (commercially available) KCA-iP102 (optional accessory) Removing the USB device or iPod 1 Press SRC to the USB terminal. Start playing a USB device or iPod 1 Press SRC to turn on the power. 2 Slide... open the cover. 3 Connect a USB device or iPod to select a source other than "USB" or "iPod". 2 Remove the USB device or iPod. Playback starts automatically. USB terminal Press to pause.
Instruction Manual
Page 13
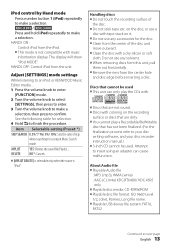
... show "iPod MODE". Adjust [SETTINGS] mode settings While listening to an iPod or KENWOOD Music Editor media ... 1 Press the volume knob to enter [FUNCTION] mode. 2...English 13 About Audio file ■ Playable Audio file : MP3 (.mp3), WMA (.wma) : AAC-LC (.m4a) KDC-BT648U/ KDC-X695 only ■ Playable disc media: CD-R/RW/ROM ■ Playable disc file format: ISO 9660 Level 1/2, Joliet, ... silicon or soft cloth. Do not use any solvents. ■ When removing discs from this unit, pull them out horizontally. ■ Remove the rims from the center of the disc and move outward. ■...
... show "iPod MODE". Adjust [SETTINGS] mode settings While listening to an iPod or KENWOOD Music Editor media ... 1 Press the volume knob to enter [FUNCTION] mode. 2...English 13 About Audio file ■ Playable Audio file : MP3 (.mp3), WMA (.wma) : AAC-LC (.m4a) KDC-BT648U/ KDC-X695 only ■ Playable disc media: CD-R/RW/ROM ■ Playable disc file format: ISO 9660 Level 1/2, Joliet, ... silicon or soft cloth. Do not use any solvents. ■ When removing discs from this unit, pull them out horizontally. ■ Remove the rims from the center of the disc and move outward. ■...
Instruction Manual
Page 30
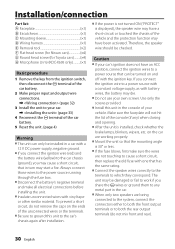
.../connection Part list: A Faceplate 1) B Escutcheon 1) C Mounting sleeve 1) D Wiring harness 1) E Removal tool 2) F Flat head screw (for Nissan cars 4) G Round head screw (for Toyota cars 4) H Microphone (3 m) (KDC-X695 only 1) Basic procedure 1 Remove the key from the ignition switch, then disconnect the · terminal of the car battery. 2 Make... to work if you may cause a short circuit, that can only be checked. To prevent a short circuit, do not remove the caps on the car are being connected to the system, connect the connectors either to both the front output terminals or...
.../connection Part list: A Faceplate 1) B Escutcheon 1) C Mounting sleeve 1) D Wiring harness 1) E Removal tool 2) F Flat head screw (for Nissan cars 4) G Round head screw (for Toyota cars 4) H Microphone (3 m) (KDC-X695 only 1) Basic procedure 1 Remove the key from the ignition switch, then disconnect the · terminal of the car battery. 2 Make... to work if you may cause a short circuit, that can only be checked. To prevent a short circuit, do not remove the caps on the car are being connected to the system, connect the connectors either to both the front output terminals or...
Instruction Manual
Page 33
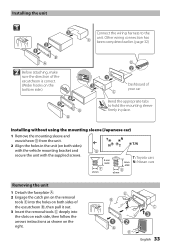
... and escutcheon B from the unit. 2 Align the holes in place. G ø5mm T: Toyota cars N: Nissan cars Removing the unit 1 Detach the faceplate A. 2 Engage the catch pin on the removal tools E into the slots on each side, then follow the arrows instructions as shown on both sides) with the vehicle mounting...sure the direction of the escutcheon is correct. (Wider hooks on the 3 bottom side.) 4 5 B D 2 1 C Dashboard of the escutcheon B, then pull it out. 3 Insert the removal tools E deeply into the holes on both sides of your car Bend the appropriate tabs to the C unit.
... and escutcheon B from the unit. 2 Align the holes in place. G ø5mm T: Toyota cars N: Nissan cars Removing the unit 1 Detach the faceplate A. 2 Engage the catch pin on the removal tools E into the slots on each side, then follow the arrows instructions as shown on both sides) with the vehicle mounting...sure the direction of the escutcheon is correct. (Wider hooks on the 3 bottom side.) 4 5 B D 2 1 C Dashboard of the escutcheon B, then pull it out. 3 Insert the removal tools E deeply into the holes on both sides of your car Bend the appropriate tabs to the C unit.
Instruction Manual
Page 34
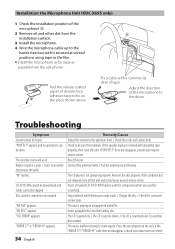
Installation the Microphone Unit (KDC-X695 only) 1 Check the installation position of tape. "IN" flashes. "NA FILE" appears. Reset the unit. Reinsert the disc properly. Insert a finalized CD-R/CD-RW (finalize ... dirty. / The CD is upside-down. / The CD is malfunctioning for recording). The unit is scratched a lot. Fix a cable with a commercial item of the microphone H. 2 Remove oil and other dirt from the H installation surface. 3 Install the microphone. 4 Wire the microphone cable up to the radio. The unit does not work at...
Installation the Microphone Unit (KDC-X695 only) 1 Check the installation position of tape. "IN" flashes. "NA FILE" appears. Reset the unit. Reinsert the disc properly. Insert a finalized CD-R/CD-RW (finalize ... dirty. / The CD is upside-down. / The CD is malfunctioning for recording). The unit is scratched a lot. Fix a cable with a commercial item of the microphone H. 2 Remove oil and other dirt from the H installation surface. 3 Install the microphone. 4 Wire the microphone cable up to the radio. The unit does not work at...
Instruction Manual
Page 35
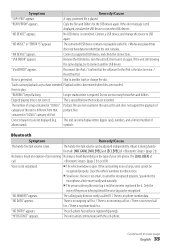
... still displayed, initialize the USB device or use too many hierarchies and folders. Close the vehicle windows to next page English 35 "READ ERROR" appears. Remove the USB device, turn the unit off, then turn it . them to another USB device. Correct characters are recorded. The unit cannot communicate with the...
... still displayed, initialize the USB device or use too many hierarchies and folders. Close the vehicle windows to next page English 35 "READ ERROR" appears. Remove the USB device, turn the unit off, then turn it . them to another USB device. Correct characters are recorded. The unit cannot communicate with the...


