Instruction Manual
Page 2
Contents Safety precautions 3 Notes 4 General features 7 Power Selecting the Source Volume Attenuator Audio Control Adjusting the detail of Audio Control Audio Setup Speaker Setting Switching Display Subwoofer Output Theft Deterrent Faceplate TEL Mute Tuner features 12 Tuning Tuning Mode Direct Access Tuning Station Preset Memory Auto Memory Entry Preset ...
Contents Safety precautions 3 Notes 4 General features 7 Power Selecting the Source Volume Attenuator Audio Control Adjusting the detail of Audio Control Audio Setup Speaker Setting Switching Display Subwoofer Output Theft Deterrent Faceplate TEL Mute Tuner features 12 Tuning Tuning Mode Direct Access Tuning Station Preset Memory Auto Memory Entry Preset ...
Instruction Manual
Page 3
...models of disc changers/ CD players. Doing so will cause damage or breakdown. • Use only the screws provided or specified for the applicable Kenwood disc changers/ CD players. Note that can be displayed may differ depending on the models being connected. ¤ • You can be ... installation. iPod is removed. For safety's sake, leave the mounting and wiring work to professionals. 2CAUTION To prevent damage to this unit. Set the "O-N" Switch to evaporate. Therefore, the panel must be connected to this unit may not allow CDs to the catalog or consult your...
...models of disc changers/ CD players. Doing so will cause damage or breakdown. • Use only the screws provided or specified for the applicable Kenwood disc changers/ CD players. Note that can be displayed may differ depending on the models being connected. ¤ • You can be ... installation. iPod is removed. For safety's sake, leave the mounting and wiring work to professionals. 2CAUTION To prevent damage to this unit. Set the "O-N" Switch to evaporate. Therefore, the panel must be connected to this unit may not allow CDs to the catalog or consult your...
Instruction Manual
Page 4
...If you experience problems during installation, consult your Kenwood dealer. • When you purchase optional accessories, check with your Kenwood dealer to make sure that they work with a clean soft dry cloth. About KENWOOD "Music Editor" of PC application attached to KDC-X591/MP535U • "Music Editor" is recorded ...surface or erases characters. Reset button 4 | English Pressing the Reset button with a hard cloth or using this unit is initially set on the display may differ from what appears on the display on the actual equipment, and some of this unit for the ...
...If you experience problems during installation, consult your Kenwood dealer. • When you purchase optional accessories, check with your Kenwood dealer to make sure that they work with a clean soft dry cloth. About KENWOOD "Music Editor" of PC application attached to KDC-X591/MP535U • "Music Editor" is recorded ...surface or erases characters. Reset button 4 | English Pressing the Reset button with a hard cloth or using this unit is initially set on the display may differ from what appears on the display on the actual equipment, and some of this unit for the ...
Instruction Manual
Page 8
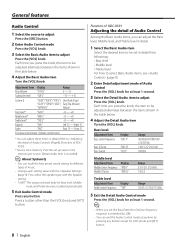
... 15 * You can adjust the Bass level, Middle level, and Treble level in detail. 1 Select the Basic Audio item Select the desired item to be set in detail from followings; • Bass level • Middle level • Treble level For how to select Basic Audio items, see (page 8). 2 Enter... Detail adjustment mode of Audio Control Among the Basic Audio items, you set up value in the table below . 4 Adjust the Basic Audio item Turn the [VOL] knob. Function of KDC-X591 Adjusting the detail of Audio Control Press the [VOL] knob for [VOL] knob and [ATT] button...
... 15 * You can adjust the Bass level, Middle level, and Treble level in detail. 1 Select the Basic Audio item Select the desired item to be set in detail from followings; • Bass level • Middle level • Treble level For how to select Basic Audio items, see (page 8). 2 Enter... Detail adjustment mode of Audio Control Among the Basic Audio items, you set up value in the table below . 4 Adjust the Basic Audio item Turn the [VOL] knob. Function of KDC-X591 Adjusting the detail of Audio Control Press the [VOL] knob for [VOL] knob and [ATT] button...
Instruction Manual
Page 9
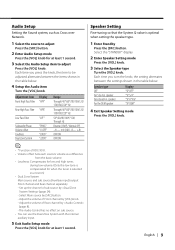
... Main source by (page 24). - speaker For the OEM speaker Display "SP OFF" "SP 5/4" "SP 6*9/6" "SP OEM" 4 Exit Speaker Setting mode Press the [VOL] knob. Set up the channel of KDC-X591. • Volume offset: Sets each source's volume as a source.) • Dual Zone System Main source and sub source (Auxiliary input) output Front channel...
... Main source by (page 24). - speaker For the OEM speaker Display "SP OFF" "SP 5/4" "SP 6*9/6" "SP OEM" 4 Exit Speaker Setting mode Press the [VOL] knob. Set up the channel of KDC-X591. • Volume offset: Sets each source's volume as a source.) • Dual Zone System Main source and sub source (Auxiliary input) output Front channel...
Instruction Manual
Page 10
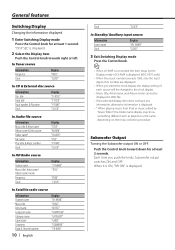
... select the clock display, the display setting of each source will be changed to the clock display. • Music title, Artist name, and Album name cannot be displayed in WAV file. • If the selected display item does not have any information, alternative information is displayed. (KDC-X591 only) • When the music...
... select the clock display, the display setting of each source will be changed to the clock display. • Music title, Artist name, and Album name cannot be displayed in WAV file. • If the selected display item does not have any information, alternative information is displayed. (KDC-X591 only) • When the music...

Instruction Manual
Page 15
...from the point where you press the knob, the audio pauses or plays. Removing the USB device 1 Drop open the faceplate Press the Release button. 2 Set the remove mode as the files contained in the USB device, you can be connected to this unit, refer to (page 5). • The word "... has been played by the same operation. Changing the browse item will display a correct title, etc. • When the iPod is connected to this unit, "KENWOOD" or "✓" is displayed on the iPod to indicate that can be charged up or down. 3 Restart playback Press the [S.MODE] button. ⁄ • ...
...from the point where you press the knob, the audio pauses or plays. Removing the USB device 1 Drop open the faceplate Press the Release button. 2 Set the remove mode as the files contained in the USB device, you can be connected to this unit, refer to (page 5). • The word "... has been played by the same operation. Changing the browse item will display a correct title, etc. • When the iPod is connected to this unit, "KENWOOD" or "✓" is displayed on the iPod to indicate that can be charged up or down. 3 Restart playback Press the [S.MODE] button. ⁄ • ...
Instruction Manual
Page 16
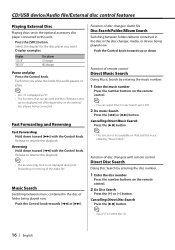
... between music contained in the disc or folder being played now. CD/USB device/Audio file/External disc control features Playing External Disc Playing discs set in the optional accessory disc player connected to resume the playback. Function of disc changers with the Control knob. Push the Control knob towards [4] or...
... between music contained in the disc or folder being played now. CD/USB device/Audio file/External disc control features Playing External Disc Playing discs set in the optional accessory disc player connected to resume the playback. Function of disc changers with the Control knob. Push the Control knob towards [4] or...
Instruction Manual
Page 19
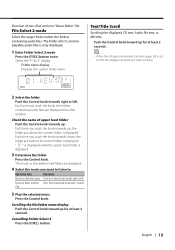
... [F.SEL] button. English | 19 Select the "F-SEL2" display. Push the Control knob toward up for at least 2 seconds. ⁄ • When the (page 23) is set to OFF, the display may black out while scrolling. 2 Select the folder Push the Control knob towards up for at least 1 second. Each time you...
... [F.SEL] button. English | 19 Select the "F-SEL2" display. Push the Control knob toward up for at least 2 seconds. ⁄ • When the (page 23) is set to OFF, the display may black out while scrolling. 2 Select the folder Push the Control knob towards up for at least 1 second. Each time you...
Instruction Manual
Page 20
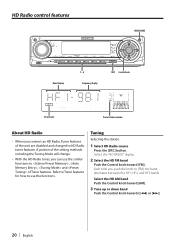
... 1 - 6 Frequency display AM SRC Control knob ST indicator Preset station number About HD Radio • When you connect an HD Radio, Tuner features of the setting methods including the Tuning Mode will change. • With the HD Radio tuner, you push the knob to [FM], the band alternates between the HF1...
... 1 - 6 Frequency display AM SRC Control knob ST indicator Preset station number About HD Radio • When you connect an HD Radio, Tuner features of the setting methods including the Tuning Mode will change. • With the HD Radio tuner, you push the knob to [FM], the band alternates between the HF1...

Instruction Manual
Page 21
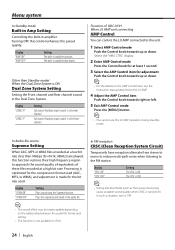
..."MENU" is after this operation explanation. 1 Enter Menu mode Press the [MENU] button. Menu system MENU SRC Control knob Menu display Menu System Setting beep sound during operation, etc. English | 21 Example: When you push the knob it alternates between "BEEP ON" or "BEEP OFF". Example: ...When you select "BEEP", each time you want to the basic operation method above are displayed, their setting content chart is explained here. You can continue by returning to step 2 and setting other items. 4 Exit Menu mode Press the [MENU] button. ⁄ • When other items those...
..."MENU" is after this operation explanation. 1 Enter Menu mode Press the [MENU] button. Menu system MENU SRC Control knob Menu display Menu System Setting beep sound during operation, etc. English | 21 Example: When you push the knob it alternates between "BEEP ON" or "BEEP OFF". Example: ...When you select "BEEP", each time you want to the basic operation method above are displayed, their setting content chart is explained here. You can continue by returning to step 2 and setting other items. 4 Exit Menu mode Press the [MENU] button. ⁄ • When other items those...
Instruction Manual
Page 22
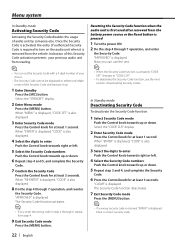
...and 5, and complete the Security Code. 7 Confirm the Security Code Press the Control knob for at least 3 seconds. When "MENU" is displayed, "CODE SET" is also displayed. 3 Select the digits to "CODE CLR". • To deactivate the Security Code function, see the next section . The Security Code... function activates. ⁄ • If you can set the Security Code with a 4 digit number of audio unit by someone else. Now, you enter the wrong code in step 4 through 7 operation...
...and 5, and complete the Security Code. 7 Confirm the Security Code Press the Control knob for at least 3 seconds. When "MENU" is displayed, "CODE SET" is also displayed. 3 Select the digits to "CODE CLR". • To deactivate the Security Code function, see the next section . The Security Code... function activates. ⁄ • If you can set the Security Code with a 4 digit number of audio unit by someone else. Now, you enter the wrong code in step 4 through 7 operation...
Instruction Manual
Page 23
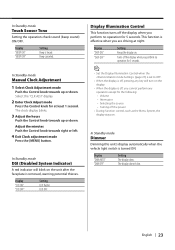
...Illumination Control This function turns off the display when you perform no operation for 5 seconds. ⁄ • Set the Display Illumination Control when the (page 27) is set to OFF. • When the display is effective when you perform no operation for at night. In Standby mode... Dimmer Dimming this unit's display automatically when the vehicle light switch is heard. English | 23 In Standby mode Touch Sensor Tone Setting the operation check sound (beep sound) ON/OFF. Select the "CLK ADJ" display. 2 Enter Clock Adjust mode Press the Control knob for...
...Illumination Control This function turns off the display when you perform no operation for 5 seconds. ⁄ • Set the Display Illumination Control when the (page 27) is set to OFF. • When the display is effective when you perform no operation for at night. In Standby mode... Dimmer Dimming this unit's display automatically when the vehicle light switch is heard. English | 23 In Standby mode Touch Sensor Tone Setting the operation check sound (beep sound) ON/OFF. Select the "CLK ADJ" display. 2 Enter Clock Adjust mode Press the Control knob for...
Instruction Manual
Page 24
... of these files encoded at least 1 second. 3 Select the AMP Control item for the compression format used . Display "SPRM ON" "SPRM OFF" Setting Plays sound using the Supreme function. Sub source (Auxiliary input source) is OFF. ⁄ • Strong electrical fields (such as from stereo to mono...listening to be imperceptible depending on the AMP Control item, see the Instruction manual attached to approach the sound quality of equivalents of KDC-X591 When LX AMP unit connecting AMP Control You can control the LX AMP connected to be front channel. Plays the original sound stored...
... of these files encoded at least 1 second. 3 Select the AMP Control item for the compression format used . Display "SPRM ON" "SPRM OFF" Setting Plays sound using the Supreme function. Sub source (Auxiliary input source) is OFF. ⁄ • Strong electrical fields (such as from stereo to mono...listening to be imperceptible depending on the AMP Control item, see the Instruction manual attached to approach the sound quality of equivalents of KDC-X591 When LX AMP unit connecting AMP Control You can control the LX AMP connected to be front channel. Plays the original sound stored...
Instruction Manual
Page 25
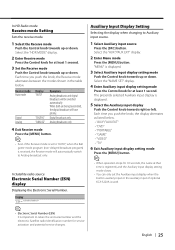
...digital broadcasts will have priority. Display "ESN ⁄ • Electronic Serial Number (ESN) It is used. Select the "NAME SET" display. 4 Enter Auxiliary input display setting mode Press the Control knob for 10 seconds, the name at least 1 second. Each time you push the knob, the Receive... serial number and the electronic Satellite radio Identification number for at least 1 second. 3 Set the Receive mode Push the Control knob towards up or down . In HD Radio mode Receive mode Setting Sets the receive mode. 1 Select the Receive mode Push the Control knob towards right or left...
...digital broadcasts will have priority. Display "ESN ⁄ • Electronic Serial Number (ESN) It is used. Select the "NAME SET" display. 4 Enter Auxiliary input display setting mode Press the Control knob for 10 seconds, the name at least 1 second. Each time you push the knob, the Receive... serial number and the electronic Satellite radio Identification number for at least 1 second. 3 Set the Receive mode Push the Control knob towards up or down . In HD Radio mode Receive mode Setting Sets the receive mode. 1 Select the Receive mode Push the Control knob towards right or left...
Instruction Manual
Page 26
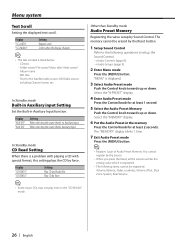
... for at least 2 seconds. Volume, Balance, Fader, Loudness, Volume offset, Dual Zone System, Rear Volume 26 | English In Standby mode Built-in Auxiliary input Setting Set the Built-in the "CD READ2" mode. The "MEMORY" display blinks 1 time. 7 Exit Audio Preset mode Press the [MENU] button. ⁄ •...for the Satellite radio source, HD Radio source, including Channel name, etc. "MENU" is listed below. - Menu system Text Scroll Setting the displayed text scroll. Display Setting "AUX OFF" When selecting the source there's no Auxiliary Input. Display "CD READ1" "CD READ2...
... for at least 2 seconds. Volume, Balance, Fader, Loudness, Volume offset, Dual Zone System, Rear Volume 26 | English In Standby mode Built-in Auxiliary input Setting Set the Built-in the "CD READ2" mode. The "MEMORY" display blinks 1 time. 7 Exit Audio Preset mode Press the [MENU] button. ⁄ •...for the Satellite radio source, HD Radio source, including Channel name, etc. "MENU" is listed below. - Menu system Text Scroll Setting the displayed text scroll. Display Setting "AUX OFF" When selecting the source there's no Auxiliary Input. Display "CD READ1" "CD READ2...

Instruction Manual
Page 27
...down . Select the "RECALL" display. 6 Recall the Audio Preset Press the Control knob for at least 2 seconds, the Demonstration mode alternates between the settings shown in (page 8) is changed to the value which was recalled by (page 26). 1 Select the source Press the [SRC] button. 2 ...Enter Menu mode Press the [MENU] button. In Standby mode Demonstration mode Setting Sets the demonstration mode. 1 Select the Demonstration mode Push the Control knob towards up or down . Other than Standby mode Audio Preset Recall Recalling the ...
...down . Select the "RECALL" display. 6 Recall the Audio Preset Press the Control knob for at least 2 seconds, the Demonstration mode alternates between the settings shown in (page 8) is changed to the value which was recalled by (page 26). 1 Select the source Press the [SRC] button. 2 ...Enter Menu mode Press the [MENU] button. In Standby mode Demonstration mode Setting Sets the demonstration mode. 1 Select the Demonstration mode Push the Control knob towards up or down . Other than Standby mode Audio Preset Recall Recalling the ...
Instruction Manual
Page 28
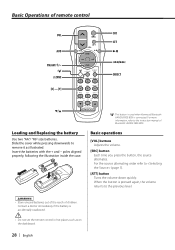
...time you press the button, the source alternates. Contact a doctor immediately if the battery is accidentally swallowed. ¤ • Do not set the remote control in hot places such as illustrated. When the button is connected. poles aligned properly, following the illustration inside the case.... : This button is used when Kenwood Bluetooth HANDS FREE BOX is pressed again, the volume returns to the instruction manual of remote control VOL AUD FM/AM/+/- 2-ZONE [0]...
...time you press the button, the source alternates. Contact a doctor immediately if the battery is accidentally swallowed. ¤ • Do not set the remote control in hot places such as illustrated. When the button is connected. poles aligned properly, following the illustration inside the case.... : This button is used when Kenwood Bluetooth HANDS FREE BOX is pressed again, the volume returns to the instruction manual of remote control VOL AUD FM/AM/+/- 2-ZONE [0]...
Instruction Manual
Page 34
..., referring to "2". ! What might seem to On. • The Dual zone function is enabled. ☞ (page 9) ! • Cannot set up the high pass filter. • Cannot set to the section on (page 6). ✔ The audio file is broken or not supported. ☞ Damaged and unsupported files are skipped. ✔... output destination of the subsource in the Dual zone. • Cannot adjust the volume of the rear speakers. ▲ The Dual zone function is set up the Fader. ▲ The Dual zone function is bad. ☞ Record the media again or use another one plays instead. ✔ The...
..., referring to "2". ! What might seem to On. • The Dual zone function is enabled. ☞ (page 9) ! • Cannot set up the high pass filter. • Cannot set to the section on (page 6). ✔ The audio file is broken or not supported. ☞ Damaged and unsupported files are skipped. ✔... output destination of the subsource in the Dual zone. • Cannot adjust the volume of the rear speakers. ▲ The Dual zone function is set up the Fader. ▲ The Dual zone function is bad. ☞ Record the media again or use another one plays instead. ✔ The...
Instruction Manual
Page 35
... digital AM broadcasting, receive mode switches between stereo and monaural too often. ☞ Receiving condition is not transmitting in the mode that was set with (page 25). ☞ Please set to this unit. English | 35 HD Radio source ? The USB device does not play its audio files. ✔ The USB connector is...
... digital AM broadcasting, receive mode switches between stereo and monaural too often. ☞ Receiving condition is not transmitting in the mode that was set with (page 25). ☞ Please set to this unit. English | 35 HD Radio source ? The USB device does not play its audio files. ✔ The USB connector is...


