Instruction Manual
Page 2
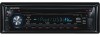
... features 7 Power Selecting the Source Volume Attenuator Audio Control Adjusting the detail of Audio Control Audio Setup Speaker Setting Subwoofer Output Switching Display Theft Deterrent Faceplate TEL Mute Tuner features 12 Tuning Tuning Mode Direct Access Tuning Station Preset Memory Auto Memory Entry Preset Tuning CD/USB device/Audio file/External...
... features 7 Power Selecting the Source Volume Attenuator Audio Control Adjusting the detail of Audio Control Audio Setup Speaker Setting Subwoofer Output Switching Display Theft Deterrent Faceplate TEL Mute Tuner features 12 Tuning Tuning Mode Direct Access Tuning Station Preset Memory Auto Memory Entry Preset Tuning CD/USB device/Audio file/External...
Instruction Manual
Page 3
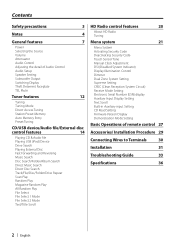
... as it is trademark of water splashing. • Do not place the faceplate (and the faceplate case) in . If the unit still does not operate normally after a while, consult your unit to the catalog or consult your Kenwood dealer for installation. The "AAC" logo is a piece of the unit...• Do not subject the faceplate to this unit. Refer to malfunction. • Use only the screws provided or specified for connectable models of Apple Computer, Inc., registered in cold weather, dew or condensation may form on the lens may cause your Kenwood dealer. iPod is a trademark ...
... as it is trademark of water splashing. • Do not place the faceplate (and the faceplate case) in . If the unit still does not operate normally after a while, consult your unit to the catalog or consult your Kenwood dealer for installation. The "AAC" logo is a piece of the unit...• Do not subject the faceplate to this unit. Refer to malfunction. • Use only the screws provided or specified for connectable models of Apple Computer, Inc., registered in cold weather, dew or condensation may form on the lens may cause your Kenwood dealer. iPod is a trademark ...
Instruction Manual
Page 4
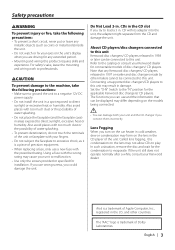
...the faceplate is stained badly, wipe the stain off with a cloth moistened with neutral cleaner, then wipe it again with your model and in the USB device. Notes • If you experience problems during installation, consult your Kenwood dealer. • When you purchase optional accessories, check with your Kenwood ...). • Press the reset button if the disc auto changer fails to operate properly, press the Reset button. Cleaning the Unit If the faceplate of (page 22) to prevent theft. • The characters which can damage the data contained in your area. • We recommend the...
...the faceplate is stained badly, wipe the stain off with a cloth moistened with neutral cleaner, then wipe it again with your model and in the USB device. Notes • If you experience problems during installation, consult your Kenwood dealer. • When you purchase optional accessories, check with your Kenwood ...). • Press the reset button if the disc auto changer fails to operate properly, press the Reset button. Cleaning the Unit If the faceplate of (page 22) to prevent theft. • The characters which can damage the data contained in your area. • We recommend the...

Instruction Manual
Page 11
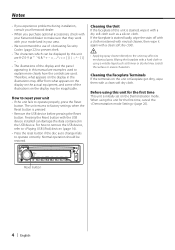
...grooves on the unit with too much dust or the possibility of water splashing. The audio system pauses. Removing the Faceplate Press the Release button. The faceplate unlocks, allowing you to use the TEL Mute feature, you , helping to deter theft. When a call Press... the [SRC] button. Reattaching the Faceplate 1 Align the projections on the faceplate. The faceplate is locked in its faceplate case while detached. • Do not expose the faceplate (and the faceplate case) to direct sunlight or excessive heat or humidity. The "CALL" ...
...grooves on the unit with too much dust or the possibility of water splashing. The audio system pauses. Removing the Faceplate Press the Release button. The faceplate unlocks, allowing you to use the TEL Mute feature, you , helping to deter theft. When a call Press... the [SRC] button. Reattaching the Faceplate 1 Align the projections on the faceplate. The faceplate is locked in its faceplate case while detached. • Do not expose the faceplate (and the faceplate case) to direct sunlight or excessive heat or humidity. The "CALL" ...
Instruction Manual
Page 23
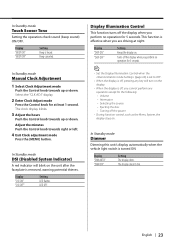
.... 3 Adjust the hours Push the Control knob towards up or down . Display "DISP ON" "DISP OFF" Setting Keeps the display on the unit after the faceplate is off, pressing any key will blink on . In Standby mode Dimmer Dimming this unit's display automatically when the vehicle light switch is heard. Turns...
.... 3 Adjust the hours Push the Control knob towards up or down . Display "DISP ON" "DISP OFF" Setting Keeps the display on the unit after the faceplate is off, pressing any key will blink on . In Standby mode Dimmer Dimming this unit's display automatically when the vehicle light switch is heard. Turns...
Instruction Manual
Page 29
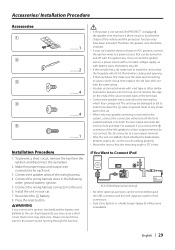
... for iPod connection. • Dual Zone System in the car. • When only two speakers are working properly. • Mount the unit so that the faceplate will become unavailable. For example, if you connect the ignition wire to a power source with a constant voltage supply, as with battery wires, the battery may...
... for iPod connection. • Dual Zone System in the car. • When only two speakers are working properly. • Mount the unit so that the faceplate will become unavailable. For example, if you connect the ignition wire to a power source with a constant voltage supply, as with battery wires, the battery may...
Instruction Manual
Page 32
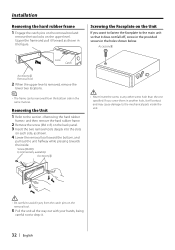
... hole than the one specified. Screw (M4X8) (commercially available) Accessory2 ¤ • Never insert the screw in the same manner. Screwing the Faceplate on each side, as shown in the holes shown below. Accessory5 Lock Catch Accessory2 Removal tool 2 When the upper level is removed, remove the lower... Upper the frame and pull it does not fall off, screw in the provided screws in the figure. If you want to fasten the faceplate to the mechanical parts inside . Installation Removing the hard rubber frame 1 Engage the catch pins on the removal tool and remove the two ...
... hole than the one specified. Screw (M4X8) (commercially available) Accessory2 ¤ • Never insert the screw in the same manner. Screwing the Faceplate on each side, as shown in the holes shown below. Accessory5 Lock Catch Accessory2 Removal tool 2 When the upper level is removed, remove the lower... Upper the frame and pull it does not fall off, screw in the provided screws in the figure. If you want to fasten the faceplate to the mechanical parts inside . Installation Removing the hard rubber frame 1 Engage the catch pins on the removal tool and remove the two ...
Instruction Manual
Page 34
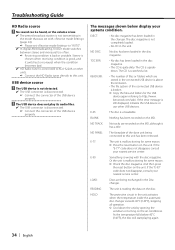
... been loaded in the changer. E-77: The unit is good, and it has a title. HOLD: The protective circuit in the Disc changer. kenwood.com/usb/. NO PANEL: The faceplate of the slave unit being exchanged in the unit activates when the temperature inside the automatic disc changer exceeds 60°C (140°...
... been loaded in the changer. E-77: The unit is good, and it has a title. HOLD: The protective circuit in the Disc changer. kenwood.com/usb/. NO PANEL: The faceplate of the slave unit being exchanged in the unit activates when the temperature inside the automatic disc changer exceeds 60°C (140°...

