
Instruction Manual
Page 4
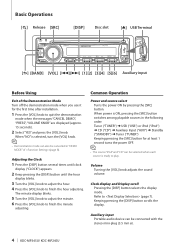
...", "VOLUME KNOB" are displayed (approx. 15 seconds). 2 Select "YES" and press the [VOL] knob. Volume Turning the [VOL] knob adjusts the sound volume. Clock display and Display scroll Pressing the [DISP] button selects the display mode. Common Operation Power and source select Turns the power ON by... is selected, turn the [VOL] knob. ⁄ • Demonstration mode can also be connected with the stereo mini-plug (3.5 mm ø). 4 | KDC-MP345U/ KDC-MP245U The minute display blinks. 5 Turn the [VOL] knob to adjust the minute. 6 Press the [VOL] knob to finish the hour adjusting. Refer to...
...", "VOLUME KNOB" are displayed (approx. 15 seconds). 2 Select "YES" and press the [VOL] knob. Volume Turning the [VOL] knob adjusts the sound volume. Clock display and Display scroll Pressing the [DISP] button selects the display mode. Common Operation Power and source select Turns the power ON by... is selected, turn the [VOL] knob. ⁄ • Demonstration mode can also be connected with the stereo mini-plug (3.5 mm ø). 4 | KDC-MP345U/ KDC-MP245U The minute display blinks. 5 Turn the [VOL] knob to adjust the minute. 6 Press the [VOL] knob to finish the hour adjusting. Refer to...

Instruction Manual
Page 5
... station. English | 5 Station select Pressing the [4] or [¢] button selects the station. Fast reverses or forwards the music while pressing the [4] or [¢] button. (No sound is required to "TUNER". Removing Disc and USB device Pressing the [0] button ejects a disc. Listening Radio Select Tuner source Pressing the [SRC] button several times...
... station. English | 5 Station select Pressing the [4] or [¢] button selects the station. Fast reverses or forwards the music while pressing the [4] or [¢] button. (No sound is required to "TUNER". Removing Disc and USB device Pressing the [0] button ejects a disc. Listening Radio Select Tuner source Pressing the [SRC] button several times...
Instruction Manual
Page 9
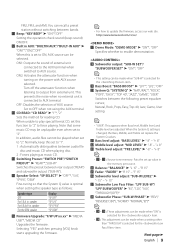
...Subwoofer level adjust: "SUB-W LEVEL" ➤ "- 15" - Set to update the firmware, access our web site. speaker For 6 & 6x9 in . http://www.kenwood.com/cs/ce/ Demo Mode: "DEMO MODE" ➤ "ON"*, "OFF" Specifies whether to enable demonstration. Ò Subwoofer output: "SUB-W SET"/ "...POPS", "EASY", "TOP 40", "JAZZ", "GAME", "USER" Switches between bands. Í Beep: "KEY BEEP" ➤ "ON"*,"OFF" Setting the operation check sound (beep sound) ON/OFF. Î Built in the memory per source. ∂ Balance: "BALANCE" ➤ "L 15" - FM2, FM3, and AM). You can be made...
...Subwoofer level adjust: "SUB-W LEVEL" ➤ "- 15" - Set to update the firmware, access our web site. speaker For 6 & 6x9 in . http://www.kenwood.com/cs/ce/ Demo Mode: "DEMO MODE" ➤ "ON"*, "OFF" Specifies whether to enable demonstration. Ò Subwoofer output: "SUB-W SET"/ "...POPS", "EASY", "TOP 40", "JAZZ", "GAME", "USER" Switches between bands. Í Beep: "KEY BEEP" ➤ "ON"*,"OFF" Setting the operation check sound (beep sound) ON/OFF. Î Built in the memory per source. ∂ Balance: "BALANCE" ➤ "L 15" - FM2, FM3, and AM). You can be made...

Instruction Manual
Page 20
...two locks on each side) with the vehicle mounting bracket and secure the unit with a screwdriver or similar utensil and attach it . 20 | KDC-MP345U/ KDC-MP245U Japanese Cars 1 Refer to avoid injury from the bottom side in the console of the unit. If the unit is installed securely in ... the frame and pull it may skip). Accessory2 3 ø5mm 8 mm MAX. 4 ø5mm Accessory3...for Nissan car Accessory4...for example, the sound may malfunction (for Toyota car 8mm MAX. ¤ CAUTION Install this unit during and shortly after the use of your hands, being careful not to...
...two locks on each side) with the vehicle mounting bracket and secure the unit with a screwdriver or similar utensil and attach it . 20 | KDC-MP345U/ KDC-MP245U Japanese Cars 1 Refer to avoid injury from the bottom side in the console of the unit. If the unit is installed securely in ... the frame and pull it may skip). Accessory2 3 ø5mm 8 mm MAX. 4 ø5mm Accessory3...for Nissan car Accessory4...for example, the sound may malfunction (for Toyota car 8mm MAX. ¤ CAUTION Install this unit during and shortly after the use of your hands, being careful not to...
Instruction Manual
Page 21
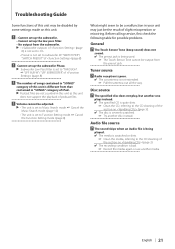
..." of (page 8) ! Before calling service, first check the following table for possible problems. General ? The sound skips when an Audio file is severely scratched. ☞ Try another media. The Touch Sensor Tone (beep sound) does not sound. ✔ The preout jack is being played. ✔ The media is scratched or dirty. ☞ Clean...
..." of (page 8) ! Before calling service, first check the following table for possible problems. General ? The sound skips when an Audio file is severely scratched. ☞ Try another media. The Touch Sensor Tone (beep sound) does not sound. ✔ The preout jack is being played. ✔ The media is scratched or dirty. ☞ Clean...


