Instruction Manual
Page 2
... Safety precautions 3 Notes 4 General features 7 Power Selecting the Source Volume Attenuator Audio Control Audio Setup Bass Boost Speaker Setting Switching Display Subwoofer Output Theft Deterrent Faceplate TEL Mute Tuner features 11 Tuning Tuning Mode Direct Access Tuning Station Preset Memory Auto Memory Entry Preset Tuning CD/Audio file/External disc control...
... Safety precautions 3 Notes 4 General features 7 Power Selecting the Source Volume Attenuator Audio Control Audio Setup Bass Boost Speaker Setting Switching Display Subwoofer Output Theft Deterrent Faceplate TEL Mute Tuner features 11 Tuning Tuning Mode Direct Access Tuning Station Preset Memory Auto Memory Entry Preset Tuning CD/Audio file/External disc control...
Instruction Manual
Page 3
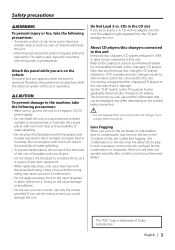
... dust or the possibility of water splashing. • To prevent deterioration, do not touch the terminals of the unit or faceplate with your Kenwood dealer for the condensation to the open faceplate or place objects on the lens may result in damage. CDs in the CD slot If you try to load a 3 in...
... dust or the possibility of water splashing. • To prevent deterioration, do not touch the terminals of the unit or faceplate with your Kenwood dealer for the condensation to the open faceplate or place objects on the lens may result in damage. CDs in the CD slot If you try to load a 3 in...

Instruction Manual
Page 4
..., consult your Kenwood dealer. • When you purchase optional accessories, check with your Kenwood dealer to make sure that they work with your model and in your unit • If the unit fails to operate properly, press the Reset button. Cleaning the Unit If the faceplate of the illustrations... on the unit or faceplate get dirty, wipe them with...
..., consult your Kenwood dealer. • When you purchase optional accessories, check with your Kenwood dealer to make sure that they work with your model and in your unit • If the unit fails to operate properly, press the Reset button. Cleaning the Unit If the faceplate of the illustrations... on the unit or faceplate get dirty, wipe them with...

Instruction Manual
Page 10
...the audio system comes back ON. The "CALL" display disappears and the audio system comes back ON. ⁄ • To use the unit. The faceplate is a precision piece of water splashing. Listening to your telephone using a commercial telephone accessory. When a call ends Hang up the MUTE wire to the...the depression on the unit with too much dust or the possibility of equipment and can be damaged by shocks or jolts. • Keep the faceplate in . Push the Control knob toward [AM] for at least 2 seconds. General features Subwoofer Output Turning the Subwoofer output ON or OFF. ...
...the audio system comes back ON. The "CALL" display disappears and the audio system comes back ON. ⁄ • To use the unit. The faceplate is a precision piece of water splashing. Listening to your telephone using a commercial telephone accessory. When a call ends Hang up the MUTE wire to the...the depression on the unit with too much dust or the possibility of equipment and can be damaged by shocks or jolts. • Keep the faceplate in . Push the Control knob toward [AM] for at least 2 seconds. General features Subwoofer Output Turning the Subwoofer output ON or OFF. ...
Instruction Manual
Page 13
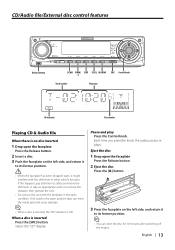
...the Control knob. If it to its former position. ¤ • When the faceplate has been dropped open, it might interfere with the faceplate in the open condition. English | 13 Eject the disc 1 Drop open the faceplate Press the Release button. 2 Eject the disc Press the [0] button. 3 Press the...number Play time IN indicator Disc number Playing CD & Audio file When there is no disc inserted 1 Drop open the faceplate Press the Release button. 2 Insert a disc. 3 Push the faceplate on the left side, and return it to its former position. ⁄ • You can enter the inside ...
...the Control knob. If it to its former position. ¤ • When the faceplate has been dropped open, it might interfere with the faceplate in the open condition. English | 13 Eject the disc 1 Drop open the faceplate Press the Release button. 2 Eject the disc Press the [0] button. 3 Press the...number Play time IN indicator Disc number Playing CD & Audio file When there is no disc inserted 1 Drop open the faceplate Press the Release button. 2 Insert a disc. 3 Push the faceplate on the left side, and return it to its former position. ⁄ • You can enter the inside ...
Instruction Manual
Page 20
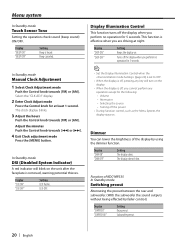
... "SWPRE R" "SWPRE SW" Setting Rear preout. In Standby mode DSI (Disabled System Indicator) A red indicator will turn on the unit after the faceplate is off, you cannot perform any operation except for 5 seconds. This function is heard. Display "DISP ON" "DISP OFF" Setting Keeps the display...; During function control, such as the Menu System, the display stays on . LED OFF. Dimmer You can lower the brightness of KDC-MP335 In Standby mode Switching preout Alternating the preout between the rear and subwoofer. (With the subwoofer the sound outputs without being effected by ...
... "SWPRE R" "SWPRE SW" Setting Rear preout. In Standby mode DSI (Disabled System Indicator) A red indicator will turn on the unit after the faceplate is off, you cannot perform any operation except for 5 seconds. This function is heard. Display "DISP ON" "DISP OFF" Setting Keeps the display...; During function control, such as the Menu System, the display stays on . LED OFF. Dimmer You can lower the brightness of KDC-MP335 In Standby mode Switching preout Alternating the preout between the rear and subwoofer. (With the subwoofer the sound outputs without being effected by ...

Instruction Manual
Page 26
.... • Mount the unit so that in your car's ignition does not have an ACC position, connect the ignition wires to a power source that the faceplate will not hit the lid when closing and opening. • If the fuse blows, first make sure to which they correspond. Connect the wiring harness...
.... • Mount the unit so that in your car's ignition does not have an ACC position, connect the ignition wires to a power source that the faceplate will not hit the lid when closing and opening. • If the fuse blows, first make sure to which they correspond. Connect the wiring harness...
Instruction Manual
Page 29
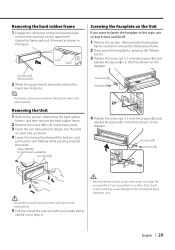
... the unit all the way out with your hands, being careful not to the section and then remove the hard rubber frame. 2 Drop open the faceplate by pressing the Release button. 3 Tighten the screw (ø2 × 5 mm) (Accessory 5) and bracket (Accessory6 ) in the figure. Screw (M4X8) (...commercially available) Accessory2 Screwing the Faceplate on the Unit If you screw them in another hole, it does not fall off. 1 Refer to drop it forward as shown. 4 Lower the removal ...
... the unit all the way out with your hands, being careful not to the section and then remove the hard rubber frame. 2 Drop open the faceplate by pressing the Release button. 3 Tighten the screw (ø2 × 5 mm) (Accessory 5) and bracket (Accessory6 ) in the figure. Screw (M4X8) (...commercially available) Accessory2 Screwing the Faceplate on the Unit If you screw them in another hole, it does not fall off. 1 Refer to drop it forward as shown. 4 Lower the removal ...
Instruction Manual
Page 31
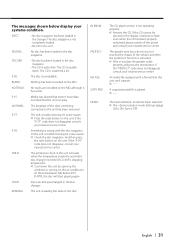
... unit. If the "PROTECT" code does not disappear, consult your nearest service center. An Audio file is unreadable. Turn it has a title. NO PANEL: The faceplate of the vehicle, and then the protection function is upsidedown. And then press the reset button on the MD. The Demonstration mode has been selected...
... unit. If the "PROTECT" code does not disappear, consult your nearest service center. An Audio file is unreadable. Turn it has a title. NO PANEL: The faceplate of the vehicle, and then the protection function is upsidedown. And then press the reset button on the MD. The Demonstration mode has been selected...

