Instruction Manual
Page 2
...CDs 6 About MP3 and WMA 7 General features 8 Power Selecting the Source Volume Attenuator System Q Audio Control Audio Setup Speaker Setting Switching Display Dimmer Control Theft Deterrent Faceplate TEL Mute Tuner features 12 Tuning Tuning Mode Station Preset Memory Auto Memory Entry Preset Tuning CD/Audio file/External disc control features 14 Playing CD & Audio file Playing External...) Receive mode Setting SIRIUS ID (ESN) display Auxiliary Input Display Setting Text Scroll CD Read Setting Demonstration mode Setting Basic Operations of remote control 24 Accessories/ Installation...
...CDs 6 About MP3 and WMA 7 General features 8 Power Selecting the Source Volume Attenuator System Q Audio Control Audio Setup Speaker Setting Switching Display Dimmer Control Theft Deterrent Faceplate TEL Mute Tuner features 12 Tuning Tuning Mode Station Preset Memory Auto Memory Entry Preset Tuning CD/Audio file/External disc control features 14 Playing CD & Audio file Playing External...) Receive mode Setting SIRIUS ID (ESN) display Auxiliary Input Display Setting Text Scroll CD Read Setting Demonstration mode Setting Basic Operations of remote control 24 Accessories/ Installation...
Instruction Manual
Page 5
... to explain more clearly how the controls are used. About SIRIUS Satellite radio tuner Refer to the instruction manual of SIRIUS Satellite radio tuner KTC-SR901/SR902/SR903 (optional accessory), when connected, for the operation method. • KDC-MP2032/KDC-MP232/KDC-232MR Refer to the sections of...directly to the unit may affect its mechanical parts. Notes • If you experience problems during installation, consult your Kenwood dealer. • When you purchase optional accessories, check with your area. • If the unit fails to operate properly, press the Reset button. Therefore, ...
... to explain more clearly how the controls are used. About SIRIUS Satellite radio tuner Refer to the instruction manual of SIRIUS Satellite radio tuner KTC-SR901/SR902/SR903 (optional accessory), when connected, for the operation method. • KDC-MP2032/KDC-MP232/KDC-232MR Refer to the sections of...directly to the unit may affect its mechanical parts. Notes • If you experience problems during installation, consult your Kenwood dealer. • When you purchase optional accessories, check with your area. • If the unit fails to operate properly, press the Reset button. Therefore, ...
Instruction Manual
Page 6
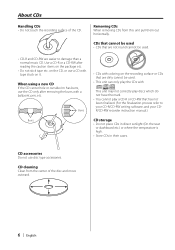
Burrs • CDs with . CD accessories Do not use a CD with a ballpoint pen, etc. CD cleaning Clean from this unit pull them out horizontally. This unit may not correctly play discs which do not have the mark. • You cannot play a CD-R or CD-RW that are not round cannot be used. • CD-R and CD-RW are dirty cannot...
Burrs • CDs with . CD accessories Do not use a CD with a ballpoint pen, etc. CD cleaning Clean from this unit pull them out horizontally. This unit may not correctly play discs which do not have the mark. • You cannot play a CD-R or CD-RW that are not round cannot be used. • CD-R and CD-RW are dirty cannot...
Instruction Manual
Page 8
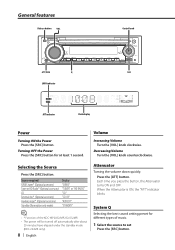
...Press the [SRC] button for different types of the KDC-MP2032/MP232/232MR • The power will be turned off automatically after about 20 minutes have elapsed under the standby mode (KDC-232MR only). 8 | English Attenuator Turning the volume ...Control knob ATT/DIM Q SRC LOUD indicator ATT indicator Clock display Power Turning ON the Power Press the [SRC] button. Source required Display SIRIUS tuner* (Optional accessory) "SIRIUS" Tuner or HD Radio* (Optional accessory) "TUNER" or "HD RADIO" CD "CD" External disc* (Optional accessory) "CD CH" Auxiliary input* (Optional accessory...
...Press the [SRC] button for different types of the KDC-MP2032/MP232/232MR • The power will be turned off automatically after about 20 minutes have elapsed under the standby mode (KDC-232MR only). 8 | English Attenuator Turning the volume ...Control knob ATT/DIM Q SRC LOUD indicator ATT indicator Clock display Power Turning ON the Power Press the [SRC] button. Source required Display SIRIUS tuner* (Optional accessory) "SIRIUS" Tuner or HD Radio* (Optional accessory) "TUNER" or "HD RADIO" CD "CD" External disc* (Optional accessory) "CD CH" Auxiliary input* (Optional accessory...

Instruction Manual
Page 11
... or the possibility of water splashing. The audio system pauses. The faceplate is a precision piece of equipment and can be damaged by using a commercial telephone accessory. Dimmer Control You can lower the brightness of the display by shocks or jolts. • Keep the faceplate in its faceplate case while detached. • Do...
... or the possibility of water splashing. The audio system pauses. The faceplate is a precision piece of equipment and can be damaged by using a commercial telephone accessory. Dimmer Control You can lower the brightness of the display by shocks or jolts. • Keep the faceplate in its faceplate case while detached. • Do...
Instruction Manual
Page 14
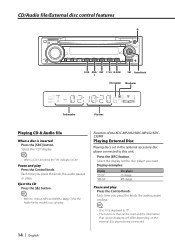
... players being connected. 14 | English Pause and play Press the Control knob. Select the "CD" display. • When a CD is inserted, the "IN" indicator is inserted Press the [SRC] button. Function of the KDC-MP2032/KDC-MP232/KDC232MR Playing External Disc Playing discs set in the optional accessory disc player connected to (page 7) for the disc player you...
... players being connected. 14 | English Pause and play Press the Control knob. Select the "CD" display. • When a CD is inserted, the "IN" indicator is inserted Press the [SRC] button. Function of the KDC-MP2032/KDC-MP232/KDC232MR Playing External Disc Playing discs set in the optional accessory disc player connected to (page 7) for the disc player you...
Instruction Manual
Page 24
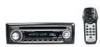
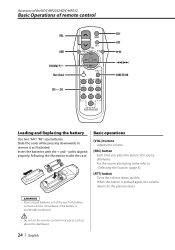
... while pressing downwards to the previous level. 2WARNING • Store unused batteries out of the reach of remote control VOL AUD FM/AM/+/- Insert the batteries with the + and - Not Used [0] - [9] SRC ATT... VOL AUD 38 FM+ 4 ¢ AM- When the button is accidentally swallowed. • Do not set the remote control in hot places such as illustrated. Basic operations [VOL] buttons Adjusts the volume. [SRC] button Each time you press the ...and Replacing the battery Use two "AA"/ "R6"-size batteries. Accessory of the KDC-MP2032/KDC-MP232 Basic Operations of children.
... while pressing downwards to the previous level. 2WARNING • Store unused batteries out of the reach of remote control VOL AUD FM/AM/+/- Insert the batteries with the + and - Not Used [0] - [9] SRC ATT... VOL AUD 38 FM+ 4 ¢ AM- When the button is accidentally swallowed. • Do not set the remote control in hot places such as illustrated. Basic operations [VOL] buttons Adjusts the volume. [SRC] button Each time you press the ...and Replacing the battery Use two "AA"/ "R6"-size batteries. Accessory of the KDC-MP2032/KDC-MP232 Basic Operations of children.
Instruction Manual
Page 26
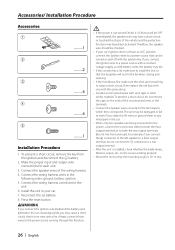
Accessories/ Installation Procedure Accessories 1 ..........1 2 ..........2 3 ..........4 4 ..........4 5 ..........1 Installation Procedure 1. Press the reset button. 2WARNING If you connect the ignition wire (red) and the battery wire (yellow) to the car chassis (ground), you ...
Accessories/ Installation Procedure Accessories 1 ..........1 2 ..........2 3 ..........4 4 ..........4 5 ..........1 Installation Procedure 1. Press the reset button. 2WARNING If you connect the ignition wire (red) and the battery wire (yellow) to the car chassis (ground), you ...
Instruction Manual
Page 27
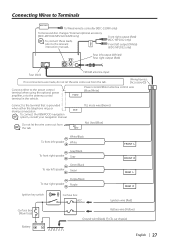
...antenna input If no connections are made, do not let the wire come out from the tab. FRONT Front right output (Red) (KDC-MP2032 only) Front left output (White) (KDC-MP2032 only) Rear left speaker Green/Black Green To rear right speaker Purple/Black Purple FRONT L FRONT R REAR L REAR R Ignition ... box (Main fuse) Battery + - TEL mute wire (Brown) Do not let the wire come out from the tab. CONT To Wired remote controller (KDC-232MR only) To Kenwood disc changer/ External optional accessory (KDC-MP2032/MP232/232MR only) To connect these leads, refer to Terminals REMO.
...antenna input If no connections are made, do not let the wire come out from the tab. FRONT Front right output (Red) (KDC-MP2032 only) Front left output (White) (KDC-MP2032 only) Rear left speaker Green/Black Green To rear right speaker Purple/Black Purple FRONT L FRONT R REAR L REAR R Ignition ... box (Main fuse) Battery + - TEL mute wire (Brown) Do not let the wire come out from the tab. CONT To Wired remote controller (KDC-232MR only) To Kenwood disc changer/ External optional accessory (KDC-MP2032/MP232/232MR only) To connect these leads, refer to Terminals REMO.
Instruction Manual
Page 28
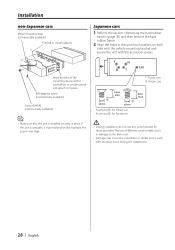
... hard rubber frame. 2 Align the holes in the unit (two locations on each side) with the vehicle mounting bracket and secure the unit with the accessory screws. Self-tapping screw (commercially available) Screw (M4X8) (commercially available) T N NT T/N T: Toyota cars N: Nissan cars 3 ø5mm 8 mm MAX. 4 ø5mm 8mm MAX. Accessory3...for...
... hard rubber frame. 2 Align the holes in the unit (two locations on each side) with the vehicle mounting bracket and secure the unit with the accessory screws. Self-tapping screw (commercially available) Screw (M4X8) (commercially available) T N NT T/N T: Toyota cars N: Nissan cars 3 ø5mm 8 mm MAX. 4 ø5mm 8mm MAX. Accessory3...for...


