Quick Start Guide
Page 2
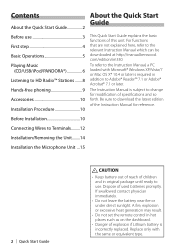
Be sure to the relevant Instruction Manual which can be downloaded at http://manual.kenwood. Dispose of explosion if Lithium battery is incorrectly replaced. Replace only with Microsoft® Windows XP/Vista/7 or Mac OS X® 10.4 or later... Quick Start Guide About the Quick Start Guide 2 Before use . Before Installation 10 Connecting Wires to Terminals.........12 Installation/Removing the Unit........14 Installation the Microphone Unit ...15 2 | Quick Start Guide ¤ CAUTION • Keep battery out of reach of children and in hot places such as on the dashboard. ...
Be sure to the relevant Instruction Manual which can be downloaded at http://manual.kenwood. Dispose of explosion if Lithium battery is incorrectly replaced. Replace only with Microsoft® Windows XP/Vista/7 or Mac OS X® 10.4 or later... Quick Start Guide About the Quick Start Guide 2 Before use . Before Installation 10 Connecting Wires to Terminals.........12 Installation/Removing the Unit........14 Installation the Microphone Unit ...15 2 | Quick Start Guide ¤ CAUTION • Keep battery out of reach of children and in hot places such as on the dashboard. ...
Quick Start Guide
Page 12
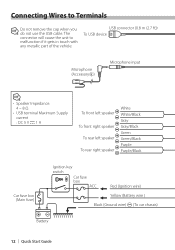
... cause the unit to Terminals ⁄ Do not remove the cap when you do not use the USB cable. USB connector (0.8 m (2.7 ft)) To USB device Microphone (Accessory5) Microphone input ⁄ • Speaker Impedance: 4 - 8 Ω • USB terminal Maximum Supply current : DC 5 V 1 A To front left speaker To front right speaker To rear left...
... cause the unit to Terminals ⁄ Do not remove the cap when you do not use the USB cable. USB connector (0.8 m (2.7 ft)) To USB device Microphone (Accessory5) Microphone input ⁄ • Speaker Impedance: 4 - 8 Ω • USB terminal Maximum Supply current : DC 5 V 1 A To front left speaker To front right speaker To rear left...
Quick Start Guide
Page 15
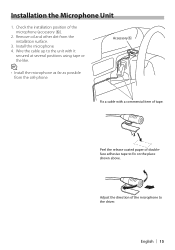
...the cell-phone. Wire the cable up to the unit with a commercial item of the microphone (accessory 5). 2. English | 15 Install the microphone. 4. Peel the release coated paper of the microphone to fix on the place shown above. Accessory5 Fix a cable with it secured at ...several positions using tape or the like. ⁄ • Install the microphone as far as possible from the installation surface. 3. Installation the Microphone Unit 1. Adjust the direction of doubleface adhesive tape to the driver. Check the installation position of tape....
...the cell-phone. Wire the cable up to the unit with a commercial item of the microphone (accessory 5). 2. English | 15 Install the microphone. 4. Peel the release coated paper of the microphone to fix on the place shown above. Accessory5 Fix a cable with it secured at ...several positions using tape or the like. ⁄ • Install the microphone as far as possible from the installation surface. 3. Installation the Microphone Unit 1. Adjust the direction of doubleface adhesive tape to the driver. Check the installation position of tape....
kdcx995 (pdf)
Page 6
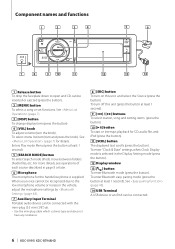
...For more details, see operations of each source described in page 8 or later. 6 Microphone The microphone for the hands free phone is selected in the vehicle, adjust the microphone settings by (page 48). 7 Auxiliary Input Terminal Portable audio device can be inserted ...microphone volume or noises in the Display Setting mode (press the button). 12 Display window 13 [ ] button To enter Bluetooth mode (press the button). To enter "Clock & Date" settings when Clock Display mode is supplied. See (page 48). 14 USB Terminal A USB device or an iPod can be connected. 6 | KDC-X995/ KDC-BT948HD...
...For more details, see operations of each source described in page 8 or later. 6 Microphone The microphone for the hands free phone is selected in the vehicle, adjust the microphone settings by (page 48). 7 Auxiliary Input Terminal Portable audio device can be inserted ...microphone volume or noises in the Display Setting mode (press the button). 12 Display window 13 [ ] button To enter Bluetooth mode (press the button). To enter "Clock & Date" settings when Clock Display mode is supplied. See (page 48). 14 USB Terminal A USB device or an iPod can be connected. 6 | KDC-X995/ KDC-BT948HD...
kdcx995 (pdf)
Page 49
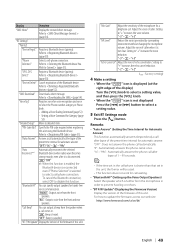
.... "OFF": Beep is heard. "Mic Gain" Adjust the sensitivity of the microphone for Category (page 53) "Detailed Setup" Move to "+" increases the voice volume. Setting to (page 50). "1s" - http://www.kenwood.com/cs/ce/bt/ English | 49 Select" Refer to "+" increases the noise... reduction. "OFF"/ "0s" - "+3" "NR Level" Reduce the noises generated by surrounding environment without changing the microphone volume. Setting to (page 51). Display Overview...
.... "OFF": Beep is heard. "Mic Gain" Adjust the sensitivity of the microphone for Category (page 53) "Detailed Setup" Move to "+" increases the voice volume. Setting to (page 50). "1s" - http://www.kenwood.com/cs/ce/bt/ English | 49 Select" Refer to "+" increases the noise... reduction. "OFF"/ "0s" - "+3" "NR Level" Reduce the noises generated by surrounding environment without changing the microphone volume. Setting to (page 51). Display Overview...
kdcx995 (pdf)
Page 68
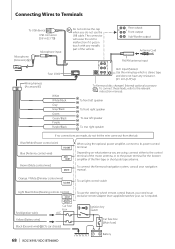
...to Terminals To USB device USB connector (0.8 m (2.7 ft)) Microphone (Accessory5) Microphone input ⁄ Do not remove the cap when you need ...connections are using the optional power amplifier, connect to the relevant instruction manuals. To connect the Kenwood navigation system, consult your car is stereo type and does not have any metallic part of ...; (To car chassis) To use the USB cable. Ignition key switch Car fuse box (Main fuse) 68 | KDC-X995/ KDC-BT948HD + - Rear output R L Front output Sub Woofer output Antenna Cord FM/AM antenna input Fuse (10A) Wiring harness...
...to Terminals To USB device USB connector (0.8 m (2.7 ft)) Microphone (Accessory5) Microphone input ⁄ Do not remove the cap when you need ...connections are using the optional power amplifier, connect to the relevant instruction manuals. To connect the Kenwood navigation system, consult your car is stereo type and does not have any metallic part of ...; (To car chassis) To use the USB cable. Ignition key switch Car fuse box (Main fuse) 68 | KDC-X995/ KDC-BT948HD + - Rear output R L Front output Sub Woofer output Antenna Cord FM/AM antenna input Fuse (10A) Wiring harness...
kdcx995 (pdf)
Page 70
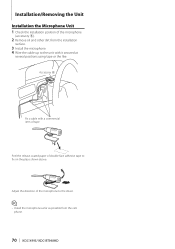
.../Removing the Unit Installation the Microphone Unit 1 Check the installation position of the microphone to the driver. ⁄ • Install the microphone as far as possible from the installation surface. 3 Install the microphone. 4 Wire the cable up... to the unit with a commercial item of double-face adhesive tape to fix on the place shown above. Adjust the direction of the microphone (accessory 5). 2 Remove oil and other dirt from the cellphone. 70 | KDC-X995/ KDC-BT948HD...
.../Removing the Unit Installation the Microphone Unit 1 Check the installation position of the microphone to the driver. ⁄ • Install the microphone as far as possible from the installation surface. 3 Install the microphone. 4 Wire the cable up... to the unit with a commercial item of double-face adhesive tape to fix on the place shown above. Adjust the direction of the microphone (accessory 5). 2 Remove oil and other dirt from the cellphone. 70 | KDC-X995/ KDC-BT948HD...
kdcx995 (pdf)
Page 72
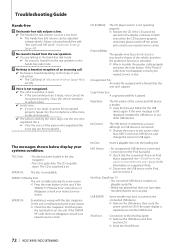
... for information on the unit. If the same display is quite dirty. Adjust it . Reset the iPod/iPhone. 72 | KDC-X995/ KDC-BT948HD Speak into the loading slot. If the "ERROR 77"/"Mecha Error" code does not disappear, consult your systems condition. Troubleshooting Guide Hands-...other than USB. If the "Protect" code does not disappear, consult your nearest service center. No Disc: Insert a playable disc into the microphone a little more loudly and naturally. The person uttering the voice tag is connected. Change the source to the iPod has...
... for information on the unit. If the same display is quite dirty. Adjust it . Reset the iPod/iPhone. 72 | KDC-X995/ KDC-BT948HD Speak into the loading slot. If the "ERROR 77"/"Mecha Error" code does not disappear, consult your systems condition. Troubleshooting Guide Hands-...other than USB. If the "Protect" code does not disappear, consult your nearest service center. No Disc: Insert a playable disc into the microphone a little more loudly and naturally. The person uttering the voice tag is connected. Change the source to the iPod has...


