

Instruction manual
Page 7
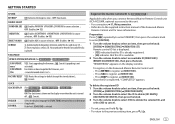
... power will automatically turn off the power. * Press and hold volume to turn on the power Press . • Press and hold to 15. . How to reset How to replace the battery To On the faceplate On the remote control Turn on the power. ) Adjust the volume Turn the volume knob. Pull...
... power will automatically turn off the power. * Press and hold volume to turn on the power Press . • Press and hold to 15. . How to reset How to replace the battery To On the faceplate On the remote control Turn on the power. ) Adjust the volume Turn the volume knob. Pull...

Instruction manual
Page 8
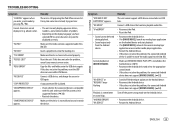
... button in each preset button, regardless of the [EASY MENU] setting. • Refer to the illustration on the power for the first time (or [FACTORY RESET] is selected or activated. 5 Press and hold to make the settings, then press the knob. To return to select [CLOCK], then press the knob. "DEMO...
... button in each preset button, regardless of the [EASY MENU] setting. • Refer to the illustration on the power for the first time (or [FACTORY RESET] is selected or activated. 5 Press and hold to make the settings, then press the knob. To return to select [CLOCK], then press the knob. "DEMO...
Instruction manual
Page 9
... Automatically distinguishes between audio file disc and music CD. ; 2: Forces to the supplied instruction manual of the Kenwood Marine Remote Control unit for ) Applicable only when you connect Kenwood Marine Remote Control unit (KCA-RC55MR, optional accessory) to default (except the stored station). ; NO: Cancels...2/IHEARTRADIO in source selection. ; No sound can be heard if an audio file disc is registered, "COMPLETED" appears. FACTORY RESET YES: Resets the settings to this ID is not activated). NO: Cancels. "REGISTERING" appears on the display even when the unit is ...
... Automatically distinguishes between audio file disc and music CD. ; 2: Forces to the supplied instruction manual of the Kenwood Marine Remote Control unit for ) Applicable only when you connect Kenwood Marine Remote Control unit (KCA-RC55MR, optional accessory) to default (except the stored station). ; NO: Cancels...2/IHEARTRADIO in source selection. ; No sound can be heard if an audio file disc is registered, "COMPLETED" appears. FACTORY RESET YES: Resets the settings to this ID is not activated). NO: Cancels. "REGISTERING" appears on the display even when the unit is ...

Instruction manual
Page 11
... when the list is empty. • This feature can store up to four messages in the list. • To clear the message list, set [FACTORY RESET] to [YES]. ( 5) Other settings 1 Press the volume knob to enter [FUNCTION]. 2 Turn the volume knob to select an item (see the following table), then press...
... when the list is empty. • This feature can store up to four messages in the list. • To clear the message list, set [FACTORY RESET] to [YES]. ( 5) Other settings 1 Press the volume knob to enter [FUNCTION]. 2 Turn the volume knob to select an item (see the following table), then press...

Instruction manual
Page 20
... steps 1 to 4 to reconfirm the pass code. • Make a note of your SmartFavorite music channels or currently tuned music channel. YES: Resets stored channel and lock setting to exit. Press one of the channel number. 3 Press and hold to start playback from the beginning of the current... the volume knob to stop scanning. SIRIUS XM CHANNEL LOCK CODE SET LOCK SETTING CHANNEL EDIT*1 CHANNEL CLEAR*1 TUNE START*2 SIGNAL LEVEL BUFFER USAGE SXM RESET Default: XX To unlock settings: 1 Turn the volume knob to select a number. 2 Press S / T to move to the entry position. 3 Repeat steps ...
... steps 1 to 4 to reconfirm the pass code. • Make a note of your SmartFavorite music channels or currently tuned music channel. YES: Resets stored channel and lock setting to exit. Press one of the channel number. 3 Press and hold to start playback from the beginning of the current... the volume knob to stop scanning. SIRIUS XM CHANNEL LOCK CODE SET LOCK SETTING CHANNEL EDIT*1 CHANNEL CLEAR*1 TUNE START*2 SIGNAL LEVEL BUFFER USAGE SXM RESET Default: XX To unlock settings: 1 Turn the volume knob to select a number. 2 Press S / T to move to the entry position. 3 Repeat steps ...

Instruction manual
Page 21
... pairing. Auto Pairing When you may not automatically connect to the unit after searching. 3 Press the volume knob to pair once you reset the unit. KENWOOD MUSIC PLAY application is completed. Audio/Video Remote Control Profile (AVRCP) - Advanced Audio Coding (AAC) - "PAIRING OK" appears when...the instruction manual of the connected device is set to turn on the unit. 2 Search and select this unit model name (KDC-X7**/KDC-BT7**HD/ KMR-D7**BT/KDC-X5**/KDC-BT5**U) on . - [AUTO PAIRING] is turned on the Bluetooth device. Advanced Audio Distribution Profile (A2DP) - aptX ...
... pairing. Auto Pairing When you may not automatically connect to the unit after searching. 3 Press the volume knob to pair once you reset the unit. KENWOOD MUSIC PLAY application is completed. Audio/Video Remote Control Profile (AVRCP) - Advanced Audio Coding (AAC) - "PAIRING OK" appears when...the instruction manual of the connected device is set to turn on the unit. 2 Search and select this unit model name (KDC-X7**/KDC-BT7**HD/ KMR-D7**BT/KDC-X5**/KDC-BT5**U) on . - [AUTO PAIRING] is turned on the Bluetooth device. Advanced Audio Distribution Profile (A2DP) - aptX ...

Instruction manual
Page 30
.../ 100HZ/120HZ/150HZ/180HZ/220HZ/ 250HZ: Adjusts the crossover frequency for [DTA SETTINGS]. Selects the location of the rear speakers in order to adjust.) YES: Resets the settings ([DISTANCE] and [GAIN]) of [DTA SETTINGS]. ( 27) DTA SETTINGS POSITION DISTANCE GAIN DTA...
.../ 100HZ/120HZ/150HZ/180HZ/220HZ/ 250HZ: Adjusts the crossover frequency for [DTA SETTINGS]. Selects the location of the rear speakers in order to adjust.) YES: Resets the settings ([DISTANCE] and [GAIN]) of [DTA SETTINGS]. ( 27) DTA SETTINGS POSITION DISTANCE GAIN DTA...

Instruction manual
Page 32
... select the color (R/G/B) to adjust. 3 Turn the volume knob to adjust the level (0 to the nearest service center. If this does not solve the problem, reset the unit. ( 3) Skip to play. DIMMER TIME: Set the dimmer on and off time. 1 Turn the volume knob to adjust the [ON] time,...zone. TEXT SCROLL AUTO/ONCE: Select whether to drop the disc when it is determined when files are recorded. 28 ENGLISH Clean the connectors. ( 31) Reset the unit. ( 3) Setting/deleting the remote control ID is generated. Be careful not to scroll the display information automatically, or scroll only once. ; ...
... select the color (R/G/B) to adjust. 3 Turn the volume knob to adjust the level (0 to the nearest service center. If this does not solve the problem, reset the unit. ( 3) Skip to play. DIMMER TIME: Set the dimmer on and off time. 1 Turn the volume knob to adjust the [ON] time,...zone. TEXT SCROLL AUTO/ONCE: Select whether to drop the disc when it is determined when files are recorded. 28 ENGLISH Clean the connectors. ( 31) Reset the unit. ( 3) Setting/deleting the remote control ID is generated. Be careful not to scroll the display information automatically, or scroll only once. ; ...
Instruction manual
Page 33
... SUPPORTED" appears. Playback is clean and inserted properly. Connect a USB device that contains playable audio files. • Reconnect the iPod. • Reset the iPod. • Reconnect the Android device. • If in [HAND MODE], launch any media player application on the Android device and start... USB device, and change the source to unit. ( 32) • Make sure KENWOOD MUSIC PLAY APP is compatible with this does not solve the problem, consult your nearest service centre. Reset the unit. Correct characters are in [HAND MODE], relaunch the current media player application or...
... SUPPORTED" appears. Playback is clean and inserted properly. Connect a USB device that contains playable audio files. • Reconnect the iPod. • Reset the iPod. • Reconnect the Android device. • If in [HAND MODE], launch any media player application on the Android device and start... USB device, and change the source to unit. ( 32) • Make sure KENWOOD MUSIC PLAY APP is compatible with this does not solve the problem, consult your nearest service centre. Reset the unit. Correct characters are in [HAND MODE], relaunch the current media player application or...

Instruction manual
Page 34
... you can get a better signal reception. • Use voice calling method in the U.S.A. TuneScan has been aborted. • Search from the Bluetooth device again. • Reset the unit. ( 3) • Make sure you have entered the same PIN code to the unit. Echo or noise is impossible. Make sure you have entered...
... you can get a better signal reception. • Use voice calling method in the U.S.A. TuneScan has been aborted. • Search from the Bluetooth device again. • Reset the unit. ( 3) • Make sure you have entered the same PIN code to the unit. Echo or noise is impossible. Make sure you have entered...
Instruction manual
Page 35
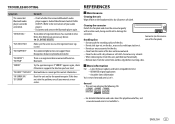
...unit Wipe off dirt on the reverse Handling discs side of the faceplate) • Do not touch the recording surface of your nearest service center. KENWOOD original application - "NO ENTRY"/ "NO PAIR" There is used. "ERROR" Try the operation again. Cleaning the connector Detach the faceplate and ... with a dry silicone or soft cloth. "NO INFO"/"NO DATA" Bluetooth device cannot get the contact information. "HF ERROR XX"/ "BT ERROR" Reset the unit and try the operation again. Connector (on the faceplate with a dry silicone or soft cloth. on the disc, or use a disc with...
...unit Wipe off dirt on the reverse Handling discs side of the faceplate) • Do not touch the recording surface of your nearest service center. KENWOOD original application - "NO ENTRY"/ "NO PAIR" There is used. "ERROR" Try the operation again. Cleaning the connector Detach the faceplate and ... with a dry silicone or soft cloth. "NO INFO"/"NO DATA" Bluetooth device cannot get the contact information. "HF ERROR XX"/ "BT ERROR" Reset the unit and try the operation again. Connector (on the faceplate with a dry silicone or soft cloth. on the disc, or use a disc with...

Instruction manual
Page 40
... only be used with a 12 V DC power supply, negative ground. • Disconnect the battery's negative terminal before fitting. on the power. 6 Detach the faceplate and reset the unit. ( 3) 36 ENGLISH Installing the unit (in place. Dashboard of your vehicle wiring harness does not have the ignition terminal, connect Ignition wire (red...
... only be used with a 12 V DC power supply, negative ground. • Disconnect the battery's negative terminal before fitting. on the power. 6 Detach the faceplate and reset the unit. ( 3) 36 ENGLISH Installing the unit (in place. Dashboard of your vehicle wiring harness does not have the ignition terminal, connect Ignition wire (red...

