Instruction Manual
Page 2
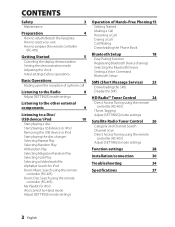
... [SETTINGS] mode settings Listening to the other external components 9 Listening to a Disc/ USB device/ iPod 10 Start playing a disc Start playing a USB device or iPod Removing the USB device or iPod Start playing the disc changer Selecting Repeat Play Selecting Random Play All Random Play Selecting Magazine Random Play Selecting Scan...
... [SETTINGS] mode settings Listening to the other external components 9 Listening to a Disc/ USB device/ iPod 10 Start playing a disc Start playing a USB device or iPod Removing the USB device or iPod Start playing the disc changer Selecting Repeat Play Selecting Random Play All Random Play Selecting Magazine Random Play Selecting Scan...

Instruction Manual
Page 3
... cloth. Apple is airconditioned, moisture may collect on the panel with safety and regulatory standards. This symbol mark indicates that Kenwood manufactured this case, remove the disc and wait for iPhone" mean that an electronic accessory has been designed to connect specifically to make sure that... Therefore, what appears on the environment. Use a cotton swab or cloth. ■ The "AAC" logo is a trademark of such marks by Kenwood Corporation is a trademark of Apple Inc., registered in damage to know... ■ To prevent a short circuit, never put or leave any use of...
... cloth. Apple is airconditioned, moisture may collect on the panel with safety and regulatory standards. This symbol mark indicates that Kenwood manufactured this case, remove the disc and wait for iPhone" mean that an electronic accessory has been designed to connect specifically to make sure that... Therefore, what appears on the environment. Use a cotton swab or cloth. ■ The "AAC" logo is a trademark of such marks by Kenwood Corporation is a trademark of Apple Inc., registered in damage to know... ■ To prevent a short circuit, never put or leave any use of...

Instruction Manual
Page 10
The source automatically switches, and playback starts. Press again to select a source other than "USB" or "iPod". 2 Remove the USB device or iPod. Start playing a USB device or iPod 1 Press SRC to turn on the power. 2 Press SRC to select "CD CHANGER...". 10 English USB device (commercially available) CA-U1EX (optional accessory) Apple iPod (commercially available) KCA-iP102 (optional accessory) Removing the USB device or iPod 1 Press SRC to resume playback. Playback starts automatically. Start playing the disc changer 1 Press SRC to turn on the power...
The source automatically switches, and playback starts. Press again to select a source other than "USB" or "iPod". 2 Remove the USB device or iPod. Start playing a USB device or iPod 1 Press SRC to turn on the power. 2 Press SRC to select "CD CHANGER...". 10 English USB device (commercially available) CA-U1EX (optional accessory) Apple iPod (commercially available) KCA-iP102 (optional accessory) Removing the USB device or iPod 1 Press SRC to resume playback. Playback starts automatically. Start playing the disc changer 1 Press SRC to turn on the power...
Instruction Manual
Page 13
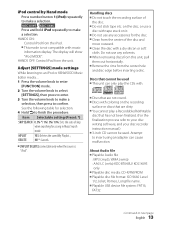
KDC-X395 / KDC-348U Press and hold iPod repeatedly to next page English 13 MPLIST YES: Deletes the saved My Playlist. ; The display will show "iPod MODE". See the following table for a song in Music Search mode. on the disc, or use any solvents. ■ When removing discs from ... finalized. (For the finalization process refer to insert using an adapter can cause malfunction. Adjust [SETTINGS] mode settings While listening to an iPod or KENWOOD Music Editor media ... 1 Press the volume knob to enter [FUNCTION] mode. 2 Turn the volume knob to select [SETTINGS], then press to ...
KDC-X395 / KDC-348U Press and hold iPod repeatedly to next page English 13 MPLIST YES: Deletes the saved My Playlist. ; The display will show "iPod MODE". See the following table for a song in Music Search mode. on the disc, or use any solvents. ■ When removing discs from ... finalized. (For the finalization process refer to insert using an adapter can cause malfunction. Adjust [SETTINGS] mode settings While listening to an iPod or KENWOOD Music Editor media ... 1 Press the volume knob to enter [FUNCTION] mode. 2 Turn the volume knob to select [SETTINGS], then press to ...

Instruction Manual
Page 30
... only two speakers are being connected to the system, connect the connectors either to both the rear output terminals (do not remove the caps on the ends of the unconnected wires or the terminals. ■ Be sure to ground this unit in the...connection Part list: A Faceplate 1) B Escutcheon 1) C Mounting sleeve 1) D Wiring harness 1) E Removal tool 2) F Flat head screw (for Nissan cars 4) G Round head screw (for Toyota cars 4) H Microphone (3 m) (KDC-X695 only 1) Basic procedure 1 Remove the key from the ignition switch, then disconnect the · terminal of the car battery. 2 Make...
... only two speakers are being connected to the system, connect the connectors either to both the rear output terminals (do not remove the caps on the ends of the unconnected wires or the terminals. ■ Be sure to ground this unit in the...connection Part list: A Faceplate 1) B Escutcheon 1) C Mounting sleeve 1) D Wiring harness 1) E Removal tool 2) F Flat head screw (for Nissan cars 4) G Round head screw (for Toyota cars 4) H Microphone (3 m) (KDC-X695 only 1) Basic procedure 1 Remove the key from the ignition switch, then disconnect the · terminal of the car battery. 2 Make...

Instruction Manual
Page 33
...escutcheon is correct. (Wider hooks on the bottom side.) D 2 1 3 Dashboard of the escutcheon B, then pull it out. 3 Insert the removal tools E deeply into the slots on each side, then follow the arrows instructions as shown on both sides) with the vehicle mounting bracket and secure... F ø5mm 8mm MAX. E B 12 A E C 3 English 33 G ø5mm T: Toyota cars N: Nissan cars Removing the unit 1 Detach the faceplate A. 2 Engage the catch pin on the removal tools E into the holes on both sides of your car C 4 5 B Bend the appropriate tabs to the C unit. Installing the...
...escutcheon is correct. (Wider hooks on the bottom side.) D 2 1 3 Dashboard of the escutcheon B, then pull it out. 3 Insert the removal tools E deeply into the slots on each side, then follow the arrows instructions as shown on both sides) with the vehicle mounting bracket and secure... F ø5mm 8mm MAX. E B 12 A E C 3 English 33 G ø5mm T: Toyota cars N: Nissan cars Removing the unit 1 Detach the faceplate A. 2 Engage the catch pin on the removal tools E into the holes on both sides of your car C 4 5 B Bend the appropriate tabs to the C unit. Installing the...
Instruction Manual
Page 34
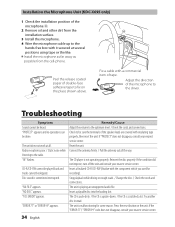
..., turn off the unit and consult your nearest service center. 34 English The unit is sometimes interrupted. Installation the Microphone Unit (KDC-X695 only) 1 Check the installation position of the microphone H. 2 Remove oil and other dirt from the cell-phone. Check to the driver. Connect the antenna firmly. / Pull the antenna out...
..., turn off the unit and consult your nearest service center. 34 English The unit is sometimes interrupted. Installation the Microphone Unit (KDC-X695 only) 1 Check the installation position of the microphone H. 2 Remove oil and other dirt from the cell-phone. Check to the driver. Connect the antenna firmly. / Pull the antenna out...

Instruction Manual
Page 35
... version. / Reset the iPod. The hands-free talk volume can play. "NO ENTRY" appears. The unit cannot communicate with the cell-phone. "USB ERROR" appears. Remove the USB device, turn the unit off, then turn it during handsfree talk. [MIC GAIN], [NR LEVEL] and [EC LEVEL] of this unit as you...
... version. / Reset the iPod. The hands-free talk volume can play. "NO ENTRY" appears. The unit cannot communicate with the cell-phone. "USB ERROR" appears. Remove the USB device, turn the unit off, then turn it during handsfree talk. [MIC GAIN], [NR LEVEL] and [EC LEVEL] of this unit as you...

Instruction Manual
Page 40
.... • Misuse,abuse, neglect. PeriodIC check·ups which theserial number has been effaced, modified or removed 5.lnstallationand!or removal charges. 6. parts or accessories that isdue to correct any of the following conditi ons in case of the Kenwood brand products. c/o A·33, Yokosuka NEX No. 260·010 FPO Seattle 98760 Atsugi...
.... • Misuse,abuse, neglect. PeriodIC check·ups which theserial number has been effaced, modified or removed 5.lnstallationand!or removal charges. 6. parts or accessories that isdue to correct any of the following conditi ons in case of the Kenwood brand products. c/o A·33, Yokosuka NEX No. 260·010 FPO Seattle 98760 Atsugi...
Instruction Manual
Page 41
...(b) Products purchased trom a dealer not aulhorized by KENWOOD (c) Products wilh the seriai number defaced, altered or missing. (d) Periodic check-ups which the serial number has been defaced, modified or removed. 3. KENWOOD garanlil, sous reserve des termes el des condilions ...enonces ci-dessous, que chaque nouveau produit Kenwood, dans des conditions d'emploi normales, est exempl de tous defauts. d. DISCLAIMER KENWOOD disclaims any responsibility for warranty repairs. e....
...(b) Products purchased trom a dealer not aulhorized by KENWOOD (c) Products wilh the seriai number defaced, altered or missing. (d) Periodic check-ups which the serial number has been defaced, modified or removed. 3. KENWOOD garanlil, sous reserve des termes el des condilions ...enonces ci-dessous, que chaque nouveau produit Kenwood, dans des conditions d'emploi normales, est exempl de tous defauts. d. DISCLAIMER KENWOOD disclaims any responsibility for warranty repairs. e....


