Instruction Manual
Page 1
... records Record the serial number, found on the back of the unit, in the spaces designated on the product. Familiarity with installation and operation procedures will help you call upon your KENWOOD dealer for information or service on the warranty card, and in the space provided below. KCA-R71FM FM MODULATOR SYSTEM INSTRUCTION MANUAL SYSTEME A MODULATION DE FREQUENCE MODE D'EMPLOI SISTEMA DE MODULADOR FM MANUAL DE INSTRUCCIONES FM Take the time to the model...
... records Record the serial number, found on the back of the unit, in the spaces designated on the product. Familiarity with installation and operation procedures will help you call upon your KENWOOD dealer for information or service on the warranty card, and in the space provided below. KCA-R71FM FM MODULATOR SYSTEM INSTRUCTION MANUAL SYSTEME A MODULATION DE FREQUENCE MODE D'EMPLOI SISTEMA DE MODULADOR FM MANUAL DE INSTRUCCIONES FM Take the time to the model...

Instruction Manual
Page 2
... Modes 5 Sirius satellite radio tuner features Selecting Sirius Mode 6 Switching Seek Mode 6 Selecting the Preset Band 6 Select the channel 7 Channel Preset Memory 7 Preset Tuning 7 Channel Scan 7 Channel Search 7 Direct Access Tuning 8 Switching Display 8 Disc control features Playing Disc 9 Fast Fowarding and Reversing 9 Track Search 9 Disc Search 10 Direct Track Search 10 Direct Disc Search 10 Track/Disc Repeat 10 Track Scan 10 Random Play 10 Magazine Random Play 11 Folder Search 11 Text/Title Scroll 11 Switching Display 11 Menu system Menu system 12 Changing...
... Modes 5 Sirius satellite radio tuner features Selecting Sirius Mode 6 Switching Seek Mode 6 Selecting the Preset Band 6 Select the channel 7 Channel Preset Memory 7 Preset Tuning 7 Channel Scan 7 Channel Search 7 Direct Access Tuning 8 Switching Display 8 Disc control features Playing Disc 9 Fast Fowarding and Reversing 9 Track Search 9 Disc Search 10 Direct Track Search 10 Direct Disc Search 10 Track/Disc Repeat 10 Track Scan 10 Random Play 10 Magazine Random Play 11 Folder Search 11 Text/Title Scroll 11 Switching Display 11 Menu system Menu system 12 Changing...
Instruction Manual
Page 3
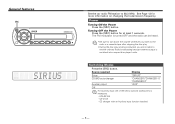
... be connected: To connect a disc changer having the "O-N" switch to this unit in your vehicle, contact your Kenwood dealer. Reset button • Some car stereos cause the sound of the tuner to make for a moment when an engine is not equipped with a dry silicon cloth or soft cloth. 2CAUTION Do not use the wrong screws, you smell or see smoke, turn off...
... be connected: To connect a disc changer having the "O-N" switch to this unit in your vehicle, contact your Kenwood dealer. Reset button • Some car stereos cause the sound of the tuner to make for a moment when an engine is not equipped with a dry silicon cloth or soft cloth. 2CAUTION Do not use the wrong screws, you smell or see smoke, turn off...
Instruction Manual
Page 5
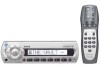
... Power Press the [SRC] button. CD changer with an Auxiliary input function installed. -5- General features SRC Set the car radio FM station to receive ordinary Radio broadcasting because antenna output is switched into compact disc player's side. Switching Modes Press the [SRC] button. The FM modulator is turned OFF and the radio can be heard. • Be sure to turn down the volume whenever you listen to the radio or a cassette tape...
... Power Press the [SRC] button. CD changer with an Auxiliary input function installed. -5- General features SRC Set the car radio FM station to receive ordinary Radio broadcasting because antenna output is switched into compact disc player's side. Switching Modes Press the [SRC] button. The FM modulator is turned OFF and the radio can be heard. • Be sure to turn down the volume whenever you listen to the radio or a cassette tape...
Instruction Manual
Page 6
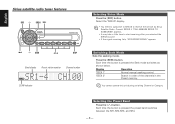
... display Preset station number Channel number SCAN indicator Selecting Sirius Mode Press the [SRC] button. Press the [SEEK] button. Display Operation "SEEK 1" "SEEK 2" Normal manual seeking control. You cannot operate this unit during switching Channel or Category. Each time the button is pressed the Seek mode switches as shown below. Switching Seek Mode Sets the seeking mode. Search in order of the channels in the Preset memory. Select the "SIRIUS" display. • You need to subscribe to SIRIUS to start receiving...
... display Preset station number Channel number SCAN indicator Selecting Sirius Mode Press the [SRC] button. Press the [SEEK] button. Display Operation "SEEK 1" "SEEK 2" Normal manual seeking control. You cannot operate this unit during switching Channel or Category. Each time the button is pressed the Seek mode switches as shown below. Switching Seek Mode Sets the seeking mode. Search in order of the channels in the Preset memory. Select the "SIRIUS" display. • You need to subscribe to SIRIUS to start receiving...

Instruction Manual
Page 7
.... 1 Enter Channel Search mode Press the [SRCH] button. 2 Select the Category Press the [u] or [d] button. 3 Select the Channel Press the [4] or [¢] button. Canceling Channel Search Press the [SRCH] button. The preset number display blinks 1 time. Preset Tuning Calling up the channels in the memory Press the [#1] - [#6] button for at least 1 second. "SCAN" indicator is received Press the [SEEK] button for at least 1 second. Channel Search A channel is...
.... 1 Enter Channel Search mode Press the [SRCH] button. 2 Select the Category Press the [u] or [d] button. 3 Select the Channel Press the [4] or [¢] button. Canceling Channel Search Press the [SRCH] button. The preset number display blinks 1 time. Preset Tuning Calling up the channels in the memory Press the [#1] - [#6] button for at least 1 second. "SCAN" indicator is received Press the [SEEK] button for at least 1 second. Channel Search A channel is...
Instruction Manual
Page 8
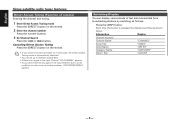
... cannot receive any signal in the input Channel due to Channel number 223. • If there is pressed the display switches as follows. Each time the button is no button operation for 10 seconds, the Direct Access Tuning mode is automatically canceled. • You can display various kinds of remote) Entering the channel and tuning. 1 Enter Direct Access Tuning mode Press the [DIRECT] button on radio wave or another problem, "ACQUIRING SIGNAL" appears. Switching Display You can set...
... cannot receive any signal in the input Channel due to Channel number 223. • If there is pressed the display switches as follows. Each time the button is no button operation for 10 seconds, the Direct Access Tuning mode is automatically canceled. • You can display various kinds of remote) Entering the channel and tuning. 1 Enter Direct Access Tuning mode Press the [DIRECT] button on radio wave or another problem, "ACQUIRING SIGNAL" appears. Switching Display You can set...
Instruction Manual
Page 9
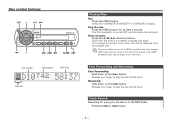
... [4] button. The FM modulator is replayed from the paused part. This unit enables control of the MP3compatible disc auto-changer to play the disc at least 1 second. Release your finger to be heard. Reversing Hold down on the [¢] button. Press the [4] or [¢] button. -9- Release your finger to the instruction manual of an MP3-compatible disc auto-changer. MP3 media formats, refer to play the disc at that point. Disc number...
... [4] button. The FM modulator is replayed from the paused part. This unit enables control of the MP3compatible disc auto-changer to play the disc at least 1 second. Release your finger to be heard. Reversing Hold down on the [¢] button. Press the [4] or [¢] button. -9- Release your finger to the instruction manual of an MP3-compatible disc auto-changer. MP3 media formats, refer to play the disc at that point. Disc number...

Instruction Manual
Page 10
... 're listening to select disc 10. 1 Start Track Scan Press the [SCN] button. Press the [u] or [d] button. Press the [REP] button. Repeat play Display Track Repeat Disc Repeat OFF Track No. Disc No. Track Scan Playing the first part of disc changers with remote) Doing Disc Search by entering the track number. 1 Enter the track number Press the number buttons on the remote. 2 Do Disc Search Press the [+] or [-] button. Canceling Direct Disc Search Press the [38] button. Input "0" to .
... 're listening to select disc 10. 1 Start Track Scan Press the [SCN] button. Press the [u] or [d] button. Press the [REP] button. Repeat play Display Track Repeat Disc Repeat OFF Track No. Disc No. Track Scan Playing the first part of disc changers with remote) Doing Disc Search by entering the track number. 1 Enter the track number Press the number buttons on the remote. 2 Do Disc Search Press the [+] or [-] button. Canceling Direct Disc Search Press the [38] button. Input "0" to .
Instruction Manual
Page 15
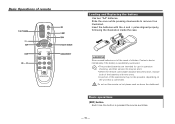
... their service life may not be short. • When the remote controllable distance becomes short, replace both of the operations may be possible, depending on hot places such as illustrated. poles aligned properly, following the illustration inside the case. 2WARNING Store unused batteries out of the reach of remote T. Basic operations [SRC] button Each time the button is connected. Do not set the remote...
... their service life may not be short. • When the remote controllable distance becomes short, replace both of the operations may be possible, depending on hot places such as illustrated. poles aligned properly, following the illustration inside the case. 2WARNING Store unused batteries out of the reach of remote T. Basic operations [SRC] button Each time the button is connected. Do not set the remote...

Instruction Manual
Page 16
.... [T.UP]/ [T.DOWN] buttons Tune up or down the channels. [0] - [9] buttons Press buttons [#1] - [#6] to recall preset channels. [DIRECT] button Enters and cancels the (page 8) mode. [CH SEARCH] button Enters and cancels the (page 7) mode. Each time the [+] button is pressed Trak Scan function turns ON or OFF. [0] - [9] buttons When in (page 10) and (page 10), enter the track/disc number. - 16 - English Basic Operations of remote In Sirius source [+] buttons Select the band.
.... [T.UP]/ [T.DOWN] buttons Tune up or down the channels. [0] - [9] buttons Press buttons [#1] - [#6] to recall preset channels. [DIRECT] button Enters and cancels the (page 8) mode. [CH SEARCH] button Enters and cancels the (page 7) mode. Each time the [+] button is pressed Trak Scan function turns ON or OFF. [0] - [9] buttons When in (page 10) and (page 10), enter the track/disc number. - 16 - English Basic Operations of remote In Sirius source [+] buttons Select the band.

Instruction Manual
Page 17
... view Number of items 1 2 2 1 3 1 The use the accessories shipped with the same rating. • Do not let unconnected wires or terminals touch metal on the car or anything else conducting electricity. To prevent a short circuit, remove the key from the ignition and disconnect the - Install the unit in the following order: ground, battery, ignition. 4. Make the proper input and output...
... view Number of items 1 2 2 1 3 1 The use the accessories shipped with the same rating. • Do not let unconnected wires or terminals touch metal on the car or anything else conducting electricity. To prevent a short circuit, remove the key from the ignition and disconnect the - Install the unit in the following order: ground, battery, ignition. 4. Make the proper input and output...
Instruction Manual
Page 18
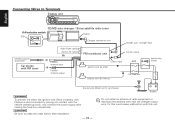
... ignition wire (Red) or battery wire (Yellow) is short-circuited by coming into contact with this could cause malfunction with the vehicle chassis (ground), only connect the power supply after installation. - 18 - Connecting Wires to press the reset button after making the fuse box connections. 2CAUTION Be sure to Terminals Display unit English CD/MD auto-changer / Sirius satellite radio tuner O-N selection switch "N" Output Changer connection wire CD/MD...
... ignition wire (Red) or battery wire (Yellow) is short-circuited by coming into contact with this could cause malfunction with the vehicle chassis (ground), only connect the power supply after installation. - 18 - Connecting Wires to press the reset button after making the fuse box connections. 2CAUTION Be sure to Terminals Display unit English CD/MD auto-changer / Sirius satellite radio tuner O-N selection switch "N" Output Changer connection wire CD/MD...
Instruction Manual
Page 19
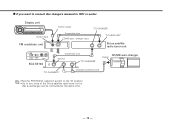
... CHANGER" "TO HEAD UNIT" Sirius satellite radio tuner unit ]N O N OFF ON PROTOCOL AUX SWITCH SWITCH AUX IN KCA-S210A Connection wire "TO HU" "TO CHANGER2" CD/MD auto-changer Output "TO CHANGER1" Changer connection wire • Set the PROTOCOL selection switch to the "N" position. • Up to connect disc changers released in 1997 or earlier Display unit Control input FM modulator unit Control output Connection wire CD/MD auto - ■ If you want...
... CHANGER" "TO HEAD UNIT" Sirius satellite radio tuner unit ]N O N OFF ON PROTOCOL AUX SWITCH SWITCH AUX IN KCA-S210A Connection wire "TO HU" "TO CHANGER2" CD/MD auto-changer Output "TO CHANGER1" Changer connection wire • Set the PROTOCOL selection switch to the "N" position. • Up to connect disc changers released in 1997 or earlier Display unit Control input FM modulator unit Control output Connection wire CD/MD auto - ■ If you want...
Instruction Manual
Page 20
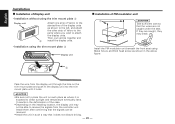
... to receive the signals from the controller unit. English Installation ■ Installation of Display unit • Installation without using the trim mount plate 3 Display unit Attach one strip of Velcro to the slanted-line of the display units as shown to the left, and attach the other strip of FM modulator unit 1 2CAUTION Take sufficient care so that it is exposed to direct...
... to receive the signals from the controller unit. English Installation ■ Installation of Display unit • Installation without using the trim mount plate 3 Display unit Attach one strip of Velcro to the slanted-line of the display units as shown to the left, and attach the other strip of FM modulator unit 1 2CAUTION Take sufficient care so that it is exposed to direct...
Instruction Manual
Page 21
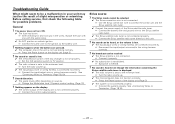
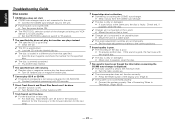
... Sirius satellite radio tuner is not functioning normally. ☞ Press the Reset button on sources. ☞ Change the Modulation level / Dynamic control setting. (Page 13) ? No broadcast can be selected.2 ✔ The Sirius connection wire is not connected. ☞ Use the Sirius connection wire to connect the control unit and the Sirius satellite radio tuner. ✔ Connect the power supply of slight misoperation or miswiring. Nothing happens when the buttons are connected incorrectly. ☞ Reconnect the input/output...
... Sirius satellite radio tuner is not functioning normally. ☞ Press the Reset button on sources. ☞ Change the Modulation level / Dynamic control setting. (Page 13) ? No broadcast can be selected.2 ✔ The Sirius connection wire is not connected. ☞ Use the Sirius connection wire to connect the control unit and the Sirius satellite radio tuner. ✔ Connect the power supply of slight misoperation or miswiring. Nothing happens when the buttons are connected incorrectly. ☞ Reconnect the input/output...
Instruction Manual
Page 22
...; Press the Reset button of the display unit. (Page 3) ✔ The system is faulty. No sound is heard even though the information concerning the CD/MD auto-changer is displayed.67 ✔ The radio volume is sets to the minimum level. ☞ Turn the radio volume up . ✔ The disc is loaded in a stable place. ✔ The angle adjustment switches are set properly.54...
...; Press the Reset button of the display unit. (Page 3) ✔ The system is faulty. No sound is heard even though the information concerning the CD/MD auto-changer is displayed.67 ✔ The radio volume is sets to the minimum level. ☞ Turn the radio volume up . ✔ The disc is loaded in a stable place. ✔ The angle adjustment switches are set properly.54...
Instruction Manual
Page 23
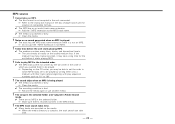
...; The disc format is not an MP3. ☞ Do not use another media. ? Noise or no MP3 in the selected folder. ☞ Make sure there's recorded content in the unit connected. ☞ Refer to "99". ? MP3 source ? Cannot play sequence numbers such as "01" to the instruction manual of the disc changer (slave unit) for the unit before the unit starts playing MP3.71...
...; The disc format is not an MP3. ☞ Do not use another media. ? Noise or no MP3 in the selected folder. ☞ Make sure there's recorded content in the unit connected. ☞ Refer to "99". ? MP3 source ? Cannot play sequence numbers such as "01" to the instruction manual of the disc changer (slave unit) for the unit before the unit starts playing MP3.71...
Instruction Manual
Page 24
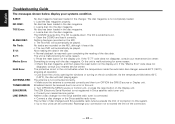
... all operation.E0d ➪ Cool down . As the temperature falls below display your nearest service center. Broadcast cannot be connected. The number of disc changers and Sirius satellite radio tuners exceeds the limit of the connection. - 24 - Rearrange your nearest service center. Nothing has been recorded on the Display unit. The CD/MD is upside-down the unit by opening the windows or turning on the...
... all operation.E0d ➪ Cool down . As the temperature falls below display your nearest service center. Broadcast cannot be connected. The number of disc changers and Sirius satellite radio tuners exceeds the limit of the connection. - 24 - Rearrange your nearest service center. Nothing has been recorded on the Display unit. The CD/MD is upside-down the unit by opening the windows or turning on the...

Instruction Manual
Page 25
... V) Current consumption 1.0 A Operating Temperature 10 ~ 50 °C Preout Level (mV)/ Load (during disc play 1000mV/10 kΩ Preout impedance 600Ω Size (W × H × D) Remote Controller 45 × 140 × 29 mm (1-12/16 × 5-8/16 × 1-1/8 in.) Display unit 154 × 43 × 17 mm (6-1/16 × 1-11/16 × 11/16 in.) FM modulator unit 126...
... V) Current consumption 1.0 A Operating Temperature 10 ~ 50 °C Preout Level (mV)/ Load (during disc play 1000mV/10 kΩ Preout impedance 600Ω Size (W × H × D) Remote Controller 45 × 140 × 29 mm (1-12/16 × 5-8/16 × 1-1/8 in.) Display unit 154 × 43 × 17 mm (6-1/16 × 1-11/16 × 11/16 in.) FM modulator unit 126...
