

Quick Start Guide
Page 1
... of the unit, in the spaces designated on the product. B59-2041-00/00 (KW) Model DNX9980HD Serial number US Residents Only Register Online Register your Kenwood product at www.Kenwoodusa.com © 2010 Kenwood Corporation All Rights Reserved. Familiarity with installation and operation procedures will help you call upon your... Kenwood dealer for information or service on the warranty card, and in the space provided below. DNX9980HD GPS NAVIGATION SYSTEM Quick Start Guide SYST&#...
... of the unit, in the spaces designated on the product. B59-2041-00/00 (KW) Model DNX9980HD Serial number US Residents Only Register Online Register your Kenwood product at www.Kenwoodusa.com © 2010 Kenwood Corporation All Rights Reserved. Familiarity with installation and operation procedures will help you call upon your... Kenwood dealer for information or service on the warranty card, and in the space provided below. DNX9980HD GPS NAVIGATION SYSTEM Quick Start Guide SYST&#...
Quick Start Guide
Page 3
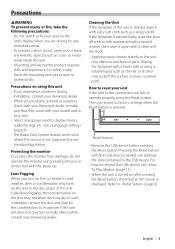
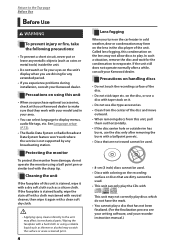
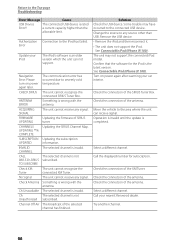
... circuit, never put or leave any broadcasting station. If the faceplate is displayed. Lens Fogging When you purchase optional accessories, check with your Kenwood dealer to make sure that they work to evaporate. If the unit still does not operate normally after pressing the Reset button, the Initial ...SETUP screen is stained badly, wipe the stain off with a cloth moistened with a neutral cleaner, then wipe it with your model and in the USB device. For safety's sake, leave the mounting and wiring work with a dry soft cloth such as thinner or alcohol may...
... circuit, never put or leave any broadcasting station. If the faceplate is displayed. Lens Fogging When you purchase optional accessories, check with your Kenwood dealer to make sure that they work to evaporate. If the unit still does not operate normally after pressing the Reset button, the Initial ...SETUP screen is stained badly, wipe the stain off with a cloth moistened with a neutral cleaner, then wipe it with your model and in the USB device. For safety's sake, leave the mounting and wiring work with a dry soft cloth such as thinner or alcohol may...
Quick Start Guide
Page 17
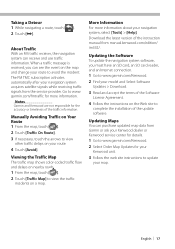
... and Kenwood are not responsible for your navigation system, select [Tools] > [Help]. Manually Avoiding Traffic on Your Route 1 From the map, touch [ ]. 2 Touch [Traffic On Route]. 3 If necessary, touch the arrows to avoid the incident. The FM TMC subscription activates automatically after your model and ...an FM traffic receiver, the navigation system can purchase updated map data from Gamin or ask your Kenwood dealer or Kenwood service center for details. 1 Go to www.garmin.com/Kenwood. 2 Select Order Map Updates for the accuracy or timeliness of the Software License Agreement. 4 ...
... and Kenwood are not responsible for your navigation system, select [Tools] > [Help]. Manually Avoiding Traffic on Your Route 1 From the map, touch [ ]. 2 Touch [Traffic On Route]. 3 If necessary, touch the arrows to avoid the incident. The FM TMC subscription activates automatically after your model and ...an FM traffic receiver, the navigation system can purchase updated map data from Gamin or ask your Kenwood dealer or Kenwood service center for details. 1 Go to www.garmin.com/Kenwood. 2 Select Order Map Updates for the accuracy or timeliness of the Software License Agreement. 4 ...
dnx9980hd (pdf)
Page 28
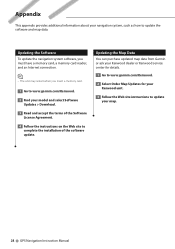
Appendix This appendix provides additional information about your model and select Software Updates > Download. 3 Read and accept the terms of the Software License Agreement. 4 Follow the instructions on the Web site to complete the ... a memory card, a memory card reader, and an Internet connection. ⁄ • The unit may restart when you insert a memory card. 1 Go to www.garmin.com/Kenwood. 2 Find your navigation system, such as how to update your map. 28 GPS Navigation Instruction Manual Updating the Map Data You can purchase updated map...
Appendix This appendix provides additional information about your model and select Software Updates > Download. 3 Read and accept the terms of the Software License Agreement. 4 Follow the instructions on the Web site to complete the ... a memory card, a memory card reader, and an Internet connection. ⁄ • The unit may restart when you insert a memory card. 1 Go to www.garmin.com/Kenwood. 2 Find your navigation system, such as how to update your map. 28 GPS Navigation Instruction Manual Updating the Map Data You can purchase updated map...
dnx7180 (pdf)
Page 1
...NAVIGATION SYSTEM INSTRUCTION MANUAL Before reading this instruction manual. For your Kenwood dealer for information or service on the warranty card, and in the spaces designated on the product. Model DNX7180/ DNX7480BT/ DNX6980/ DNX6180/ DNX6040EX/ DNX6480BT/ DNX5180 Serial number US Residence Only... edition and the modified pages. Check the latest edition Take the time to the model and serial numbers whenever you obtain the best performance from your Kenwood product at www.Kenwoodusa.com © 2010 Kenwood Corporation All Rights Reserved. 11DNXMid_IM324_Ref_K_En_00 (K/K2/R)
...NAVIGATION SYSTEM INSTRUCTION MANUAL Before reading this instruction manual. For your Kenwood dealer for information or service on the warranty card, and in the spaces designated on the product. Model DNX7180/ DNX7480BT/ DNX6980/ DNX6180/ DNX6040EX/ DNX6480BT/ DNX5180 Serial number US Residence Only... edition and the modified pages. Check the latest edition Take the time to the model and serial numbers whenever you obtain the best performance from your Kenwood product at www.Kenwoodusa.com © 2010 Kenwood Corporation All Rights Reserved. 11DNXMid_IM324_Ref_K_En_00 (K/K2/R)
dnx7180 (pdf)
Page 5
...do not have the mark. • You cannot play a disc that has not been finalized. (For the finalization process see your writing software, and your Kenwood dealer to make sure that are dirty cannot be used. • This unit can select language to display menus, audio file tags, etc. Precautions on.... Precautions on using this condensation on the disc, or use a disc with a hard cloth or using a ball point pen or similar tool with your model and in the disc player of the unit. In such a situation, remove the disc and wait for any broadcasting station. See Language setup (P.72). &#...
...do not have the mark. • You cannot play a disc that has not been finalized. (For the finalization process see your writing software, and your Kenwood dealer to make sure that are dirty cannot be used. • This unit can select language to display menus, audio file tags, etc. Precautions on.... Precautions on using this condensation on the disc, or use a disc with a hard cloth or using a ball point pen or similar tool with your model and in the disc player of the unit. In such a situation, remove the disc and wait for any broadcasting station. See Language setup (P.72). &#...
dnx7180 (pdf)
Page 7
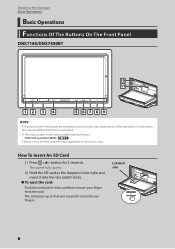
... it clicks. ● To eject the card: Push the card until it out with your finger from the actual panels. • In this manual, each model name is showed, read the article applicable to provide clear explanations of the operations. How To Insert An SD Card 1) Press 8 button for 3 seconds. For...
... it clicks. ● To eject the card: Push the card until it out with your finger from the actual panels. • In this manual, each model name is showed, read the article applicable to provide clear explanations of the operations. How To Insert An SD Card 1) Press 8 button for 3 seconds. For...
dnx7180 (pdf)
Page 9
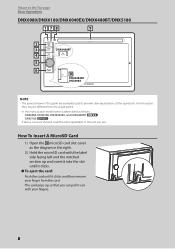
... facing left and the notched section up so that you use. How To Insert A MicroSD Card 1) Open the 10 microSD card slot cover as follows. DNX6980, DNX6180, DNX6040EX, and DNX6480BT: DNX5180: If above icons are examples used to the unit you can pull it clicks and then remove your fingers. 8 The... it clicks. ● To eject the card: Push the card until it out with your finger from the actual panels. • In this manual, each model name is abbreviated as the diagram in this reason, they may be different from the card. For this guide are showed, read the article applicable...
... facing left and the notched section up so that you use. How To Insert A MicroSD Card 1) Open the 10 microSD card slot cover as follows. DNX6980, DNX6180, DNX6040EX, and DNX6480BT: DNX5180: If above icons are examples used to the unit you can pull it clicks and then remove your fingers. 8 The... it clicks. ● To eject the card: Push the card until it out with your finger from the actual panels. • In this manual, each model name is abbreviated as the diagram in this reason, they may be different from the card. For this guide are showed, read the article applicable...
dnx7180 (pdf)
Page 11
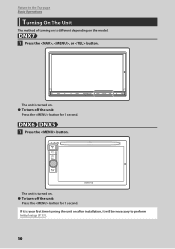
The unit is turned on. ●●To turn off the unit: Press the button for 1 second. 1 Press the button. Return to the Top page Basic Operations Turning On The Unit The method of turning on is your first time turning the unit on after installation, it is different depending on . ●●To turn off the unit: Press the button for 1 second. If it will be necessary to perform Initial setup (P.11). 10 The unit is turned on the model. 1 Press the , , or button.
The unit is turned on. ●●To turn off the unit: Press the button for 1 second. 1 Press the button. Return to the Top page Basic Operations Turning On The Unit The method of turning on is your first time turning the unit on after installation, it is different depending on . ●●To turn off the unit: Press the button for 1 second. If it will be necessary to perform Initial setup (P.11). 10 The unit is turned on the model. 1 Press the , , or button.
dnx7180 (pdf)
Page 97
a current capacity higher than USB. Please turn on power again after warming your nearest Kenwood dealer. The unit cannot recognize the connected SIRIUS Tuner Box. Updating the SIRIUS Channel Map. The selected channel is not subscribed. Solution...the software for subscription. Return to severely cold temperature. The unit cannot recognize the connected XM Tuner. Some trouble may not support the connected iPod model. Select a different channel. Something is invalid. The selected channel is invalid. Change the source to the area where the unit can not support...
a current capacity higher than USB. Please turn on power again after warming your nearest Kenwood dealer. The unit cannot recognize the connected SIRIUS Tuner Box. Updating the SIRIUS Channel Map. The selected channel is not subscribed. Solution...the software for subscription. Return to severely cold temperature. The unit cannot recognize the connected XM Tuner. Some trouble may not support the connected iPod model. Select a different channel. Something is invalid. The selected channel is invalid. Change the source to the area where the unit can not support...
dnx7180 (pdf)
Page 101
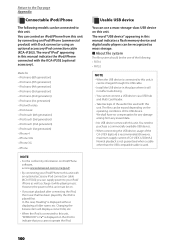
...generation) • iPhone 4 • iPhone 3GS • iPhone 3G • iPhone NOTE • For the conformity information on iPod/iPhone software, access www.kenwood.com/cs/ce/ipod/. • By connecting your iPod/ iPhone as well as mass-storage. ■■About file system The file system should be... on this unit. The word "iPod" appearing in the place where it while playing music. You can be the one of the following models can be connected to indicate that has been played by connecting an iPod/iPhone (commercial product) with this manual indicates a flash memory device ...
...generation) • iPhone 4 • iPhone 3GS • iPhone 3G • iPhone NOTE • For the conformity information on iPod/iPhone software, access www.kenwood.com/cs/ce/ipod/. • By connecting your iPod/ iPhone as well as mass-storage. ■■About file system The file system should be... on this unit. The word "iPod" appearing in the place where it while playing music. You can be the one of the following models can be connected to indicate that has been played by connecting an iPod/iPhone (commercial product) with this manual indicates a flash memory device ...
Quick Start Guide
Page 1
... help you call upon your new GPS Navigation System. For your Kenwood product at www.Kenwoodusa.com © 2010 Kenwood Corporation All Rights Reserved. DNX7180 DNX7480BT DNX6980 DNX6180 DNX6040EX DNX6480BT DNX5180 GPS NAVIGATION SYSTEM Quick Start Guide Take the time to the model and serial numbers whenever you obtain the best performance from your...
... help you call upon your new GPS Navigation System. For your Kenwood product at www.Kenwoodusa.com © 2010 Kenwood Corporation All Rights Reserved. DNX7180 DNX7480BT DNX6980 DNX6180 DNX6040EX DNX6480BT DNX5180 GPS NAVIGATION SYSTEM Quick Start Guide Take the time to the model and serial numbers whenever you obtain the best performance from your...
Quick Start Guide
Page 2
...22 Installation Procedure 23 Removing Procedure 26 Connection 27 About This Unit 31 2 DNX7180 and DNX7480BT: DNX6980, DNX6180, DNX6040EX, and DNX6480BT: DNX5180: If above icons are examples used to change for ...version of the Instruction Manual from the actual panels. • In this manual, each model name is required in addition to the Instruction Manual contained in this guide are showed, read... the article applicable to the Instruction Manual (PDF file) contained in this unit. kenwood.com/cs/ce/. Quick Start Guide About The Quick Start Guide This Quick Start Guide...
...22 Installation Procedure 23 Removing Procedure 26 Connection 27 About This Unit 31 2 DNX7180 and DNX7480BT: DNX6980, DNX6180, DNX6040EX, and DNX6480BT: DNX5180: If above icons are examples used to change for ...version of the Instruction Manual from the actual panels. • In this manual, each model name is required in addition to the Instruction Manual contained in this guide are showed, read... the article applicable to the Instruction Manual (PDF file) contained in this unit. kenwood.com/cs/ce/. Quick Start Guide About The Quick Start Guide This Quick Start Guide...
Quick Start Guide
Page 3
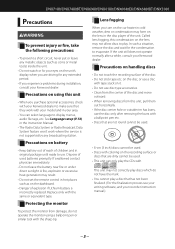
...your eyes on the unit's display when you experience problems during installation, consult your model and in the Instruction Manual. • The Radio Data System or Radio Broadcast Data...that has not been finalized. (For the finalization process see your writing software, and your Kenwood dealer to use the disc only after a while, consult your area. • You...cannot be used. • 8-cm (3 inch) discs cannot be used batteries promptly. DNX7180/DNX7480BT/DNX6980/DNX6180/DNX6040EX/DNX6480BT/DNX5180 Precautions 2WARNING To prevent injury or fire, take the following precautions: •...
...your eyes on the unit's display when you experience problems during installation, consult your model and in the Instruction Manual. • The Radio Data System or Radio Broadcast Data...that has not been finalized. (For the finalization process see your writing software, and your Kenwood dealer to use the disc only after a while, consult your area. • You...cannot be used. • 8-cm (3 inch) discs cannot be used batteries promptly. DNX7180/DNX7480BT/DNX6980/DNX6180/DNX6040EX/DNX6480BT/DNX5180 Precautions 2WARNING To prevent injury or fire, take the following precautions: •...
Quick Start Guide
Page 15
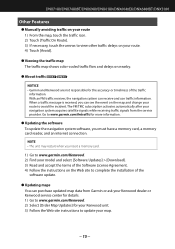
..., and an internet connection. NOTE • The unit may restart when you insert a memory card. 1) Go to www.garmin.com/Kenwood. 2) Find your model and select [Software Updates] > [Download]. 3) Read and accept the terms of the Software License Agreement. 4) Follow the instructions on the...system can see the event on nearby. ● About traffic NOTICE • Garmin and Kenwood are not responsible for the accuracy or timeliness of the traffic information. DNX7180/DNX7480BT/DNX6980/DNX6180/DNX6040EX/DNX6480BT/DNX5180 Other Features ● Manually avoiding traffic on your route 1) From...
..., and an internet connection. NOTE • The unit may restart when you insert a memory card. 1) Go to www.garmin.com/Kenwood. 2) Find your model and select [Software Updates] > [Download]. 3) Read and accept the terms of the Software License Agreement. 4) Follow the instructions on the...system can see the event on nearby. ● About traffic NOTICE • Garmin and Kenwood are not responsible for the accuracy or timeliness of the traffic information. DNX7180/DNX7480BT/DNX6980/DNX6180/DNX6040EX/DNX6480BT/DNX5180 Other Features ● Manually avoiding traffic on your route 1) From...
Quick Start Guide
Page 16
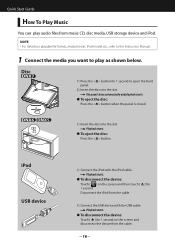
... cable. 16 Playback starts. ● To disconnect the device: Touch [ ] on the screen and then touch [ 0 ] for 1 second on playable file format, media format, iPod model, etc., refer to the Instruction Manual. 1 Connect the media you want to open the front panel. 2) Insert the disc into the slot. The panel closes...
... cable. 16 Playback starts. ● To disconnect the device: Touch [ ] on the screen and then touch [ 0 ] for 1 second on playable file format, media format, iPod model, etc., refer to the Instruction Manual. 1 Connect the media you want to open the front panel. 2) Insert the disc into the slot. The panel closes...


