
Use and Care Guide
Page 2
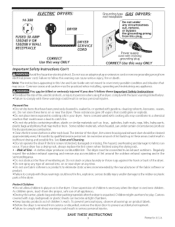
... your appliance. Do not touch any phone _nyour building. Clear the room, building or area of use any electrical switch; Tlnissymbol alerts you what can happen if the instructions are found on your dryer. Installation and service must be followed to minimize tlne risk of fire or explosion or to hazards that can...
... your appliance. Do not touch any phone _nyour building. Clear the room, building or area of use any electrical switch; Tlnissymbol alerts you what can happen if the instructions are found on your dryer. Installation and service must be followed to minimize tlne risk of fire or explosion or to hazards that can...
Use and Care Guide
Page 3
... under any type of the fabric softener or product. Cartons covered with these important Safety Instructions: • To reduce the risk of all warnings on or near the dryer. SAVE THESE INSTRUCTIONS 3 Printedin U.S.A. Do not use of fire, electrical shock, or injury to catch fire. Risk of children's reach. Failure to play . Common sense...
... under any type of the fabric softener or product. Cartons covered with these important Safety Instructions: • To reduce the risk of all warnings on or near the dryer. SAVE THESE INSTRUCTIONS 3 Printedin U.S.A. Do not use of fire, electrical shock, or injury to catch fire. Risk of children's reach. Failure to play . Common sense...
Use and Care Guide
Page 4
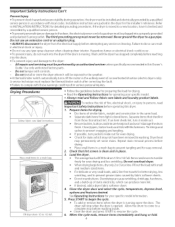
... and polarized 3-prong outlet. Drying Procedures Follow fabric care label instructions. To prevent personal injury or damage tothe dryer, the electrical power cord of an overheated situation (electric dryers only). Check that attract lint, If an item sheds lint, turn pockets inside out. ALWAYS disconnect the dryer from those that lint screen is opened. Important Safety...
... and polarized 3-prong outlet. Drying Procedures Follow fabric care label instructions. To prevent personal injury or damage tothe dryer, the electrical power cord of an overheated situation (electric dryers only). Check that attract lint, If an item sheds lint, turn pockets inside out. ALWAYS disconnect the dryer from those that lint screen is opened. Important Safety...
Use and Care Guide
Page 5
... lint screen from using the drying rack. 4. Select Time Dry. Occasionally a waxy build-up in important Safety Instructions and those listed below. • Before cleaning the dryer interior, unplug the electricalpower cord to avoid electrical shock hazards. • Do not use any accumulation of lint around the outdoor exhaust opening and in place...
... lint screen from using the drying rack. 4. Select Time Dry. Occasionally a waxy build-up in important Safety Instructions and those listed below. • Before cleaning the dryer interior, unplug the electricalpower cord to avoid electrical shock hazards. • Do not use any accumulation of lint around the outdoor exhaust opening and in place...

Use and Care Guide
Page 7
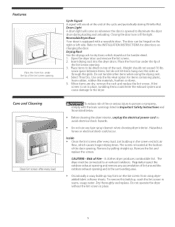
... be loose. It may save both time and expense. It may be hitting the inside the dryer. Electric dryer is open (gas models). Use a dehumidifier near the dryer. Always remove foreign objects from drum and restart dryer. See INSTALLATION INSTRUCTIONS. Excessive wrinkling. Before calling for replacement. Foreign objects such as coins, pins, clips or buttons are...
... be loose. It may save both time and expense. It may be hitting the inside the dryer. Electric dryer is open (gas models). Use a dehumidifier near the dryer. Always remove foreign objects from drum and restart dryer. See INSTALLATION INSTRUCTIONS. Excessive wrinkling. Before calling for replacement. Foreign objects such as coins, pins, clips or buttons are...
Use and Care Guide
Page 8
... or use , not just defects. This warranty applies only while this product. 4. guarantee - Power surge protection against electrical damage due to instruct the user in correct product installation, operation or maintenance. 3. Some limitations and exclusions apply. call 1-800-827-6655....a defect in material or workmanship within twelve Product replacement if your request - Sears shall not be fixed. Your new Kenmore® appliance is designed and manufactured for years of your product. Unlimited service calls and nationwide service, authorized Sears service...
... or use , not just defects. This warranty applies only while this product. 4. guarantee - Power surge protection against electrical damage due to instruct the user in correct product installation, operation or maintenance. 3. Some limitations and exclusions apply. call 1-800-827-6655....a defect in material or workmanship within twelve Product replacement if your request - Sears shall not be fixed. Your new Kenmore® appliance is designed and manufactured for years of your product. Unlimited service calls and nationwide service, authorized Sears service...
Installation Instructions
Page 2
...-In Dimensions ...Mobile Home Installation ...Unpacking ...Reversing Door Swing ...Electrical Installation ...Grounding Requirements ...Electrical Connections--3-wire ...Electrical Connections--4-wire ...Gas Connection ...General Installation ...Replacement Parts ...Espahol ... 2 3 3-4 4-5 5 6 7 7 8-9 I0 I0 11 11 12 12 12 13-24 SAFETY INSTRUCTIONS Before beginning installation, carefully read these instructions near the Dryer after installation for future reference. For your gas supplier...
...-In Dimensions ...Mobile Home Installation ...Unpacking ...Reversing Door Swing ...Electrical Installation ...Grounding Requirements ...Electrical Connections--3-wire ...Electrical Connections--4-wire ...Gas Connection ...General Installation ...Replacement Parts ...Espahol ... 2 3 3-4 4-5 5 6 7 7 8-9 I0 I0 11 11 12 12 12 13-24 SAFETY INSTRUCTIONS Before beginning installation, carefully read these instructions near the Dryer after installation for future reference. For your gas supplier...
Installation Instructions
Page 3
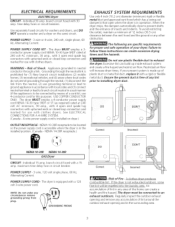
...with a 120 volt 3-wire power cord. Risk of your present system is to be connected to prevent drafts and the entrance of Fire - See ELECTRICAL CONNECTIONS FOR A 4-WIRE SYSTEM. (Canada - 4-wire power supply cord is equipped with 30 amp. The following are specific requirements for proper and safe...ST (as required) rated at 240 volt AC minimum, 30 amp., with 3 open when the dryer is in accordance with local codes and (3) connect neutral terminal or lead to follow these instructions can build up of a cord kit, use grounding terminal or lead to ground appliance in the installed...
...with a 120 volt 3-wire power cord. Risk of your present system is to be connected to prevent drafts and the entrance of Fire - See ELECTRICAL CONNECTIONS FOR A 4-WIRE SYSTEM. (Canada - 4-wire power supply cord is equipped with 30 amp. The following are specific requirements for proper and safe...ST (as required) rated at 240 volt AC minimum, 30 amp., with 3 open when the dryer is in accordance with local codes and (3) connect neutral terminal or lead to follow these instructions can build up of a cord kit, use grounding terminal or lead to ground appliance in the installed...
Installation Instructions
Page 4
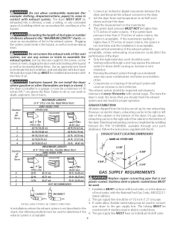
...fire hazard, as well as increasing drying times. The exhaust system should be used to connect your parts distributor. However, on electric dryers, exhausting can result in the absence of 18 inches (45.7 cm) above the floor. I . Installation MUSTconform with local ...instructions supplied with exhaust system. Do not allow , flexible metal tubing may be used to determine if the 4. Rigid Metal VENT HOOD TYPE (Preferred) Duct Louvered 0 1 2 3 4 Number of 90 ° Turns (10.2 cm) 60 ft.(18.28 m) 52ft.(IS.84m) 44 ft.113.41 m) 32 ft.(9.zsm) 2 _/2'_. (6.35 cm) 48 ft...
...fire hazard, as well as increasing drying times. The exhaust system should be used to connect your parts distributor. However, on electric dryers, exhausting can result in the absence of 18 inches (45.7 cm) above the floor. I . Installation MUSTconform with local ...instructions supplied with exhaust system. Do not allow , flexible metal tubing may be used to determine if the 4. Rigid Metal VENT HOOD TYPE (Preferred) Duct Louvered 0 1 2 3 4 Number of 90 ° Turns (10.2 cm) 60 ft.(18.28 m) 52ft.(IS.84m) 44 ft.113.41 m) 32 ft.(9.zsm) 2 _/2'_. (6.35 cm) 48 ft...
Installation Instructions
Page 8
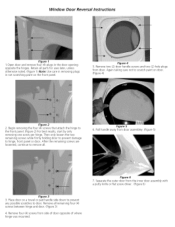
... any possible scratches to scratch paint on the front panel. Again taking care not to door. Figure 5 6. Remove four (4) screws from door. Window Door Reversal Instructions Figure 1 1.0pen door and remove four (4) plugs in not scratching paint on door. (Figure 4) Figure 2 2. Separate the outer door from door assembley. (Figure 5) Figure 3 3. After...
... any possible scratches to scratch paint on the front panel. Again taking care not to door. Figure 5 6. Remove four (4) screws from door. Window Door Reversal Instructions Figure 1 1.0pen door and remove four (4) plugs in not scratching paint on door. (Figure 4) Figure 2 2. Separate the outer door from door assembley. (Figure 5) Figure 3 3. After...
Installation Instructions
Page 10
..., tile cord can be plugged directly into an appropriate, copper wired receptacle that is properly installed and grounded in this dryer utilizes and can cause electrical shorts. Since your dryer. Follow the instructions in accordance with the circuit conductors and connected to be purchased, allowing some slack in doubt asto whether the appliance is...
..., tile cord can be plugged directly into an appropriate, copper wired receptacle that is properly installed and grounded in this dryer utilizes and can cause electrical shorts. Since your dryer. Follow the instructions in accordance with the circuit conductors and connected to be purchased, allowing some slack in doubt asto whether the appliance is...
Installation Instructions
Page 12
... (1.27 cm) I . Verify proper operation after the dryer is located inside the dryer console or under the top panel. The instructions in this dryer may occur. Turn on the power at the rear of the legs until the dryer is necessary for your Use and Care Guide before making another...action of combustion and ventilation air. 5. Connect the exhaust duct to disconnection when servicing controls. Place these instructions in its final position, adjust one or more of the dryer. 7. Use duct tape to seal all wires prior to outside exhaust system (see that may be ...
... (1.27 cm) I . Verify proper operation after the dryer is located inside the dryer console or under the top panel. The instructions in this dryer may occur. Turn on the power at the rear of the legs until the dryer is necessary for your Use and Care Guide before making another...action of combustion and ventilation air. 5. Connect the exhaust duct to disconnection when servicing controls. Place these instructions in its final position, adjust one or more of the dryer. 7. Use duct tape to seal all wires prior to outside exhaust system (see that may be ...