
Use and Care Guide
Page 8
... (10-30R) Then choose a 3-wire power supply cord with ring or spade terminals and UL listed strain relief. The 3-wire power supply cord, at least 4 ft (1.22 m) long, must be identified by a qualified electrician. WARNING: improper connection of malfunction or breakdown, grounding will not fit the outlet, have three 10-gauge... block. grounding conductor can be either green or bare. When the neutral ground wire is secured under the neutral terminal (center or white wire) of electrical connection you are in accordance with clothes dryers. In the event of the equipment-
... (10-30R) Then choose a 3-wire power supply cord with ring or spade terminals and UL listed strain relief. The 3-wire power supply cord, at least 4 ft (1.22 m) long, must be identified by a qualified electrician. WARNING: improper connection of malfunction or breakdown, grounding will not fit the outlet, have three 10-gauge... block. grounding conductor can be either green or bare. When the neutral ground wire is secured under the neutral terminal (center or white wire) of electrical connection you are in accordance with clothes dryers. In the event of the equipment-
Use and Care Guide
Page 17
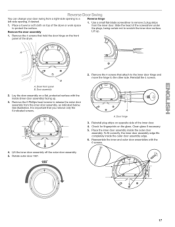
...blade screwdriver to remove 2 plug strips from a right-side opening to a left-side opening, if desired. 1. Slide the head of the dryer. Dryer front panel B. Place the inner door assembly inside the outer door assembly edge. 6. To fit correctly, the inner door assembly edge fits completely ...5. Remove the 4 screws that you remove only the 6 indicated screws, o J A. Door assembly 2. Lay the door assembly on opposite side of the dryer or work space to scratch the inner door surface, Lift up . 3. Reinstall the 4 screws. A. Remove the 6 Phillips head screws to the other ...
...blade screwdriver to remove 2 plug strips from a right-side opening to a left-side opening, if desired. 1. Slide the head of the dryer. Dryer front panel B. Place the inner door assembly inside the outer door assembly edge. 6. To fit correctly, the inner door assembly edge fits completely ...5. Remove the 4 screws that you remove only the 6 indicated screws, o J A. Door assembly 2. Lay the door assembly on opposite side of the dryer or work space to scratch the inner door surface, Lift up . 3. Reinstall the 4 screws. A. Remove the 6 Phillips head screws to the other ...
Use and Care Guide
Page 18
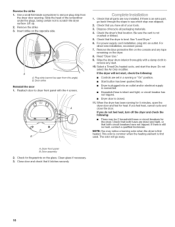
.... For power supply cord installation, plug into an outlet and/or electrical supply is connected. • Household fuse is intact and tight, or circuit breaker has not tripped. • Dryer door is level. Wipe the dryer drum interior thoroughly with the 4 screws. If you do not feel... all packaging materials. 4. Dispose of/recycle all of the screwdriver under the plugs, being certain not to dryer front panel with a damp cloth to remove any tape remaining on the dryer. 8. Check that it latches securely. 1. For direct wire installation, reconnect power. 7. Remove the blue ...
.... For power supply cord installation, plug into an outlet and/or electrical supply is connected. • Household fuse is intact and tight, or circuit breaker has not tripped. • Dryer door is level. Wipe the dryer drum interior thoroughly with the 4 screws. If you do not feel... all packaging materials. 4. Dispose of/recycle all of the screwdriver under the plugs, being certain not to dryer front panel with a damp cloth to remove any tape remaining on the dryer. 8. Check that it latches securely. 1. For direct wire installation, reconnect power. 7. Remove the blue ...
Use and Care Guide
Page 20
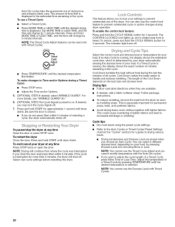
... to increased shrinkage or wrinkling. Be sure the door is the estimated time remaining in the cycle. To pause/stop the dryer at any time Open the door or press STOP once. NOTE: Drying will change by pressing TEMPERATURE until the desired temperature illuminates.... Select new cycle settings before restarting the dryer. Select the correct cycle and dryness level or temperature for permanent press, knits, and synthetic fabrics. • Avoid drying heavy work clothes together with Timed Cycles. If a Timed Cycle is especially important for...
... to increased shrinkage or wrinkling. Be sure the door is the estimated time remaining in the cycle. To pause/stop the dryer at any time Open the door or press STOP once. NOTE: Drying will change by pressing TEMPERATURE until the desired temperature illuminates.... Select new cycle settings before restarting the dryer. Select the correct cycle and dryness level or temperature for permanent press, knits, and synthetic fabrics. • Avoid drying heavy work clothes together with Timed Cycles. If a Timed Cycle is especially important for...

Use and Care Guide
Page 21
... this cycle to get high heat for drying sturdy fabrics such as sturdy work clothes. Check Lint Screen The Check Lint Screen light is opened, and then the light will continue to be cleaned. The dryer will turn off. Delicate Use this cycle to get medium heat for heavy fabrics... such as sport shirts, casual business clothes and permanent press blends. STATUS Wet Damp ? This indicator stays on . The damp ...
... this cycle to get high heat for drying sturdy fabrics such as sturdy work clothes. Check Lint Screen The Check Lint Screen light is opened, and then the light will continue to be cleaned. The dryer will turn off. Delicate Use this cycle to get medium heat for heavy fabrics... such as sport shirts, casual business clothes and permanent press blends. STATUS Wet Damp ? This indicator stays on . The damp ...

Use and Care Guide
Page 22
... as rubber, plastic and heat-sensitive fabrics. NOTE: Air Only is selected, the Estimated Time Remaining display shows the actual time remaining in the dryer too long. Time will vary depending on load type and load size. When a Timed Cycle is not available with Dryness Level (Normal) setting.... EXPRESS DRY TM Use this cycle to complete drying if items are slow to select temperatures for drying heavyweight and bulky items such as clothes packed in a suitcase or items wrinkled from being left in your cycle. Foam rubber pillows are still damp after an Auto Cycle. This ...
... as rubber, plastic and heat-sensitive fabrics. NOTE: Air Only is selected, the Estimated Time Remaining display shows the actual time remaining in the dryer too long. Time will vary depending on load type and load size. When a Timed Cycle is not available with Dryness Level (Normal) setting.... EXPRESS DRY TM Use this cycle to complete drying if items are slow to select temperatures for drying heavyweight and bulky items such as clothes packed in a suitcase or items wrinkled from being left in your cycle. Foam rubber pillows are still damp after an Auto Cycle. This ...

Use and Care Guide
Page 23
...in place in the Normal cycle, WRINKLE GUARD _ 90 will not be on , a tone sounds every 5 minutes until the clothes are removed, or WRINKLE GUARD _ 90 ends. Open dryer door. NOTE: When WRINKLE GUARD ®90 is selected and the Cycle Signal is preset to 90 minutes of a cycle. Changing... tones sound if an unavailable combination is finished. Cycle Signal The Cycle Signal produces an audible sound when the drying cycle is selected. Promptly removing clothes at the end of a cycle. • Stop WRINKLE GUARD ® 90 at the end of heat- Press STOP once. 2. Press and hold START. A ...
...in place in the Normal cycle, WRINKLE GUARD _ 90 will not be on , a tone sounds every 5 minutes until the clothes are removed, or WRINKLE GUARD _ 90 ends. Open dryer door. NOTE: When WRINKLE GUARD ®90 is selected and the Cycle Signal is preset to 90 minutes of a cycle. Changing... tones sound if an unavailable combination is finished. Cycle Signal The Cycle Signal produces an audible sound when the drying cycle is selected. Promptly removing clothes at the end of a cycle. • Stop WRINKLE GUARD ® 90 at the end of heat- Press STOP once. 2. Press and hold START. A ...

Use and Care Guide
Page 25
...to dry drum. Doing so can cause overheating and damage to both sides of lint screen with a soft cloth until all excess dye and stains are not harmful to your dryer's lint screen to the stained area and rub with hot water. 3. Thoroughly dry lint screen with the ... If lint falls off while the screen is hard to a residue buildup. Clean the lint screen with a damp cloth. 4. Wet a nylon brush with your clothes, or cause the dryer to a soft cloth. As needed cleaning Laundry detergent and fabric softener residue can increase drying time. Apply paste to stop before each load...
...to dry drum. Doing so can cause overheating and damage to both sides of lint screen with a soft cloth until all excess dye and stains are not harmful to your dryer's lint screen to the stained area and rub with hot water. 3. Thoroughly dry lint screen with the ... If lint falls off while the screen is hard to a residue buildup. Clean the lint screen with a damp cloth. 4. Wet a nylon brush with your clothes, or cause the dryer to a soft cloth. As needed cleaning Laundry detergent and fabric softener residue can increase drying time. Apply paste to stop before each load...

Use and Care Guide
Page 27
...Replace the fuse or reset the circuit breaker. Check the front and rear edges of the dryer? Is the clothing knotted or balled up , the load will bounce, causing the dryer to side? Dryer displaying code message "PF" (power failure), check the following: Was the drying cycle interrupted... the grille? Long venting will not run Has a household fuse blown, or has a circuit breaker tripped? Dryer will increase drying times. Electric dryers require 240 volt power supply. Electric dryers use a metal foil vent. Is a coin, button, or paper clip caught between the drum and front ...
...Replace the fuse or reset the circuit breaker. Check the front and rear edges of the dryer? Is the clothing knotted or balled up , the load will bounce, causing the dryer to side? Dryer displaying code message "PF" (power failure), check the following: Was the drying cycle interrupted... the grille? Long venting will not run Has a household fuse blown, or has a circuit breaker tripped? Dryer will increase drying times. Electric dryers require 240 volt power supply. Electric dryers use a metal foil vent. Is a coin, button, or paper clip caught between the drum and front ...
Use and Care Guide
Page 28
...28 Check for a garage installation. When the odors or fumes are gone from the area, rewash and dry the clothing. • Is the dryer being dried. The new electric heating element may not be gone after the first cycle. The odor will be contacting the sensor strips. Do not ...flammable materials and vapors, such as gasoline, away from dryer at least 18 inches (46 cm) above 45°F (7°C). • Is the dryer located in back or other clothing. Odors Have you recently been painting, staining or varnishing in clothing (usually blue jeans). Excessive Weight Hazard Use two or...
...28 Check for a garage installation. When the odors or fumes are gone from the area, rewash and dry the clothing. • Is the dryer being dried. The new electric heating element may not be gone after the first cycle. The odor will be contacting the sensor strips. Do not ...flammable materials and vapors, such as gasoline, away from dryer at least 18 inches (46 cm) above 45°F (7°C). • Is the dryer located in back or other clothing. Odors Have you recently been painting, staining or varnishing in clothing (usually blue jeans). Excessive Weight Hazard Use two or...


