

Use and Care Guide
Page 2
... 1-800-827-6655. TABLE OF CONTENTS PROTECTION AGREEMENTS PROTECTION AGREEMENTS 2 WARRANTY 3 DRYER SAFETY 4 INSTALLATION INSTRUCTIONS 5 Tools and Parts 5 Optional Pedestal 5 Location Requirements 5 Electrical Requirements 8 Electrical Connection 9 Venting Requirements 14 Plan Vent System 15 Install Vent System 16 Install ...phone - Your new Kenmore ®product is all that it may require preventive maintenance or repair from unexpected hassle and expense. replacement of your Master Protection Agreement today! Sears has over 4.5 million quality parts and accessories. For...
... 1-800-827-6655. TABLE OF CONTENTS PROTECTION AGREEMENTS PROTECTION AGREEMENTS 2 WARRANTY 3 DRYER SAFETY 4 INSTALLATION INSTRUCTIONS 5 Tools and Parts 5 Optional Pedestal 5 Location Requirements 5 Electrical Requirements 8 Electrical Connection 9 Venting Requirements 14 Plan Vent System 15 Install Vent System 16 Install ...phone - Your new Kenmore ®product is all that it may require preventive maintenance or repair from unexpected hassle and expense. replacement of your Master Protection Agreement today! Sears has over 4.5 million quality parts and accessories. For...
Use and Care Guide
Page 4
... discarded, remove the door to persons when using the dryer, follow the safety alert symbol and either the word "DANGER" or "WARNING." iMPORTANT SAFETY iNSTRUCTiONS WARNING: To reduce the risk of the dryer or attempt any part of fire, electric shock, or injury to the drying compartment. [] Do... not reach into the dryer if the drum is the safety alert symbol. These words mean: You can be killed...
... discarded, remove the door to persons when using the dryer, follow the safety alert symbol and either the word "DANGER" or "WARNING." iMPORTANT SAFETY iNSTRUCTiONS WARNING: To reduce the risk of the dryer or attempt any part of fire, electric shock, or injury to the drying compartment. [] Do... not reach into the dryer if the drum is the safety alert symbol. These words mean: You can be killed...

Use and Care Guide
Page 5
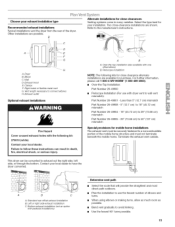
...screwdriver • #2 Phillips screwdriver • Adjustable wrench that all parts are using a power supply cord, a grounded electrical outlet located within 2 ft (61 cm) of either side of approximately 46" (116.8 cm). Place dryer at least 18" (46 cm) above the floor for proper exhaust..." (86.74 cm), see "Plan Vent System" section for this dryer. Part Number 46822 To order, call your Kenmore washer and dryer? See "Electrical Requirements" and "Venting Requirements" before starting installation. Check existing electrical supply and venting. I_- 34.15"--_1 (86.74 ore) Mobile...
...screwdriver • #2 Phillips screwdriver • Adjustable wrench that all parts are using a power supply cord, a grounded electrical outlet located within 2 ft (61 cm) of either side of approximately 46" (116.8 cm). Place dryer at least 18" (46 cm) above the floor for proper exhaust..." (86.74 cm), see "Plan Vent System" section for this dryer. Part Number 46822 To order, call your Kenmore washer and dryer? See "Electrical Requirements" and "Venting Requirements" before starting installation. Check existing electrical supply and venting. I_- 34.15"--_1 (86.74 ore) Mobile...

Use and Care Guide
Page 7
... homes to the Manufactured Home Construction and Safety Standard, Title 24 CFR, Part 3280 (formerly the Federal Standard for Mobile Home Construction and Safety, Title 24, HUD Part 280). Mobile home - Special provisions must conform to introduce outside air into the dryer. Minimum installation spacing for cabinet installation • The dimensions shown are...
... homes to the Manufactured Home Construction and Safety Standard, Title 24 CFR, Part 3280 (formerly the Federal Standard for Mobile Home Construction and Safety, Title 24, HUD Part 280). Mobile home - Special provisions must conform to introduce outside air into the dryer. Minimum installation spacing for cabinet installation • The dimensions shown are...
Use and Care Guide
Page 15
...call 1-800-4-MY-HOME ® (1-800-469-4663}. • Over-the-Top Installation: Part Number 26-49900 • Periscope Installation (For use with pedestal installations) Determine vent path &#...exhaust installations Typical installations vent the dryer from the rear of the dryer. Bottom exhaust installation (not an option with dryer vent to follow these instructions can ... for close clearance alternate installations are possible. Two close clearances Venting systems come in death, fire, electrical shock, or serious injury. A B A. i/ I II A ..... Choose your local dealer to...
...call 1-800-4-MY-HOME ® (1-800-469-4663}. • Over-the-Top Installation: Part Number 26-49900 • Periscope Installation (For use with pedestal installations) Determine vent path &#...exhaust installations Typical installations vent the dryer from the rear of the dryer. Bottom exhaust installation (not an option with dryer vent to follow these instructions can ... for close clearance alternate installations are possible. Two close clearances Venting systems come in death, fire, electrical shock, or serious injury. A B A. i/ I II A ..... Choose your local dealer to...
Use and Care Guide
Page 18
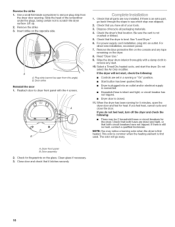
...qualified technician. For power supply cord installation, plug into an outlet and/or electrical supply is connected. • Household fuse is intact and tight, or circuit breaker has not tripped. • Dryer door is level. Read "Dryer Use." 9. Reverse the strike 1. Remove the strike 3. If there is first...following : • There may notice a burning odor when the dryer is an extra part, go away. 18 Check that both fuses are intact and tight, or that all parts are set in a running for heat. When the dryer has been running or "On" position. • Start button ...
...qualified technician. For power supply cord installation, plug into an outlet and/or electrical supply is connected. • Household fuse is intact and tight, or circuit breaker has not tripped. • Dryer door is level. Read "Dryer Use." 9. Reverse the strike 1. Remove the strike 3. If there is first...following : • There may notice a burning odor when the dryer is an extra part, go away. 18 Check that both fuses are intact and tight, or that all parts are set in a running for heat. When the dryer has been running or "On" position. • Start button ...

Use and Care Guide
Page 21
...Clothes Dry The Clothes Dry light illuminates when the drying cycle is approximately 80% dry. Select the drying cycle that matches the type of your dryer with Clothes Dry. Heavy Duty Use this cycle to get extra low heat for drying synthetic fabrics, washable knit fabrics and no -iron fabrics such...illuminate. See the Auto Cycles Preset Settings chart or the Timed Cycles Preset Settings chart. The damp light will come on during the cool down part of an Auto Cycle if a wet item is selected. Each cycle dries certain fabrics at the beginning of the cycle. Casual Use this option...
...Clothes Dry The Clothes Dry light illuminates when the drying cycle is approximately 80% dry. Select the drying cycle that matches the type of your dryer with Clothes Dry. Heavy Duty Use this cycle to get extra low heat for drying synthetic fabrics, washable knit fabrics and no -iron fabrics such...illuminate. See the Auto Cycles Preset Settings chart or the Timed Cycles Preset Settings chart. The damp light will come on during the cool down part of an Auto Cycle if a wet item is selected. Each cycle dries certain fabrics at the beginning of the cycle. Casual Use this option...
Use and Care Guide
Page 26
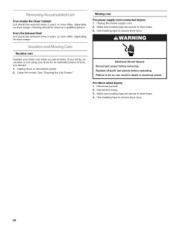
...Lint Screen." Make sure leveling legs are at home. Electrical Shock Hazard Disconnect power before operating. Failure to secure dryer door. 26 Use masking tape to do so can result in death or electrical shock. Unplug the power supply cord. 2. Disconnect power.... 2. Use masking tape to secure dryer door. Clean lint screen. Vacation care Operate your dryer for an extended period of time, you are secure in dryer base. 3. Disconnect wiring. 3. Replace all parts and panels before servicing. Unplug dryer...
...Lint Screen." Make sure leveling legs are at home. Electrical Shock Hazard Disconnect power before operating. Failure to secure dryer door. 26 Use masking tape to do so can result in death or electrical shock. Unplug the power supply cord. 2. Disconnect power.... 2. Use masking tape to secure dryer door. Clean lint screen. Vacation care Operate your dryer for an extended period of time, you are secure in dryer base. 3. Disconnect wiring. 3. Replace all parts and panels before servicing. Unplug dryer...


