Installation Manual
Page 2
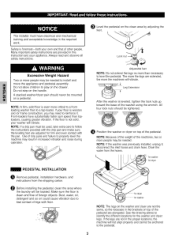
..., the machine will be needed to follow the instructions provided with the pan. O Position the washer or dryer on top of foreign objects. for washer for dryer NOTE: The legs on the washer and dryer are not in increased vibration and noise during operation. If the legs are not the same, ...even contact with the drip pan and make sure the leveling feet are extended, the more people may need to the pedestal. A stacked washer/dryer pair should be anchored to reinforce it , disconnect the inlet hoses and drain hose. All four lock nuts should never be needed . Excessive...
..., the machine will be needed to follow the instructions provided with the pan. O Position the washer or dryer on top of foreign objects. for washer for dryer NOTE: The legs on the washer and dryer are not in increased vibration and noise during operation. If the legs are not the same, ...even contact with the drip pan and make sure the leveling feet are extended, the more people may need to the pedestal. A stacked washer/dryer pair should be anchored to reinforce it , disconnect the inlet hoses and drain hose. All four lock nuts should never be needed . Excessive...
Installation Manual
Page 3
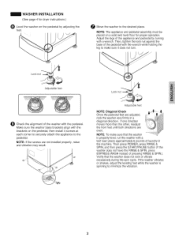
... RINSE & SPIN.). Then, tighten the lock nut against the base of the appliance and pedestal by adjusting the feet. WASHER INSTALLATION (See page 4 for dryer instructions.) O Level the washer on a solid and level floor for proper operation. Then press POWER, press RINSE & SPIN, and then press the... START/PAUSE button (If the washer does not have the RINSE & SPIN, press EXPRESS WASH instead of the washer with the brackets on the...
... RINSE & SPIN.). Then, tighten the lock nut against the base of the appliance and pedestal by adjusting the feet. WASHER INSTALLATION (See page 4 for dryer instructions.) O Level the washer on a solid and level floor for proper operation. Then press POWER, press RINSE & SPIN, and then press the... START/PAUSE button (If the washer does not have the RINSE & SPIN, press EXPRESS WASH instead of the washer with the brackets on the...
Installation Manual
Page 4
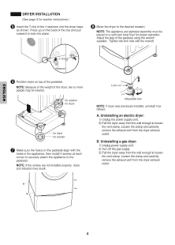
...['_-... NOTE: If the screws are not installed properly, noise and vibration ma_ result. Uninstallinga gas dryer: 1) Unplug power supply cord. 2) Turn off the gas supply. 3) Pull the dryer away from the wall enough to loosen the vent clamp, Loosen the clamp and carefully remove... the exhaust vent from the dryer exhaust outlet, B. O Position dryer on the pedestal align with the wrench. Uninstallingan electric dryer: 1) Unplug the power supply cord, 2) Pull the dryer away from the dryer exhaust outlet. f_orr dWrySehr r for washer O Make sure the holes on top...
...['_-... NOTE: If the screws are not installed properly, noise and vibration ma_ result. Uninstallinga gas dryer: 1) Unplug power supply cord. 2) Turn off the gas supply. 3) Pull the dryer away from the wall enough to loosen the vent clamp, Loosen the clamp and carefully remove... the exhaust vent from the dryer exhaust outlet, B. O Position dryer on the pedestal align with the wrench. Uninstallingan electric dryer: 1) Unplug the power supply cord, 2) Pull the dryer away from the dryer exhaust outlet. f_orr dWrySehr r for washer O Make sure the holes on top...