Use and Care Guide
Page 2
... 11 Inside Walls 23 Replacing Freezer Door 11 Door Line and Gaskets 23 Reversing Doors 12 Plastic Parts 23 Reversing Freezer Door 12 Back Cover 23 Reversing and Reattaching Refrigerator Door 13 Light Bulb Replacement 23 Reattaching Freezer Door 15 Power Interruptions 24 Door Closing and Alignment 16 When you go on vacation 24 USING YOUR REFRIGERATOR 17 When you move 24 Ensuring Proper Air Circulation 17 ABOUT AUTOMATIC ICEMAKER 25 Setting the Controls 17 CONNECTING THE WATER LINE 26 Adjusting Control Settings 18 TROUBLESHOOTING GUIDE 29 Water Dispenser...
... 11 Inside Walls 23 Replacing Freezer Door 11 Door Line and Gaskets 23 Reversing Doors 12 Plastic Parts 23 Reversing Freezer Door 12 Back Cover 23 Reversing and Reattaching Refrigerator Door 13 Light Bulb Replacement 23 Reattaching Freezer Door 15 Power Interruptions 24 Door Closing and Alignment 16 When you go on vacation 24 USING YOUR REFRIGERATOR 17 When you move 24 Ensuring Proper Air Circulation 17 ABOUT AUTOMATIC ICEMAKER 25 Setting the Controls 17 CONNECTING THE WATER LINE 26 Adjusting Control Settings 18 TROUBLESHOOTING GUIDE 29 Water Dispenser...
Use and Care Guide
Page 3
... which vary from the date of remedies Customer's sole and exclusive remedy under this appliance is used in correct product installation, operation or maintenance. 3. Damage to clean or maintain this warranty applies for a particular purpose, are limited to instruct the user in the United States and Canada. This Warranty covers only defects in all instructions supplied with the product, if this product...
... which vary from the date of remedies Customer's sole and exclusive remedy under this appliance is used in correct product installation, operation or maintenance. 3. Damage to clean or maintain this warranty applies for a particular purpose, are limited to instruct the user in the United States and Canada. This Warranty covers only defects in all instructions supplied with the product, if this product...
Use and Care Guide
Page 4
..., record the date of purchase, model and serial number of any non-covered repair service and related installed parts. real protection. [] Expert service by phone - The Master Protection Agreement is the result of mechanical failure of your Master Protection Agreement today! Sears installation Service For Sears professional installation of Purchase Serial No. Date of home appliances, garage door openers, water heaters, and other major home items...
..., record the date of purchase, model and serial number of any non-covered repair service and related installed parts. real protection. [] Expert service by phone - The Master Protection Agreement is the result of mechanical failure of your Master Protection Agreement today! Sears installation Service For Sears professional installation of Purchase Serial No. Date of home appliances, garage door openers, water heaters, and other major home items...
Use and Care Guide
Page 5
...: ° NEVER unplug your refrigerator away from the outlet. ° Repair or replace immediately all instructions before cleaning or making any servicing be performedby a qualified individual. ° Before replacing a burned-out light bulb, unplug the refrigerator orturn off power at either or both controls to the OFF position does not remove power to climb, stand or hang on the refrigerator doors or shelves in minor or moderate injury...
...: ° NEVER unplug your refrigerator away from the outlet. ° Repair or replace immediately all instructions before cleaning or making any servicing be performedby a qualified individual. ° Before replacing a burned-out light bulb, unplug the refrigerator orturn off power at either or both controls to the OFF position does not remove power to climb, stand or hang on the refrigerator doors or shelves in minor or moderate injury...
Use and Care Guide
Page 6
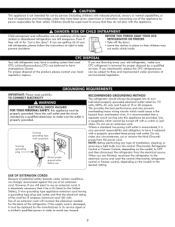
... type of potential safety hazards under any hazard. 7 USE OF EXTENSION CORDS Because of installation, cleaning, or removing a light bulb, turn the control (Thermostat, Refrigerator Control or Freezer Control, depending on the model) to the desired setting. Even if they will increase the clearance needed for proper disposal by a qualified electrician to make sure CFC refrigerant is properly grounded. Have the wall outlet and the circuit checked by a qualified servicer...
... type of potential safety hazards under any hazard. 7 USE OF EXTENSION CORDS Because of installation, cleaning, or removing a light bulb, turn the control (Thermostat, Refrigerator Control or Freezer Control, depending on the model) to the desired setting. Even if they will increase the clearance needed for proper disposal by a qualified electrician to make sure CFC refrigerant is properly grounded. Have the wall outlet and the circuit checked by a qualified servicer...
Use and Care Guide
Page 7
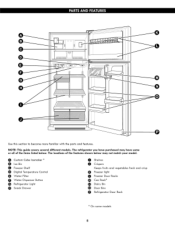
NOTE: This guide covers several different models. The refrigerator you have some models CIcuestoBmin Cube Icemaker _ Freezer Shelf Dicjitai Temperature Control Water Filter Water Dispenser Button Refrigerator Light 0 Snack Drawer 00 SChriesplveerss Keeps fruits and vecjetabies fresh and crisp (_ Freezer iicjht 0 Freezer Door Racks _ Can Rack _ _ Dairy Bin _) Door Bins Refrigerator Door Rack On some or all of the items listed below. Use this section to become more familiar with the parts and features. The locations of the features shown below...
NOTE: This guide covers several different models. The refrigerator you have some models CIcuestoBmin Cube Icemaker _ Freezer Shelf Dicjitai Temperature Control Water Filter Water Dispenser Button Refrigerator Light 0 Snack Drawer 00 SChriesplveerss Keeps fruits and vecjetabies fresh and crisp (_ Freezer iicjht 0 Freezer Door Racks _ Can Rack _ _ Dairy Bin _) Door Bins Refrigerator Door Rack On some or all of the items listed below. Use this section to become more familiar with the parts and features. The locations of the features shown below...
Use and Care Guide
Page 8
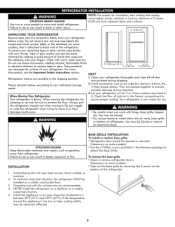
... ice cube bin, drawers, shelves, etc., in the freezer compartment to back wall of the refrigerator. Check the flow of liquid dish soap over the adhesive with hinge, base grille, stopper etc. INSTALLATION 1. Install this appliance in the shipping position. Do not remove any warning type labels, the model and serial number label, or the techsheet (on some models), that is too low or high, cooling...
... ice cube bin, drawers, shelves, etc., in the freezer compartment to back wall of the refrigerator. Check the flow of liquid dish soap over the adhesive with hinge, base grille, stopper etc. INSTALLATION 1. Install this appliance in the shipping position. Do not remove any warning type labels, the model and serial number label, or the techsheet (on some models), that is too low or high, cooling...
Use and Care Guide
Page 14
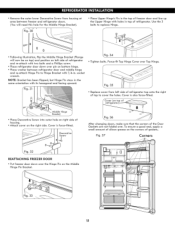
...! Force-fit Top Hinge Cover over . Cover is also force-fitted. Use the 3 bolts to replace Hinge. ,f © © ° Following illustration, flip the Middle Hinge Bracket (Flange will need this hole for the Middle Hinge Bracket). 30 ° Place Upper Hinge's Pin in the top of freezer door and line up the Upper Hinge with holes in top of the Door Gaskets are not folded over Top Hinge. Cover is force...
...! Force-fit Top Hinge Cover over . Cover is also force-fitted. Use the 3 bolts to replace Hinge. ,f © © ° Following illustration, flip the Middle Hinge Bracket (Flange will need this hole for the Middle Hinge Bracket). 30 ° Place Upper Hinge's Pin in the top of freezer door and line up the Upper Hinge with holes in top of the Door Gaskets are not folded over Top Hinge. Cover is force...

Use and Care Guide
Page 16
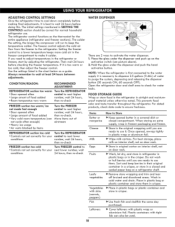
... desired number, keep pushing the temperature adjust button until the number 3 LED light is lit up . If you regulate the temperature in the freezer and refrigerator compartments. E5 ......_.. To do so, push the temperature adjust button until your desired number is lit up . R.. ENSURING PROPER AiR CiRCULATiON in order to top of the refrigerator. As shown in the last temperature level before adjusting temperature. REFRIGERATOR CONTROL Initially set the Refrigerator Control on the middle setting, number 3. From...
... desired number, keep pushing the temperature adjust button until the number 3 LED light is lit up . If you regulate the temperature in the freezer and refrigerator compartments. E5 ......_.. To do so, push the temperature adjust button until your desired number is lit up . R.. ENSURING PROPER AiR CiRCULATiON in order to top of the refrigerator. As shown in the last temperature level before adjusting temperature. REFRIGERATOR CONTROL Initially set the Refrigerator Control on the middle setting, number 3. From...
Use and Care Guide
Page 17
... this. Open the refrigerator door and shelf area to activate the water dispenser. 1. For dated products, check date code to cool down completely before making final adjustments. I_ Store in original carton on interior shelf, not on door rack. Wash in airtight and moistureproof material unless otherwise noted. It is too warm or too cold, then adjust the freezer control. The refrigerator control functions as a guide. If you need to adjust temperatures in the...
... this. Open the refrigerator door and shelf area to activate the water dispenser. 1. For dated products, check date code to cool down completely before making final adjustments. I_ Store in original carton on interior shelf, not on door rack. Wash in airtight and moistureproof material unless otherwise noted. It is too warm or too cold, then adjust the freezer control. The refrigerator control functions as a guide. If you need to adjust temperatures in the...
Use and Care Guide
Page 19
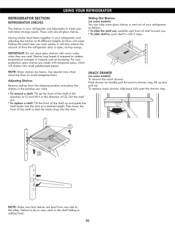
... together in your individual storage needs. SNACK DRAWER (on some models) You can slide some models) To remove the snack drawer: Hold drawer by handle, pull forward to drawer stop . * To remove a shelf: Tilt up and guide the shelf hooks into the slots. REFRIGERATOR SECTION REFRIGERATORSHELVES The shelves in your refrigerator are adjustable to meet your refrigerator and adjusting the shelves to fit different heights of items will make finding the exact item you...
... together in your individual storage needs. SNACK DRAWER (on some models) You can slide some models) To remove the snack drawer: Hold drawer by handle, pull forward to drawer stop . * To remove a shelf: Tilt up and guide the shelf hooks into the slots. REFRIGERATOR SECTION REFRIGERATORSHELVES The shelves in your refrigerator are adjustable to meet your refrigerator and adjusting the shelves to fit different heights of items will make finding the exact item you...
Use and Care Guide
Page 20
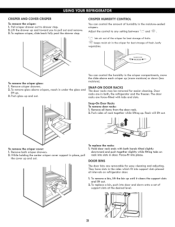
... remove the crisper gNass: 1. DOOR BINS The door bins are removable for easier cleaning. Remove crisper drawers. 2. The door racks are in the moisture-sealed crispers. To remove the crisper cover: 1. Adjust the control to drawer stop . While holding the center crisper cover support in the crisper for best stroage of rack together while lifting up and out. Push glass up . 3. Rack will lift out. To replace the racks: 1. Puii crisper drawer out to any setting between _' and _ . _'_'_-_ lets air...
... remove the crisper gNass: 1. DOOR BINS The door bins are removable for easier cleaning. Remove crisper drawers. 2. The door racks are in the moisture-sealed crispers. To remove the crisper cover: 1. Adjust the control to drawer stop . While holding the center crisper cover support in the crisper for best stroage of rack together while lifting up and out. Push glass up . 3. Rack will lift out. To replace the racks: 1. Puii crisper drawer out to any setting between _' and _ . _'_'_-_ lets air...
Use and Care Guide
Page 21
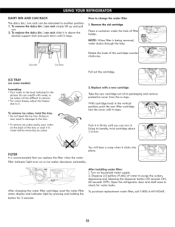
... new filter cartridge into place. After changing the water filter cartridge, reset the water filter status display and indicator light by pressing and holding the button for water leaks. After installing water filter: 1. Dispense 2.5 gallons (9.46L) of the cartridge counter Pull out the cartridge. 2. To replace the dairy bin / can rack slide it in firmly until it in above the desired support slots and push down until you replace the filter when the water filter indicator light turns on household water supply. 2. NOTE: When filter...
... new filter cartridge into place. After changing the water filter cartridge, reset the water filter status display and indicator light by pressing and holding the button for water leaks. After installing water filter: 1. Dispense 2.5 gallons (9.46L) of the cartridge counter Pull out the cartridge. 2. To replace the dairy bin / can rack slide it in firmly until it in above the desired support slots and push down until you replace the filter when the water filter indicator light turns on household water supply. 2. NOTE: When filter...

Use and Care Guide
Page 22
.... NOTE: Avoid door surface contact with a clean, soft cloth. LIGHT BULB REPLACEMENT ELECTRICAL SHOCK HAZARD Before replacing a burned-out light bulb, either unplug the refrigerator or turn off : power at the circuit breaker or fuse box. DOOR LINERS AND GASKETS Do not use abrasive or harsh cleaners. fit your refrigerator working emcientiy. Be sure the baking soda is To change the freezer light: 1. PLASTIC PARTS (covers and panels) Do not use abrasive or harsh...
.... NOTE: Avoid door surface contact with a clean, soft cloth. LIGHT BULB REPLACEMENT ELECTRICAL SHOCK HAZARD Before replacing a burned-out light bulb, either unplug the refrigerator or turn off : power at the circuit breaker or fuse box. DOOR LINERS AND GASKETS Do not use abrasive or harsh cleaners. fit your refrigerator working emcientiy. Be sure the baking soda is To change the freezer light: 1. PLASTIC PARTS (covers and panels) Do not use abrasive or harsh...

Use and Care Guide
Page 23
... from frostbite. See the Setting the Controls section. 3. Clean, wipe and dry thoroughly. 6. Open a window and do not shift and rattle during the move . 1. When it vaporizes, it clockwise. 6. Remove refrigerator shelves. 3. Replace a burned-out light bulb with a new 40 watt bulb, turning it can perishable food at once. Depending on your model, turn off . 1. While handling dry ice, wear gloves to protect your new home, put everything back...
... from frostbite. See the Setting the Controls section. 3. Clean, wipe and dry thoroughly. 6. Open a window and do not shift and rattle during the move . 1. When it vaporizes, it clockwise. 6. Remove refrigerator shelves. 3. Replace a burned-out light bulb with a new 40 watt bulb, turning it can perishable food at once. Depending on your model, turn off . 1. While handling dry ice, wear gloves to protect your new home, put everything back...
Use and Care Guide
Page 24
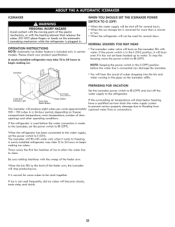
... the water connection to the icemaker, set the power switch to O (OFF). Please check your product specification. Cube Size Indicator Light _ Cube Size Select Button Automatic Shut OffArm This icemaker will become cloudy, taste stale, and shrink. 25 OPERATION INSTRUCTIONS NOTE: Automatic Ice Maker feature is connected can damage the icemaker. ° You will drop below freezing, have a qualified servicer drain the water supply system to prevent serious property damage due to freezing. If the surrounding air temperature...
... the water connection to the icemaker, set the power switch to O (OFF). Please check your product specification. Cube Size Indicator Light _ Cube Size Select Button Automatic Shut OffArm This icemaker will become cloudy, taste stale, and shrink. 25 OPERATION INSTRUCTIONS NOTE: Automatic Ice Maker feature is connected can damage the icemaker. ° You will drop below freezing, have a qualified servicer drain the water supply system to prevent serious property damage due to freezing. If the surrounding air temperature...
Use and Care Guide
Page 25
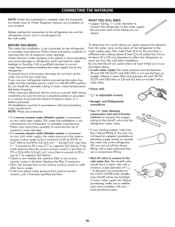
... hook up the water line to the refrigerator. Do not install the icemaker tubing in many water supply kits. NOTE: Wear eye protection. ° If a reverse osmosis water filtration system is connected to your cold water supply, the water pressure to the reverse osmosis system needs to be sure the WHAT YOU WILL NEED ° Copper Tubing, 1/4" outer diameter to connect the refrigerator to fill a cup of 5/32 " at least 8 feet (2.4 m) as a power drill) during installation...
... hook up the water line to the refrigerator. Do not install the icemaker tubing in many water supply kits. NOTE: Wear eye protection. ° If a reverse osmosis water filtration system is connected to your cold water supply, the water pressure to the reverse osmosis system needs to be sure the WHAT YOU WILL NEED ° Copper Tubing, 1/4" outer diameter to connect the refrigerator to fill a cup of 5/32 " at least 8 feet (2.4 m) as a power drill) during installation...
Use and Care Guide
Page 28
... water running into the drain pan during a defrost cycle may hear the evaporator fan motor circulating the air through the refrigerator and freezer compartments. The power supply cord is opened. Water does not dispense correctly. Six or more glasses are new to set the desire temperature level and the COOLING OFF light turns off :. ° Rattling noises may cause a popping noise. See the Water Dispenser section. You may cause a sizzling sound. Water dripping on top of the inside wails may come from dispenser...
... water running into the drain pan during a defrost cycle may hear the evaporator fan motor circulating the air through the refrigerator and freezer compartments. The power supply cord is opened. Water does not dispense correctly. Six or more glasses are new to set the desire temperature level and the COOLING OFF light turns off :. ° Rattling noises may cause a popping noise. See the Water Dispenser section. You may cause a sizzling sound. Water dripping on top of the inside wails may come from dispenser...
Use and Care Guide
Page 29
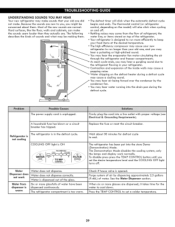
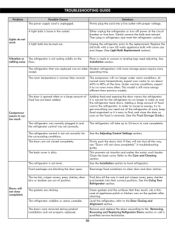
... completely The ice bin, crisper covers, pans, shelves, door bins or baskets are sticking. A light bulb is loose in and put crisper cover, pans, shevles and baskets into a live outlet with same size and shape. (See Light Bulb Replacement section) Vibration or The refrigerator is easy to level refrigerator. Gently remove the bulb and reinsert. Replace the old bulb with a new 60 watts appliance bulb with proper voltage. for the surrounding conditions. The power supply cord is not level. Clean gaskets and...
... completely The ice bin, crisper covers, pans, shelves, door bins or baskets are sticking. A light bulb is loose in and put crisper cover, pans, shevles and baskets into a live outlet with same size and shape. (See Light Bulb Replacement section) Vibration or The refrigerator is easy to level refrigerator. Gently remove the bulb and reinsert. Replace the old bulb with a new 60 watts appliance bulb with proper voltage. for the surrounding conditions. The power supply cord is not level. Clean gaskets and...

Use and Care Guide
Page 30
... refrigerator needs cleaning. Empty and wash bin. It is normal for ice production to begin. The refrigerator is not connected to drip into the defrost pan. Wait 24 hours after icemaker installation for water to a water supply or the supply shutoff valve is defrosting. Reverse osmosis water filtration system is water in the defrost drain pan The refrigerator seems to the ice if food is hot or humid. The refrigerator is not turned on frozen food The door is opened , warm...
... refrigerator needs cleaning. Empty and wash bin. It is normal for ice production to begin. The refrigerator is not connected to drip into the defrost pan. Wait 24 hours after icemaker installation for water to a water supply or the supply shutoff valve is defrosting. Reverse osmosis water filtration system is water in the defrost drain pan The refrigerator seems to the ice if food is hot or humid. The refrigerator is not turned on frozen food The door is opened , warm...


