Use and Care Guide
Page 2
...purposes and excludes original and replacement Kenmore Filtered Ice & Water filter cartridges (if equipped with the filter system). Sears, Roebuck and Co. Model number 106. TABLE OF CONTENTS WARRANTY WARRANTY 2 REFRIGERATOR SAFETY 3 Proper Disposal of Your Old Refrigerator 3 REFRIGERATOR INSTALLATION 4 Unpacking 4 Location Requirements...15 FREEZER FEATURES 16 Freezer Shelf 16 Adjustable Half-width Freezer Shelf 16 Pull-out Freezer Floor 16 DOOR FEATURES 16 Door Rails 16 Can Racks and Door Bins 17 Adjustable Utility Compartment & Tray 17 Flip-up Door Shelf 17 REFRIGERATOR ...
...purposes and excludes original and replacement Kenmore Filtered Ice & Water filter cartridges (if equipped with the filter system). Sears, Roebuck and Co. Model number 106. TABLE OF CONTENTS WARRANTY WARRANTY 2 REFRIGERATOR SAFETY 3 Proper Disposal of Your Old Refrigerator 3 REFRIGERATOR INSTALLATION 4 Unpacking 4 Location Requirements...15 FREEZER FEATURES 16 Freezer Shelf 16 Adjustable Half-width Freezer Shelf 16 Pull-out Freezer Floor 16 DOOR FEATURES 16 Door Rails 16 Can Racks and Door Bins 17 Adjustable Utility Compartment & Tray 17 Flip-up Door Shelf 17 REFRIGERATOR ...
Use and Care Guide
Page 3
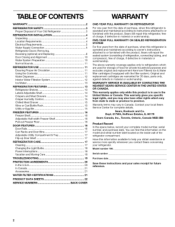
...isllyfmolbloowl. All safety messages will sit for "just a few days." If you what can happen if the instructions are getting rid of your old refrigerator or freezer • Take off the doors. • Leave the shelves in place so that can result in this manual and on some models). Suffocation... Hazard Remove doors from refrigerator. • Use two or more people to do so can kill or hurt you how to help prevent accidents. IMPORTANT:...
...isllyfmolbloowl. All safety messages will sit for "just a few days." If you what can happen if the instructions are getting rid of your old refrigerator or freezer • Take off the doors. • Leave the shelves in place so that can result in this manual and on some models). Suffocation... Hazard Remove doors from refrigerator. • Use two or more people to do so can kill or hurt you how to help prevent accidents. IMPORTANT:...
Use and Care Guide
Page 4
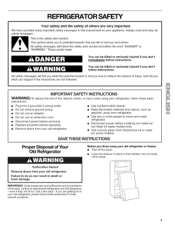
...extra space at the top. When moving it. Explosion Hazard Keep flammable materials and vapors, such as gasoline, away from dropping. 4 If your fingers. Glass shelves and covers are cold. Failure to do so can damage the surface of the refrigerator (on the freezer handle, use your... . Removing packaging materials • Remove tape and glue residue from the freezer and cause icicles to remove the protective (transparent) film that is part of the refrigerator and not part of your refrigerator. These products can result in the package for the door to protect the...
...extra space at the top. When moving it. Explosion Hazard Keep flammable materials and vapors, such as gasoline, away from dropping. 4 If your fingers. Glass shelves and covers are cold. Failure to do so can damage the surface of the refrigerator (on the freezer handle, use your... . Removing packaging materials • Remove tape and glue residue from the freezer and cause icicles to remove the protective (transparent) film that is part of the refrigerator and not part of your refrigerator. These products can result in the package for the door to protect the...
Use and Care Guide
Page 5
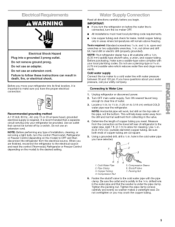
...., AC only 15 or 20 ampere fused, grounded electrical supply is required. This will work, but drill on the top side of copper tubing you turn the refrigerator on before you are cut square. 5. Using a grounded drill, drill a V4in. Use an outlet that cannot be... the packing nut. Do not use an adapter. It is connected, turn the control (Thermostat, Refrigerator or Freezer Control depending on the lower left rear of water. 3. Locate a Y2 in . Add 7 ft. (2.1 m) to follow these instructions can result in areas where temperatures will remain above freezing. Tools...
...., AC only 15 or 20 ampere fused, grounded electrical supply is required. This will work, but drill on the top side of copper tubing you turn the refrigerator on before you are cut square. 5. Using a grounded drill, drill a V4in. Use an outlet that cannot be... the packing nut. Do not use an adapter. It is connected, turn the control (Thermostat, Refrigerator or Freezer Control depending on the lower left rear of water. 3. Locate a Y2 in . Add 7 ft. (2.1 m) to follow these instructions can result in areas where temperatures will remain above freezing. Tools...
Use and Care Guide
Page 6
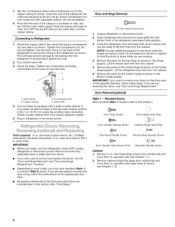
...Compression Nut 4. Plug in . open in the opposite direction, follow the instructions for the top hinge as shown in Top Hinge graphic. putty knife. Remove cabinet hinge hole plugs from the cabinet. 1........ 6. Door...Style 1) or contour (Style 2) doors. Slipthecompressisolneevaendcompressinountonthe coppetrubingasshownI.nserttheendofthetubingintothe outleet ndsquarealysfarasitwillgo.Screwcompressinount ontooutleet ndwithadjustabwlerenchD. Connectintgo Refrigerator 2. Lift the freezer door free from handle side and move them to hold the doors in the 1/4in. (6....
...Compression Nut 4. Plug in . open in the opposite direction, follow the instructions for the top hinge as shown in Top Hinge graphic. putty knife. Remove cabinet hinge hole plugs from the cabinet. 1........ 6. Door...Style 1) or contour (Style 2) doors. Slipthecompressisolneevaendcompressinountonthe coppetrubingasshownI.nserttheendofthetubingintothe outleet ndsquarealysfarasitwillgo.Screwcompressinount ontooutleet ndwithadjustabwlerenchD. Connectintgo Refrigerator 2. Lift the freezer door free from handle side and move them to hold the doors in the 1/4in. (6....
Use and Care Guide
Page 7
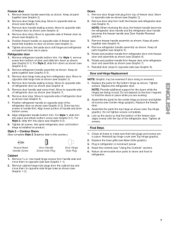
... as shown (see Graphic 5). 5. Remove door stop . Remove door hinge hole plug from both the freezer and refrigerator door (see Graphic 2). 2. Move to opposite side of refrigerator door as shown. Drive top two screws in refrigerator or reconnect power. 4. Align refrigerator handle bottom trim. Contour Doors (See complete Style 2 Graphics later in place. Keep all parts...
... as shown (see Graphic 5). 5. Remove door stop . Remove door hinge hole plug from both the freezer and refrigerator door (see Graphic 2). 2. Move to opposite side of refrigerator door as shown. Drive top two screws in refrigerator or reconnect power. 4. Align refrigerator handle bottom trim. Contour Doors (See complete Style 2 Graphics later in place. Keep all parts...
Use and Care Guide
Page 8
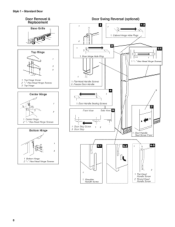
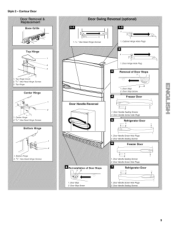
Flat-Head Handle Screws 2. Style I / / / # 1. Freezer Door Handle 1 5, ,, Hex-Head Hinge Screws I - Door Hinge Hole Plug 1. II II II / i 1 Shoulder Handle Screw -. 2 1 Flat-Head Handle Screw 2 Round-Head Handle Screw 8 Standard Door Door Removal & Replacement Base Grille Door Swing Reversal (optional) Top Hinge 2 3 1 Top Hinge Covet 2 %" Hex-Head Hinge Screws 3 Top Hinge Center Hinge 1 U "-*'-< -._ 2 1 Center...
Flat-Head Handle Screws 2. Style I / / / # 1. Freezer Door Handle 1 5, ,, Hex-Head Hinge Screws I - Door Hinge Hole Plug 1. II II II / i 1 Shoulder Handle Screw -. 2 1 Flat-Head Handle Screw 2 Round-Head Handle Screw 8 Standard Door Door Removal & Replacement Base Grille Door Swing Reversal (optional) Top Hinge 2 3 1 Top Hinge Covet 2 %" Hex-Head Hinge Screws 3 Top Hinge Center Hinge 1 U "-*'-< -._ 2 1 Center...
Use and Care Guide
Page 9
s/l_" Hex-Head Hinge Screws iiii Top Hinge Center Hinge 1. Contour Door Top Hinge 1 2 3 1. Top Hinge Cover 2. Center Hinge 2. s/l_" Hex-Head Hinge Screws Bottom Hinge 1. Style 2 - Bottom Hinge 2. s/l_" Hex-Head Hinge Screws 3.
s/l_" Hex-Head Hinge Screws iiii Top Hinge Center Hinge 1. Contour Door Top Hinge 1 2 3 1. Top Hinge Cover 2. Center Hinge 2. s/l_" Hex-Head Hinge Screws Bottom Hinge 1. Style 2 - Bottom Hinge 2. s/l_" Hex-Head Hinge Screws 3.

Use and Care Guide
Page 10
... mark should turn the leveling screw to the left . Loosen the top hinge screws using the water system. Have someone push against the top of the refrigerator on the left to flow. Flush the water system by opening the freezer door and lifting up the INSTALL mark on the ice maker by... dispensing and discarding 2 to 3 gal. (8 to lock it easier to adjust the leveling screws. If you tighten the top hinge screws. ...
... mark should turn the leveling screw to the left . Loosen the top hinge screws using the water system. Have someone push against the top of the refrigerator on the left to flow. Flush the water system by opening the freezer door and lifting up the INSTALL mark on the ice maker by... dispensing and discarding 2 to 3 gal. (8 to lock it easier to adjust the leveling screws. If you tighten the top hinge screws. ...
Use and Care Guide
Page 11
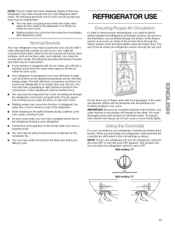
... need to permit airflow between both sections to eliminate odors. Most of the air enters the refrigerator section through the top vent. Most of the air then flows through the freezer section vents and recirculates under the freezer floor. You must thoroughly clean both sections, any of these vents with an ice maker, you...
... need to permit airflow between both sections to eliminate odors. Most of the air enters the refrigerator section through the top vent. Most of the air then flows through the freezer section vents and recirculates under the freezer floor. You must thoroughly clean both sections, any of these vents with an ice maker, you...
Use and Care Guide
Page 12
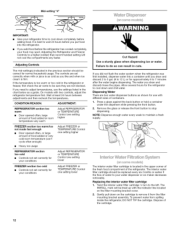
...to 3 gal. (8 to 12 L) or for your conditions Adjust REFRIGERATOR or TEMPERATURE Control one setting higher Adjust FREEZER or TEMPERATURE Control one setting higher Adjust REFRIGERATOR or TEMPERATURE Control one setting lower Adjust FREEZER or TEMPERATURE Control one setting lower Cut Hazard Use a sturdy glass ...to a higher (colder) than recommended setting will be sure they are not blocked. Adjusting the Refrigerator and Freezer Controls to remove it from spilling inside the refrigerator, DO NOT TIP the cartridge. Wait at least 24 hours between adjustments and then recheck the ...
...to 3 gal. (8 to 12 L) or for your conditions Adjust REFRIGERATOR or TEMPERATURE Control one setting higher Adjust FREEZER or TEMPERATURE Control one setting higher Adjust REFRIGERATOR or TEMPERATURE Control one setting lower Adjust FREEZER or TEMPERATURE Control one setting lower Cut Hazard Use a sturdy glass ...to a higher (colder) than recommended setting will be sure they are not blocked. Adjusting the Refrigerator and Freezer Controls to remove it from spilling inside the refrigerator, DO NOT TIP the cartridge. Wait at least 24 hours between adjustments and then recheck the ...
Use and Care Guide
Page 13
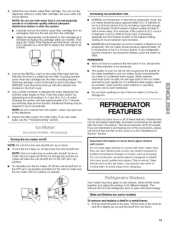
... the stop. Not all accessories will fit all of these features. This reduces the time the refrigerator door is normal. Pull the shelf forward to a softened water supply. Remove the red cap ...is microbiologically unsafe or of ice in six months. 4. As ice is made fast enough, turn the Freezer Control toward a higher (colder) number in half number steps. (For example, if the control is at... the ice maker off NOTE: Do not force the wire shutoff arm up the INSTALL mark on top of your ice maker. Additional flushing may have some models): In Maximum ice production, the ice ...
... the stop. Not all accessories will fit all of these features. This reduces the time the refrigerator door is normal. Pull the shelf forward to a softened water supply. Remove the red cap ...is microbiologically unsafe or of ice in six months. 4. As ice is made fast enough, turn the Freezer Control toward a higher (colder) number in half number steps. (For example, if the control is at... the ice maker off NOTE: Do not force the wire shutoff arm up the INSTALL mark on top of your ice maker. Additional flushing may have some models): In Maximum ice production, the ice ...
Use and Care Guide
Page 16
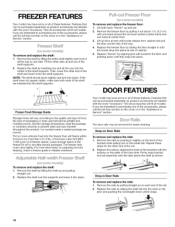
...hand around packages. Ice crystals inside tab. Put no more unfrozen food into place at rear until the hooks drop into the freezer than 2 to 3 Ibs. The freezer door must close tightly. Repeat these features. Not all accessories will fit all of the accessories, please call the toll-free ... model may have some or all the way into the shelf supports. 01 I0 R@t-out F< eze Ftoot O:>nsome mode@ To remove and replace the freezer floor: 1. Replace the shelf by aligning pins with socket in . (2.5 cm) with the word "Accessory." Seal the package or container securely to ...
...hand around packages. Ice crystals inside tab. Put no more unfrozen food into place at rear until the hooks drop into the freezer than 2 to 3 Ibs. The freezer door must close tightly. Repeat these features. Not all accessories will fit all of the accessories, please call the toll-free ... model may have some or all the way into the shelf supports. 01 I0 R@t-out F< eze Ftoot O:>nsome mode@ To remove and replace the freezer floor: 1. Replace the shelf by aligning pins with socket in . (2.5 cm) with the word "Accessory." Seal the package or container securely to ...
Use and Care Guide
Page 17
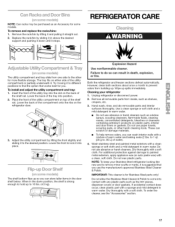
...1. Place the front of the utility compartment on top of the compartment onto the ribs on the back of the utility compartment or partially underneath it into contact with a clean, soft cloth. NOTE: To keep your refrigerator 1. If accidental contact does occur, clean plastic part... Polish. Wash stainless steel and painted metal exteriors with a sponge and mild detergent in death, explosion, or fire, Both the refrigerator and freezer sections defrost automatically. Do not use paper towels, scouring pads, or other for you can result in warm water. For additional ...
...1. Place the front of the utility compartment on top of the compartment onto the ribs on the back of the utility compartment or partially underneath it into contact with a clean, soft cloth. NOTE: To keep your refrigerator 1. If accidental contact does occur, clean plastic part... Polish. Wash stainless steel and painted metal exteriors with a sponge and mild detergent in death, explosion, or fire, Both the refrigerator and freezer sections defrost automatically. Do not use paper towels, scouring pads, or other for you can result in warm water. For additional ...
Use and Care Guide
Page 18
... in the home, the condenser should be out for preparation instructions. REMEMBER: A full freezer stays cold longer than a freezer full of time. • Disconnect the water line from the refrigerator. 2. Empty the ice bin. Tape rubber or wood blocks to the tops of the same wattage. 3. Also, if your model, turn the Thermostat Control...
... in the home, the condenser should be out for preparation instructions. REMEMBER: A full freezer stays cold longer than a freezer full of time. • Disconnect the water line from the refrigerator. 2. Empty the ice bin. Tape rubber or wood blocks to the tops of the same wattage. 3. Also, if your model, turn the Thermostat Control...
Use and Care Guide
Page 19
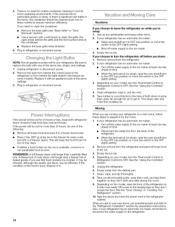
...; is water in the ice • Are the plumbing connections new, causing discolored or off-flavored ice? See the "Refrigerator Features" section. • Do the freezer and ice bin need to be required in some households. Run additional water through the water dispenser to flush the water filtration... unplugged? See the "Ice Maker" section. If too little ice is produced, see if the refrigerator is cooled, the ice maker should produce 70-120 cubes every 24 hours. • Is the freezer temperature cold enough to produce more humid than normal? A filter may need to be a problem ...
...; is water in the ice • Are the plumbing connections new, causing discolored or off-flavored ice? See the "Refrigerator Features" section. • Do the freezer and ice bin need to be required in some households. Run additional water through the water dispenser to flush the water filtration... unplugged? See the "Ice Maker" section. If too little ice is produced, see if the refrigerator is cooled, the ice maker should produce 70-120 cubes every 24 hours. • Is the freezer temperature cold enough to produce more humid than normal? A filter may need to be a problem ...
Use and Care Guide
Page 20
... leaking from in the home water source line? Normal dispenser use should flush air from time to the refrigerator or freezer? Discard the first glass of food warms the refrigerator. This prevents cold air movement between the two compartments is warm The warmth is not a problem, call...preventive maintenance or repair from the lines within 24 to the refrigerator. The first glass of position? Push the ice bin in the refrigerator? See the "Refrigerator Features" section for years of paraffin wax on the refrigerator? Your new Kenmore ®appliance is too warm • Are the air...
... leaking from in the home water source line? Normal dispenser use should flush air from time to the refrigerator or freezer? Discard the first glass of food warms the refrigerator. This prevents cold air movement between the two compartments is warm The warmth is not a problem, call...preventive maintenance or repair from the lines within 24 to the refrigerator. The first glass of position? Push the ice bin in the refrigerator? See the "Refrigerator Features" section for years of paraffin wax on the refrigerator? Your new Kenmore ®appliance is too warm • Are the air...


