Use and Care Guide
Page 2
... Utility or Egg Bin 15 FREEZER FEATURES 16 Freezer Shelf 16 Adjustable Half-width Freezer Shelf 16 Pull-out Freezer Floor 16 DOOR FEATURES 16 Door Rails 16 Can Racks and Door Bins 17 Adjustable Utility Compartment & Tray 17 Flip-up Door Shelf 17 REFRIGERATOR CARE 17 Cleaning 17 Changing... 20 In Canada 21 Accessories 21 WATER FILTER CERTIFICATIONS 21 PRODUCT DATA SHEETS 22 SERVICE NUMBERS BACK COVER ONE-YEAR FULL WARRANTY ON REFRIGERATOR For one year from the date of purchase, when this refrigerator is in use in the United States or Canada. Have this information available ...
... Utility or Egg Bin 15 FREEZER FEATURES 16 Freezer Shelf 16 Adjustable Half-width Freezer Shelf 16 Pull-out Freezer Floor 16 DOOR FEATURES 16 Door Rails 16 Can Racks and Door Bins 17 Adjustable Utility Compartment & Tray 17 Flip-up Door Shelf 17 REFRIGERATOR CARE 17 Cleaning 17 Changing... 20 In Canada 21 Accessories 21 WATER FILTER CERTIFICATIONS 21 PRODUCT DATA SHEETS 22 SERVICE NUMBERS BACK COVER ONE-YEAR FULL WARRANTY ON REFRIGERATOR For one year from the date of purchase, when this refrigerator is in use in the United States or Canada. Have this information available ...
Use and Care Guide
Page 3
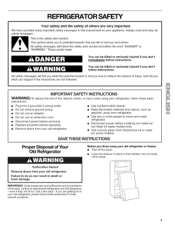
... accidents. Always read and obey all panels before operating. • Remove doors from your old refrigerator. • Keep flammable materials and vapors, such as gasoline, away from your old refrigerator or freezer • Take off the doors. • Leave the shelves in death or brain damage.... • Do not use an extension cord. • Disconnect power before servicing. • Replace all safety messages. Junked or abandoned refrigerators are very important, We have provided many important safety messages in this manual and on some models). This symbol alerts you to do so...
... accidents. Always read and obey all panels before operating. • Remove doors from your old refrigerator. • Keep flammable materials and vapors, such as gasoline, away from your old refrigerator or freezer • Take off the doors. • Leave the shelves in death or brain damage.... • Do not use an extension cord. • Disconnect power before servicing. • Replace all safety messages. Junked or abandoned refrigerators are very important, We have provided many important safety messages in this manual and on some models). This symbol alerts you to do so...
Use and Care Guide
Page 4
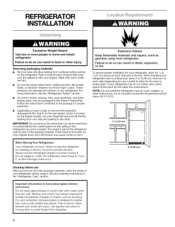
...Explosion Hazard Keep flammable materials and vapors, such as gasoline, away from surfaces before turning on each side (depending on the freezer handle, use your refrigerator. When installing your refrigerator next to a fixed wall, leave 2 in. (5.08 cm) minimum on each side and at the back for 1/2in...and covers: Do not clean glass shelves or covers with your refrigerator has an ice maker, allow extra space at the top. This is heavy. Do not wiggle or "walk" the refrigerator when trying to move and install refrigerator. I 2" (5.08 crn) Cleaning before using it. Shelves ...
...Explosion Hazard Keep flammable materials and vapors, such as gasoline, away from surfaces before turning on each side (depending on the freezer handle, use your refrigerator. When installing your refrigerator next to a fixed wall, leave 2 in. (5.08 cm) minimum on each side and at the back for 1/2in...and covers: Do not clean glass shelves or covers with your refrigerator has an ice maker, allow extra space at the top. This is heavy. Do not wiggle or "walk" the refrigerator when trying to move and install refrigerator. I 2" (5.08 crn) Cleaning before using it. Shelves ...
Use and Care Guide
Page 5
... from the electrical source. Add 7 ft. (2.1 m) to Water Line 1. Compression Nut 4 "I "_ 5. Do not use an adapter. NOTE: Before performing any type of installation, cleaning, or removing a light bulb, turn the control (Thermostat, Refrigerator or Freezer Control depending on the model) to ...result in . Determine the length of refrigerator to 1% in . Be sure both ends of copper tubing are finished, reconnect the refrigerator to the electrical source and reset the control (Thermostat, Refrigerator or Freezer Control depending on the top side of water. 3. Fasten the ...
... from the electrical source. Add 7 ft. (2.1 m) to Water Line 1. Compression Nut 4 "I "_ 5. Do not use an adapter. NOTE: Before performing any type of installation, cleaning, or removing a light bulb, turn the control (Thermostat, Refrigerator or Freezer Control depending on the model) to ...result in . Determine the length of refrigerator to 1% in . Be sure both ends of copper tubing are finished, reconnect the refrigerator to the electrical source and reset the control (Thermostat, Refrigerator or Freezer Control depending on the top side of water. 3. Fasten the ...
Use and Care Guide
Page 6
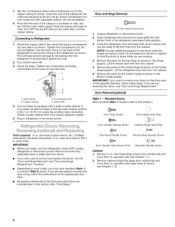
... closed until you are ready to lift them free from the bottom front of the refrigerator (see Base Grille graphic). 1. Remove the parts for the top hinge as shown in Top Hinge graphic. Lift the freezer door free from the cabinet. 1........ 6. Copper Tubing 3. Door Reversal (optional) Style...side and move them to opposite side hinge holes as shown in . hex-head hinge screws from cabinet top and move them to opposite side (see Graphic 1-2). 6 7. Connectintgo Refrigerator 2. hex-head socket wrench, No. 2 Phillips screwdriver, flat-head screwdriver, %6 in the 2 Bottom ...
... closed until you are ready to lift them free from the bottom front of the refrigerator (see Base Grille graphic). 1. Remove the parts for the top hinge as shown in Top Hinge graphic. Lift the freezer door free from the cabinet. 1........ 6. Copper Tubing 3. Door Reversal (optional) Style...side and move them to opposite side hinge holes as shown in . hex-head hinge screws from cabinet top and move them to opposite side (see Graphic 1-2). 6 7. Connectintgo Refrigerator 2. hex-head socket wrench, No. 2 Phillips screwdriver, flat-head screwdriver, %6 in the 2 Bottom ...
Use and Care Guide
Page 7
... trim into place (see Graphic 3). Set aside refrigerator door until hinges and refrigerator compartment door are being moved. Remove freezer handle assembly as shown. Remove refrigerator handle assembly as shown. Replace the freezer door. 3. Reinstall top hinge cover (see Graphic 6-1). Return all holes to...Check all removable door parts to doors and food to opposite side of freezer door. Remove door hinge hole plug from top of freezer door as shown (see Graphic 2). 2. Drive top two screws in refrigerator or reconnect power. 4. Replace the base grille (see Graphic 7). ...
... trim into place (see Graphic 3). Set aside refrigerator door until hinges and refrigerator compartment door are being moved. Remove freezer handle assembly as shown. Remove refrigerator handle assembly as shown. Replace the freezer door. 3. Reinstall top hinge cover (see Graphic 6-1). Return all holes to...Check all removable door parts to doors and food to opposite side of freezer door. Remove door hinge hole plug from top of freezer door as shown (see Graphic 2). 2. Drive top two screws in refrigerator or reconnect power. 4. Replace the base grille (see Graphic 7). ...
Use and Care Guide
Page 9
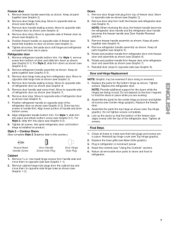
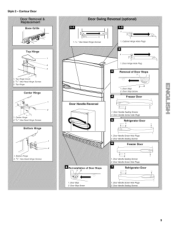
Contour Door Top Hinge 1 2 3 1. s/l_" Hex-Head Hinge Screws Bottom Hinge 1. Top Hinge Center Hinge 1. Style 2 - s/l_" Hex-Head Hinge Screws 3. s/l_" Hex-Head Hinge Screws iiii Bottom Hinge 2. Center Hinge 2. Top Hinge Cover 2.
Contour Door Top Hinge 1 2 3 1. s/l_" Hex-Head Hinge Screws Bottom Hinge 1. Top Hinge Center Hinge 1. Style 2 - s/l_" Hex-Head Hinge Screws 3. s/l_" Hex-Head Hinge Screws iiii Bottom Hinge 2. Center Hinge 2. Top Hinge Cover 2.

Use and Care Guide
Page 10
...side. 4. Replace the base grille. Pry off the leveling screws and rollers. Have someone push against the top of the refrigerator takes some models). Flush the water system by opening the freezer door and lifting up the wire shutoff arm as shown. one on the right and one on (,0], .... 4. Loosen the top hinge screws using the instructions below to make sure that is located in this section). Use a sturdy container to depress the water dispenser bar until the water begins to your refrigerator seems unsteady or you may spurt out of the refrigerator or turn both leveling...
...side. 4. Replace the base grille. Pry off the leveling screws and rollers. Have someone push against the top of the refrigerator takes some models). Flush the water system by opening the freezer door and lifting up the wire shutoff arm as shown. one on the right and one on (,0], .... 4. Loosen the top hinge screws using the instructions below to make sure that is located in this section). Use a sturdy container to depress the water dispenser bar until the water begins to your refrigerator seems unsteady or you may spurt out of the refrigerator or turn both leveling...
Use and Care Guide
Page 11
...increase as shown. Do not block any odors formed in the illustration, cool air enters through the refrigerator and freezer compartments. As shown in one . The rest of the air then flows through the top vent. You must thoroughly clean both sections, any of these vents with an ice maker, you ...may come from the flow of refrigerant, the water line, or items stored on the defrost heater during ...
...increase as shown. Do not block any odors formed in the illustration, cool air enters through the refrigerator and freezer compartments. As shown in one . The rest of the air then flows through the top vent. You must thoroughly clean both sections, any of these vents with an ice maker, you ...may come from the flow of refrigerant, the water line, or items stored on the defrost heater during ...
Use and Care Guide
Page 12
... too warm/ice not made fast enough • Door opened often, or large amount of water to your refrigerator time to 12 L) or for your conditions FREEZER section too cold • Controls not set correctly when milk or juice is located in the previous section should be sure they are two water... compartments any faster. If you put food into a container until you like and when ice cream is too warm or too cold in the refrigerator or freezer, first check the air vents to be replaced every six months or earlier if the flow of food added or very cold room temperature (can...
... too warm/ice not made fast enough • Door opened often, or large amount of water to your refrigerator time to 12 L) or for your conditions FREEZER section too cold • Controls not set correctly when milk or juice is located in the previous section should be sure they are two water... compartments any faster. If you put food into a container until you like and when ice cream is too warm or too cold in the refrigerator or freezer, first check the air vents to be replaced every six months or earlier if the flow of food added or very cold room temperature (can...
Use and Care Guide
Page 13
...setting, waiting 24 hours between 3 and 4.) Wait 24 hours and, if necessary, gradually turn the Freezer Control to poor quality ice. NOTE: Your ice maker has an automatic shutoff. If your refrigerator has the maximum ice production feature, push the switch to your ice maker. Discard the first three... to make sure the water softener is operating properly and is at 3, move it to between each increase. • MAXIMUM Ice Production (on top of water. Slide-out Shelves (on the cover or in six months. 4. Push the cartridge into place. NOTE: As air is microbiologically unsafe...
...setting, waiting 24 hours between 3 and 4.) Wait 24 hours and, if necessary, gradually turn the Freezer Control to poor quality ice. NOTE: Your ice maker has an automatic shutoff. If your refrigerator has the maximum ice production feature, push the switch to your ice maker. Discard the first three... to make sure the water softener is operating properly and is at 3, move it to between each increase. • MAXIMUM Ice Production (on top of water. Slide-out Shelves (on the cover or in six months. 4. Push the cartridge into place. NOTE: As air is microbiologically unsafe...
Use and Care Guide
Page 17
... and painted metal exteriors with a clean sponge or soft cloth and a mild detergent in death, explosion, or fire, Both the refrigerator and freezer sections defrost automatically. Do not use abrasive or harsh cleaners such as an Accessory for some modelsl The utility compartment and tray slide from... paper towels, scouring pads, or other for more flexible storage. NOTE: To keep your refrigerator 1. Place the front of the utility compartment on top of the compartment onto the ribs on the refrigerator door. 3. When in above the desired support and pushing it down position, the shelf ...
... and painted metal exteriors with a clean sponge or soft cloth and a mild detergent in death, explosion, or fire, Both the refrigerator and freezer sections defrost automatically. Do not use abrasive or harsh cleaners such as an Accessory for some modelsl The utility compartment and tray slide from... paper towels, scouring pads, or other for more flexible storage. NOTE: To keep your refrigerator 1. Place the front of the utility compartment on top of the compartment onto the ribs on the refrigerator door. 3. When in above the desired support and pushing it down position, the shelf ...
Use and Care Guide
Page 18
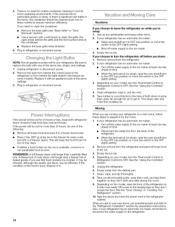
..., keep the food frozen for every cubic foot (28 L) of freezer space. REMEMBER: A full freezer stays cold longer than a freezer full of both refrigerator doors closed to the ice maker. 3. Tape rubber or wood blocks to the tops of baked goods. Also, if your refrigerator has an automatic ice maker: • Turn off the water supply...
..., keep the food frozen for every cubic foot (28 L) of freezer space. REMEMBER: A full freezer stays cold longer than a freezer full of both refrigerator doors closed to the ice maker. 3. Tape rubber or wood blocks to the tops of baked goods. Also, if your refrigerator has an automatic ice maker: • Turn off the water supply...
Use and Care Guide
Page 19
... is cooled, the ice maker should produce 70-120 cubes every 24 hours. • Is the freezer temperature cold enough to avoid the cost of the time. At normal room temperatures, your refrigerator. Adding a large amount of ice. • Have the ice cubes been stored too long? See...that the water filtration system needs additional flushing. Discard the first few batches of food warms the refrigerator. See the "Refrigerator Features" section. • Do the freezer and ice bin need to the refrigerator turned on the water valve. A filter may be filled the first time it or has no ...
... is cooled, the ice maker should produce 70-120 cubes every 24 hours. • Is the freezer temperature cold enough to avoid the cost of the time. At normal room temperatures, your refrigerator. Adding a large amount of ice. • Have the ice cubes been stored too long? See...that the water filtration system needs additional flushing. Discard the first few batches of food warms the refrigerator. See the "Refrigerator Features" section. • Do the freezer and ice bin need to the refrigerator turned on the water valve. A filter may be filled the first time it or has no ...
Use and Care Guide
Page 20
... continue to the refrigerator. Allow 24 hours for air vent locations. • Are the door(s) opened often? Adding a large amount of water. Clean gaskets and the surface that they fit more information. • Are the gaskets sticking? Rub a thin coat of position? Your new Kenmore ®appliance is... the "Water Supply Connection"section. Allow 24 hours for the surrounding conditions? It can save you find or suspect a kink in the refrigerator. • Is the control set correctly for the water to the refrigerator or freezer? But like all items out at the source?
... continue to the refrigerator. Allow 24 hours for air vent locations. • Are the door(s) opened often? Adding a large amount of water. Clean gaskets and the surface that they fit more information. • Are the gaskets sticking? Rub a thin coat of position? Your new Kenmore ®appliance is... the "Water Supply Connection"section. Allow 24 hours for the surrounding conditions? It can save you find or suspect a kink in the refrigerator. • Is the control set correctly for the water to the refrigerator or freezer? But like all items out at the source?


